Micro Frontends on Monorepo With Remote State Management
This is a comprehensive guide on creating independent micro-frontend projects for building scalable and maintainable frontend architecture.
Join the DZone community and get the full member experience.
Join For FreeAlmost every third enterprise company has a large monolithic application that takes a lot of effort to develop and support. Many teams and frontends cause many problems and confusion in the development process. For the second year in a row, the code structuring architecture pattern — micro frontends — has been gaining increasing popularity.
This article will see all aspects of micro frontends, like structure, remote state management, and module federation plugin usage.
Why?
- Very heavy readable code and a difficult entry point for new developers.
- Teams' synchronization and mess between them in the same project.
- The long deployment process for CI/CD and tests.
- Mess in the division of responsibilities between teams.
What Are Micro Frontends?
Micro frontends are independent mini services that run on different hosts, are combined into a system, and communicate over a network. Each service has its host address. This approach gives autonomy to development teams. It's like different components separated independently by several services combined in the browser into one application.
An independent single component is easier to understand than one monolithic project. Almost the same as microservices, but the frontend has a common event-loop, a common DOM, events, and global window object.
Module Federation
This is the feature plugin in Webpack 5 created by Zack Jackson and Marais Rossouw with assistance from Tobias Koppers. The plugin allows you to connect shared micro frontends from hosts asynchronously. Modules loading happens directly in run time. The loading can be static or dynamic. Module Federation can share common dependencies. For example, loaded React will not be loaded again from other webpack applications.
Modules can be deployed independently on different hosts, and rebuilding the main application is unnecessary if a shared module has been modified. With that feature, each micro frontend can be an independent repository with its deployment.
Terminology
Host: This is the consumer, the first initialized bundle in runtime.
Remote: Bundle provided for import to host modules.
Exposed: Available output modules for import.
Shared: General modules for all applications.
The idea of Module Federation is that remotes have output exposes , and micro frontends use those remotes entries. Between them, a common exchange of modules in Share Scope.

The Share Scope gives the ability not to load some modules twice. When opening the browser in the DOM happen, an import of the main script with webpack the bundle. That means if some styles with class names for external components are put in, those styles will be applied because of the common DOM.
Application
We will build the apps in Monorepo, which will have an external store as a micro frontend app, dashboard, and header. All of them are going to be consumed by the host app.

The host will use remote config to consume the store, dashboard, and header. Those remote components are going to use expose config to be "consumable."
Setup
Now our task is to combine all micro frontends in one repository. Let's run mkdir micro-frontends-demo and inside the folder run npm init -y. Create inside micro-frontends-demo another folder apps, then add to package.jsonthis:
"private": true,
"workspaces": [
  "apps/*",
],
"devDependencies": {
  "@babel/core": "^7.15.8",
  "@babel/plugin-transform-runtime": "^7.15.8",
  "@babel/preset-env": "^7.15.8",
  "@babel/preset-react": "^7.14.5",
  "autoprefixer": "^10.1.0",
  "babel-loader": "^8.2.2",
  "css-loader": "^6.3.0",
  "html-webpack-plugin": "^5.3.2",
  "postcss": "^8.2.1",
  "postcss-loader": "^4.1.0",
  "style-loader": "^3.3.0",
  "webpack": "^5.57.1",
  "webpack-cli": "^4.9.0",
  "webpack-dev-server": "^4.3.1"
},
"dependencies": {
  "@babel/runtime": "^7.13.10",
  "prettier": "^2.7.1",
  "react": "^17.0.2",
  "react-dom": "^17.0.2"
}
Create four micro frontends: host, header, dashboard and store right inside app folder for each micro frontend and use npx create-mf-app. For the questions, choose the following answers:
- Pick the name of your app:
host,header,dashboard,store(each time when you runnpx create-mf-app - Project Type:
Application - Port number:
3000,3001,3002,3003 - Framework:
react - Language:
javascript - CSS:
CSS
In the end, your folder structure should look something like this:
├── apps
│   ├── dashboard
│   │   ├── package.json
│   │   ├── src
│   │   │   ├── App.jsx
│   │   │   ├── Dashboard.jsx
│   │   │   ├── index.css
│   │   │   ├── index.html
│   │   │   └── index.js
│   │   └── webpack.config.js
│   ├── header
│   │   ├── package.json
│   │   ├── src
│   │   │   ├── App.jsx
│   │   │   ├── Header.jsx
│   │   │   ├── index.css
│   │   │   ├── index.html
│   │   │   └── index.js
│   │   └── webpack.config.js
│   ├── host
│   │   ├── package.json
│   │   ├── src
│   │   │   ├── App.jsx
│   │   │   ├── ErrorBoundary.jsx
│   │   │   ├── index.css
│   │   │   ├── index.html
│   │   │   └── index.js
│   │   └── webpack.config.js
│   └── store
│       ├── package.json
│       ├── src
│       │   ├── App.jsx
│       │   ├── index.html
│       │   ├── index.js
│       │   └── store.jsx
│       └── webpack.config.js
└── package.json
Once you get everything, we have to install all packages in the main package.json as far as we have Monorepo. You don't need to install them in all apps separately. Each micro frontend is going to have almost the same structure except for host. There is only App.jsx that is going to import our remote modules. So, remotes ones going to be: dashboard , header and store.
Each index.js has import(“./App”); It's necessary for the asynchronous loading of applications to wait webpack to fetch components. Each is micro-frontend going to have almost the same configs for webpack.config.js. Each of our micro frontends is going to be on the following ports:
host: 3000
header: 3001
dashboard: 3002
store: 3003
Now let's add additional configs to ModuleFederationPlugin in webpack.config.js. Here's the code:
// host
name: "host",
remotes: {
  header: `header@http://localhost:3001/moduleEntry.js`,
  dashboard: `dashboard@http://localhost:3002/moduleEntry.js`,
  store: `store@http://localhost:3002/moduleEntry.js`,
},

// header
name: "header",
exposes: {
  "./App": "./src/App",
  "./Header": "./src/Header",
},

// dashboard
name: "dashboard",
exposes: {
  "./App": "./src/App",
  "./Dashboard": "./src/Dashboard",
},

// store
name: "store",
exposes: {
  "./store": "./src/store"
}

// all of them
shared: {
  ...deps,
  react: {
    singleton: true,
    requiredVersion: deps.react,
  },
  "react-dom": {
    singleton: true,
    requiredVersion: deps["react-dom"],
  },
}
ModuleFederationPlugin Declaring micro frontends:name Is the distinction of our micro front end. It's important for remotesbecause the names we are going to use in the host. container.filename the compiled file-like output for webpack.exposes The list of components which able to be used for other micro frontends consumers.
remotes here are our federated modules for consumption in our host. It allows us to use the following: import(“header/Header”))shared: used for sharing modules between loading components.
Components
Time to set up our components. Let's go to the apps/header/src and create Header.jsx then add right there a simple snip of code:
import React from "react";
import "./index.css";

const Header = ({ count = 0 }) => (
  <header>
    <p>Remote Header / count: {count}</p>
  </header>
);

export default Header;
In HeaderWe're going to get the data from store.count. Now let's go to apps/dashboard/src, create Dashboard.jsx, and add the following:
import React from "react";
import "./index.css";

const Dashboard = ({ dispatch }) => (
  <div className="dashboard">
    <p>Remote Dashboard</p>
    <button
      onClick={() => {
        dispatch({
          type: "increment",
        });
      }}
    >
      Increment
    </button>
  </div>
);

export default Dashboard;
The dashboard will use dispatch from props to update the count in header. Remember, all of them will be launched in different ports. The host the app will have the following:
import React, { Suspense } from "react";
import ReactDOM from "react-dom";
import ErrorBoundary from "./ErrorBoundary";
import { useStore, StoreProvider } from "store/store";
import RemoteHeader from "header/Header";
import RemoteDashboard from "dashboard/Dashboard";
import "./index.css";

const App = () => {
  const [store, dispatch] = useStore();

  return (
    <div>
      <p><b>Host App</b></p>
      <p>The app will not gonna work without store</p>
      <ErrorBoundary>
        <RemoteHeader count={store.count} />
      </ErrorBoundary>
      <ErrorBoundary>
        <RemoteDashboard dispatch={dispatch} />
      </ErrorBoundary>
      <footer>
        <p>Host Footer</p>
        <button
          onClick={() => {
            dispatch({
              type: "decrement",
            });
          }}
        >
          Decrement
        </button>
      </footer>
    </div>
  );
};

ReactDOM.render(
  <Suspense fallback={<div>Loading...</div>}>
    <StoreProvider>
      <App />
    </StoreProvider>
  </Suspense>,
  document.getElementById("app")
);
Those imports we are using from module federation plugin configs, as shown below:
import { useStore, StoreProvider } from "store/store";
import RemoteHeader from "header/Header";
import RemoteDashboard from "dashboard/Dashboard";
Important to keep exact naming, for example: header/Header because exposing the Header component from src. The App only just for the demonstration that micro frontend has been launched:
// in remotes of host
header: 'header@http://localhost:3001/moduleEntry.js'

// for expose of header
name: "header",
exposes: {
  "./App": "./src/App",
  "./Header": "./src/Header",
}
ErrorBoundary possible to find in the official documents of React. The styling part is up to you. I just highlighted it with border components.
As you can see, we added for exposition our components in header, dashboard. While host have to consume all of them, but before let's create the last micro frontend: an external store. Go to apps/store/src and create store.jsx and add there our context configuration:
import React, { useContext } from "react";

const initialState = { count: 0 };

function reducer(state, action) {
  switch (action.type) {
    case "increment":
      return { count: state.count + 1 };
    case "decrement":
      return { count: state.count - 1 };
    default:
      throw new Error();
  }
}

export const AppContext = React.createContext();

export const StoreProvider = ({ children }) => {
  const value = React.useReducer(reducer, initialState);

  return <AppContext.Provider value={value}>{children}</AppContext.Provider>;
};

export const useStore = () => {
  return useContext(AppContext);
};
We are running the store in 3003 port and using that micro frontend in the host . Actions and store results delegated to Header and Dashboard. Now let's tie everything together on the host.
Run All Together
It's time to run all four micro frontends together. Open http://localhost:3003 , and you can see there is Name: store. The same for Header and Dashboard. How to check the exposing module?
Hit the http://localhost:3002/remoteEntry.js and you will get the manifest. Remember the part in config in ModuleFederationPlugin?
filename: "remoteEntry.js",Host app using those remotes to grab those components:
remotes: {
  header: 'header@http://localhost:3001/remoteEntry.js',
  dashboard: 'dashboard@http://localhost:3002/remoteEntry.js',
  store: 'store@http://localhost:3003/remoteEntry.js',
}
Now, if you ran all ports from 3000 till 3003 you will see something like this (depends on the styling, of course).
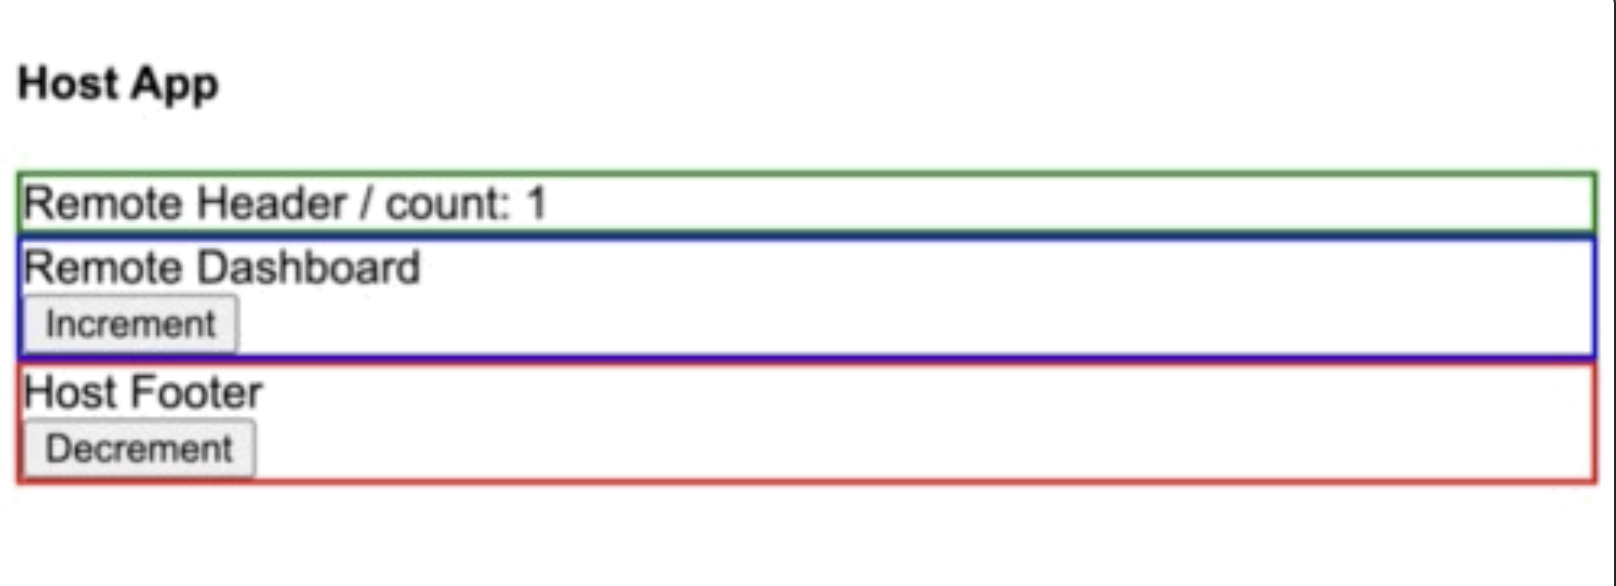
By clicking on "Increment" or "Decrement," you will mutate the external store from localhost:3003 which the module has been loaded asynchronously. Code changes, let's say in Dashboard, will be delivered to host only when you reload the page because you need to load imports again. And this is it.
I was using npx with create-mf-app for each project in Monorepo to save time. You can create each project separately, use different React versions, and share only the modules that need to be in common.
Conclusion
Of course, the setup will take some time, and it is quite easy to make a mistake in the naming or configuration file. But it is important to understand that each component we have created has become an individual independent frontend project.
Published at DZone with permission of Anton Kalik. See the original article here.
Opinions expressed by DZone contributors are their own.
Comments