Hybris Multi-Tenant System Using REST Webservices
Take a look at this is about the Integration of Hybris multi tenant with REST API.
Join the DZone community and get the full member experience.
Join For FreeIntroduction
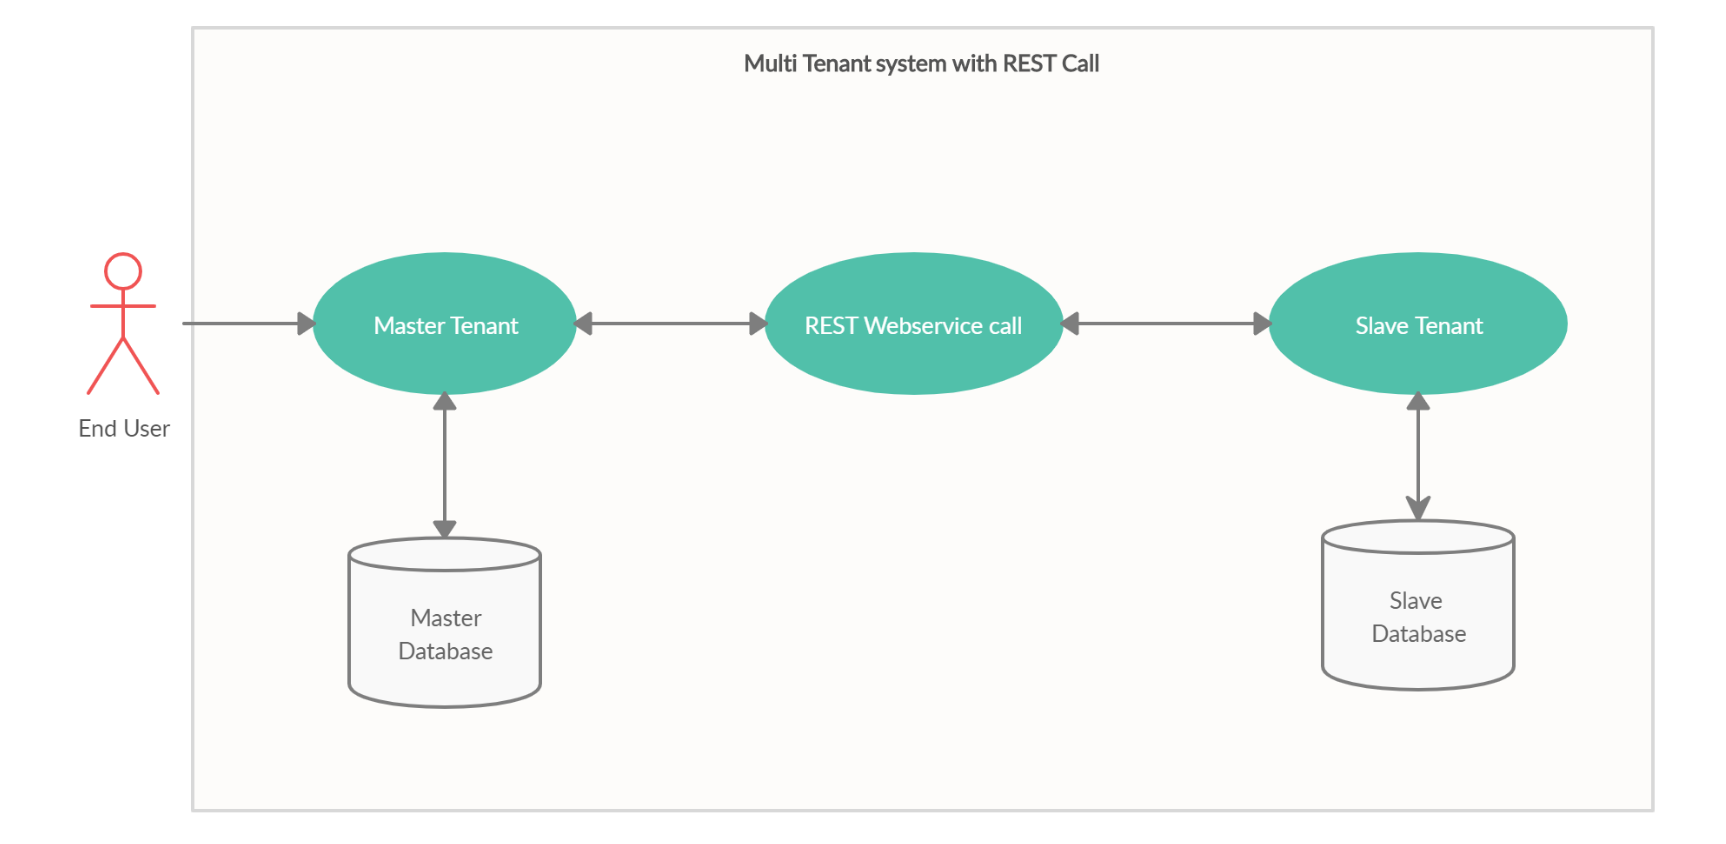
The purpose of this document is to demonstrate how to achieve multitenancy using web services. Before starting, we need to understand the basic concept of the multi-tenant system in SAP Hybris and REST web services.
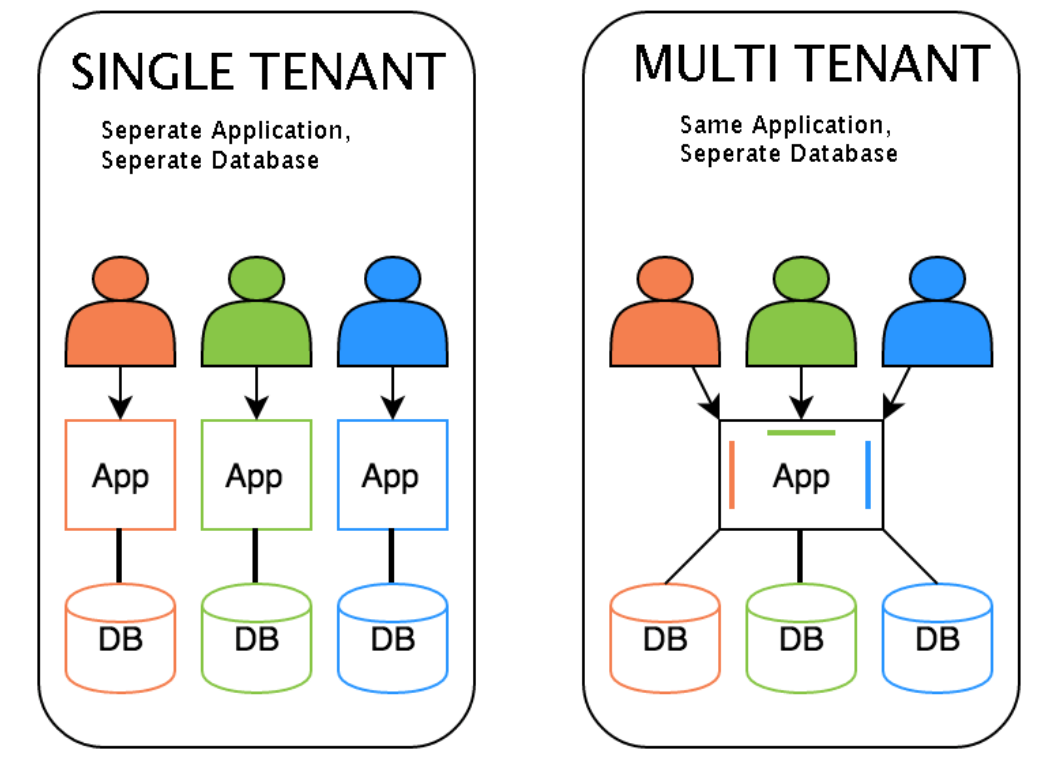
Multi-tenancy means an individual set of data across one database. The Hybris e-commerce suite provides one single codebase that can be run over multiple set of data. A multi-tenant system:
- Provides isolation between a set of data (tenant).
- Provides the option of using separate databases.
- Provides individual time zone and locale settings.
 In a multi-tenant architecture, multiple instances of an application operate in a shared environment. This architecture is able to work because each tenant is integrated physically, but logically separated; meaning that a single instance of the software will run on one server and then serve multiple tenants. In this way, a software application in a multi-tenant architecture can share a dedicated instance of configurations, data, user management, and other properties.
Multi-tenancy applications can share the same users, displays, rules although users can customize these to an extent and database schemas, which tenants can also customize.
Types of Multi-Tenant Architecture
There are three main multi-tenancy model types, all with varying levels of complexity and costs. A single, shared database schema is a multi-tenancy model with a multi-tenant database. This is the simplest form out of the three and is a relatively low cost for tenants because of the use of shared resources. This form uses a single application and database instance to host tenants and store data. Using a single, shared database schema allows for easier scaling; however, operational costs can be higher.

REST Web Services
Hybris provides a great way to expose all of its functionality via web services, We can provide all the data available in the Hybris database (products, promotions, vouchers, wish list) to third-party applications which are not built using Hybris.
Some web services are exposed via HTTP and 9001 ports, whereas others, where Spring security is applied, are exposed via HTTPS and 9002 port.
Most of the features are provided by Hybris Out-Of-The-Box (OOTB). In the case of customization, we only have to fetch data either by Flexible Search Query or from services, add them to a list, and return the list to the calling application. Everything else will be taken care of by Hybris automatically.
Follow these steps to configure the new tenant with web service extension:
- You will need to add the new tenant, that we'll call “mytenant,” to the list of installed tenants in your local properties file.
Like this:
installed.tenants=mytenant
Use this property for mytenant working with other slave tenants:
installed.tenants=mytenant, junit
2. We need to create a new module inside the custom module, and under that, you can create new extensions such as “mytenantwebservices” for managing web services for new tenant using ywebservice or ycommercewebservice template. After creation, you need to add this extension to your localextensions.xml file like this:
<extension dir="${HYBRIS_BIN_DIR}/custom/mytenant/mytenantwebservices" />
3. Hybris allows us to have different “.properties” file to each slave tenant. You don't necessarily need to have them in order to install a slave tenant. But in our case, we have to override some properties from the master tenant. Every property that is not present on slave tenant’s “.properties” file will inherit the values from the master tenant. So create a file named local_tenant_mytenant.properties inside your Hybris config folder.
Put these properties inside it:
xxxxxxxxxx
task.engine.loadonstartup=true
# Add your Database details
db.url=jdbc:sqlserver://localhost:1433;databaseName=mytenant;responseBuffering=adaptive;loginTimeout=10
db.driver=com.microsoft.sqlserver.jdbc.SQLServerDriver
db.username=hybris
db.password=newPassword
db.tableprefix=es_
mysql.optional.tabledefs=CHARSET=utf8 COLLATE=utf8_bin
mysql.tabletype=InnoDB
hmc.webroot=/hmc_mytenant
hac.webroot=/hac_mytenant
platformwebservices.webroot=/ws410_mytenant
oauth2.webroot=/authorizationserver_mytenant
mytenantwebservices.rootcontext=/mytenantwebservices
solrserver.instances.default.autostart=true
hmc.language=en
cockpit.default.useTestIds=true
cmscockpit.default.login=cmsmanager
cmscockpit.default.password=1234
productcockpit.default.login=productmanager
productcockpit.default.password=1234
hmc.default.login=admin
hmc.default.password=nimda
commerceservices.orderCode.keyGenerator=orderCodeGenerator
// you can add extensions from master tenant in below property
forbidden.extensions=
# Added New for Tenant switch and accessing web context
mytenantwebservices.webroot=/mytenant
cache.shared=true
core.application-context=core-spring.xml,core-media-spring.xml,persistence-spring.xml,core-profiling-spring.xml,core-jmx-spring.xml,core-filter-spring.xml,servicelayer-spring.xml,user-spring.xml,security-spring.xml,media-spring.xml,i18n-spring.xml,interceptor-spring.xml,event-spring.xml
processing.application-context=processing-spring.xml,cronjob-spring.xml,task-spring.xml,processengine-spring.xml,processing-jmx-spring.xml,processing-distributed-spring.xml
Make the modifications to the properties related to database connectivity according to your local database. As mentioned above property create database mytenant. You can have any name to database but make sure it is correctly mentioned in above tenant properties.
4. Go to the extensioninfo.xml file of the newly created extension -> mytenantwebservices.
Here this line is very important:<webmodule jspcompile="false" webroot="/mytenantwebservices"/>
You will be calling your web services with the root as /mytenantwebservices. Here you can give any name you want to give but you need to use the same name mentioned in this file for calling your web services.
5. For testing your setup:
- Compile your code (ant clean all) and start hybris server.
- Once it's up. In master tenant, go to /hac → platform tab → tenants.
- You should see your “mytenant” tenant within the tenants list.
- Click on the activate button.
- Check if you were redirected to your tenant /hac endpoint. In our case "hac_mytenant"
- Go to platform → initialization.
- Check on the project list if you have only the needed extensions within this list. Other master tenant’s extensions should not be present here.
- Click to initialize.
- If the initialization is finished with success you should be able to start using your new mytenant tenant.
6. Time to check the sample webservice:
Now open Rest-Client and execute the following sample webservice request to retrieves all user from Hybris.
The URL is found here. http://localhost:9001/mytenant/mytenantwebservices/sample/users
Method: GET
You can able see the response in the body of the REST client.
Note: If you don’t want to customize webservice and use the default webservices provided use /rest instead of your custom name /mytenantwebservice.
Example:
URL - http://localhost:9001/mytenant/rest/sample/users
References
Opinions expressed by DZone contributors are their own.

Comments