Running a Spring Boot Application Under Payara Server Using a Payara Data Source
You can use a JDBC resource and connection pool to run your Spring Boot apps with Payara Data.
Join the DZone community and get the full member experience.
Join For FreeThis article is a practical step-by-step guide for running a Spring Boot application on Payara 5. This application will use a MySQL data source configured via the Payara 5 interface. Learn how to install payara 5 with NGINX.
The complete application is available here.
If you are a Spring Boot aficionado, then you already know that Spring Boot prefers Tomcat as the default application server, can auto-configure embedded H2, HSQL, and Derby databases, and relies on HikariCP as the default connection pool.
Now, let's switch from Tomcat to Payara 5, from H2 (HSQL, Derby) to MySQL, and from HikariCP to the Payara 5 connection pool. Assuming that you downloaded and installed Payara 5, let's get started:
Step 1: Add Connector/J (JDBC MySQL Connector) in Payara 5
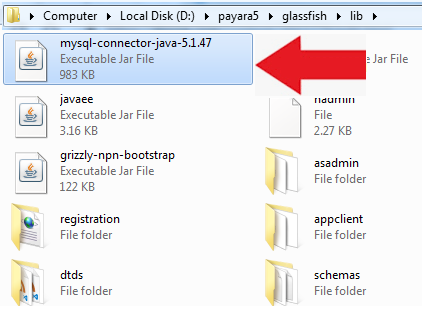
In order to communicate with MySQL, Payara requires Connector/J. Once you downloaded and extracted the archive of Connector/J, locate the JAR file named mysql-connector-java-5.1.47.jar. This file should be copied manually in {PAYARA_HOME|/glassfish/lib folder, as you can see in the below screenshot:
Step 2: Start Payara domain1 From CLI
Open a console/terminal, navigate to {PAYARA_HOME}/bin folder, and type,asadmin start-domaincommand:

After the command was successfully executed (this may take a few seconds), you should see the message: "Command start-domain executed successfully."
But, there is a possibility that instead of this nice message to obtain aNullPointerException, as below:

Most probably, you obtained this error because you installed and defaulted to a Java (JDK) version that is not supported by Payara. We have to please Payara by settingAS_JAVAto a supported JDK distribution. JDK 8 is safest. There is nothing wrong or unusual with having multiple JDKs installed on the same machine, so don't worry about this aspect. Just instruct Payara to use a compatible one.
In order to set up AS_JAVA, edit the file {PAYARA_HOME}/glassfish/config/asenv.bat (on a Windows machine) or {PAYARA_HOME}/glassfish/config/asenv.conf (on a Linux machine) and add at the bottom of it a line as,set AS_JAVA=C:\Program Files\Java\jdk1.8.0_111(on a Windows machine) or as,AS_JAVA="/usr/lib/jvm/jdk1.8.0_111"(for a Linux machine):
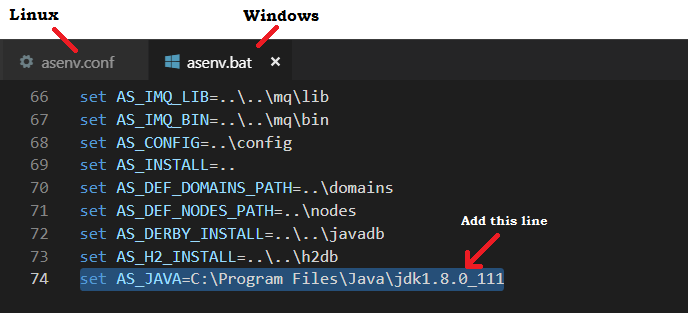
After you accomplish this edit, run theasadmin start-domaincommand again. This time, it should work as expected.
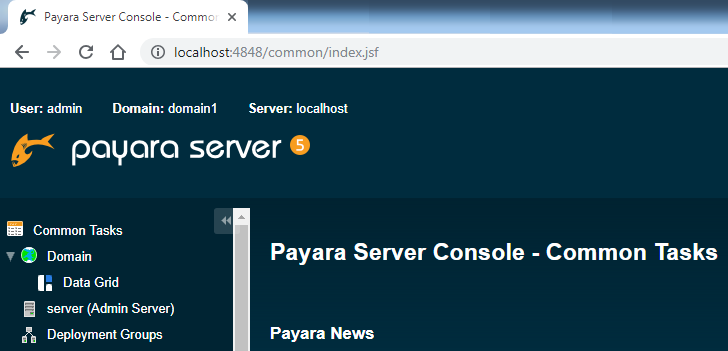
Further, open your favorite browser and navigate to localhost:4848. Shortly, you should see the Payara Server Console, as shown below:
Step 3: Create a New JDBC Connection Pool Via the Payara Interface
In the left-side panel, locate JDBC | JDBC Connection Pools node and click on it. This will open the JDBC Connection Pools wizard containing the current configured connections pools:

In this wizard, click on the New button and start configuring a new connection pool for MySQL. Fill up the Pool Name as MySqlPool (or any other name), Resource Type as javax.sql.DataSource and Database Driver Vendor as MySql:
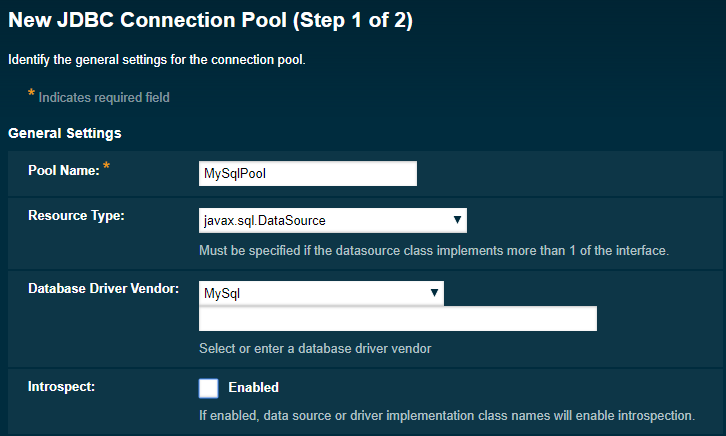
After you finish, just click on the top-right corner Next button. This will take you to step two of this configuration process.
In step two, we have a wizard composed of several parts. The first part is named General settings, and it should contain the proper settings already set up. So, scroll down to the second part, Pool settings:
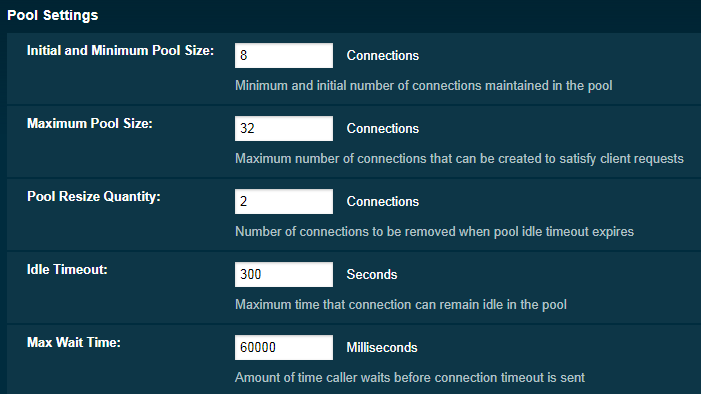
We will leave the default settings, but, from here, you can easily customize the connection pool settings, like the maximum pool size.
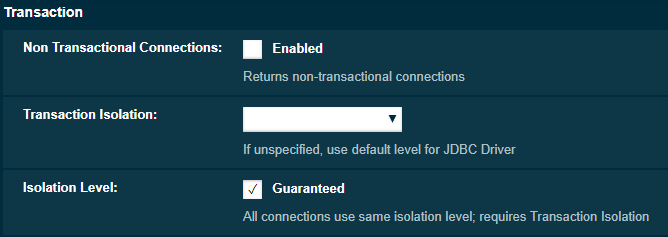
Scroll down again, and you will find the Transaction part. We will not modify this part as well, but if you want the transactions to act in a specific isolation level (e.g., Repeatable Reads), then this is the place to do it next to other configurations.
Below this wizard, we have the Additional Properties table. Depending on the database vendor, this panel contains specific properties. In this case, this table contains a comprehensive list of properties specific to MySQL:
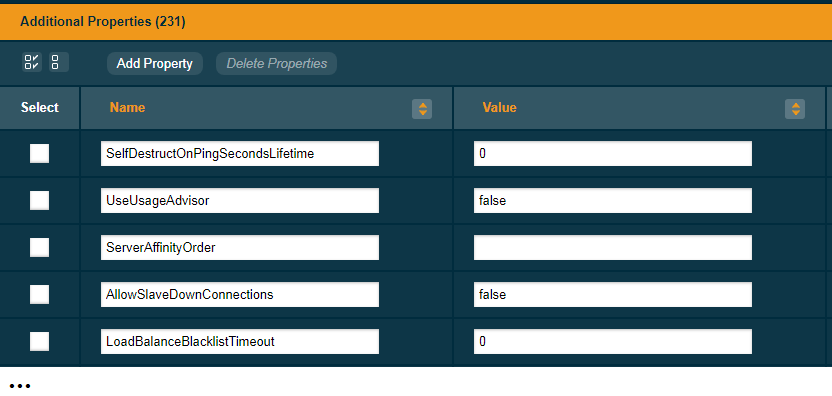
Feel free to adjust the values of these properties to match your needs. For now, we address the following properties: User, Password, DatabaseName, ServerName, URL, url, and CreateDatabaseIfNotExist:
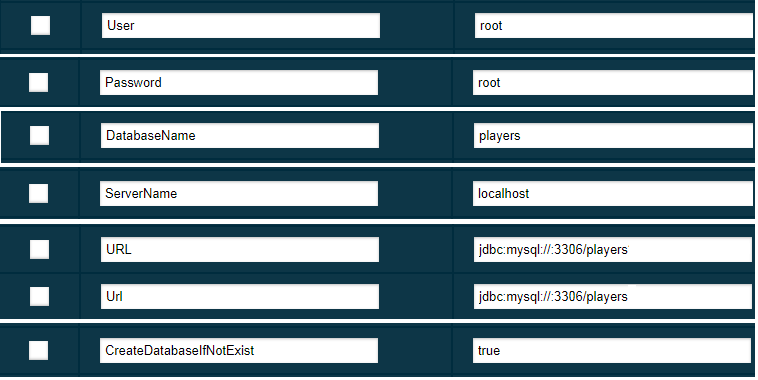
So, we connect on localhost to a database named players that will be automatically created if it doesn't exist. The credentials for user and password are root and root (use other account credentials if you like). The default MySQL port is 3306. After you find and edit each of these properties, simply click the Finish button (on the top-right corner).
The new connection pool is created, and now, you should see it in the list of connection pools, as in the figure below:

But, how do we know that our connection pool is working fine? Well, Payara provides a cool Ping facility. For starters, click on the connection pool name and wait for it to be loaded.

You should see a Ping button. Before clicking on this button, ensure that MySQL is running conforming to your settings. In this case, it should be running on localhost:3306. After you click on this button, you should receive a Ping Succeeded message or an error message that explains what went wrong.

Ok, so far so good!
Step 4: Create a JDBC Resource Via the Payara Interface
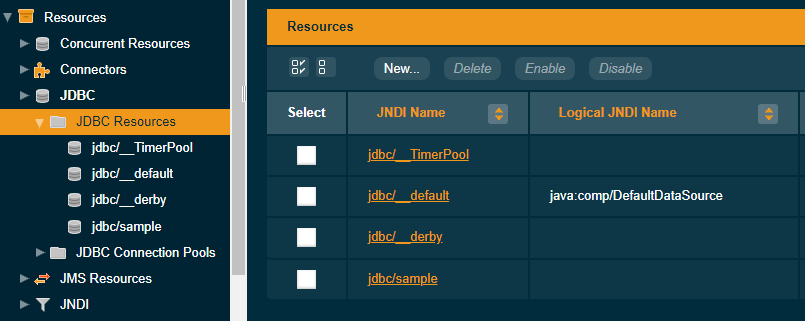
Now, we have to create a JDBC resource that exploits our connection pool. For this, in the left-side panel, click on the JDBC | JDBC Resources node. Shortly, you should see the list of available JDBC resources:
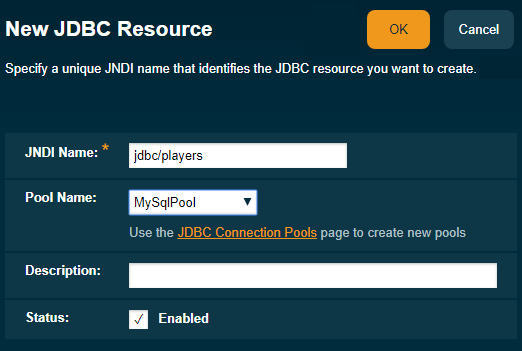
Click on the New button to launch the wizard for creating a JDBC resource. For the unique JNDI Name that identifies the JDBC resource, type jdbc/players. For Pool Name, select from the dropdown the MySqlPool connection pool.
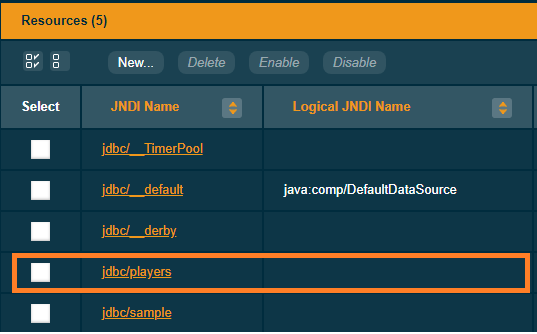
Finally, click on the Ok button from the top-right corner. You should see the new JDBC resource listed as below:
Done! Now, simply close the Payara Server Console. Further, we focus on the Spring Boot application.
Step 5: Get a Spring Boot Kickoff Application
In order to develop an application that will use the above JDBC resource, we go for a Maven-based Spring Boot kickoff application containing the following starters: starter-data-jpa, starter-jdbc, starter-web, starter-test.
One simple and fast way is to use the Spring Initializr wizard.
Step 6: Prepare the pom.xml for Payara
In order to deploy our Spring Boot application under Payara, we need to adjust the pom.xml file as follows:
- Commonly, Spring Boot applications are packaged as JARs, but we need a WAR, so prepare the <packaging>accordingly:
<packaging>war</packaging>- Spring Boot applications are deployed by default on Tomcat, so we need to exclude Tomcat:
<dependency>
    <groupId>org.springframework.boot</groupId>
    <artifactId>spring-boot-starter-web</artifactId>
    <exclusions>
        <exclusion>
            <groupId>org.springframework.boot</groupId>
            <artifactId>spring-boot-starter-tomcat</artifactId>
        </exclusion>
    </exclusions>
</dependency>
- Once we removed Tomcat, we cannot compile the code because of the missing Servlet API, so we need to provide Servlet API dependency in an explicit way:
<dependency>
    <groupId>javax.servlet</groupId>
    <artifactId>javax.servlet-api</artifactId>
    <scope>provided</scope>
</dependency>
- The complete pom.xml is available here.
Step 7: Configure the Data Source Via JNDI, jdbc/players
Remember that we have created a JDBC resource and a connection pool that have as an entry point the JNDI name jdbc/players. Now, we instruct our application to expose ajavax.sql.DataSource via this JNDI name. For this, we rely on the Spring,JndiDataSourceLookupAPI as follows:
@Configuration
public class DataSourceConfigurer {

    private static final String JNDI = "jdbc/players";

    @Bean(destroyMethod = "") // disable inference of a potential close() method as a destroyer
    public DataSource dataSource() throws DataSourceLookupFailureException {
        JndiDataSourceLookup dataSourceLookup = new JndiDataSourceLookup();
        return dataSourceLookup.getDataSource(JNDI);
    }
}
The complete source code of this class is available here.
Step 8: Create a Model
Further, we create a simple JPA entity namedPlayer:
@Entity
@Table(name="player")
public class Player implements Serializable {

    private static final long serialVersionUID = 1L;

    @Id
    private Long id;

    private String name;
    private String city;
    private int age;
    ...
}
The complete source code of this class is here.
Step 9: Define a Typical Spring Repository
Next, we define a typical Spring repository for Player:
@Repository
public interface PlayerRepository extends JpaRepository<Player, Long> {
}
The complete source code of this class is here.
Step 10: Create a Typical Spring Service
Further, we define a typical Spring service that will expose two methods: one method for persisting a single player with id 1 and another method for finding this player by id:
@Service
public class PlayerService {

    private final PlayerRepository playerRepository;

    public PlayerService(PlayerRepository playerRepository) {
        this.playerRepository = playerRepository;
    }

    public Player newPlayerWithIdOne() {
       ...
    }

    public Player findFirstPlayer() {
       ...
    }
}
The complete source code of this class is here.
Step 11: Expose This Service Via a @RestController
Next, we create a common Spring controller that exposes two endpoints, a GET endpoint (/fetch) and a POST endpoint (/new):
@RestController
public class PlayerController {

    private final PlayerService playerService;

    public PlayerController(PlayerService playerService) {
        this.playerService = playerService;
    }

    @GetMapping("/fetch")
    public Player fetchPlayer() {

        return playerService.findFirstPlayer();
    }

    @PostMapping("/new")
    public Player newPlayer() {

        return playerService.newPlayerWithIdOne();
    }

}
The complete source code of this class is here.
Step 12: Define the Main Class
The main class of our application relies on theSpringBootServletInitializerAPI:
@SpringBootApplication
@EntityScan("com.jpa.model")
@ComponentScan({"com.http.requests", "com.services"})
@EnableJpaRepositories("com.jpa.queries")
public class SpringBootPayaraMySqlKickoffApplication extends SpringBootServletInitializer {

    @Override
    protected SpringApplicationBuilder configure(SpringApplicationBuilder application) {
        return application.sources(SpringBootPayaraMySqlKickoffApplication.class);
    }

    public static void main(String[] args) {
        SpringApplication.run(SpringBootPayaraMySqlKickoffApplication.class, args);
    }
}
The complete source code of this class is here.
Step 13: Consume the Endpoints From a Simple HTML Page
You can easily test the endpoints (/fetch and /new) via curl, ARC Rest Client, Postman, etc., but we prefer a simple HTML page based on plain AJAX:
<script>
    function newPlayer() {
        var xhttp = new XMLHttpRequest();
        ...
    }

    function fetchPlayer() {
        var xhttp = new XMLHttpRequest();
        ...
    }
...
<button type="button" onclick="newPlayer()">Insert a single player with id 1</button>
<button type="button" onclick="fetchPlayer()">Get player with id 1</button>
The complete source code of this page is here.
Step 14: Provide the Well-Known Application.Properties
As you know, Spring Boot rely on the application.properties file as the main configuration file. We provide this file with a few useful settings for Hibernate:
# creates the schema, destroying previous data
spring.jpa.hibernate.ddl-auto=create

# display the executed SQLs
spring.jpa.show-sql=true

# display statistics
spring.jpa.properties.hibernate.generate_statistics=true
Step 15: Adding web.xml and glassfish-web.xml Descriptors
Just in case, you will need the Standard Deployment Descriptor (web.xml). We have a provided an empty one:
<?xml version="1.0" encoding="UTF-8"?>
<web-app metadata-complete="true"
         xmlns="http://xmlns.jcp.org/xml/ns/javaee"
         xmlns:xsi="http://www.w3.org/2001/XMLSchema-instance"
         xsi:schemaLocation="http://xmlns.jcp.org/xml/ns/javaee
     http://xmlns.jcp.org/xml/ns/javaee/web-app_3_1.xsd"
         version="3.1">

</web-app>
Moreover, if you need the Glassfish Descriptor (glassfish-web.xml), here it is (we have used it to customize the root context):
<?xml version="1.0" encoding="UTF-8"?>
<!DOCTYPE glassfish-web-app PUBLIC ...>
   <glassfish-web-app error-url="">
   ...
   <!-- set a friendly context root -->
   <context-root>/players</context-root>

   <!-- Change the default character encoding from ISO-8859-1 to UTF-8 -->
   <parameter-encoding default-charset="UTF-8"/>
</glassfish-web-app>
The complete source code of this file is here.
Step 16: Compile the Application and Locate the WAR
Well, it is time to compile the application. Of course, we can do this in different ways (e.g., from our favorite IDE, etc), but let's simply run the mvn clean installcommand from the project folder:
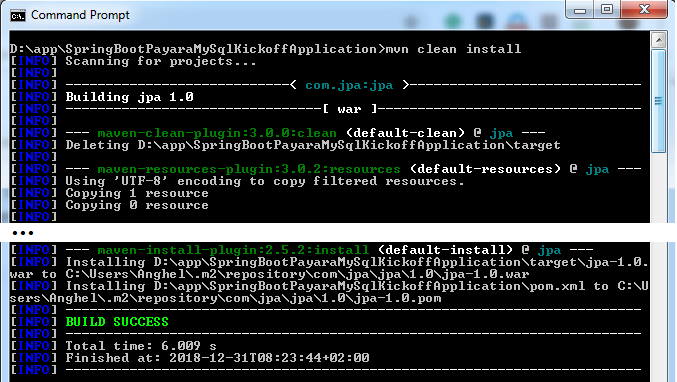
Now, you should have a /target folder containing the application WAR.
Step 17: Deploy the WAR on Payara
Only one important step separates us from running the application, the deployment step. Again, we can deploy the application from our favorite IDE (e.g., is very easy to do this from NetBeans), or via Maven, but this time, let's do it via Payara interface.
Launch Payara Server Console and navigate to the Applications node. Click on the Deploy button:

Further, we need to upload the WAR file on Payara (deploy). Simply click on the Choose File button and select the WAR of our application. Moreover, select Web Application as the Type of the application:
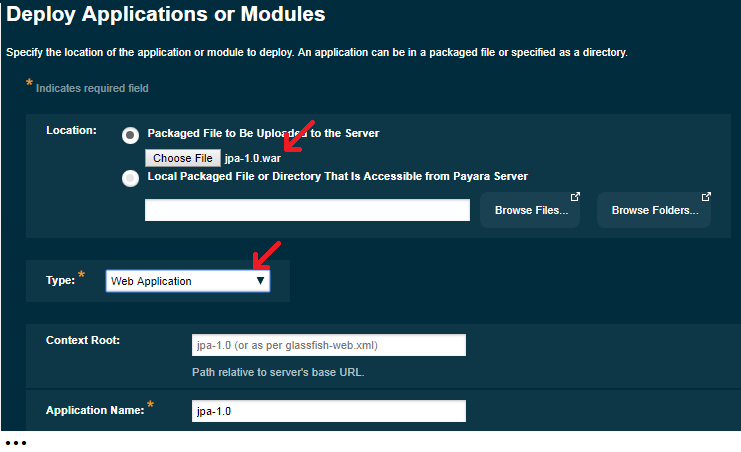
Click on the Ok button from the top-right corner and wait for Payara to finish the deployment. In the end, you will be automatically redirected to the table containing the deployed applications.
Step 18: Launching the Application
In this table, locate our application and click on the Launch button:

At this point, you will see two available links, one on port 8080 (http) and one on port 8181 (https). Click on the 8080 link:
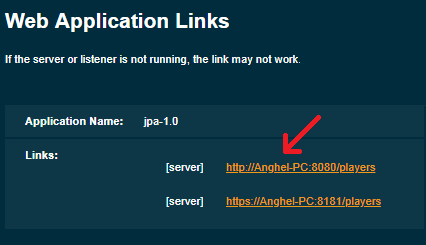
The application should be launched and look like below:

Now, we can try to persist and fetch a player with id 1. For example, you can try the below sequence of three steps:
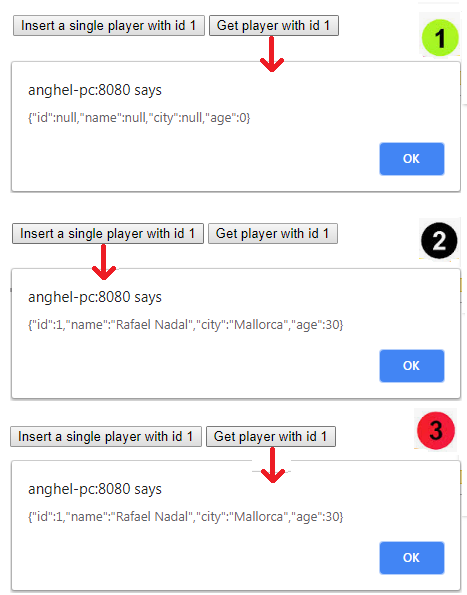
Done! In order to stop Payara, simply run at the command line:asadmin stop-domain.
The complete application is available here.
Opinions expressed by DZone contributors are their own.

Comments