Sponsored Content
RabbitMQ in Microservices
RabbitMQ in Microservices
Learn how to use the RabbitMQ message broker to enable communication between your distributed systems, promoting loosely-coupled microservices.
This article was provided by and does not represent the editorial content of DZone.
Join the DZone community and get the full member experience.
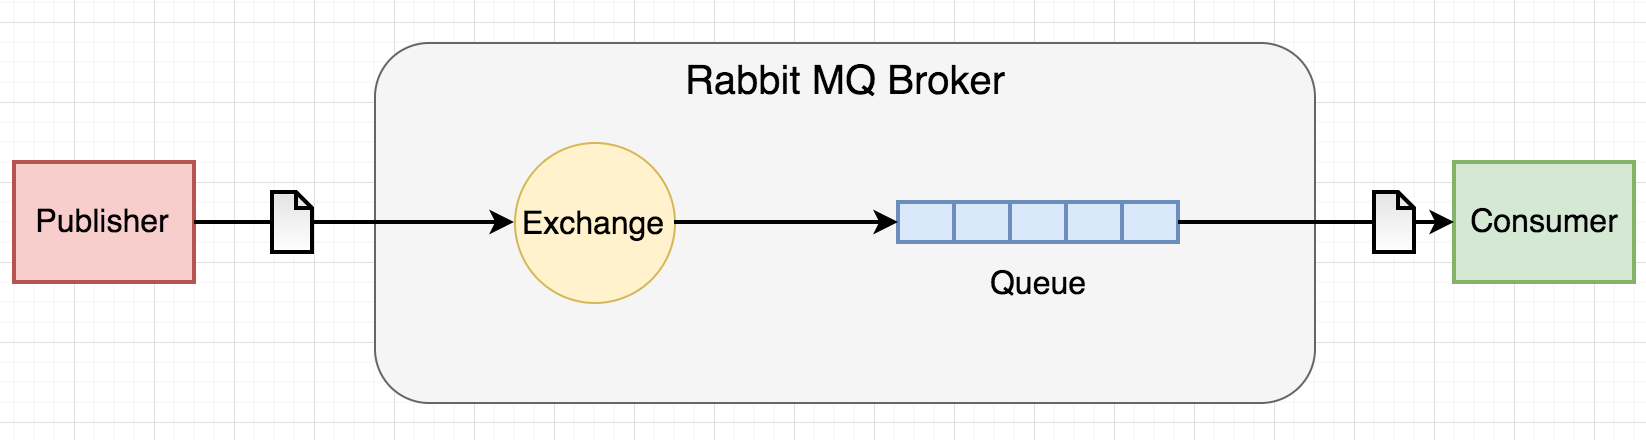
Join For FreeRabbitMQ, also known as Open-Source Message Broker, supports multiple message protocols and can be deployed on distributed systems. It is lightweight and makes it easy to deploy applications. It mainly acts as a queue where a message which is entered can first be operated on. RabbitMQ runs on many operating systems and cloud environments and provides a wide range of developer tools for most popular languages. It is a Producer-Consumer style pattern where the producer sends a message and the consumer consumes it. The main features of RabbitMQ are mentioned below:
-
Asynchronous Messaging
-
Distributed Deployment
-
Management & Monitoring
-
Enterprise- and Cloud-Ready
Installation
For RabbitMQ, you first need to have ErLang installed in your system as the RabbitMQ program is written in the ErLang programming language. After ErLang, you can download the latest version of RabbitMQ from its home site by following instructions given there.
Use of RabbitMQ in Microservices
RabbitMQ is one of the simplest freely available options for implementing messaging queues in your microservices architecture. These queue patterns can help to scale your application by communicating between various microservices. We can use these queues for various purposes, like interaction between core microservices, decoupling of microservices, implementing failover mechanisms, and sending email notifications via message brokers.
Wherever two or more core modules need communicate with each other, we should not make direct HTTP calls, as they can make the core layer tightly coupled and it will be difficult to manage when there are more instances of each core module. Also, whenever a service is down, the HTTP call pattern will fail, as after a restart, there is no way to track old HTTP request calls. This results in the need for RabbitMQ.
Setting Up RabbitMQ in Microservices
In microservice architecture, for this demonstration, we will use an example pattern of sending email notifications via various core microservices. In this pattern, we will have a producer, any of the core microservices, which will generate the email content and pass it on to the queue. Then this email content is taken by the consumer, who is always listening to the queue for new messages.
Please note that we are using Spring Boot for our microservices, so we will be doing configuration provided for Spring.
1) Producer: This layer is responsible for the generation of email content and passing on this content to the message broker in RabbitMQ.
a) In the properties file, we need to mention the queue name and exchange types along with the host and port where the RabbitMQ server is installed.
queue.name=messagequeue
fanout.exchange=messagequeue-exchange
spring.rabbitmq.host: localhost
spring.rabbitmq.port: 5672
spring.rabbitmq.username: guest
spring.rabbitmq.password: guest
b) We need to create one configuration class, which will use the queue name and exchange type to bind the queue to the microservice module.
@Configuration
public class RabbitConfiguration {

 @Value("${fanout.exchange}")
 private String fanoutExchange;

 @Value("${queue.name}")
 private String queueName;

 @Bean
 Queue queue() {
  return new Queue(queueName, true);
 }

 @Bean
 FanoutExchange exchange() {
  return new FanoutExchange(fanoutExchange);
 }

 @Bean
 Binding binding(Queue queue, FanoutExchange exchange) {
  return BindingBuilder.bind(queue).to(exchange);
 }

}
c) Finally, we need one util class, which will be used to send actual email content to the queue using RabbitTemplate, provided by the Spring framework.
@Component
public class QueueProducer {

 protected Logger logger = LoggerFactory.getLogger(getClass());

 @Value("${fanout.exchange}")
 private String fanoutExchange;

 private final RabbitTemplate rabbitTemplate;

 @Autowired
 public QueueProducer(RabbitTemplate rabbitTemplate) {
  super();
  this.rabbitTemplate = rabbitTemplate;
 }

 public void produce(NotificationRequestDTO notificationDTO) throws Exception {
  logger.info("Storing notification...");
  rabbitTemplate.setExchange(fanoutExchange);
  rabbitTemplate.convertAndSend(new ObjectMapper().writeValueAsString(notificationDTO));
  logger.info("Notification stored in queue sucessfully");
 }

}
d) Then you can call a produce method from anywhere in the module.
{
  queueProducer.produce(notificationDTO);
}
2) Consumer: This layer is responsible for consuming the message from the RabbitMQ message broker with the FIFO method, then performing email-related operations.
a) In the properties file, we need to mention the queue name and exchange types, along with the host and port where the RabbitMQ server is installed.
queue.name=messagequeue
fanout.exchange=messagequeue-exchange
spring.rabbitmq.host: localhost
spring.rabbitmq.port: 5672
spring.rabbitmq.username: guest
spring.rabbitmq.password: guest
b) We need to create one configuration class, which will use the queue name and exchange type to bind the queue to the microservice module. Also, in the consumer's RabbitMQ configuration, we will need to create a MessageListenerAdapter bean, which will make it act as a consumer and always listen for the incoming message in queue pipeline. This MessageListenerAdapter will have a parameterized constructor with a Consumer util class and defaultListenerMethod, where we can specify email-related operations.
@Configuration
public class RabbitConfiguration {

 private static final String LISTENER_METHOD = "receiveMessage";

 @Value("${queue.name}")
 private String queueName;

 @Value("${fanout.exchange}")
 private String fanoutExchange;


 @Bean
 Queue queue() {
  return new Queue(queueName, true);
 }

 @Bean
 FanoutExchange exchange() {
  return new FanoutExchange(fanoutExchange);
 }

 @Bean
 Binding binding(Queue queue, FanoutExchange exchange) {
  return BindingBuilder.bind(queue).to(exchange);
 }

 @Bean
 SimpleMessageListenerContainer container(ConnectionFactory connectionFactory,
  MessageListenerAdapter listenerAdapter) {
  SimpleMessageListenerContainer container = new SimpleMessageListenerContainer();
  container.setConnectionFactory(connectionFactory);
  container.setQueueNames(queueName);
  container.setMessageListener(listenerAdapter);
  return container;
 }

 @Bean
 MessageListenerAdapter listenerAdapter(QueueConsumer consumer) {
  return new MessageListenerAdapter(consumer, LISTENER_METHOD);
 }

}
c) Then, we need to create the QueueConsumer class which will have the specified message listener method where we can do actual email sending operations.
@Component
public class QueueConsumer {

 @Autowired
 MailServiceImpl mailServiceImpl;
 protected Logger logger = LoggerFactory.getLogger(getClass());

 public void receiveMessage(String message) {
  logger.info("Received (String) " + message);
  processMessage(message);
 }

 public void receiveMessage(byte[] message) {
  String strMessage = new String(message);
  logger.info("Received (No String) " + strMessage);
  processMessage(strMessage);
 }

 private void processMessage(String message) {
  try {
   MailDTO mailDTO = new ObjectMapper().readValue(message, MailDTO.class);
   ValidationUtil.validateMailDTO(mailDTO);
   mailServiceImpl.sendMail(mailDTO, null);
  } catch (JsonParseException e) {
   logger.warn("Bad JSON in message: " + message);
  } catch (JsonMappingException e) {
   logger.warn("cannot map JSON to NotificationRequest: " + message);
  } catch (Exception e) {
   logger.error(e.getMessage());
  }

 }
}
Conclusion
Using RabbitMQ, you can avoid direct HTTP calls between services and remove tight coupling of core microservices. This will help you in scaling your microservices at a higher level and add failover mechanisms between microservices.
Opinions expressed by DZone contributors are their own.
{{ parent.title || parent.header.title}}
{{ parent.tldr }}
{{ parent.linkDescription }}
{{ parent.urlSource.name }}