DZone
Thanks for visiting DZone today,
Edit Profile
  • Manage Email Subscriptions
  • How to Post to DZone
  • Article Submission Guidelines
Sign Out View Profile
  • Post an Article
  • Manage My Drafts
Over 2 million developers have joined DZone.
Log In / Join
Refcards Trend Reports Events Over 2 million developers have joined DZone. Join Today! Thanks for visiting DZone today,
Edit Profile Manage Email Subscriptions Moderation Admin Console How to Post to DZone Article Submission Guidelines
View Profile
Sign Out
Refcards
Trend Reports
Events
Zones
Culture and Methodologies Agile Career Development Methodologies Team Management
Data Engineering AI/ML Big Data Data Databases IoT
Software Design and Architecture Cloud Architecture Containers Integration Microservices Performance Security
Coding Frameworks Java JavaScript Languages Tools
Testing, Deployment, and Maintenance Deployment DevOps and CI/CD Maintenance Monitoring and Observability Testing, Tools, and Frameworks
Partner Zones AWS Cloud
by AWS Developer Relations
Culture and Methodologies
Agile Career Development Methodologies Team Management
Data Engineering
AI/ML Big Data Data Databases IoT
Software Design and Architecture
Cloud Architecture Containers Integration Microservices Performance Security
Coding
Frameworks Java JavaScript Languages Tools
Testing, Deployment, and Maintenance
Deployment DevOps and CI/CD Maintenance Monitoring and Observability Testing, Tools, and Frameworks
Partner Zones
AWS Cloud
by AWS Developer Relations
11 Monitoring and Observability Tools for 2023
Learn more
  1. DZone
  2. Refcards
  3. ADO.NET Entity Framework
refcard cover
Refcard #131

ADO.NET Entity Framework

Object-Relational Mapping and Data Access

Become an expert at developing ADO.NET framework. This DZone Refcard will give you a major advantage when developing the data architecture for your .NET applications.

Free PDF for Easy Reference
refcard cover

Written By

author avatar Dane Morgridge
Development Manager, Roska
Table of Contents
► About the ADO.NET Entity Framework ► The ObjectContext ► The Data Model ► Inserting Entities ► Querying Entities ► Updating Entities ► Deleting Entities ► POCO Support ► Conclusion & Resources
Section 1

About the ADO.NET Entity Framework

The ADO.NET Entity Framework (EF) is a powerful object relational mapping (ORM) tool that exists inside Microsoft Visual Studio 2010. Many new features were introduced with the current release of ADO.NET EF 4.0, which provides superior functionality when compared with EF 1.0. The EF version number was changed to match the version of the .NET framework, and EF 1.0 is frequently referred to as version 3.5 because of this.

Section 2

The ObjectContext

There are several classes that you will work with when using the EF. The most important of these objects is the all-central ObjectContext, which is the gate keeper for the classes responsible for all the change tracking as well as all database access. EF keeps track of each entity that is attached to it. ObjectContext can become quite large in terms of memory and resource as more entities are attached to it, which may present some problems when it comes time to persist changes to the database.

For example, when a SaveChanges call is made, each object currently being tracked is examined to determine necessary actions. Logically, this process will take more time and will require more resources as the objects that are being tracked increase. The SaveChanges call is also wrapped in an atomic transaction and will roll back if there are any errors from the database.

A general rule of thumb is to use a new ObjectContext (such as a single web form, MVC controller, or any client-side view) with each logical set of operations. Keeping a single ObjectContext limited to a smaller set of operations will decrease the number of objects tracked and, as a result, maintain performance.

Section 3

The Data Model

Before you begin working with data, you must create a new model either by working with an existing database or by creating an empty model.

Working with an existing database

First, add a new “ADO.NET Entity Data Model”. In this example, the model is called “ContactModel. ddmx” since the data is contact type data. The Choose Model Contents dialog box opens.

Database

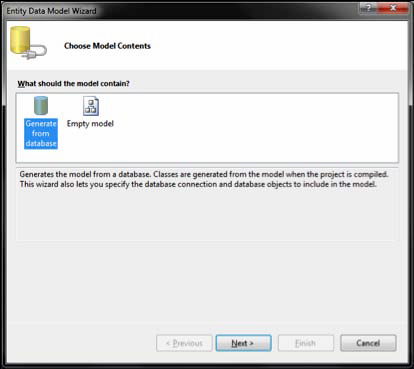
To work with an existing database, select Generate from database. Click Next. The Choose Your Data Connection dialog box opens.

Dialog

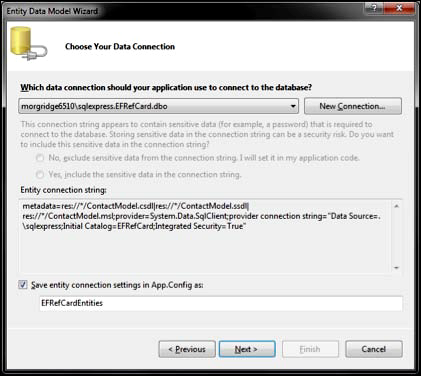
The drop-down list contains all databases that you currently have configured inside the Visual Studio Server Explorer. If the database you want is not an option in the list, click the New Connection button to add a new database.

You will see more information in the Entity connection string field than what you would see in a normal ADO.NET connection string. The entity connection string is made up of three parts:

  1. Metadata: points to the actual model. The model file in your solution is ContactModel.edmx, which you don’t see listed. There are three files:
    • ContactModel.csdl: the conceptual model (or what you see in the entity design surface). This represents the classes you work with.
    • ContactModel.ssdl: the storage model (or the physical database model).
    • ContactModel.msl: the mapping between the csdl and ssdl files.
  2. The .emdx file is an XML file that contains all of the data for the three files. When your project is compiled, these three files are generated and embedded.
  3. Provider: points to the actual ADO.NET provider.
  4. Provider Connection String: the normal ADO.NET connection string that is specific to the provider.

The last option in the Choose your Data Connection dialog box is the “Save entity connection settings in App.Config as” field, which saves the connection string. Make sure to check this checkbox so that you do not have to build the connection string by hand. The name you give to the connection string is also what your ObjectContext class name will ultimately be named.

After you have saved your connection string, click Next. The Choose your Database Objects dialog box opens.

Database Dialog Box

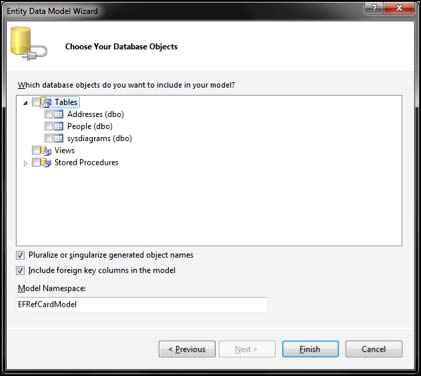
Select the tables, views, and stored procedures that you want to use. In this example, we will select the Addresses and People tables.

The two checkboxes at the bottom of the dialog box allow you to pluralize or singularize your object names or to include foreign keys in the model. Pluralizing and singularizing will help the model make more sense from a code standpoint when working with entities. In this example, the database table is named “People”. You would want the entity name to be “Person” in the singular form. If you were dealing with multiple people, you would want this to be “People”.

The information in the Model Namespace field at the bottom of the dialog box is hidden inside generated code. Since you don’t work with it directly, it is not recommended that you change this.

Click Finish. You will be taken to the model design surface that will show you the model you have created.

2 Boxes

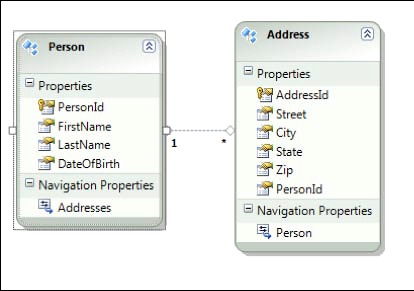
The Person and Address entities are pulled from the database. Notice that they are singular versions of the table names. The lines connecting the entities denote a one-to-many relationship between Person and Address. In other words, one Person can have multiple Addresses and one Address can only have one Person. Navigation Properties is also pluralized and singularized based on the relationship. Navigation properties are how you navigate between entities. You can use the Addresses property of a person to access that person’s address data and, in the same way, you can use the Person property off of an address to access the associated person.

Anything that you want to modify on the model can be done through the properties window in Visual Studio.

Updating the Model

When you make changes to your database, you can refresh the model by right clicking on the model design surface and selecting Update Model from Database. A dialog box similar to the Choose Your Database Objects dialog box opens. Any objects that are currently part of the model will be refreshed, and you can add any objects that are currently not part of the model.

Using Model First

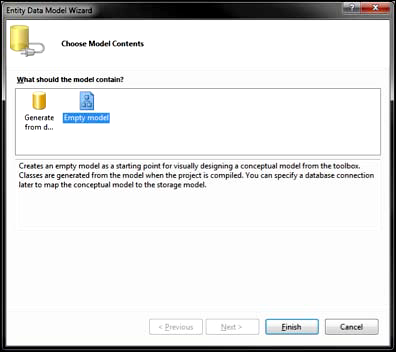
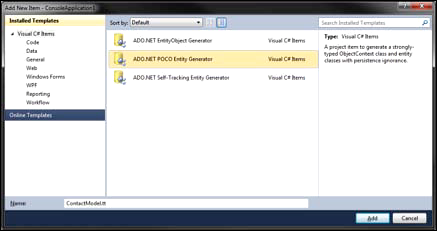
To get started, add a new ADO.NET Data Model to your project by selecting Empty model in the Choose Model Contents dialog box and click Finish.

Contents dialog

You will be taken to an empty design surface. To add an entity, right click on the design surface and select Add -> Entity. The Add Entity dialog box opens.

Dialog Box Opens

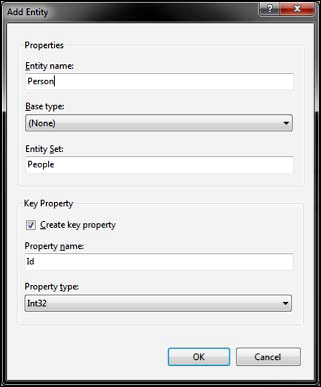
In this example, the Entity name is set to “Person”, which was pluralized to “People” in the Entity Set field. The Entity Name is the name you will use for the actual entity. The Entity Set will be the name of the plural collection as well as your database table name. If you don’t want it to be pluralized, you can change it here. However, you may encounter problems if you try to make changes to the database directly and then update it. In general, it is recommended that you stick with one design method for your database. Either use Model First consistently throughout or make your database changes externally and update the model. This will make maintaining the model consistency easier.

It is up to your design if you want to change the information in the Property name field to be more descriptive. If you do change it, make a note that you may need to tweak your association names down the road.

Click OK to return to the model design surface with your new entity:

Entity 1

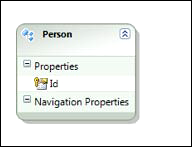
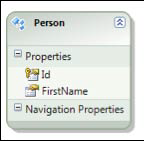
To add more items to the entity, right click on the entity and select Add -> Scalar Property. You can also use the Insert or Enter keys on your keyboard to add a new property. In this example, a FirstName property was added:

Entity 2

Click FirstName to view the Properties window:

Window 1

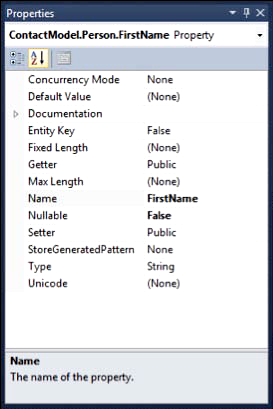
The following table includes descriptions of some of the key properties:

Property Name Description
Fixed Length Set to False by default and will result in a varchar or an nvarchar. If you want a char or nchar, set this to True.
Max Length Set to MAX by default. As a string type, either a varchar(MAX)or an nvarchar(MAX) will be created. Set this to a number to set the max character length.
StoreGeneratedPattern Set to None by default. When using keys, you can set this to determine if you want this key to be an identity or a computed value.
Type Set to String by default. Sets the datatype of the property and supports almost all SQL Server datatypes.
Unicode Set to True by default, giving you the Unicode versions of the datatypes. Determines whether you will get an nvarchar or a varchar.

Creating Associations

Once you flesh out your entities, you need a way to associate them. In SQL Server, you would simply add foreign keys to the tables. In EF, you need to create associations. To do this, right click the entity with the primary key and select Add -> Association. The Add Association dialog box opens.

Window 2

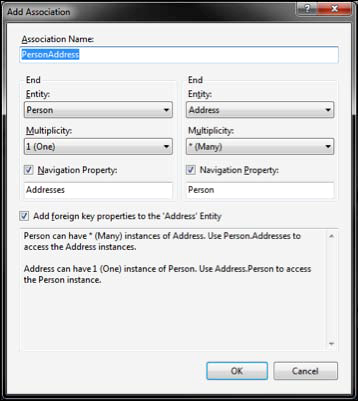
In the Add Association dialog box, you can set the two endpoints for both sides of the association as well as the association type. In this example, a one-to-many association between Person and Address is being set up. Using the Multiplicity drop-down menus, select different association types. Checking the Navigation Property checkboxes allows you to set navigation properties to be used when navigating the associations. By default, these are set to pluralized or not based on the type of association. You can rename these to more descriptive names if you want.

Check the Add foreign key properties to the ‘Address’ Entity checkbox to add foreign key properties to the non-primary key endpoint. In this example, checking this box would add a PersonId to the address table. It is important to note that the key that gets added will be a concatenation of the primary key entity name and the primary key itself. If the key was left as simply Id, the foreign key field would be PersonId. If I set the primary key field to be PersonId, the foreign key field would be PersonPersonId.

Section 4

Inserting Entities

Now that you have a model, you can start putting some data in it. To create a new person, you must create a new person object. Once you have created the new object, simply add it to the context and then call SaveChanges on the context. In this example, there is address data to add to the person object before saving.


using(EFRefCardEntities context = new EFRefCardEntities())
{
        Person person = new Person();
        person.FirstName = “Dane”;
        person.LastName = “Morgridge”;
        person.DateOfBirth = DateTime.Now;

        Address address = new Address();
        address.Street = “123 Somewhere”;
        address.City = “Philadelphia”;
        address.State = “PA”;
        address.Zip = “12345”;

        person.Addresses.Add(address);

        context.People.AddObject(person);
        context.SaveChanges();
}

Adding the address object to the Addresses collection on the person object will also add the address to the context. When SaveChanges is called, the context will inspect any objects it is tracking and decide what steps to take and what order to do them in. In this example, there are two entities that are new and they have to be submitted in the proper order. Since Address is dependent on Person because of a foreign key constraint, the person must be added first. The EF ensures that they are added in the proper order.

The SaveChanges call is automatically wrapped in a transaction. As such, if anything fails on insert, the whole thing will roll back and an exception will be thrown. To generate your database, right click on the design surface and select Generate Database From Model.

A dialog box opens where you can select the database location just as you did when adding from an existing database. Click Next to view a preview of the SQL file that will be generated. Click Finish to generate the file.

It is important to note that the generated SQL file contains create statements only and does not look at the current state of your database to determine what updates need to be done. It is recommended that you run this file against a compare database and then use a SQL compare tool to sync the schemas. You can use the same database name, but add ” _Compare” to the end. Doing this ensures that you don’t inadvertently erase your test data.

Section 5

Querying Entities

Once you have data in the database, you can get the data back out. The EF can be queried using either LINQ or Entity SQL. You will need to have some familiarity with LINQ and the various available options to take advantage of what the EF has to offer. Entity SQL is very similar to TSQL, but it is executed against the model rather than the database. There are resources online and in print to help you should you need it.

Below is a basic LINQ query that will give you all of the person data.


using (EFRefCardEntities context = new EFRefCardEntities())
{
        var people = from p in context.People
        select p;

        foreach (var person in people)
        {

          foreach (var address in person.Addresses)
          {

        }
  }
}

After you query the data, do a foreach through the people collection and then through the addresses for each person to show the navigation.

The actual query can be written two ways:


var people = from p in context.People
                select p;

or


var people = context.People;

The second option is much cleaner; and unless you need to do joins or any other special LINQ operations, the second method is recommended.

Lazy Loading, Eager Loading, and Explicit Loading

EF 4.0 supports lazy loading by default. Be aware that lazy loading will create more database connections than you may expect. For example, if there were two people in the database, the above code would call the database three times—once for the initial call and once for each person when the Addresses collection gets checked. If a navigation property hasn’t been filled when it is accessed, the EF will make a call out to the database to see if there is any data.

You can turn lazy loading off in the properties window for global options. You can also turn off lazy loading on a call-by-call basis by setting the ContextOptions.LazyLoadingEnabled property to false.

If performance is not an issue, you can leave lazy loading enabled since it will make development quicker by not having to request the additional data. If you need to control the database hits, you have a couple of options. If you plan on serializing the classes, you will want to turn lazy loading off.

To get at association data without using lazy loading, you can use eager loading and explicit loading. With eager loading, you can load the data up front in one trip to the database. With explicit loading, you can load associated data on demand.

To use eager loading, you can use the Include method:


var people = context.People.Include(“Addresses”);

This will cause one round trip to the database and get all person and all address data at once. This will use more bandwidth upfront, but it will be limited to one round trip.

Explicit loading is similar to lazy loading, but you can control when the navigation properties get loaded:


var people = context.People;

foreach (var person in people)
{
        person.Addresses.Load();
        foreach (var address in person.Addresses)
        {

        }
}

Calling Load on the navigation properties will make additional trips to the database to fill the properties, but you can control when it happens.

You can use a mix of all three methods depending on the requirements of the application.

Section 6

Updating Entities

Updating entities is a very simple process. Once you query an entity or a collection of entities, you can make any changes you wish. Calling SaveChanges on the ObjectContext will persist any updates on any entity that it is tracking.


using(EFRefCardEntities context = new EFRefCardEntities())
{
        var people = context.People.Include(“Addresses”);

        foreach (var person in people)
        {
          person.DateOfBirth = DateTime.Now.AddYears(-30);
        }

context.SaveChanges();
}

The above code will update the DateOfBirth to the current time minus 30 years, and the SaveChanges call will persist those changes down to the database.

Any change to any entity that is being tracked by the ObjectContext will be evaluated on the SaveChanges call. This is part of the reason that you should use a single ObjectContext for a small logical set of operations. The more objects being evaluated, the longer this process will take and the more resources it will consume.

Section 7

Deleting Entities

To delete an entity, call DeleteObject on the ObjectSet:


context.People.DeleteObject(person);
context.SaveChanges();

To delete an object, it must be loaded into the ObjectContext. The SaveChanges call will issue the delete statement to the database. Because of the requirement of an object to be tracked by the ObjectContext, you will likely want to use a stored procedure if you are going to delete a lot of objects. While this can be done using the EF, it will be much simpler in a stored procedure.

Be careful when deleting an entity that is part of an IEnumerable or Ienumberable<T> collection. This will throw an exception as you are modifying the collection while it is being enumerated. Pushing your collection to an array will easily get around this.

Section 8

POCO Support

Basic POCO Support with Entity Framework 4.0

The default classes that come with the EF are tied to the framework itself, and the entities themselves inherit System.Data.Objects.DataClasses.EntityObject. Luckily, EF 4.0 provides Plain Old Clr Object (POCO) support. This allows you to build data layers following the persistence ignorance concept. While this is important for many reasons, one of the most significant reasons is that it allows greater testability with your code.

In a nutshell, POCO support allows you to use the POCO objects with the ObjectContext without having to make great changes in your code. In most cases, you can switch from the normal entity generation scheme to POCO with no code changes. However, a few things are missing—specifically, explicit loading. The Load method doesn’t exist on the POCO collections, but you can use ObjectContext.LoadProperty to achieve the same result.

Lazy loading works through the use of proxies. By default, with POCO, there is a proxy object that gets generated for each POCO object that is used when interacting with the ObjectContext. The proxy object sits between the POCO object and the ObjectContext. To the ObjectContext, the POCO object is a real EF object.

It is important to note that this proxy will get in the way of serialization. Therefore, it is important to turn the proxy off. Simply turning off lazy loading will not do the trick. You can turn it off using the ContextOptions.ProxyCreationEnabled property and setting it to false.

Using POCO Support

You have a couple of options if you want to use POCO with EF 4.0. You can hand code the objects, or you can use a Text Template Transformation Toolkit (T4) to generate them for you from your model.

Using the T4 templates is the easiest method. You can download a POCO template from the Visual Studio Gallery, or the Visual Studio Extension Manager. If you search on visualstudogallery.com for the “ADO.NET POCO Entity

Generator”, you will find four (at the time of this writing): two for C# and two for Visual Basic. Each template has a website version if you use the file system-based website feature of Visual Studio. Use the other templates if you are using actual project files. No matter which you use, the process is the same. Open your .edmx file, right click on the design surface, and select “Add Code Generation Item”.

Select either the ADO.NET POCO Entity Generator and name the file. It is recommended that you name it the same as the .edmx file to keep it with the model in the project.

Window 3

Click Add. Your model is now converted to use POCO instead of the standard EF objects.

Another reason to use the T4 templates is that if you make a change to the model, it will be reflected automatically by the POCO template. If you build the files by hand, you will have to update them yourself, which could be a time-consuming process if you have a large evolving system.

Now that your project is converted to POCO, you shouldn’t have to make any changes to your project unless you are using anything that requires the full EF objects.

You can now begin to build your persistence ignorant data layer and keep good clean separation of concerns in your application. This will also make it easier for you to implement a repository pattern for your data access layer.

I maintain an open source project at CodePlex to aid you in building a data access layer using POCO with Entity Framework 4. It is an additional T4 template to provide the groundwork for you to build your data layer on. It can be downloaded at http://efrepository.codeplex.com.

Code First Development

In addition to using T4 templates, you can use the newest features of Entity Framework: Code First.

Code First development gives you the ability to define everything in code without having to use a model in an .edmx file. You can still use the same ObjectContext and POCO class concepts, but the model is inferred at runtime. Code First is not baked into EF 4.0 and Visual Studio 2010; rather, it is an out-of-band release targeted for the first quarter of 2011. The final release will be announced on the ADO.NET team blog.

Section 9

Conclusion & Resources

ADO.NET Entity Framework 4.0 is a powerful Object Relational Mapping tool and is the Microsoft data access strategy moving forward. If you are working with data in your applications, it is well worth taking a solid look.

To keep up with everything going on with the EF, watch the ADO. NET Team Blog.

The MSDN forums also have valuable information:
 http://social.msdn.microsoft.com/forums/en-US/adodotnetentityframework/threads/

Like This Refcard? Read More From DZone

related article thumbnail

DZone Article

related refcard thumbnail

Free DZone Refcard

ABOUT US

  • About DZone
  • Send feedback
  • Careers
  • Sitemap

ADVERTISE

  • Advertise with DZone

CONTRIBUTE ON DZONE

  • Article Submission Guidelines
  • Become a Contributor
  • Visit the Writers' Zone

LEGAL

  • Terms of Service
  • Privacy Policy

CONTACT US

  • 600 Park Offices Drive
  • Suite 300
  • Durham, NC 27709
  • support@dzone.com
  • +1 (919) 678-0300

Let's be friends:

{{ parent.title || parent.header.title}}

{{ parent.tldr }}

{{ parent.linkDescription }}

{{ parent.urlSource.name }}
by
CORE
· {{ parent.articleDate | date:'MMM. dd, yyyy' }} {{ parent.linkDate | date:'MMM. dd, yyyy' }}
Tweet
{{ parent.views }} ViewsClicks
  • Edit
  • Delete
  • {{ parent.isLocked ? 'Enable' : 'Disable' }} comments
  • {{ parent.isLimited ? 'Remove comment limits' : 'Enable moderated comments' }}