DZone
Thanks for visiting DZone today,
Edit Profile
  • Manage Email Subscriptions
  • How to Post to DZone
  • Article Submission Guidelines
Sign Out View Profile
  • Post an Article
  • Manage My Drafts
Over 2 million developers have joined DZone.
Log In / Join
Refcards Trend Reports Events Over 2 million developers have joined DZone. Join Today! Thanks for visiting DZone today,
Edit Profile Manage Email Subscriptions Moderation Admin Console How to Post to DZone Article Submission Guidelines
View Profile
Sign Out
Refcards
Trend Reports
Events
Zones
Culture and Methodologies Agile Career Development Methodologies Team Management
Data Engineering AI/ML Big Data Data Databases IoT
Software Design and Architecture Cloud Architecture Containers Integration Microservices Performance Security
Coding Frameworks Java JavaScript Languages Tools
Testing, Deployment, and Maintenance Deployment DevOps and CI/CD Maintenance Monitoring and Observability Testing, Tools, and Frameworks
Partner Zones AWS Cloud
by AWS Developer Relations
Culture and Methodologies
Agile Career Development Methodologies Team Management
Data Engineering
AI/ML Big Data Data Databases IoT
Software Design and Architecture
Cloud Architecture Containers Integration Microservices Performance Security
Coding
Frameworks Java JavaScript Languages Tools
Testing, Deployment, and Maintenance
Deployment DevOps and CI/CD Maintenance Monitoring and Observability Testing, Tools, and Frameworks
Partner Zones
AWS Cloud
by AWS Developer Relations
11 Monitoring and Observability Tools for 2023
Learn more
  1. DZone
  2. Refcards
  3. Getting Started with Spring-DM
refcard cover
Refcard #057

Getting Started with Spring-DM

Bringing Spring and OSGi Together

Shows you how to use Spring-DM to wire together OSGi services to build highly modular and dynamic applications.

Free PDF for Easy Reference
refcard cover

Written By

author avatar Craig Walls
Principal Consultant, Improving Enterprises
Table of Contents
► About Spring-DM ► Introducing Spring-DM ► Installing Spring-DM ► Publishing Services ► Consuming Services ► Testing Bundles ► References
Section 1

About Spring-DM

Spring is a framework that promotes development of looselycoupled/ highly-cohesive objects through dependency injection and interface-oriented design. OSGi is a framework specification that promotes development of loosely-coupled/ highly-cohesive application modules through services and interface-oriented design. Seems like a match made in heaven! Spring Dynamic Modules (Spring-DM) brings Spring and OSGi together to enable a declarative service model for OSGi that leverages Spring’s power of dependency injection. This reference card will be your resource for working with Spring- DM to wire together OSGi services and ultimately building modular applications.

You may be interested to know that Spring-DM is the basis for the SpringSource dm Server, a next-generation application server that embraces modularity through OSGi. What’s more, the upcoming OSGi R4.2 specification includes a component model known as the OSGi Blueprint Services that is heavily influenced by Spring-DM.

Section 2

Introducing Spring-DM

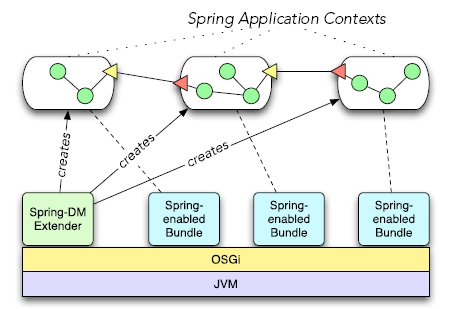
The star player of Spring-DM is a bundle known as the Spring- DM extender. The Spring-DM extender watches for bundles to be installed and inspects them to see if they are Springenabled (that is, if they contain a Spring application context definition file). When it finds a Spring-enabled bundle, the extender will create a Spring application context for the bundle.

Spring Application Contexts

Spring-DM also provides a Spring configuration namespace that enables you to declare and publish Spring beans as OSGi services and to consume OSGi services as if they were just beans in a Spring application context. This declarative model effectively eliminates the need to work with the OSGi API directly.

Section 3

Installing Spring-DM

One of the nice things about Spring-DM is that you do not need to include it in the classpath of your OSGi bundles or even reference it from those bundles. Installing Spring-DM involves two parts:

  1. Installing the Spring-DM and supporting bundles in your OSGi framework
  2. Adding the Spring-DM configuration namespace to your bundle’s Spring configuration XML files

You can download Spring-DM from
http://www.springframework.org/osgi. The distribution comes complete with everything you need to work with Spring- DM, including the Spring-DM extender bundle and all of its dependency bundles.

Installing the Spring-DM Extender Bundles

There are several means by which you can install bundles into an OSGi framework, depending on the OSGi framework and any add-ons or tools you may be using. But the most basic way is to use the “install” command that is available in most OSGi framework shells. For example, to install the Spring- DM extender bundle and the supporting Spring-DM bundles (assuming that you’ve unzipped the Spring-DM distribution in / spring-dm-1.2.0):


osgi> install file:///spring-dm-1.2.0/dist/spring-osgi-core-
   1.2.0.jar
osgi> install file:///spring-dm-1.2.0/dist/spring-osgi-extender-
   1.2.0.jar
osgi> install file:///spring-dm-1.2.0/dist/spring-osgi-io-
   1.2.0.jar

Spring-DM depends on the Spring framework, so you’ll also need to install several other Spring bundles:


osgi> install file:///spring-dm-1.2.0/lib/spring-aop-2.5.6.A.jar
osgi> install file:///spring-dm-1.2.0/lib/spring-context-
    2.5.6.A.jar
osgi> install file:///spring-dm-1.2.0/lib/spring-core-2.5.6.A.jar
osgi> install file:///spring-dm-1.2.0/lib/spring-beans-2.5.6.A.jar

Finally, you’ll also need to install several other supporting bundles that Spring and Spring-DM depend on:


osgi> install file:///spring-dm-1.2.0/lib/com.springsource.net.
   sf.cglib-2.1.3.jar
osgi> install file:///spring-dm-1.2.0/lib/com.springsource.org.
   aopalliance-1.0.0.jar
osgi> install file:///spring-dm-1.2.0/lib/com.springsource.slf4j.
   api-1.5.0.jar
osgi> install file:///spring-dm-1.2.0/lib/com.springsource.slf4j.
   log4j-1.5.0.jar
osgi> install file:///spring-dm-1.2.0/lib/com.springsource.slf4j.
   org.apache.commons.logging-1.5.0.jar
osgi> install file:///spring-dm-1.2.0/lib/log4j.osgi-1.2.15-
   SNAPSHOT.jar

Hot Tip

Use tools to help install bundles Installing bundles using the “install” command should work with almost any OSGi framework, but it is also quite a manual process. Pax Runner (http:// paxrunner.ops4j.org) is an OSGi framework launcher that takes a lot of the tedium out of installing bundles. Just use Pax Runner’s “spring dm” profile: % pax-run.sh --profiles=spring.dm

The Spring-DM Configuration Namespace

Schema URI:

http://www.springframework.org/schema/osgi

Schema XSD:

http://www.springframework.org/schema/osgi/spring-osgi.xsd

When it comes to declaring services and service consumers in Spring-DM, you’ll use Spring-DM’s core namespace. To do that, you’ll need to include the namespace in the XML file.


<?xml version=”1.0” encoding=”UTF-8”?>
<beans xmlns=”http://www.springframework.org/schema/beans”
xmlns:xsi=”http://www.w3.org/2001/XMLSchema-instance”
xmlns:osgi=”http://www.springframework.org/schema/osgi”
xsi:schemaLocation=”http://www.springframework.org/
schema/beans
    http://www.springframework.org/schema/beans/
spring-beans.xsd
   http://www.springframework.org/schema/osgi
     http://www.springframework.org/schema/
osgi/spring-osgi.xsd”>
...
</beans>

Spring’s “beans” namespace is the default namespace, but if you know that most or all of the elements in the Spring configuration file will be from the Spring-DM namespace, you can make it the default namespace:

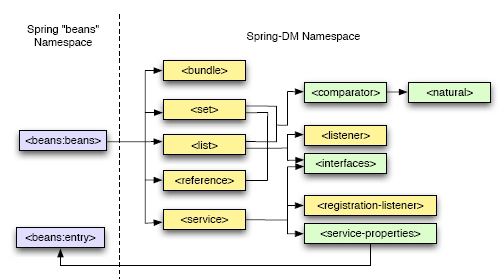
“Spring

Section 4

Publishing Services

To demonstrate Spring-DM’s capabilities, we’re going to create a few OSGi services that translate English text into some other language. All of these services will implement the following Translator interface:


package com.habuma.translator;
public interface Translator
   {
String translate(String text);
}

The first service we’ll work with is one that translates English into Pig Latin. It’s implementation looks something like this:


package com.habuma.translator.piglatin;
import com.habuma.translator.Translator;
public class PigLatinTranslator implements Translator {
private final String VOWELS = “AEIOUaeiou”;
public String translate(String text) {
  // actual implementation left out for brevity
}
}

If we were working with basic OSGi (that is, without Spring- DM), we’d publish this service to the OSGi service registry using the OSGi API, perhaps in a bundle activator’s start() method:


public void start(BundleContext context) throws Exception {
context.registerService(Translator.class.getName(),
new PigLatinTranslator(), null);
}

Although the native OSGi approach will work fine, it requires us to work programmatically with the OSGi API. Instead, we’ll publish services declaratively using Spring-DM. The first step: Create a Spring context definition file that declares the PigLatinTranslator as a Spring bean:


<?xml version=”1.0” encoding=”UTF-8”?>
<beans xmlns=”http://www.springframework.org/schema/beans”
xmlns:xsi=”http://www.w3.org/2001/XMLSchema-instance”
xsi:schemaLocation=”http://www.springframework.org/
schema/beans
  http://www.springframework.org/schema/beans/springbeans.
xsd”>
  <bean id=”pigLatinTranslator”
    class=”com.habuma.translator.piglatin.PigLatinTranslator” />
</beans>

Hot Tip

Overriding the context configuration location By default, the Spring-DM extender looks for all XML files located in a bundle’s META-INF/spring folder and assumes that they’re all Spring context definition files that are to be used to create a Spring application context for the bundle; however, if you’d like to put your context definition files elsewhere in the bundle, use the Spring-Context: header in the META-INF/ MANIFEST.MF file.
For example, if you’d rather place your Spring configuration files in a directory called “spring-config” at the root of the bundle, add the following entry to your bundle’s manifest: Spring-Context: spring-config/*.xml

This Spring context file can be named anything, but it should be placed in the Pig Latin translator bundle’s META-INF/ spring directory. When the bundle is started in an OSGi framework, the Spring-DM extender will look for Spring context configuration files in that directory and use them to create a Spring application context for the bundle.

Publishing a Simple OSGi Service

By itself the Spring context we’ve created only creates a bean in the Spring application context. It’s not yet an OSGi service. To publish it as an OSGi service, we’ll create another Spring context definition file that uses the Spring-DM namespace:


<<?xml version=”1.0” encoding=”UTF-8”?>
<<beans:beans xmlns:beans=”http://www.springframework.org/schema/
beans”
xmlns:xsi=”http://www.w3.org/2001/XMLSchema-instance”
xmlns=”http://www.springframework.org/schema/osgi”
xsi:schemaLocation=”http://www.springframework.org/
schema/beans
http://www.springframework.org/schema/beans/
spring-beans.xsd
  http://www.springframework.org/schema/osgi
http://www.springframework.org/schema/
osgi/spring-osgi.xsd”>
   <<service ref=”pigLatinTranslator”
  interface=”com.habuma.translator.Translator” />
<</beans:beans>

Hot Tip

Don’t mix your Spring and OSGi contexts Although you can certainly define all of your bundle’s Spring beans and OSGi services in a single Spring context definition file, it’s best to keep them in separate files (all in META-INF/spring). By keeping the OSGi-specific declarations out of the normal Spring context definition, you’ll be able to use the OSGi-free context to do non-OSGi integration tests of your beans.

This new Spring context file uses Spring-DM’s element to publish the bean whose ID is “pigLatinTranslator” in the OSGi service registry. The ref attribute refers to the Spring bean in the other context definition file. The interface attribute identifies the interface under which the service will be available in the OSGi service registry.

Publishing a Service Under Multiple Interfaces

Let’s suppose that the PigLatinTranslator class were to implement another interface, perhaps one called TextProcessor. And let’s say that we want to publish the service under both the Translator interface and the TextProcessor interface. In that case, you can use the element to identify the interfaces for the service:


<service ref=”pigLatinTranslator”>
  <interfaces>
    <beans:value>com.habuma.translator.Translator</beans:value>
    <beans:value>com.habuma.text.TextProcessor</beans:value>
  </interfaces>
</service>

Auto-Selecting Service Interfaces

Instead of explicitly specifying the interfaces for a service, you can also let Spring-DM figure out which interfaces to use by specifying the auto-export attribute:


<service ref=”pigLatinTranslator”
       auto-export=”interfaces” />

By setting auto-export to “interfaces”, it tells Spring-DM to publish the service under all interfaces that the implementation class implements. You can also set auto-export to “all-classes” to publish the service under all interfaces and classes for the service or “class-hierarchy.”

Publishing a Service with Properties

It’s also possible to publish a service with properties to qualify that service. These properties can later be used to help refine the selection of services available to a consumer. For example, let’s say that we want to qualify Translator services by the language that they translate to:


<rvice ref=”pigLatinTranslator”
      interface=”com.habuma.translator.Translator”>
<service-properties>
   <beans:entry key=”translator.language” value=”Pig Latin” />
 </service-properties>
</service>

The <service-properties> element can contain one or more <entry> elements from the “beans” namespace. In this case, we’ve added a property named “translator.language” with a value of “Pig Latin”. Later, we’ll use this property to help select this particular service from among a selection of services that all implement Translator.

Section 5

Consuming Services

Now that we’ve seen how to publish a service in the OSGi service registry, let’s look at how we can use Spring-DM to consume that service. To get started, we’ll create a simple client class:


package com.habuma.translator.client;
import java.util.List;
import com.habuma.translator.Translator;
public class TranslatorClient {
  private static String TEXT = “Be very very quiet. I’m hunting
rabbits!”;
  public void go() {
     System.out.println(“ TRANSLATED: “ +
        translator.translate(TEXT));
  }
  private Translator translator;
  public void setTranslator(Translator translator) {
    this.translator = translator;
  }
}

TranslatorClient is a simple POJO that is injected with a Translator and uses that Translator in its go() method to translate some text. We’ll declare it as a Spring bean like this:


<?xml version=”1.0” encoding=”UTF-8”?>
<beans xmlns=”http://www.springframework.org/schema/beans”
xmlns:xsi=”http://www.w3.org/2001/XMLSchema-instance”
xsi:schemaLocation=”http://www.springframework.org/
schema/beans
http://www.springframework.org/schema/beans/springbeans.
xsd”>
  <bean class=”com.habuma.translator.client.TranslatorClient”
     init-method=”go”>
   <property name=”translator” ref=”translator” />
  </bean>
</beans>

As with the service’s Spring context declaration, the name of this Spring context definition can be named anything, but it should be placed in the client bundle’s META-INF/spring folder so that the Spring-DM extender will find it.

The bean is declared with the init-method attribute set to call the go() method when the bean is created. And we use the <property> element to inject the bean’s translator property with a reference to a bean whose ID is “translator”.

The big question here is: Where does the “translator” bean come from?

Simple Service Consumption

Spring-DM’s <reference> element mirrors the <service> element. Rather than publishing a service, however, <reference> retrieves a service from the OSGi service registry. The simplest way to consume a Translator service is as follows:


<reference id=”translator”
interface=”com.habuma.translator.Translator” />

When the Spring-DM extender creates a Spring context for the client bundle, it will create a bean with an ID of “translator” that is a proxy to the service it finds in the service registry. With that id attribute and interface, it is quite suitable for wiring into the client bean’s translator property.

Setting a Service Timeout

In a dynamic environment like OSGi, services can come and go. When the client bundle starts up, there may not be a Translator service available for consumption. If it’s not available, then Spring-DM will wait up to 5 minutes for the service to become available before giving up and throwing an exception.

But it’s possible to override the default timeout using the <reference> element’s timeout attribute. For example, to set the timeout to 1 minute instead of 5 minutes:


<reference id=”translator”
interface=”com.habuma.translator.Translator”
timeout=”60000” />

Notice that the timeout attribute is specified in milliseconds, so 60000 indicates 60 seconds or 1 minute.

Optional Service References

Another way to deal with the dynamic nature of OSGi services is to specify that a service reference is optional. By default, the cardinality of a reference to a service is “1..1”, meaning that the service must be found within the timeout period or else an exception will be thrown. But you can specify an optional reference by setting the cardinality to “0..1”:


<reference id=”translator”
interface=”com.habuma.translator.Translator”
cardinality=”0..1” />

Filtering Services

Imagine that we have two or more Translator services published in the OSGi service registry. Let’s say that in addition to the Pig Latin translator there’s also another Translator service that translates text into Elmer Fudd speak. How can we ensure that our client gets the Pig Latin service when another implementations may be available?

Earlier, we saw how to set a property on a service when it’s published. Now we’ll use that property to filter the selection of services found on the consumer side:


<reference id=”translator”
interface=”com.habuma.translator.Translator”
filter=”(translator.language=Pig Latin)” />

The filter attribute lets us specify properties that will help refine the selection of matching services. In this case, we’re only interested in a service that has its “translator.language” property set to “Pig Latin”.

Consuming Multiple Services

But why choose? What if we wanted to consume all matching services? Instead of pin-pointing a specific service, we can use Spring-DM’s <list> element to consume a collection of matching services:


<list id=”translators”
interface=”com.habuma.translator.Translator” />

The Spring-DM extender will create a list of matching services that can be injected into a client bean collection property such as this one:


private List<Translator> translators;
public void setTranslators(List<Translator> translators) {
  this.translators = translators;
}

Optionally, you can use Spring-DM’s <set> element to create a set of matching services:


<set id=”translators”
   interface=”com.habuma.translator.Translator” />

The <list> and <set> elements share many of the same attributes with <reference>. For example, to consume a set of all Translator services filtered by a specific property:


<set id=”translators”
interface=”com.habuma.translator.Translator”
filter=”(translator.language=Elmer Fudd)” />
Section 6

Testing Bundles

Hopefully, you’re in the habit of writing unit tests for your code. If so, that practice should extend to the code that is contained within your OSGi bundles. Because Spring-DM encourages POJO-based OSGi development, you can continue to write unit-tests for the classes that define and consume OSGi services just like you would for any other non-OSGi code.

But it’s also important to write tests that exercise your OSGi services as they’ll be used when deployed in an OSGi container. To accommodate in-OSGi integration testing of bundles, Spring-DM provides AbstractConfigurableBundleCreatorTests, a JUnit 3 base test class from which you can write your bundle tests.

What’s fascinating is how tests based on AbstractConfigurableBundleCreatorTests work. When the test is run, it starts up an OSGi framework implementation (Equinox by default) and installs one or more bundles into the framework. Finally, it wraps itself in an on-the-fly bundle and installs itself into the OSGi framework so that it can test bundles as an insider.

Writing a Basic OSGi Test

To illustrate, let’s write a simple test that loads our Translator interface bundle and the Pig Latin implementation bundle:


package com.habuma.translator.test;
import org.osgi.framework.ServiceReference;
import org.springframework.osgi.test.
AbstractConfigurableBundleCreatorTests;

import com.habuma.translator.Translator;
public class PigLatinTranslatorBundleTest
      extends AbstractConfigurableBundleCreatorTests {
  @Override
  protected String[] getTestBundlesNames() {
     return new String[] {
“com.habuma.translator, interface, 1.0.0”,
“com.habuma.translator, pig-latin, 1.0.0”
      };
  }
  public void testOsgiPlatformStarts() {
    assertNotNull(bundleContext);
  }
}

The getTestBundleNames() method returns an array of Strings where each entry represents a bundle that should be installed into the OSGi framework for the test. The format of each entry is a comma-separated set of values that identify the bundle by its Maven group ID, artifact ID, and version number.

So far, our test has a single test method, testOsgiPlatformStarts(). All this method does is test that the OSGi framework has started by asserting that bundleContext (inherited from AbstractConfigurableBundleCreatorTests) is not null.

Testing OSGi Service References

A more interesting test we could write is one that uses the bundle context to lookup a reference to the Translator service and assert that it meets our expectations:


public void testServiceReferenceExists() {
  ServiceReference serviceReference =
    bundleContext.getServiceReference(Translator.class.
getName());
assertNotNull(serviceReference);
assertEquals(“Pig Latin”,
       serviceReference.getProperty(“translator.language”));
}

Here we retrieve a ServiceReference from the bundle context and assert that it isn’t null. This means that some implementation of the Translator service has been published in the OSGi service registry. Then, it examines the properties of the service reference and asserts that the “translator.language” property has been set to “Pig Latin”, as we’d expect from how we published the service earlier.

Testing OSGi Services

One more thing we could test is that the Translator service does what we’d expect it to do. Certainly, this kind of test usually belongs in a unit test. But it’s still good to throw a smoke test its way to make sure that we’re getting the service we’re expecting.

We could use the ServiceReference to lookup the service. But, we can avoid any additional work with the OSGi API by having the Translator service wired directly into our test class. First, let’s add a Translator property and setter method to our test class


private Translator translator;
public void setTranslator(Translator translator) {
  this.translator = translator;
}

When the test is run, Spring will attempt to autowire the property with a bean from its own Spring application context. But we haven’t defined a Spring application context for the test yet. Let’s do that now:


<?xml version=”1.0” encoding=”UTF-8”?>
<beans:beans xmlns:beans=”http://www.springframework.org/schema/
beans”
xmlns:xsi=”http://www.w3.org/2001/XMLSchema-instance”
xmlns=”http://www.springframework.org/schema/osgi”
   xsi:schemaLocation=”http://www.springframework.org/schema/
beans
      http://www.springframework.org/schema/beans/spring-beans.
xsd
    http://www.springframework.org/schema/osgi
    http://www.springframework.org/schema/osgi/spring-osgi.xsd”>
  <reference id=”translator”
    interface=”com.habuma.translator.Translator” />
</beans:beans>

You’ll recognize that this Spring context definition looks a lot like the one we created for the service consumer. In fact, our test class will ultimately be a consumer of the Translator service. We just have one more thing to do before we can test the service—we’ll need to override the getConfigLocations() method to tell the test where it can find the context definition file:


@Override
protected String[] getConfigLocations() {
   return new String[] { “bundle-test-context.xml” };
}

Now we can write our test method:


public void testTranslatorService() {
assertNotNull(translator);
assertEquals(“id-DAY is-thAY ork-wAY”,
       translator.translate(“Did this work”));
}

This method assumes that by the time it is invoked, the translator property has been set. It first asserts that it is not null and then throws a simple test String at it to test that the service does what we expect.

Changing the Tested OSGi Framework

By default, Spring-DM tests are run within Equinox. But you can change them to run within another OSGi framework implementation such as Apache Felix or Knopflerfish by overriding the getConfigLocations() method. For example, to run the test within Apache Felix:


@Override
  protected String getPlatformName() {
    return Platforms.FELIX;
}

Or for Knoplerfish:


@Override
protected String getPlatformName() {
  return Platforms.KNOPFLERFISH;
}

Providing a Custom Manifest

When a Spring-DM test gets wrapped up in an on-the-fly bundle, a manifest will be automatically generated for it. But if you’d like to provide a custom manifest. To provide a custom manifest for the on-the-fly bundle, all you need to do is override the getManifestLocation(). For example:


protected String getManifestLocation() {
  return “classpath:com.habuma.translator.Translator.MF”;
}

Be aware, however, that if you provide a custom manifest, you must include a few things in that manifest to make Spring-DM testing work. First, you’ll need to specify a bundle activator:


Bundle-Activator: org.springframework.osgi.test.JUnitTestActivator

And you’ll need to import JUnit and Spring-DM packages:


Import-Package: junit.framework,
  org.osgi.framework,
  org.apache.commons.logging,
  org.springframework.util,
  org.springframework.osgi.service,
  org.springframework.osgi.util,
  org.springframework.osgi.test,
  org.springframework.context
Section 7

References

Example Source Code:

http://www.habuma.com/refcard/spring-dm/translator.zip

Spring-DM Homepage:

http://www.springframework.org/osgi

OSGi Alliance:

http://www.osgi.org

Modular Java on Twitter:

http://twitter.com/modularjava

Craig’s Modular Java Blog:


http://www.modularjava.com


Craig’s Spring Blog:

http://www.springinaction.com

Craig’s Blog: http://www.springinaction.com

Recommended Book

Spring in action

Newcomers will find a thorough introduction to the framework, while experienced Drupal developers will learn best practices for building powerful websites. With Using Drupal, you’ll find concrete and creative solutions for developing the exact community website you have in mind.


Recommended Book

Modular Java

Modular Java is filled with tips and tricks that will make you a more proficient OSGi and Spring-DM developer. Equipped with the know-how gained from this book, you’ll be able to develop applications that are more robust and agile.

BUY NOW

books.dzone.com/books/zendframework

Like This Refcard? Read More From DZone

related article thumbnail

DZone Article

related refcard thumbnail

Free DZone Refcard

ABOUT US

  • About DZone
  • Send feedback
  • Careers
  • Sitemap

ADVERTISE

  • Advertise with DZone

CONTRIBUTE ON DZONE

  • Article Submission Guidelines
  • Become a Contributor
  • Visit the Writers' Zone

LEGAL

  • Terms of Service
  • Privacy Policy

CONTACT US

  • 600 Park Offices Drive
  • Suite 300
  • Durham, NC 27709
  • support@dzone.com
  • +1 (919) 678-0300

Let's be friends:

{{ parent.title || parent.header.title}}

{{ parent.tldr }}

{{ parent.linkDescription }}

{{ parent.urlSource.name }}
by
CORE
· {{ parent.articleDate | date:'MMM. dd, yyyy' }} {{ parent.linkDate | date:'MMM. dd, yyyy' }}
Tweet
{{ parent.views }} ViewsClicks
  • Edit
  • Delete
  • {{ parent.isLocked ? 'Enable' : 'Disable' }} comments
  • {{ parent.isLimited ? 'Remove comment limits' : 'Enable moderated comments' }}