A Look at Perspective Transform and Correction With Core Image
We all cut and paste images for all kinds of reasons. Here's one way to make those images look good in a 3D world.
Join the DZone community and get the full member experience.
Join For FreeHidden away in Core Image's Geometry Adjustment category are a set of perspective related filters that change the geometry of flat images to simulate them being viewed in 3D space. If you work in architecture or out-of-home advertising, these filters, used in conjunction with Core Image's rectangle detector, are perfect for mapping images onto 3D surfaces. Alternatively, the filters can synthesise the effects of a perspective control lens.
Project Assets
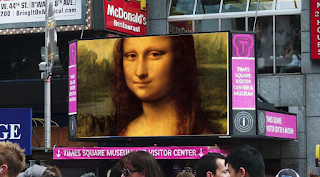
This post comes with a companion Swift playground which is available here. The two assets we'll use are this picture of a billboard:
...and this picture of The Mona Lisa:
The assets are declared as:
let monaLisa = CIImage(image: UIImage(named: "monalisa.jpg")!)!

let backgroundImage = CIImage(image: UIImage(named: "background.jpg")!)!
Detecting the Target Rectangle
Our first task is to find the co-ordinates of the corners of the white rectangle and for that, we'll use a CIDetector. The detector needs a core image context and will return a CIRectangleFeature. In real life, there's no guarantee that it will not return nil, in the playground, with known assets, we can live life on the edge and unwrap it with a !.
let ciContext =  CIContext()

    let detector = CIDetector(ofType: CIDetectorTypeRectangle,

        context: ciContext,

        options: [CIDetectorAccuracy: CIDetectorAccuracyHigh])

    let rect = detector.featuresInImage(backgroundImage).first as! CIRectangleFeature
Performing the Perspective Transform
Now we have the four points that define the corners of the white billboard, we can apply those, along with the background input image, to a perspective transform filter. The perspective transform moves an image's original corners to a new set of coordinates and maps the pixels of the image accordingly:
 let perspectiveTransform = CIFilter(name: "CIPerspectiveTransform")!

    perspectiveTransform.setValue(CIVector(CGPoint:rect.topLeft),

        forKey: "inputTopLeft")

    perspectiveTransform.setValue(CIVector(CGPoint:rect.topRight),

        forKey: "inputTopRight")

    perspectiveTransform.setValue(CIVector(CGPoint:rect.bottomRight),

        forKey: "inputBottomRight")

    perspectiveTransform.setValue(CIVector(CGPoint:rect.bottomLeft),

        forKey: "inputBottomLeft")

    perspectiveTransform.setValue(monaLisa,

             forKey: kCIInputImageKey)
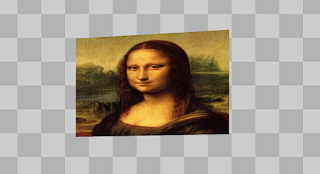
The output image of the perspective transform filter now looks like this:
We can now use a source atop compositing filter to simply composite the perspective transformed Mona Lisa over the background:
    let composite = CIFilter(name: "CISourceAtopCompositing")!

    composite.setValue(backgroundImage,

        forKey: kCIInputBackgroundImageKey)

    composite.setValue(perspectiveTransform.outputImage!,

        forKey: kCIInputImageKey)
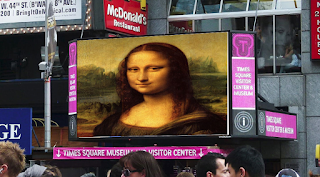
The result is OK, but the aspect ratio of the transformed image is wrong and The Mona Lisa is stretched:
Fixing Aspect Ratio with Perspective Correction
To fix the aspect ratio, we'll use Core Image's perspective correction filter. This filter works in the opposite way to a perspective transform: it converts four points (which typically map to the corners of an image subject to perspective distortion) and converts them to a flat, two dimensional rectangle.
We'll pass in the corner coordinates of the white billboard to a perspective correction filter which will return a version of the Mona Lisa cropped to the aspect ration of the billboard if we were looking at it head on:
  let perspectiveCorrection = CIFilter(name: "CIPerspectiveCorrection")!

    perspectiveCorrection.setValue(CIVector(CGPoint:rect.topLeft),

        forKey: "inputTopLeft")

    perspectiveCorrection.setValue(CIVector(CGPoint:rect.topRight),

        forKey: "inputTopRight")

    perspectiveCorrection.setValue(CIVector(CGPoint:rect.bottomRight),

        forKey: "inputBottomRight")

    perspectiveCorrection.setValue(CIVector(CGPoint:rect.bottomLeft),

        forKey: "inputBottomLeft")

    perspectiveCorrection.setValue(monaLisa,

        forKey: kCIInputImageKey)
A little bit of tweaking to centre the corrected image to the centre of the billboard rectangle:
    let perspectiveCorrectionRect = perspectiveCorrection.outputImage!.extent

    let cropRect = perspectiveCorrection.outputImage!.extent.offsetBy(

        dx: monaLisa.extent.midX - perspectiveCorrectionRect.midX,

        dy: monaLisa.extent.midY - perspectiveCorrectionRect.midY)

    let croppedMonaLisa = monaLisa.imageByCroppingToRect(cropRect)
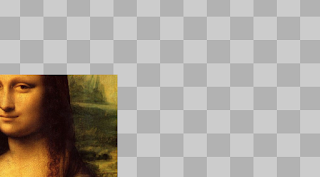
...and we now have an output image of a cropped Mona Lisa at the correct aspect ration:
Finally, using the original perspective transform filter, we pass in the new cropped version rather than the original version to get a composite with the correct aspect ratio:
    perspectiveTransform.setValue(croppedMonaLisa,

        forKey: kCIInputImageKey)

    composite.setValue(perspectiveTransform.outputImage!,

        forKey: kCIInputImageKey)
Which gives the result we're probably after:
Core Image for Swift
Although my book doesn't actually cover detectors or perspective correction, Core Image for Swift, does take a detailed look at almost every aspect of still image processing with Core Image.
Core Image for Swift is available from both Apple's iBooks Store or, as a PDF, from Gumroad. IMHO, the iBooks version is better, especially as it contains video assets which the PDF version doesn't.
Published at DZone with permission of Simon Gladman, DZone MVB. See the original article here.
Opinions expressed by DZone contributors are their own.


Comments