Automatic 1111: Custom Sketch-to-Image API
Develop a custom Sketch-to-Image API for converting hand-drawn/digital sketches into photorealistic images using stable diffusion models powered by ControlNet.
Join the DZone community and get the full member experience.
Join For FreeIn this article, we will develop a custom Sketch-to-Image API for converting hand-drawn or digital sketches into photorealistic images using stable diffusion models powered by a ControlNet model. We will extend the Automatic 1111's txt2img API to develop this custom workflow.
Prerequisites
- Stable Diffusion Web UI (Automatic 1111) running on your local machine. Follow the instructions here if you are starting from scratch.
- SD APIs Enabled. Follow the instructions on this page (scroll down to the Enabling APIs section) to enable the APIs if you haven't already done so.
- ControlNet extension installed:
- Click on the
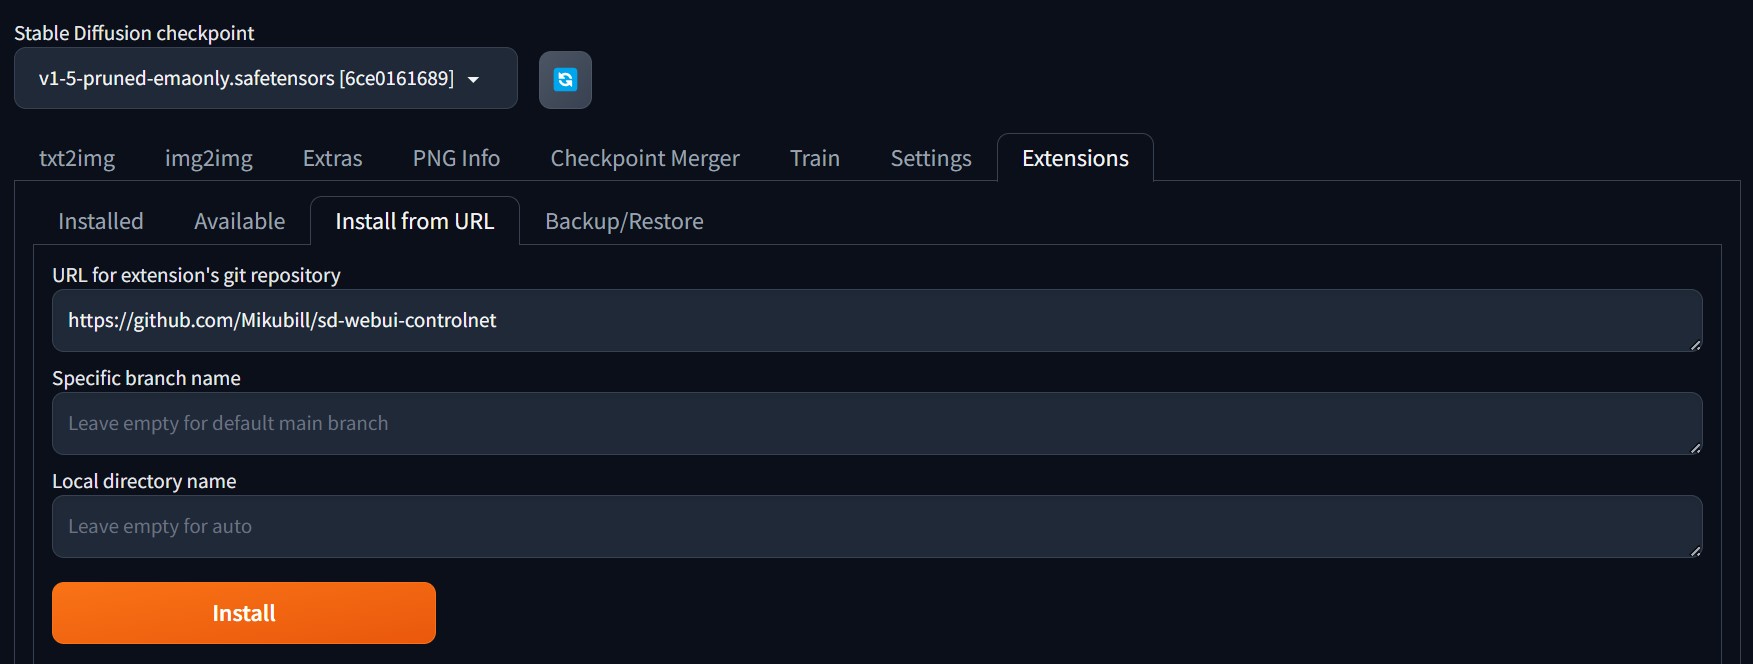
Extensionstab on Stable Diffusion Web UI. - Navigate to the
Install from URLtab. - Paste the following link in
URL for extension's git repositoryinput field and click Install.![Paste link in URL for extension's git repository input field and click Install.]()
- After the successful installation, restart the application by closing and reopening the
run.batfile if you're a PC user; Mac users may need to run./webui.shinstead. - After restarting the application, the ControlNet dropdown will become visible under the Generation tab in the txt2img screen.
![ControlNet dropdown]()
- Click on the
- Download and add the following models to Automatic 1111:
- RealVisXL_V4.0_Lightning: HuggingFace: SG161222/RealVisXL_V4.0_Lightning. Copy this model to the Stable Diffusion models folder which is under the project root directory:
/models/Stable-diffusion diffusers_xl_canny_full- HuggingFace: lllyasviel/sd_control_collection
Copy the downloaded model to/extensions/sd-webui-controlnet
- RealVisXL_V4.0_Lightning: HuggingFace: SG161222/RealVisXL_V4.0_Lightning. Copy this model to the Stable Diffusion models folder which is under the project root directory:

Payload
Now that we have all our prerequisites in place, let's build the payload for the/sdapi/v1/txt2img API.
payload = {
    "sd_model": "RealVisXL_V4.0_Lightning.safetensors [d6a48d3e20]",
    "prompt": f"{prompt}",
    "negative_prompt": f"{negative_prompt}",
    "steps": 6,
    "batch_size": 3,
    "cfg_scale": 1.5,
    "width": f"{width}",
    "height": f"{height}",
    "seed": -1,
    "sampler_index": "DPM++ SDE",
    "hr_scheduler": "Karras",
    "alwayson_scripts": {
        "controlnet": {
            "args": {
                "enabled": True,
                "input_image": f"{encoded_image}",
                "model": "diffusers_xl_canny_full [2b69fca4]",
                "module": "canny",
                "guidance_start": 0.0,
                "guidance_end": 1.0,
                "weight": 1.15,
                "threshold_a": 100,
                "threshold_b": 200,
                "resize_mode": "Resize and Fill",
                "lowvram": False,
                "guess_mode": False,
                "pixel_perfect": True,
                "control_mode": "My prompt is more important",
                "processor_res": 1024
            }
        }
    }
}
For now, we have set some placeholders for prompt, negative_prompt, width, height, and encoded_image attributes, while others are hardcoded to some default preset values. These values yielded the best results during our experimentation. Feel free to experiment with different values and models of your choice.
The encoded_image is our input sketch converted to a base64 encoded string.
Let's talk about some of the important attributes of our payload.
Attributes
- Prompt: A textual description that guides the image generation process, specifying which objects to create and detailing their intended appearance
- Negative prompt: Text input specifying the objects that should be excluded from the generated images
- Steps: A numerical value indicating the number of iterations the model should perform to refine the generated image, with more steps generally leading to higher-quality results
- Seed: A random numerical value used to generate images; Using the same seed will produce identical images when other attributes remain unchanged
- Guidance scale: Adjusts the degree to which the generated image aligns with the input prompt; Higher values ensure closer adherence but may reduce image quality or diversity.
- Starting control step: Refers to the starting parameters or conditions that guide the model's generation process, setting the initial direction and constraints for the output
- Ending control step: Includes the final adjustments or criteria used to refine and perfect the generated output, ensuring it meets the desired specifications and quality standards
- Control weight: Defines the impact or influence of a particular control or condition in the model's generation process, directly affecting how closely the model follows the specified control criteria during output generation
Refer to the model documentation for all other attribute details.
Client
Here's the Python client for converting sketches into photorealistic images.
import io
import requests
import base64
from PIL import Image


def run_sketch_client(pil, prompt, negative_prompt, height, width):
    buffered = io.BytesIO()
    pil.save(buffered, format="PNG")
    encoded_image = base64.b64encode(buffered.getvalue()).decode("utf-8")

    payload = {
        "sd_model": "RealVisXL_V4.0_Lightning.safetensors [d6a48d3e20]",
        "prompt": f"{prompt}",
        "negative_prompt": f"{negative_prompt}",
        "steps": 6,
        "batch_size": 3,
        "cfg_scale": 1.5,
        "width": f"{width}",
        "height": f"{height}",
        "seed": -1,
        "sampler_index": "DPM++ SDE",
        "hr_scheduler": "Karras",
        "alwayson_scripts": {
            "controlnet": {
                "args": [
                    {
                        "enabled": True,
                        "input_image": f"{encoded_image}",
                        "model": "diffusers_xl_canny_full [2b69fca4]",
                        "module": "canny",
                        "guidance_start": 0.0,
                        "guidance_end": 1.0,
                        "weight": 1.15,
                        "threshold_a": 100,
                        "threshold_b": 200,
                        "resize_mode": "Resize and Fill",
                        "lowvram": False,
                        "guess_mode": False,
                        "pixel_perfect": True,
                        "control_mode": "My prompt is more important",
                        "processor_res": 1024
                    }
                ]
            }
        }
    }

    print(payload)
    res = requests.post("http://localhost:7860/sdapi/v1/txt2img", json=payload)
    print(res)

    r = res.json()
    print(r)
    images = []
    if 'images' in r:
        for image in r['images']:
            image = Image.open(io.BytesIO(base64.b64decode(image)))
            images.append(image)

    return images


if __name__ == "__main__":
    pil = Image.open("butterfly.jpg")
    width, height = pil.size
    images = run_sketch_client(pil, "A photorealistic image of a beautiful butterfly", "fake, ugly, blurry, low quality", width, height)
    for i, image in enumerate(images):
        image.save(f"output_{i}.jpg")
The code uses the butterfly.jpg file as the input image, which is located in the same directory as the client code. The batch_size in our payload is set to the default value of 3, meaning the model will generate three variations of the butterfly along with an edge map (a sketch input converted into white lines on a black background). As a result, four output images will be created in the directory.
Let's focus on the edge map. This map is often used in combination with techniques like "ControlNet" to guide image generation. It highlights the subject's contours and edges, which the diffusion model leverages to maintain the structure while generating or modifying images. In our case, the edge map guides the RealVisXL Lightning model to generate the butterfly image, strictly following the canny edges provided by the edge map.
Conclusion
In this post, we've successfully created a comprehensive client that showcases the conversion of sketches into photorealistic images by extending the Stable Diffusion Web UI's txt2img API. Additionally, we've explored how the ControlNet model (diffusers_xl_canny_full) effectively guided the Stable Diffusion model (RealVisXL_V4.0_Lightning) to produce realistic images by adhering to the canny edges outlined in the generated edge map. This demonstrates the powerful synergy between these models in achieving highly detailed and accurate visual outputs from simple sketches.
You can use this API to turn your sketches into digital images, or you can make it a fun tool for your kids to convert their drawings into digital pictures.
Hope you found something useful in this article. See you soon in our next article. Happy learning!
Opinions expressed by DZone contributors are their own.
Comments