Build a Data Pipeline on AWS With Kafka, Kafka Connect, and DynamoDB
This is a two-part series that provides a step-by-step walkthrough of data pipelines. In this post, learn how to integrate DynamoDB with MSK and MSK Connect.
Join the DZone community and get the full member experience.
Join For FreeThere are many ways to stitch data pipelines: open source components, managed services, ETL tools, etc. In the Kafka world, Kafka Connect is the tool of choice for "streaming data between Apache Kafka and other systems." It has an extensive set of pre-built source and sink connectors as well as a common framework for Kafka connectors, which standardizes integration of other data systems with Kafka and makes it simpler to develop your own connectors, should there be a need to do so.
This is a two-part blog series that provides a step-by-step walkthrough of data pipelines with Kafka and Kafka Connect. I will be using AWS for demonstration purposes, but the concepts apply to any equivalent options (e.g., running these locally using Docker). Here are some of the key AWS services I will be using:
- Amazon Managed Streaming for Apache Kafka (MSK): Central component of the data infrastructure
- MSK Connect: It will be used to deploy fully managed connectors built for Kafka Connect in order to move data into or pull data from various sources.
- Amazon DynamoDB: A fully managed NoSQL database service and in the context of this blog series, it serves as the target/sink for our data pipeline
- Amazon Aurora MySQL: A fully managed, MySQL-compatible, relational database engine and is used in the second part of this blog series
Here is a quick peek of what each part will cover:
- The first part will keep things relatively simple: it's all about getting started easily. I will be using the Kafka Connect Datagen source connector to pump data some sample data into the MSK topic and then use the AWS DynamoDB sink connector to persist that data in a DynamoDB table.
- The second part will take it up a notch: we will explore change data capture. The Datagen connector will be replaced by the Debezium connector for MySQL which will extract data in real-time from tables in Aurora MySQL, push that to MSK topics. Then, we will continue to use the DynamoDB sink connector just like we did before.
Prepare Infrastructure Components and Services
To start with, you need to deploy all the resources required for this tutorial. There are lots of them, but don't worry because I have a CloudFormation template ready for you!
Before you proceed, download the template.
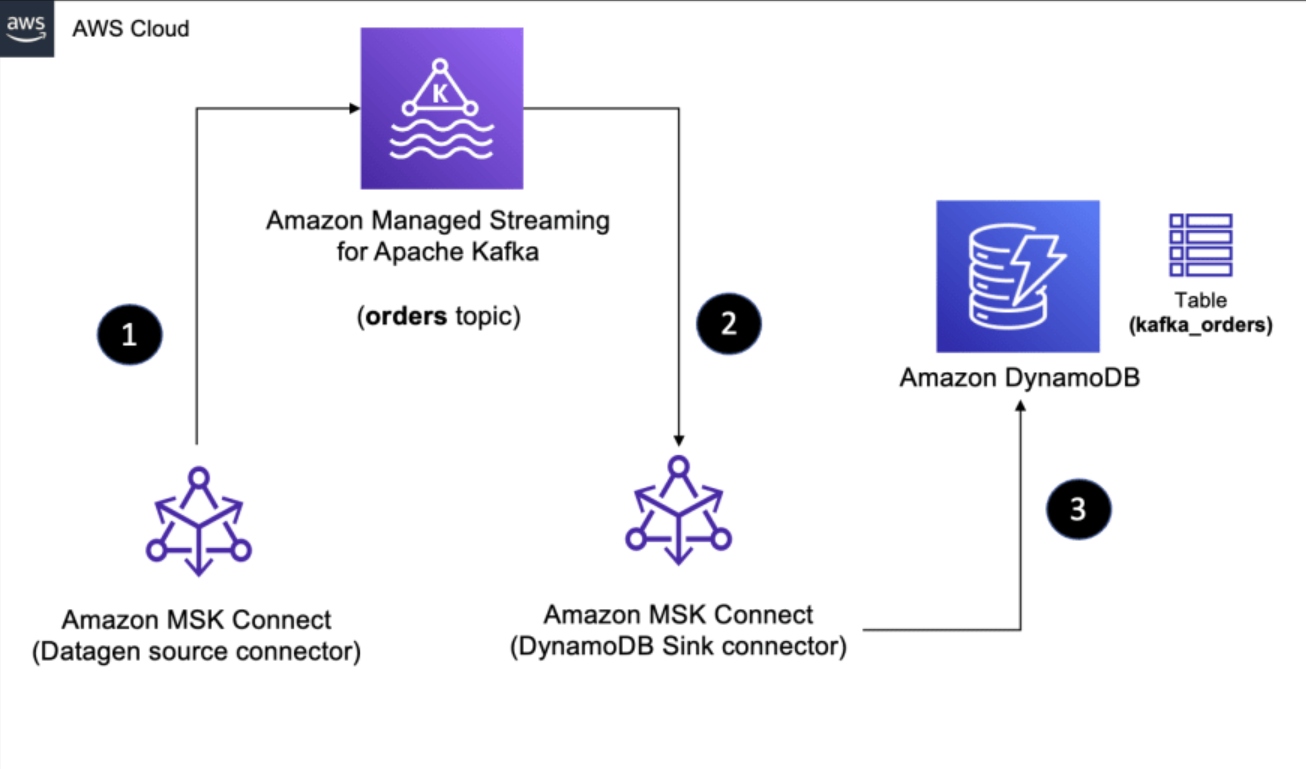
Here is a high-level diagram of the solution presented in this blog post.
For step by step instructions, refer to Creating a stack on the AWS CloudFormation console in the official documentation.
Use the AWS Console to deploy the CloudFormation template. On the Create stack wizard, choose Upload a template file and upload the file you just downloaded.

Click Next, and enter the name of the stack. Click Next to proceed. On the final page in the wizard, click Create stack to initiate the resource creation.
You can track the progress in the CloudFormation console. Once successful, you should have all the resources including:
- Core infrastructure: VPC, Subnets, etc.
- Services: MSK cluster, Aurora MySQL, etc.
- Others: IAM roles, CloudWatch log groups, etc.

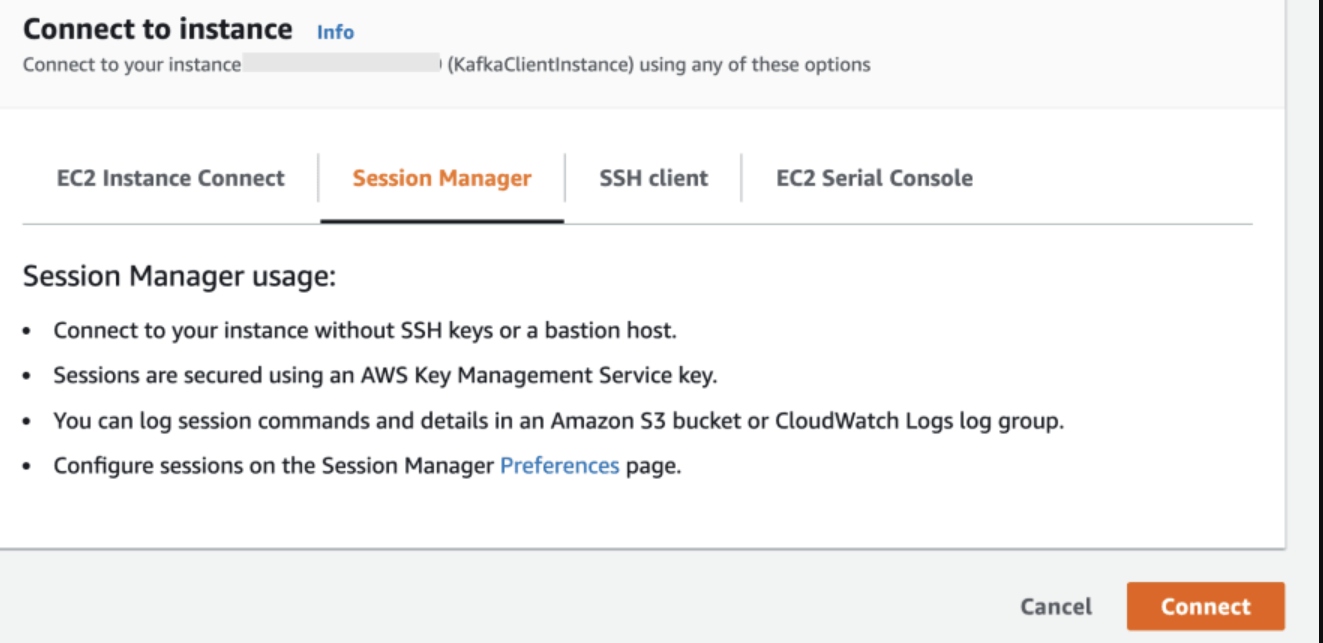
Connect to the EC2 Instance via Session Manager
In the CloudFormation list of resources, locate KafkaClientEC2Instance EC2 instance (highlighted in the above diagram).

Connect to it using Session Manager:
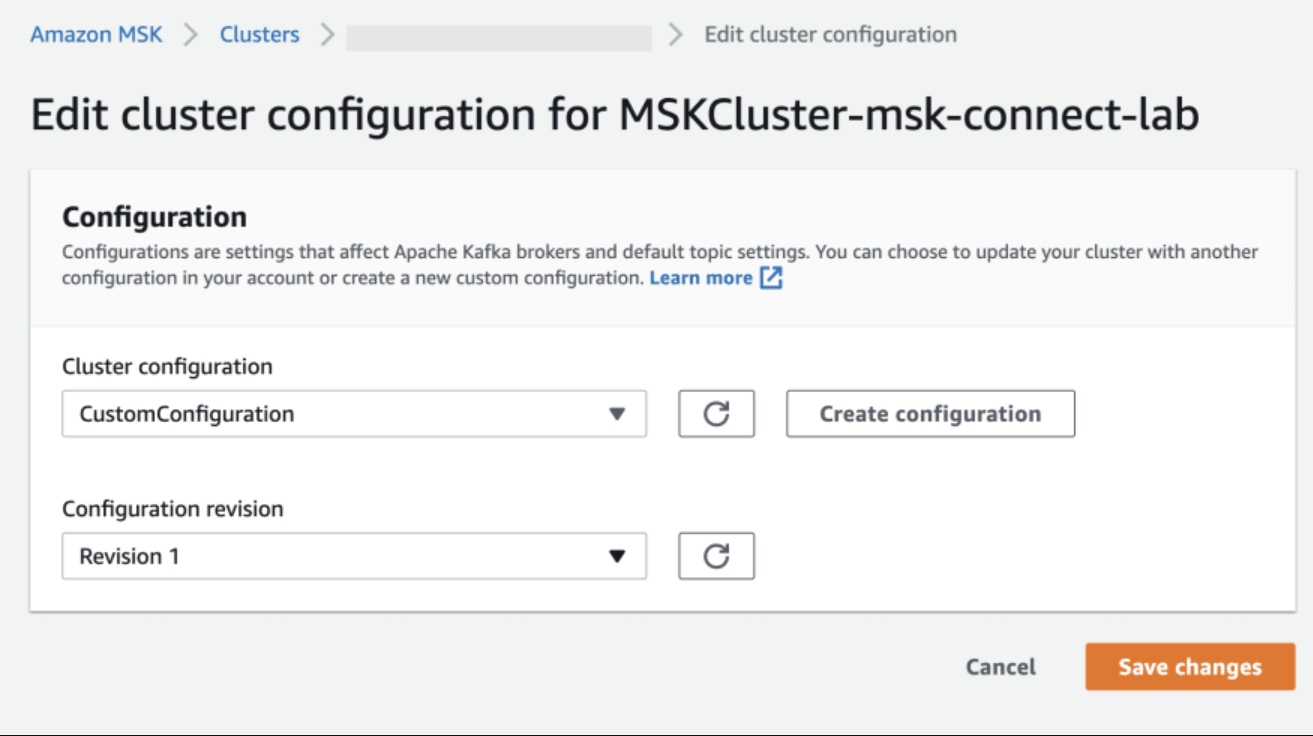
Enable Automatic Topic Creation
MSK Connect requires topic creation on the fly. We can create a Custom configuration in MSK to enable automatic topic creation.
From the EC2 instance, run the below commands to create a custom configuration:
sudo -u ec2-user -i
mkdir kafka-configuration && cd kafka-configuration

cat <<EOF > configuration.txt
auto.create.topics.enable=true
EOF

export AWS_REGION=<enter MSK cluster region e.g. us-east-1>
export AWS_REGION=us-east-1

aws kafka create-configuration \
    --name "CustomConfiguration" \
    --description "Topic auto-creation enabled" \
    --kafka-versions "2.6.2" \
    --region $AWS_REGION \
    --server-properties file://configuration.txt
Go ahead and apply this configuration:
Go to your MSK cluster > Properties > Configuration and choose Edit.
Select the configuration you just created and, choose Save. This will restart your MSK cluster: wait for this to complete before you proceed.
Data Pipeline: Part 1
Let's start by creating the first half of the pipeline that will leverage the Datagen source connector to pump sample events to a topic in MSK.
In this section, you will:
- Download the Datagen connector artifacts.
- Create a Custom Plugin in MSK.
- Deploy the Datagen source connector to MSK Connect,
At the end, you will have the first half of the data pipeline ready to go!
Create a Custom Plugin and Connector
Upload the Datagen connector file to Amazon S3
From the Kafka client EC2 instance, run these commands:
sudo -u ec2-user -i
mkdir kafka-connect-datagen && cd kafka-connect-datagen

wget https://d1i4a15mxbxib1.cloudfront.net/api/plugins/confluentinc/kafka-connect-datagen/versions/0.5.3/confluentinc-kafka-connect-datagen-0.5.3.zip
aws s3 cp ./confluentinc-kafka-connect-datagen-0.5.3.zip s3://msk-lab-<ENTER_YOUR_AWS_ACCOUNT_ID>-plugins-bucket/

cd ..
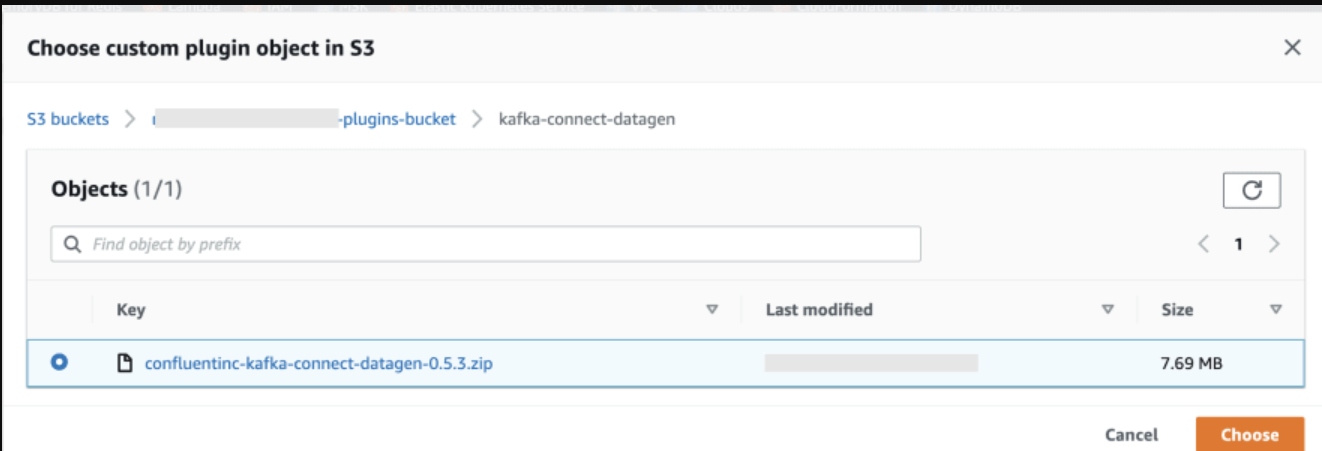
Create Custom Plugin
For step by step instructions on how to create a MSK Connect Plugin, refer to Creating a custom plugin using the AWS Management Console in the official documentation.
While creating the Custom Plugin, make sure to choose the Datagen connector zip file you uploaded to Amazon S3 in the previous step.
Create the Datagen Source Connector
For step by step instructions on how to create a MSK Connect Connector, refer to Creating a connector in the official documentation.
To create a connector:
- Choose the plugin you just created.
- Enter the connector name and choose the MSK cluster along with IAM authentication.
- You can enter the content provided below in the connector configuration section.
connector.class=io.confluent.kafka.connect.datagen.DatagenConnector
kafka.topic=orders
quickstart=orders
key.converter=org.apache.kafka.connect.storage.StringConverter
value.converter=org.apache.kafka.connect.json.JsonConverter
value.converter.schemas.enable=false
max.interval=10000
iterations=-1
tasks.max=1
Leave the Rest of the Configuration Unchanged
- Under Access Permissions, choose the correct IAM role (the one with
DatagenConnectorIAMRolein its name) for the connector. - Click Next to move to the Security options: leave them unchanged.
- Click Next. For Log delivery, choose to Deliver to Amazon CloudWatch Logs. Locate and select
/msk-connect-demo-cwlog-group. - Click Next. On the final page, scroll down and click Create connector to start the process and wait for the connector to start.
Once that's done and the connector has transitioned to a Running state, proceed with the below steps.
Test the Pipeline
Before you proceed further:
- Download AWS IAM JAR file and include it in the classpath.
- Create a properties file for Kafka CLI consumer.
In the EC2 instance, run the following commands:
sudo -u ec2-user -i

mkdir iam-auth && cd ./iam-auth
wget https://github.com/aws/aws-msk-iam-auth/releases/download/1.1.0/aws-msk-iam-auth-1.1.0-all.jar
cd ../

cat <<EOF > /home/ec2-user/kafka/config/client-config.properties
# Sets up TLS for encryption and SASL for authN.
security.protocol = SASL_SSL

# Identifies the SASL mechanism to use.
sasl.mechanism = AWS_MSK_IAM

# Binds SASL client implementation.
sasl.jaas.config = software.amazon.msk.auth.iam.IAMLoginModule required;

# Encapsulates constructing a SigV4 signature based on extracted credentials.
# The SASL client bound by "sasl.jaas.config" invokes this class.
sasl.client.callback.handler.class = software.amazon.msk.auth.iam.IAMClientCallbackHandler
EOF

export CLASSPATH=/home/ec2-user/iam-auth/aws-msk-iam-auth-1.1.0-all.jar
echo "export CLASSPATH=${CLASSPATH}" | tee -a ~/.bash_profile
To start with, list down the Kafka topics:
export MSK_BOOTSTRAP_ADDRESS=<ENTER MSK CLUSTER ENDPOINT>

/home/ec2-user/kafka/bin/kafka-topics.sh --bootstrap-server $MSK_BOOTSTRAP_ADDRESS --command-config /home/ec2-user/kafka/config/client-config.properties --list
Start Kafka CLI consumer:
/home/ec2-user/kafka/bin/kafka-console-consumer.sh --bootstrap-server $MSK_BOOTSTRAP_ADDRESS --consumer.config /home/ec2-user/kafka/config/client-config.properties --from-beginning --topic orders | jq --color-output .
If everything is set up correctly, you should see JSON output similar to this:
...
{
  "ordertime": 1488059390707,
  "orderid": 50,
  "itemid": "Item_845",
  "orderunits": 4.801443003705596,
  "address": {
    "city": "City_",
    "state": "State_6",
    "zipcode": 34225
  }
}
{
  "ordertime": 1496655341559,
  "orderid": 51,
  "itemid": "Item_71",
  "orderunits": 6.184874231875158,
  "address": {
    "city": "City_63",
    "state": "State_91",
    "zipcode": 77633
  }
}
...
Data Pipeline: Part 2
The Datagen source connector will continue to produce sample order data as long as it's running. It will produce 1 record every 10 seconds, as per our configuration (max.interval=10000 and iterations=-1).
Next up, we will implement the second half of the pipeline that's responsible for taking data from the MSK topic to the DynamoDB table with the help of the DynamoDB Sink connector.
In this section, you will:
- Download the DynamoDB connector artifacts
- Create Custom Plugin in MSK
- Deploy the DynamoDB sink connector to MSK Connect
Create a Custom Plugin and Connector
Upload the DynamoDB Connector to Amazon S3
Log into the Kafka client EC2 instance:
sudo -u ec2-user -i

mkdir kafka-connect-dynamodb && cd kafka-connect-dynamodb

wget https://d1i4a15mxbxib1.cloudfront.net/api/plugins/confluentinc/kafka-connect-aws-dynamodb/versions/1.3.0/confluentinc-kafka-connect-aws-dynamodb-1.3.0.zip

aws s3 cp ./confluentinc-kafka-connect-aws-dynamodb-1.3.0.zip s3://msk-lab-<ENTER_YOUR_AWS_ACCOUNT_ID>-plugins-bucket/

cd ..
Create Custom Plugin
For step by step instructions on how to create a MSK Connect Plugin, refer to Creating a custom plugin using the AWS Management Console in the official documentation.
While creating the Custom Plugin, make sure to choose the DynamoDB connector zip file you uploaded to Amazon S3 in the previous step.
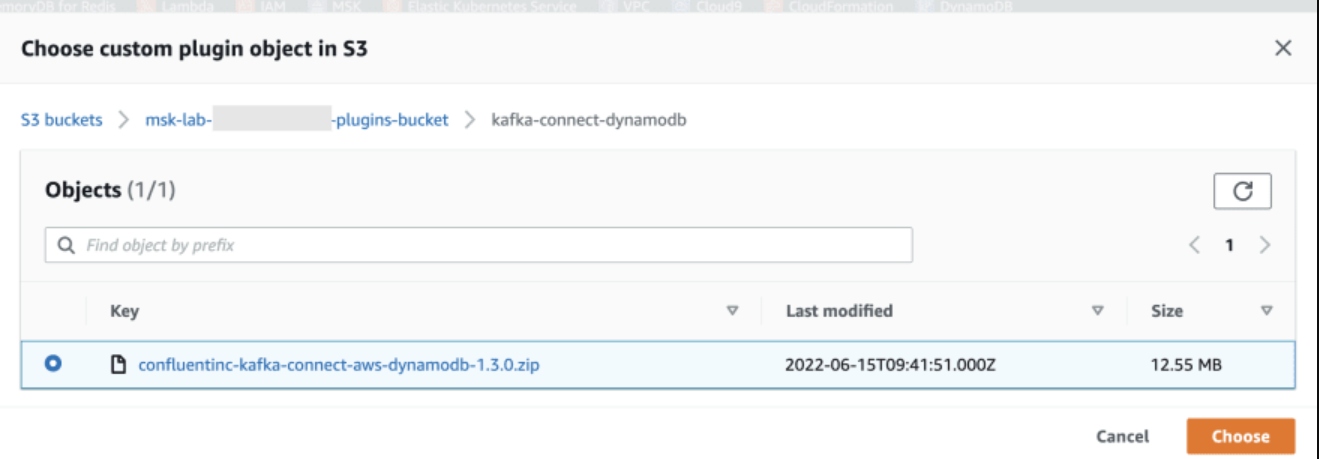
Create the DynamoDB Sink Connector
For step by step instructions on how to create a MSK Connect Connector, refer to Creating a connector in the official documentation.
To create a connector:
- Choose the plugin you just created.
- Enter the connector name and choose the MSK cluster along with IAM authentication
- You can enter the content provided below in the connector configuration section. Make sure you replace the following configuration as per your setup:
- Use the right topic name (it is
ordersin our example). - Enter MSK broker endpoint in
confluent.topic.bootstrap.servers. - For
aws.dynamodb.endpointandaws.dynamodb.region, enter the region where you created the DynamoDB table, e.g.us-east-1.
Leave the rest of the configuration unchanged.
connector.class=io.confluent.connect.aws.dynamodb.DynamoDbSinkConnector
tasks.max=1
topics=orders
aws.dynamodb.region=<ENTER AWS REGION e.g. us-east-1>
aws.dynamodb.endpoint=https://dynamodb.<ENTER AWS REGION>.amazonaws.com
aws.dynamodb.pk.hash=value.orderid
aws.dynamodb.pk.sort=
table.name.format=kafka_${topic}
transforms=flatten
transforms.flatten.type=org.apache.kafka.connect.transforms.Flatten$Value
transforms.flatten.delimiter=_
key.converter.schemas.enable=false
value.converter.schemas.enable=false
key.converter=org.apache.kafka.connect.storage.StringConverter
value.converter=org.apache.kafka.connect.json.JsonConverter
confluent.topic.bootstrap.servers=<ENTER MSK CLUSTER ENDPOINT>
confluent.topic.security.protocol=SASL_SSL
confluent.topic.sasl.mechanism=AWS_MSK_IAM
confluent.topic.sasl.jaas.config=software.amazon.msk.auth.iam.IAMLoginModule required;
confluent.topic.sasl.client.callback.handler.class=software.amazon.msk.auth.iam.IAMClientCallbackHandler
- Under Access permissions, choose the correct IAM role (the one with
DynamoDBConnectorIAMRolein its name) for the connector. - Click Next to move to the Security options: leave them unchanged.
- Click Next. For Log delivery, choose Deliver to Amazon CloudWatch Logs. Locate and select
/msk-connect-demo-cwlog-group. - Click Next. On the final page, scroll down and click Create connector to start the process and wait for the connector to start.
Once that's done and the connector has transitioned to a Running state, proceed with the below steps.
Before we go ahead and test the pipeline, there are a couple of things you should know:
Choosing DynamoDB Primary Keys
In the above configuration, we set aws.dynamodb.pk.hash to value.orderid, which implies that the orderid field from the Kafka topic event payload will be used as the partition key (the aws.dynamodb.pk.sort was left empty, but can be used to specify the DynamoDB Sort/Range key if needed).
Flattening Records Using Kafka Connect SMT
The address field in the event payload has a nested structure.
"address": {
    "city": "City_63",
    "state": "State_91",
    "zipcode": 77633
  }
To un-nest or flatten (for the lack of a better word) it, we've made use of the Flatten transform (org.apache.kafka.connect.transforms.Flatten$Value). This extracts individual fields from address and makes them available as individual attributes: address_city, address_state, address_zipcode. You will see the same in DynamoDB table as well, soon!
Test the End-to-End Pipeline
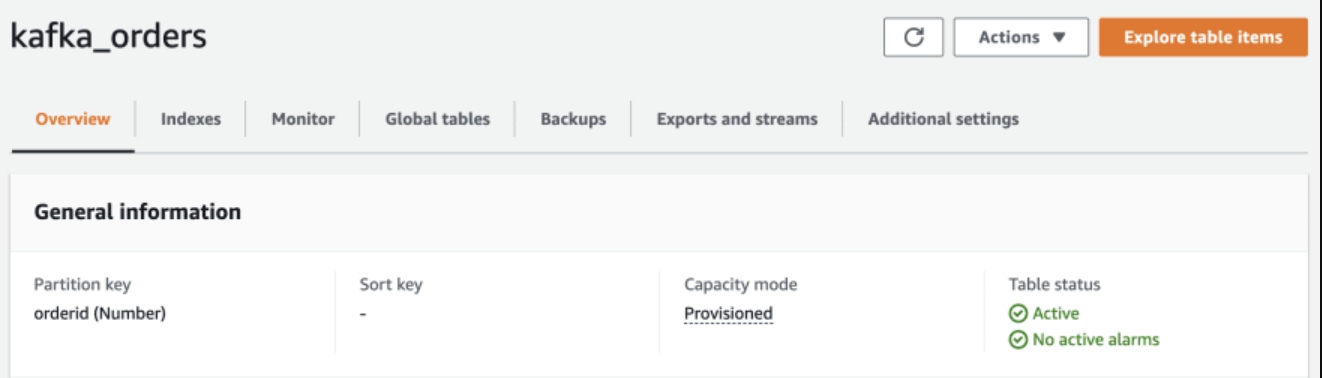
Navigate to the DynamoDB console. You will see that the kafka_orders table is already present - this was automatically created by the DynamoDB sink connector.
The Table Has orderid as the Partition Key
If you have the AWS CLI handy, you can look at the data quickly using aws dynamodb scan --table-name kafka_orders.
You will get a similar output (notice the address_* fields):
{
    "Items": [
        {
            "orderid": {
                "N": "251"
            },
            "address_zipcode": {
                "N": "68100"
            },
            "address_state": {
                "S": "State_2"
            },
            "itemid": {
                "S": "Item_46"
            },
            "ordertime": {
                "N": "1491423463934"
            },
            "address_city": {
                "S": "City_6"
            },
            "orderunits": {
                "N": "3.1272028351151926"
            }
        },
.....
Go ahead: query, and play around with the data in the DynamoDB table as you like. That's your homework!
As the connector weaves its magic, it will continue to synchronize records in the Kafka topic to the DynamoDB table. Remember that the data pipeline (from Datagen source -> MSK topic -> DynamoDB) will continue to be operational as long as the connectors are running: records will keep getting added to the orders topic in MSK and they will be persisted to the DynamoDB table.
Delete Resources
Unless you intend to work through the second part of this blog series (coming soon), delete the resources.
- Delete the contents of the
Amazon S3bucket (msk-lab-<YOUR ACCOUNT_ID>-plugins-bucket). - Delete the CloudFormation stack.
- Delete the DynamoDB table.
- Delete the MSK Connect connectors, Plugins, and Custom configuration.
Conclusion
Managed environments like MSK Connect take care of the heavy lifting and let you focus on building your data architectures. This blog focused on getting you up and running with a simple data pipeline with DynamoDB as the sink. The next part will include change data capture and walk you through how to build a solution using the components covered in this post.
Published at DZone with permission of Abhishek Gupta. See the original article here.
Opinions expressed by DZone contributors are their own.
Comments