

Building a RESTful API With Java Spring Boot
Build powerful RESTful APIs using Java Spring Boot. Use our quick and easy tutorial for retrieving credit scores and setting up a basic REST API using Postman.
Join the DZone community and get the full member experience.
Join For FreeSpring Boot is a popular framework for creating powerful RESTful APIs, and in this tutorial, we will use it to develop a simple API that simulates a credit score rating. The API endpoint we will create will allow a user to retrieve a credit score rating by sending a request to the API. However, it is important to note that we will not be linking up to any actual backend systems to pull a real credit score. Instead, we will use a random number generator to generate the score and return it to the user. Although this API is relatively simple, it will demonstrate the basics of REST API development using Java and Spring Boot. This tutorial will provide a hands-on introduction to building RESTful APIs with Java Spring Boot.
Prerequisites
Before we start, we must ensure that a couple of prerequisites are completed. To follow along and run this tutorial, you will need the following:
- A working Java installation
- Gradle or Maven build tools installed (we'll be using Gradle)
- An IDE or text editor of your choice
- Postman to test our endpoint
Creating the Initial Project
We'll be using the Spring Initializr tool to create our initial project. The Spring Initializr generator provides many options allowing for quick customizations to our starter project.
The options include:
- Project
- The type of build tool to be used with the project.
- Language
- The language the project will use.
- Spring Boot
- The Spring Boot version to use.
Project Metadata
- Group name: Uniquely identifies your project across all projects.
- Artifact name: The name of the jar without the version.
- Name: Name of the project
- Description: A description of the project.
- Package name: The name for the package is typically a combination of the group and artifact names.
- Packaging type: The type of package that is created when building your project.
- Java Version: The version of Java to be used in the project.
Dependencies
- Select and include many dependencies, from developer tools and databases to web and security frameworks.
We'll be using the following settings for our project:
Selecting Generate will initiate a download for the sample project. Unzip and open the folder generated by Spring Initializr, in our case called RESTDemo, in your favorite editor. This is where we will add our API code. Run the following command to ensure our project builds correctly out of the gate.
./gradlew buildAdding in the Code
Under the path /src/main/java/com/example/RESTDemo we'll create a file called APIController.java. This is where we will house our creditScore endpoint, as well as the code to randomly generate the return value.
Populate the newly created file with the following code:
package com.example.RESTDemo;

import java.util.Random;
import org.springframework.web.bind.annotation.ResponseBody;
import org.springframework.web.bind.annotation.RequestMapping;
import org.springframework.web.bind.annotation.RestController;

@RestController
public class APIController {

  @RequestMapping("/creditscore")
  @ResponseBody
  public String creditscore() {
    int creditScoreMin = 500;
    int creditScoreMax = 900;

    Random rand = new Random();
    int randomCreditScore = rand.nextInt(creditScoreMin, creditScoreMax);

    return String.format("{ \"credit_score\": \"%d\" }", randomCreditScore);
  }
}
The @RestController annotation is a specialized version of the Controller annotation in Spring MVC. It's used to create RESTful web services using Spring. This annotation tells Spring that this class is a controller class that should handle incoming web requests.
Inside this class, there's a single method called creditscore() which is annotated with @RequestMapping("/creditscore"). The @RequestMapping annotation maps the method to a specific URI; in this case, it's localhost:8080/creditscore.
This method is also annotated with @ResponseBody. The @ResponseBody annotation tells Spring to bind the return value of this method to the body of the HTTP response.
The method body creditscore() declares two integers creditScoreMin and creditScoreMax. By utilizing the Random object instance we created, we will generate a number between creditScoreMin and creditScoreMax. Finally returns a JSON string representation of the generated credit score.
Also, it's worth noting that this code does not handle any request parameters as it does not take any input from the user; this makes this endpoint an example of a simple endpoint.
Running and Testing the API
With our code written, run the following command in order to compile our project into an executable .jar file.
./gradlew buildNow, let's run our simple web API by using the following command in the root directory of the app.
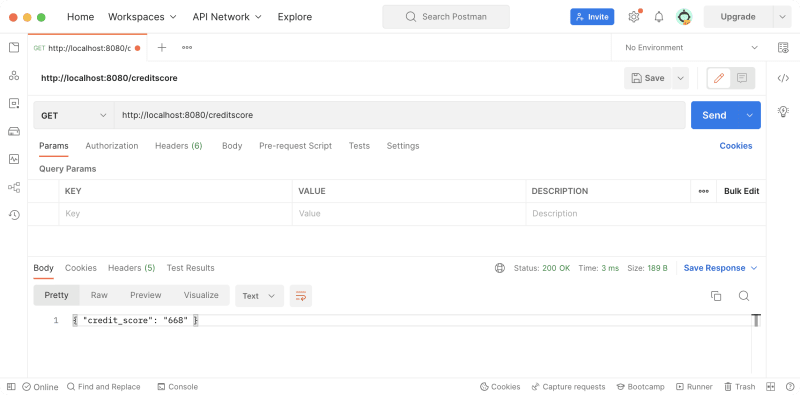
java -jar build/libs/RESTDemo-0.0.1-SNAPSHOT.jarThe API is now operational and ready for testing. You can use a tool like Postman to send an HTTP request to the API. The endpoint to getting a credit score is localhost:8080/creditscore. When you send a request to this endpoint, you should receive a 200 OK status code and a credit score generated by the random number generator.
Wrapping Up
We have developed a basic RESTful API using Java Spring Boot. This code can serve as a foundation for creating more complex APIs for your application. As you continue to develop the API, you may want to consider implementing security measures such as an API key, integrating with an API gateway, monitoring the usage of the API, or generating revenue through API monetization.
Published at DZone with permission of Dylan Frankcom. See the original article here.
Opinions expressed by DZone contributors are their own.
Comments