Building Fault-Tolerant Applications with Temporal Workflow Engine
Today's expectations of 99.999% availability and continuously running systems, Temporal shines at common challenges like fault tolerance and reliability.
Join the DZone community and get the full member experience.
Join For FreeWorkflows and orchestration are critical to most software systems. In fact, at a fundamental level, every piece of software is essentially a workflow: you write functions and execute them in a specific order. These functions retain state (variables), pass state along, discard state, and renew state. There are dependencies and relationships between these functions. Broadly speaking, any software system can be divided into two parts, orchestration and atomic actions. Orchestration handles retries, state management between methods, resource management, and error or crash handling.
Now, imagine a system that handles all the orchestration aspects of software development, allowing you to focus solely on the atomic steps. Enter Temporal, a workflow engine that does exactly that. Temporal manages workflow orchestration for you, allowing you to focus on developing core business logic. From this perspective, Temporal is a truly powerful tool in my opinion.
In this article, I'll showcase the key features Temporal provides, demonstrate how to use them, and explore the advantages they offer. We'll write a lot of code along the way, so grab your coffee and enjoy!
About Temporal
Officially, Temporal is a scalable and reliable runtime for durable function executions called Temporal Workflow Executions. Simply put, if you have functions that need to be executed in a specific order, track their statuses, act based on those statuses, retry on failure, and more, Temporal is here to help.
Without Temporal, you would have to write all this orchestration code yourself, which is far from trivial.
When using Temporal, you can write your business logic in any programming language you prefer. In this article, we will explore how all of this can be accomplished with Temporal.
Demo Project Concept
Let's try orchestrating a simple workflow by running the following steps using a Temporal workflow and see what Temporal has to offer. Imagine a user registration process in your system, and the steps to complete the registration are :
- Validate the user's email
- Create a user entry in the system
- Run the provisioning process (e.g., grant necessary permissions, enable features based on roles )
- Send a welcome email
- Log Onboarding Completion
We will simulate each of these activities using a mock API built with Express.js. The code to interact with Temporal and make these API calls (the business logic) will be written in Go.
Pre-Requisite
- Docker to run Temporal server locally.
- Go to write code to interact with Temporal
- Express.js to mock API calls
You could install docker from https://docs.docker.com/desktop/setup/install/mac-install/ , then node and npm from https://nodejs.org/en. To confirm installation, run the following commands.
docker -v
docker compose version

go version

node -v
npm -v
Setting Up Environment
First, we will run Temporal in a containerized environment using Docker. Docker Compose.yaml is a configuration file that instructs Docker on which services to run, how to set them up, and what dependencies they require. You can use the following Docker Compose file to run Temporal locally.
Note - There are simpler ways to install and run Temporal locally. I am using Docker to provide a consistent experience across different platforms. If you prefer Temporal's way of setting things locally, there are good resources available here.
First, we will set up the default configuration for temporal. Create a directory called config in your working directory and save a file development.yaml. The content of the file will be
persistence.defaultStore:
  - value: "default"
    constraints: {}

persistence.datastores:
  - value:
      default:
        sql:
          pluginName: "postgres"
          host: "postgres"
          port: 5432
          user: "temporal"
          password: "temporal"
          databaseName: "temporal"
          connectAttributes:
            sslmode: "disable"
    constraints: {}
Now save the following content into a file docker-compose.yaml. Note how config has been mounted as a volume.
version: '2.4'
services:
  temporal:
    image: temporalio/auto-setup:1.26.3
    ports:
      - "7233:7233" # Temporal frontend
    environment:
      - DB=postgres12
      - DB_PORT=5432
      - POSTGRES_USER=temporal
      - POSTGRES_PWD=temporal
      - POSTGRES_SEEDS=postgres
      - DYNAMIC_CONFIG_FILE_PATH=/etc/temporal/config/dynamicconfig/development.yaml
    depends_on:
      postgres:
        condition: service_healthy
    volumes:
      - ./config/development.yaml:/etc/temporal/config/dynamicconfig/development.yaml:ro

  postgres:
    image: postgres:13
    environment:
      POSTGRES_USER: temporal
      POSTGRES_PASSWORD: temporal
    ports:
      - "5432:5432"
    healthcheck:
      test: ["CMD-SHELL", "pg_isready -U temporal"]
      interval: 5s
      timeout: 5s
      retries: 5

  temporal-ui:
    image: temporalio/ui:latest
    ports:
      - "8080:8080"
    environment:
      - TEMPORAL_ADDRESS=temporal:7233
To bring Temporal up, execute the following command from your root directory where you have saved the docker compose file.
docker compose up -d
At this point, if you browse http://localhost:8080/namespaces/default/workflows. You should see the Temporal UI running.
In a directory of your preference, set up an express.js project using the following commands.
npm init -y
touch index.js
npm install express
The index.js file contains the mock API code. In this file, we import the express.js dependency and set up a server with REST APIs corresponding to the functions our system will orchestrate. These functions were listed earlier in Demo Project Concept section.
Copy and paste the following content into your index.js file.
const express = require('express');
const app = express();
const port = 3000;

app.get('/validate-email', (req, res) => {
    setTimeout(() => res.json({status: 'ok'}), 500);
});

app.get('/create-user', (req,res) => {
    setTimeout(() => res.json({status: 'user created'}), 800);
});

app.get('/provision-account', (req, res) => {
    if (Math.random() < 0.3) {
        return res.status(500).json({error: 'Proviosioning failed'});
    }

    setTimeout(() => {
        res.json({status: 'account provisioned'})
    }, 1000);
});

app.get('/send-welcome', (req, res) => {
    setTimeout(() => res.json({status: 'email-sent'}), 400);
});

app.get('/log', (req, res) => {
    console.log('user onboarded successfully');
    res.json({status: 'logged'});
});

app.listen(port, () => {
    console.log(`Mock API running at http://localhost:${port}`);
});
You could run this locally using node index.js and while the service is running, if you visit http://localhost:3000/validate-email, you should see:
{"status":"ok"}
Next, let’s set up the Go project.
Create a directory with a preferred name, and run go mod init temporal-go-demo.
To get Temporal's SDK, which will help us to interact with the Temporal server, the command is go get go.temporal.io/sdk@latest
The Orchestration
By creating Temporal activities, workflows, and tying them together, we will write all the code needed to implement our business functions.
Activities
Temporal activities are the tasks or business functions that we want our system to perform. When creating an orchestration using any workflow engine, I recommend focusing first on the activities, which are the atomic actions of your business logic.
In our demo project, these actions include validating a user's email address, creating a user account in the system, and so on. In Temporal terminology, these are called "side effects" because they change the system's state in ways that can't be determined ahead of time. For example, when we attempt to create a user, if all goes well, the user is created in our database, but if something goes wrong, an error is returned.
You can't know what will happen ahead of time, so some things will work, while others will fail and require retries. Temporal's solution is to store the result of each activity and retry it based on whether it succeeded in a previous attempt or not. Temporal replays workflows repeatedly, but because it knows which activities succeeded and which failed, only the failed activities are executed again.
So, you might think, "Great — if Temporal can run my activity based on its previous run status, I don't have to worry about making my activity function idempotent." Well, in an ideal world, that might be true to some level, but in reality, system crashes happen. If, for any reason, Temporal fails to store the correct activity state before a crash, you could end up with errors or duplicate executions. Therefore, you should always design your activity functions to be idempotent, meaning running them multiple times has no unintended side effects.
Let's first structure our Go project. The project structure can be
root
├── cmd
│   └── main.go
├── execute
│   └── executeWorkflow.go
└── workflow
    ├── activities.go
    └── workflows.go
First, we will write our functions in activies.go. This file contains a helper function for making REST API calls and functions corresponding to our business processes. Copy and paste below code in your activities.go file
package workflow

import (
	"context"
	"fmt"
	"net/http"
	"io/ioutil"
	"encoding/json"
	"time"
)

type APIResponse struct {
	Status string `json:"status"`
	Error string `json:"error,omitempty"`
}

const apiBaseUrl = "http://localhost:3000"

//helper function to call apis

func httpApiCall(endpoint string) (*APIResponse, error){
	//http url
	url := fmt.Sprintf("%s/%s", apiBaseUrl, endpoint)

	//setup http client
	client := &http.Client{
		Timeout: 5 * time.Second,
	}

	resp, err := client.Get(url)
	if err !=nil {
		return nil, fmt.Errorf("Request failed: %w", err)
	}

	defer resp.Body.Close()

	body, err := ioutil.ReadAll(resp.Body)

	if err !=nil {
		return nil, fmt.Errorf("failed reading response %w", err)
	}

	if resp.StatusCode >=400 {
		return nil, fmt.Errorf("Request failed %d: %s", resp.StatusCode, string(body))
	}

	var apiResp APIResponse
	err = json.Unmarshal(body, &apiResp)

	if err !=nil {
		return nil, fmt.Errorf("json unmarshal failed: %w", err)
	}
	return &apiResp, nil
}

func ValidateEmail(ctx context.Context) (string, error){
	resp, err := httpApiCall("validate-email")
	if err != nil {
		return "", err
	}
	return resp.Status, nil
}

func CreateUser(ctx context.Context) (string, error){
	resp, err :=httpApiCall("create-user")
	if err !=nil {
		return "", err
	}

	return resp.Status, nil
}

func ProvisionUserAccount(ctx context.Context) (string, error){
	resp, err :=httpApiCall("provision-account")
	if err !=nil {
		return "", err
	}
	return resp.Status, nil
}

func SendWelcome(ctx context.Context) (string, error){
	resp, err :=httpApiCall("send-welcome")
	if err !=nil {
		return "", err
	}
	return resp.Status, nil
}

func Log(ctx context.Context) (string, error){
	resp, err :=httpApiCall("log")
	if err !=nil {
		return "", err
	}
	return resp.Status, nil
}
With Temporal, activities are automatically retried, making them fault-tolerant and durable. And yes, I said durable; you can run a workflow for as long as you want, pause it for as long as you need, and it will continue without issues. This frees you up to focus solely on your business logic.
Workflow
A workflow in Temporal is a piece of code that defines the sequence of activities. Temporal guarantees that it will run the workflow exactly once from start to finish, even if your worker crashes, the network goes down, or you're in the middle of an upgrade. Great, right?
We've learned that Temporal activities are called side effects because they change the state of the system. In contrast, Temporal workflows are deterministic, meaning they will always produce the same output given the same input. The magic of Temporal lies in its ability to replay workflows from event logs, running them repeatedly while maintaining state. But if a workflow is not deterministic, the stored state may not apply to the current run, which breaks this foundation concept.
This deterministic behavior doesn't come for free. As the saying goes, "With great power comes great responsibility." You must ensure that no randomness or non-determinism enters your workflow code. Some ways to ensure that are :
|
Don’t Use |
Instead Use |
|
time.Now() |
workflow.Now(ctx) |
|
rand.Int() |
Pass random value from outside of use workflow.SideEffect |
|
http.get() |
Call an activity to make the HTTP request |
As a rule of thumb, anything that is non-deterministic should be in an activity.
For our demo, let's add the following content into the workflows.go file.
package workflow

import (
	"go.temporal.io/sdk/workflow"
	"go.temporal.io/sdk/temporal"
	"time"
)

func UserOnboardingWorkflow(ctx workflow.Context) error {
	logger :=workflow.GetLogger(ctx)

	activityOptions := workflow.ActivityOptions{
		StartToCloseTimeout: 10 * time.Second,
		RetryPolicy: &temporal.RetryPolicy{
			InitialInterval: time.Second,
			BackoffCoefficient: 2.0,
			MaximumAttempts: 3,
		},
	}

	ctx = workflow.WithActivityOptions(ctx, activityOptions)

	var result string
	var err error

	err = workflow.ExecuteActivity(ctx, ValidateEmail).Get(ctx, &result)
	if err != nil {
		logger.Error("Validate Email failed", "Error", err)
		return err
	}
	logger.Info("ValidateEmail completed", "Result", result)

	err = workflow.ExecuteActivity(ctx, CreateUser).Get(ctx, &result)
	if err != nil {
		logger.Error("Create User failed", "Error", err)
		return err
	}
	logger.Info("Create User completed", "Result", result)

	err = workflow.ExecuteActivity(ctx, ProvisionUserAccount).Get(ctx, &result)
	if err != nil {
		logger.Error("Provision User Account failed", "Error", err)
		return err
	}
	logger.Info("Provision User Account completed", "Result", result)

	err = workflow.ExecuteActivity(ctx, SendWelcome).Get(ctx, &result)
	if err != nil {
		logger.Error("SendWelcome failed", "Error", err)
		return err
	}
	logger.Info("SendWelcome completed", "Result", result)

	err = workflow.ExecuteActivity(ctx, Log).Get(ctx, &result)
	if err != nil {
		logger.Error("Loging failed", "Error", err)
		return err
	}
	logger.Info("Loging completed", "Result", result)

	return nil
}
And, now let's bridge things by registering the workflow and activities with Temporal. Let's add following content to main.go file.
package main

import (
	"go.temporal.io/sdk/client"
	"go.temporal.io/sdk/worker"
	"log"
	"github.com/justramesh2000/temporal-go-demo/workflow"
)

func main(){

	//create temporal client
	temporalClient, err := client.NewClient(client.Options{})
	if err != nil {
		log.Fatalln("Unabvle to create Temporal client", err)
	}

	defer temporalClient.Close()

	worker := worker.New(temporalClient, "user-onboarding-task-queue", worker.Options{})

	//Register workflow and activities
	worker.RegisterWorkflow(workflow.UserOnboardingWorkflow)
	worker.RegisterActivity(workflow.ValidateEmail)
	worker.RegisterActivity(workflow.CreateUser)
	worker.RegisterActivity(workflow.ProvisionUserAccount)
	worker.RegisterActivity(workflow.SendWelcome)
	worker.RegisterActivity(workflow.Log)


	err = worker.Run(nil)
	if err != nil {
		log.Fatalln("Unable to start worker", err)
	}
}
Let's execute this, assuming you are in the root directory
go mod tidy
go run ./cmd/main.go
By running the registration part of our workflow, we've created a Temporal worker. This worker listens to a specific Temporal task queue named user-onboarding-task-queue and continuously polls for work. However, we haven't started the workflow yet—at this point, Temporal has no knowledge of it.
What we've done so far can be thought of as setting up a poller or client that is ready and waiting for Temporal to provide instructions. This poller contains all the logic needed to execute the functions, but cannot initiate executions on its own.
This is where triggering or executing the workflow comes into play. Let's create the workflow execution component. Copy and paste the following into the executerWorkflow.go file
package main
import (
	"context"
	"go.temporal.io/sdk/client"
	"log"
	"github.com/justramesh2000/temporal-go-demo/workflow"
)

func main() {
	temporalClient, err := client.NewClient(client.Options{})
	if err != nil {
		log.Fatalln("Unable to create temporal client")
	}

	defer temporalClient.Close()

	workflowOptions := client.StartWorkflowOptions{
		ID:        "user-onboarding-workflow",
		TaskQueue: "user-onboarding-task-queue",
	}

	workflowExecution, err := temporalClient.ExecuteWorkflow(context.Background(), workflowOptions, workflow.UserOnboardingWorkflow)
	if err != nil {
		log.Fatalln("Failed to execute workflow", err)
	}

	log.Println("Started workflow", "WorkflowID", workflowExecution.GetID(), "RunID", workflowExecution.GetRunID())


	err = workflowExecution.Get(context.Background(), nil)
	if err != nil {
		log.Fatalln("Workflow failed", err)
	}

	log.Println("Workflow completed successfully")

}
Time to trigger the workflow and see it in action. Before that, though, ensure that the express.js application and the activity worker ( i.e, main.go ) are running. Execute the following command from root directory.
go run ./execute/executerWorkflow.go
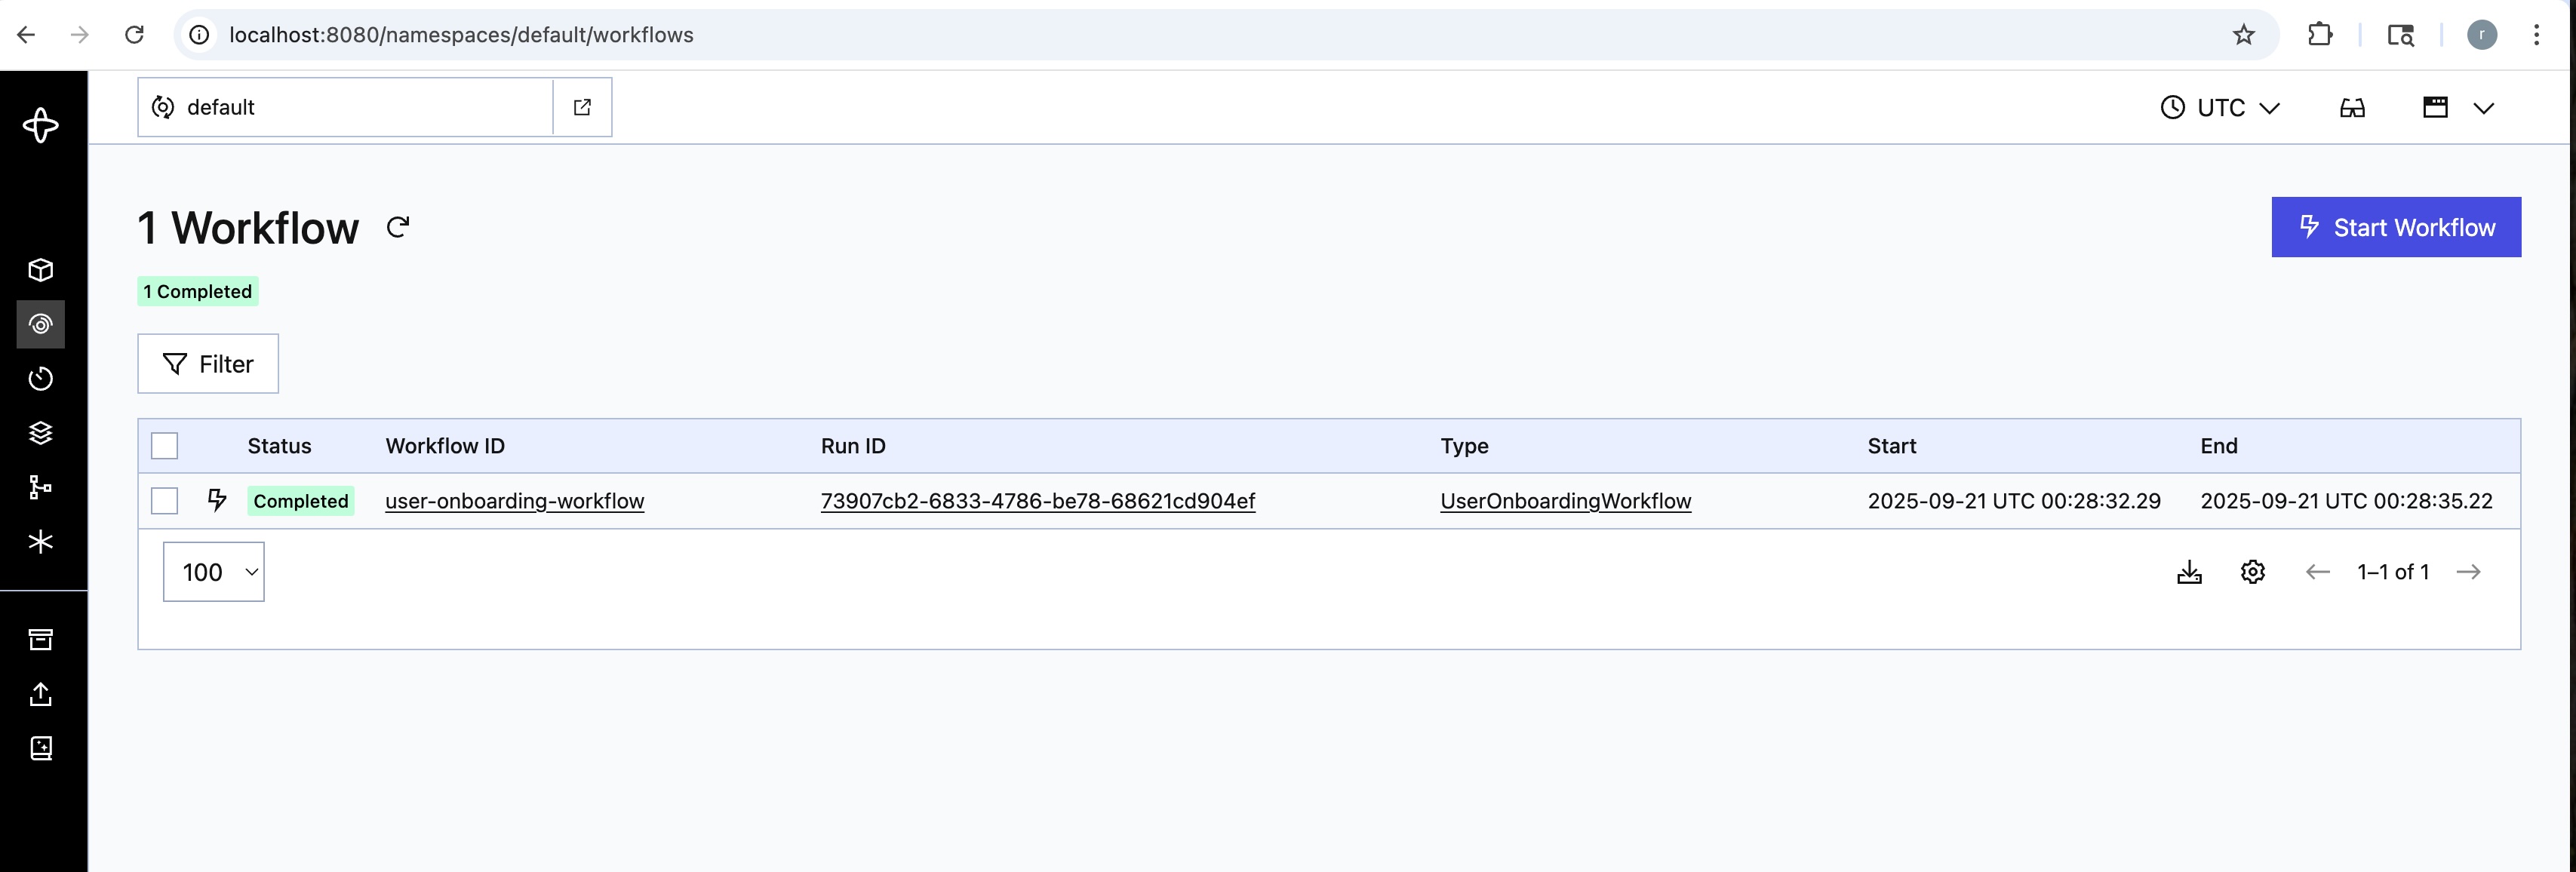
After this, you should see workflow run to completion in the Temporal UI at http://localhost:8080/namespaces/default/workflows: something like
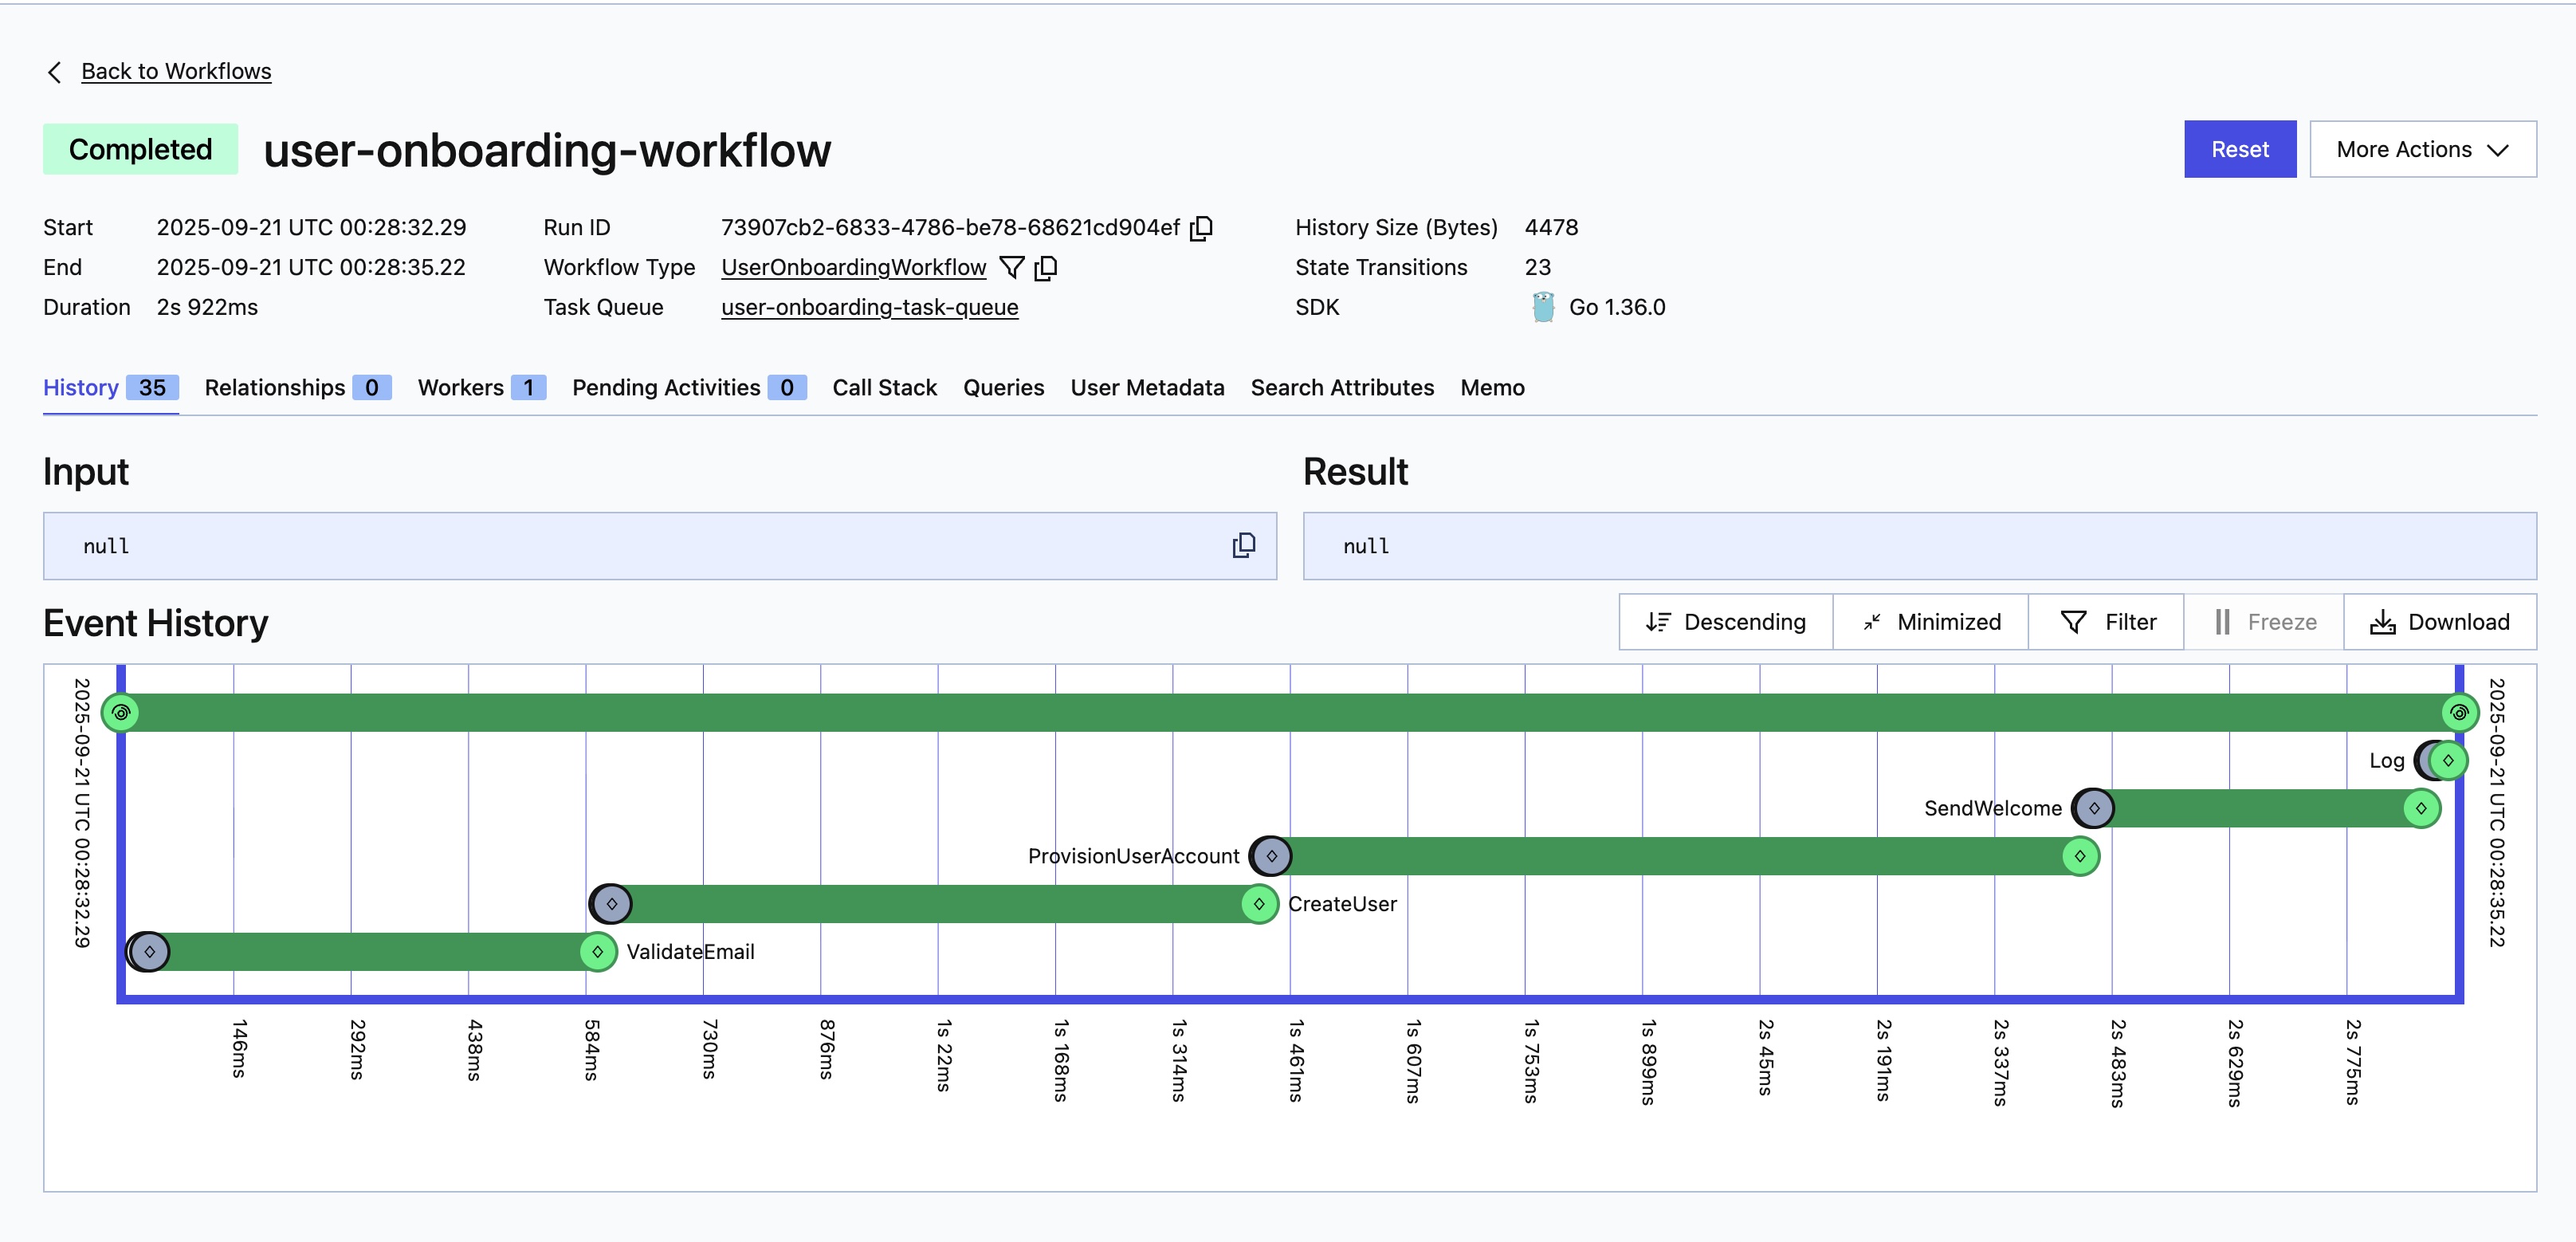
And, if you click on the workflow, you will be able to see details of activities:
You can simulate failures by killing express.js. If you re-trigger the workflow, you'll see how Temporal automatically retries. You can also introduce longer delays in express.js, which gives you a chance to kill it during workflow execution and observe how Temporal retries only the activities that failed in the previous run.
Conclusion
Temporal, as an orchestrator or workflow engine, is a powerful tool that addresses a fundamental need shared by nearly all organizations: a robust and reliable orchestration system.
It allows engineers to focus solely on writing core business logic without worrying about retries, state management, or failure handling. When writing this business logic, engineers should ensure that it is as idempotent as possible, and that proper diagnostics and observability are embedded throughout. By following these standard practices, we can build a highly reliable and maintainable system.
For simplicity, all of the code is present at https://github.com/justramesh2000/temporal-go-demo if you just want to download and run.
Opinions expressed by DZone contributors are their own.
Comments