

Create Your Own GPS-Tracker Using LoRa
This post describes how to create your own GPS tracker using Pycom LoPy microcontrollers.
Join the DZone community and get the full member experience.
Join For FreeThis post describes how to create your own GPS tracker using Pycom LoPy microcontrollers.
You will also learn how to build your own single-channel LoRa Nano Gateway.
Do you prefer guided details and explanations? There is a video recording available from my technical talk at the IBM Developer Europe Crowdcast channel.
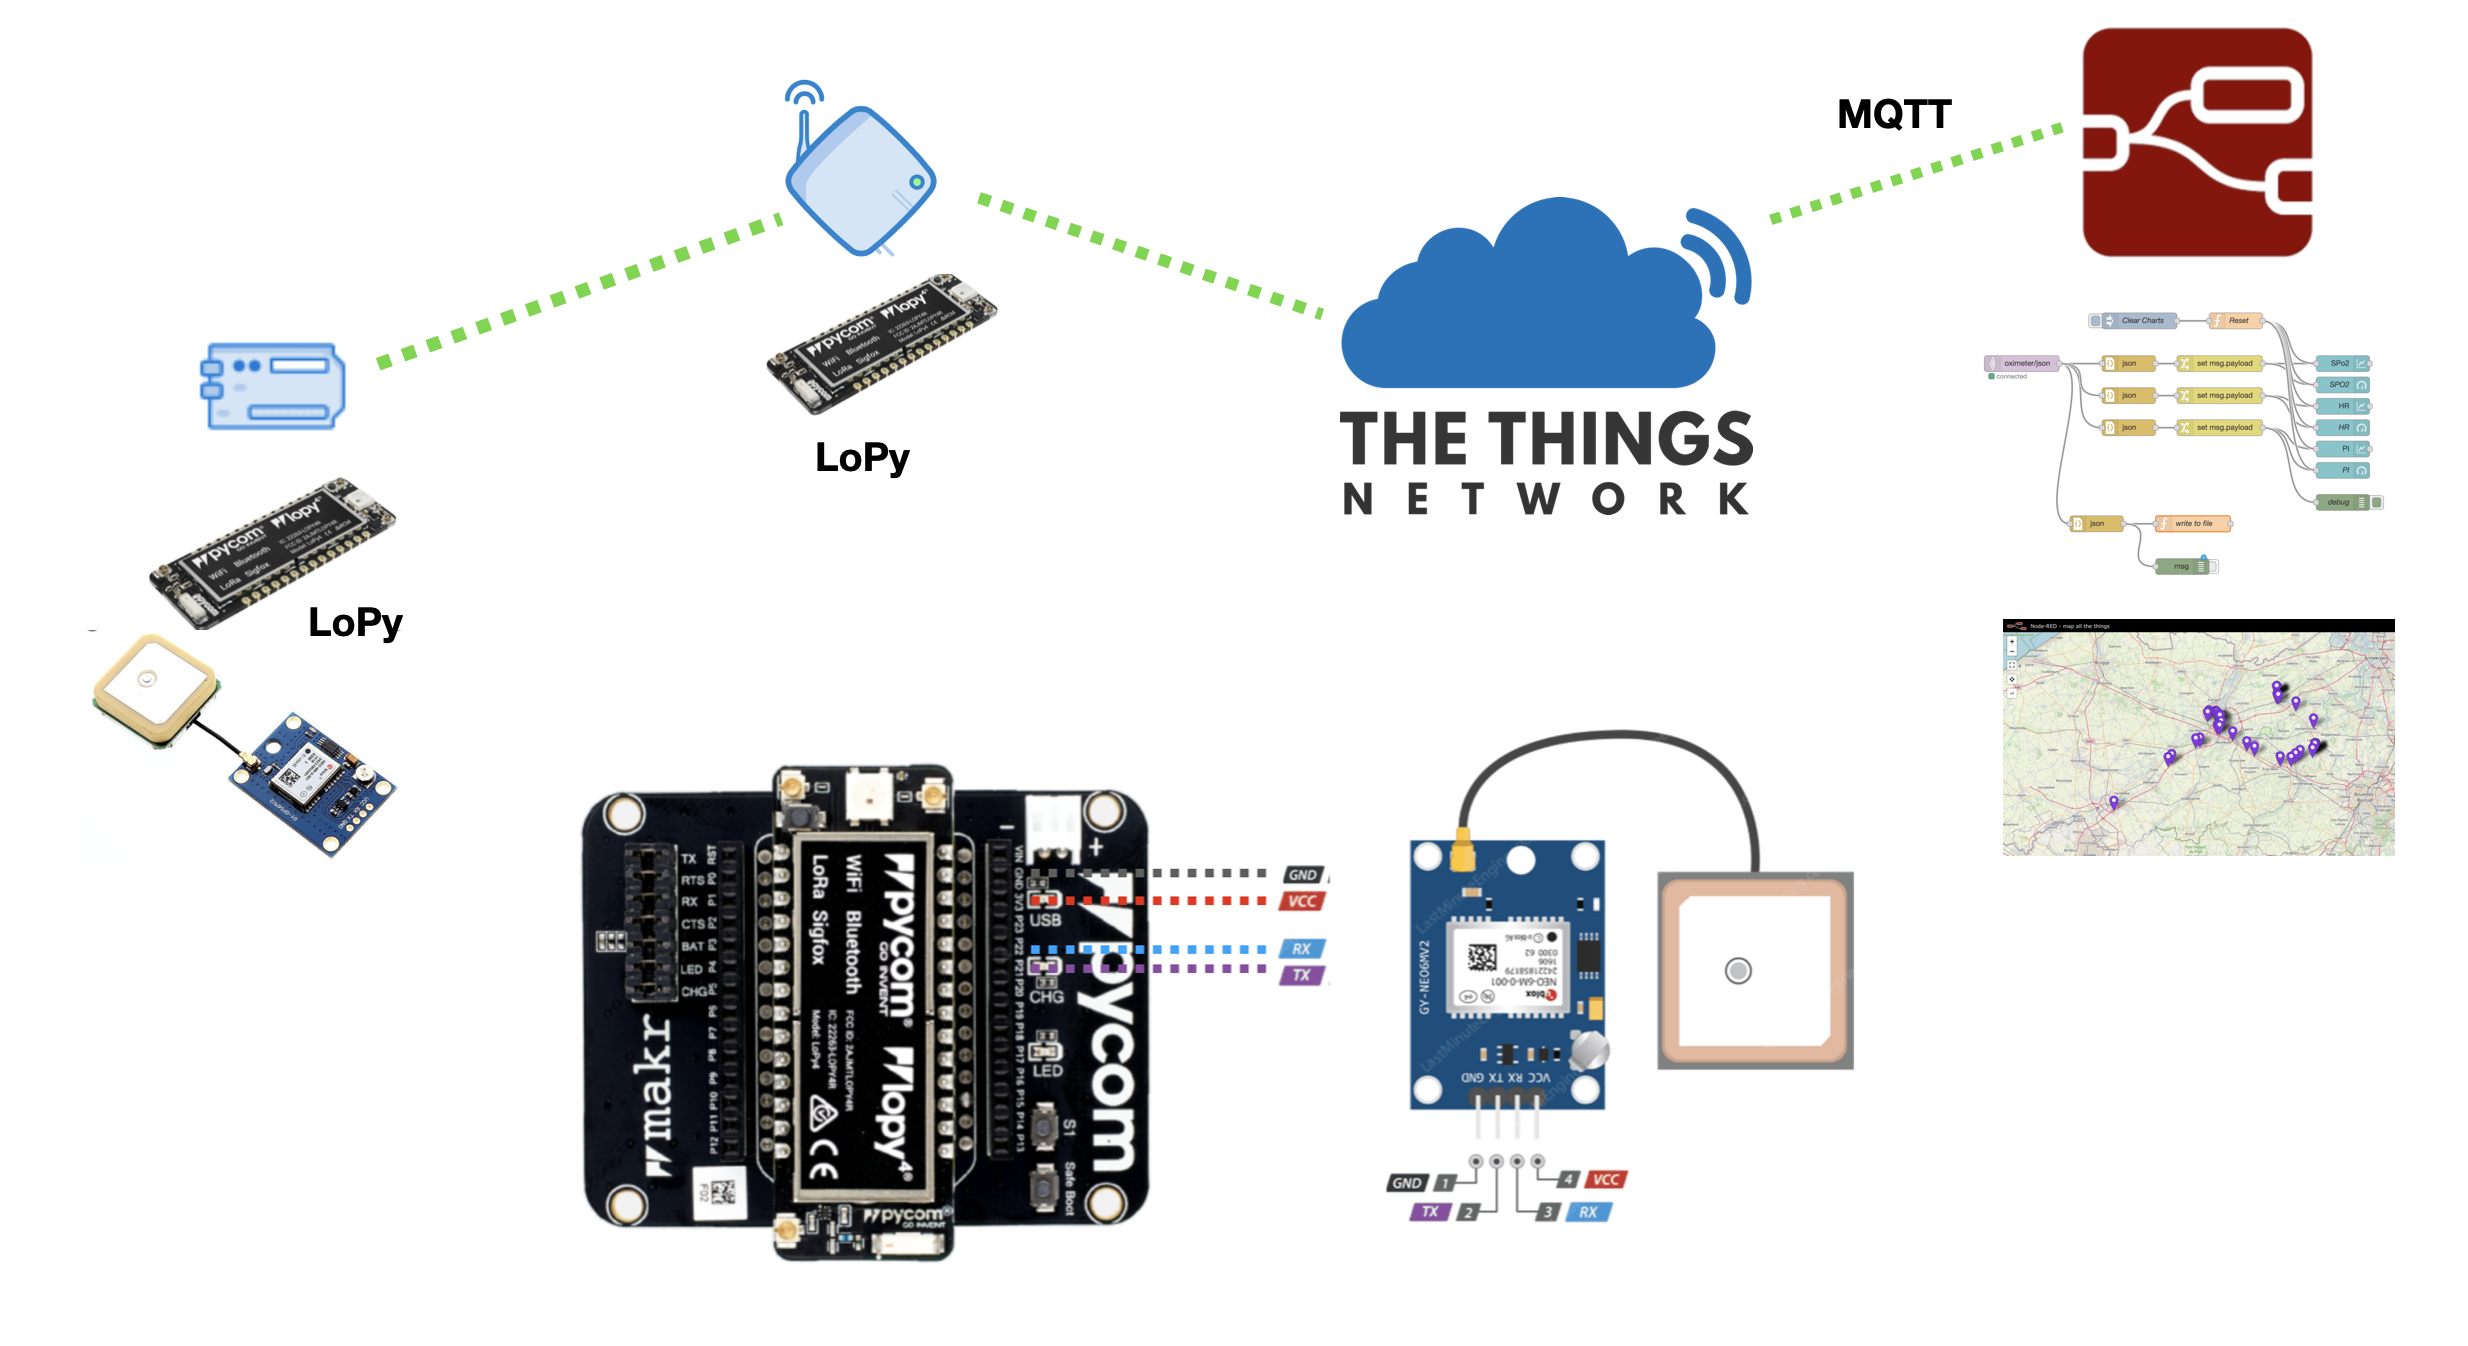
The architecture diagram below shows the different components we will cover in our setup.
A LoPy Node, used as a GPS tracking device, sending data to a LoRa Nano-Gateway.
The gateway itself is connected to 'TheThingsNetwork' via WiFi.
Finally, we'll have Node-Red running in IBM Cloud which will pick up the MQTT messages from TheThingsNetwork, store those into a Cloudant database, and visualize the GPS data points on a map.
Hardware Needed:
- 1 LoPy as LoRa node + Antenna (868MHz/915MHz) + 3.7V LiPo Battery
- 1 uBlox NMEA Serial GPS Module with Antenna
- 1 LoPy as LoRa Nano-Gateway + Antenna (868MHz/915MHz)
- 2 Pycom Expansion boards
References to the hardware used can be found at https://pycom.io/products/hardware
Software Needed:
In order to program the LoPy microcontrollers we will use Pymakr — a plugin for Atom or Visual Studio Code.
The LoPy from Pycom.io is a multi-network hardware module based on the ESP32 microcontroller. Most of the modules (functions and libraries) are built into MicroPython.
1. Setup a LoRaWAN Nano Gateway and Connect to TheThingsNetwork
The source code for the LoRaWAN Nano-Gateway can be found here.
Unzip the download file and then find the lorawan-nano-gateway folder under examples.
All details for setting up the Nano-Gateway can be found at:
https://pycom.io/lopy-lorawan-nano-gateway-using-micropython-and-ttn/
This will guide you to defining a gateway on TheThingsNetwork, set the configuration parameters according to your region, uploading the code to the board and verifying it's operational within TheThingsNetwork console.
You can get an account for free at TheThingsNetwork. It serves as a registration point for our gateway as well as an integration point for our data packets we will send from our LoRa GPS Tracker node.
2. Setup a Lora Node With GPS Tracker
Getting started with The Things Network:
https://core-electronics.com.au/tutorials/pycom/getting-started-on-the-things-network-tutorial.html
Follow the instructions on TheThingsNetwork to register and activate your LoPy device.
https://www.thethingsnetwork.org/docs/devices/lopy/usage.html
There are two ways to activate the LoPy via either OTAA (Over the Air Activation) or ABP (Activation By Personalization). OTAA is the preferred method, certainly if you have a lot of devices, but doesn't seem to be working with the LoRa Nano-Gateway.
The following sample code uses ABP activation and once the LoRa communication is active it will send 10 bytes as 10 separate packets.
xxxxxxxxxx
from network import LoRa
import binascii
import struct
lora = LoRa(mode=LoRa.LORAWAN)
dev_addr = struct.unpack(">l", binascii.unhexlify('XXXXXXX'))[0]
nwk_swkey = binascii.unhexlify('XXXXXXXXXXXXXXXXXXXXXXXXXXXXXXXX')
app_swkey = binascii.unhexlify('XXXXXXXXXXXXXXXXXXXXXXXXXXXXXXXX')
for i in range(3, 16):
lora.remove_channel(i)
lora.add_channel(0, frequency=config.LORA_FREQUENCY, dr_min=0, dr_max=5)
lora.add_channel(1, frequency=config.LORA_FREQUENCY, dr_min=0, dr_max=5)
lora.add_channel(2, frequency=config.LORA_FREQUENCY, dr_min=0, dr_max=5)
lora.join(activation=LoRa.ABP, auth=(dev_addr, nwk_swkey, app_swkey))
s = socket.socket(socket.AF_LORA, socket.SOCK_RAW)
s.setsockopt(socket.SOL_LORA, socket.SO_DR, config.LORA_NODE_DR)
s.setblocking(False)
for i in range (10):
pkt = b'PKT #' + bytes([i])
print('Sending:', pkt)
s.send(pkt)
time.sleep(4)
rx, port = s.recvfrom(256)
if rx:
print('Received: {}, on port: {}'.format(rx, port))
time.sleep(6)
Now we have configured a LoRa node we should see the packets coming in via the console of the Nano-Gateway as well as within the console of TheThingsNetwork.
Next, we can add the code for reading the fixed GPS location data.
The sample code can be found here.
In the example, we make use of the 'adafruit_gps' library and we only send a LoRa packet once we have a fixed GPS location.
This is all great, but the data we receive are all bytes! So how do we get this into a usable format? We have to decode it!
Goto TheThingsNetwork-console and select your application. Next, select the tab Payload Formats and define a decoder. Don't forget to save it.
function Decoder(bytes, port) {
console.log(bytes)
return {
GPSCoordinates: String.fromCharCode.apply(null, bytes)
};
}
Now that we have a GPS tracker connected via LoRa, wouldn't it be nice to store this into a database and show the GPS data onto a map?
For this, I chose to work with Node-Red within the IBM Cloud environment.
Easy to install, and completely free using a Lite account. You can signup for an account here.
By default the Node-Red flows are stored within a Cloudant database, so we can easily use that same database to store our GPS data.
You can find the example Node-Red flow here.
The GPS data is gathered from TheThingsNetwork via MQTT and stored into Cloudant.
In order to get the data via MQTT from TheThingsNetwork you will need to create/generate a new access key. Goto TheThingsNetwork-console and select your application. You can find the access keys within the settings tab of your application. The generated key can be found at the bottom of the application overview page.
More details on usage of MQTT with 'TheThingsNetwork' can be found here.
Conclusion
This article should get you started with the basics of IoT using Lora communication.
If you want to see all this in action, there is a video recording available from my technical talk at the IBM Developer Europe Crowdcast channel.
There I also show how to connect the Lora GPS tracker with a public Lora communication provider Proximus in Belgium.
Are you thinking of other use cases for IoT using Lora?
Opinions expressed by DZone contributors are their own.
Comments