Developing Spring Boot Applications with In-Memory Database
Learn how to use Spring Boot Ignite extensions for developing microservices with Apache Ignite.
Join the DZone community and get the full member experience.
Join For FreeI am a big fan of in-memory computing and Apache Ignite is one my favorite platform for developing high-performance backend applications. Recently, the Apache Ignite team announced a new extension for developing a Spring Boot application with the Ignite database. The full documentation of the extension is available here.
The main purpose of the extension is to integrate Ignite into Spring Boot application with minimal configuration. This autoconfigure module serves in two different flavors:
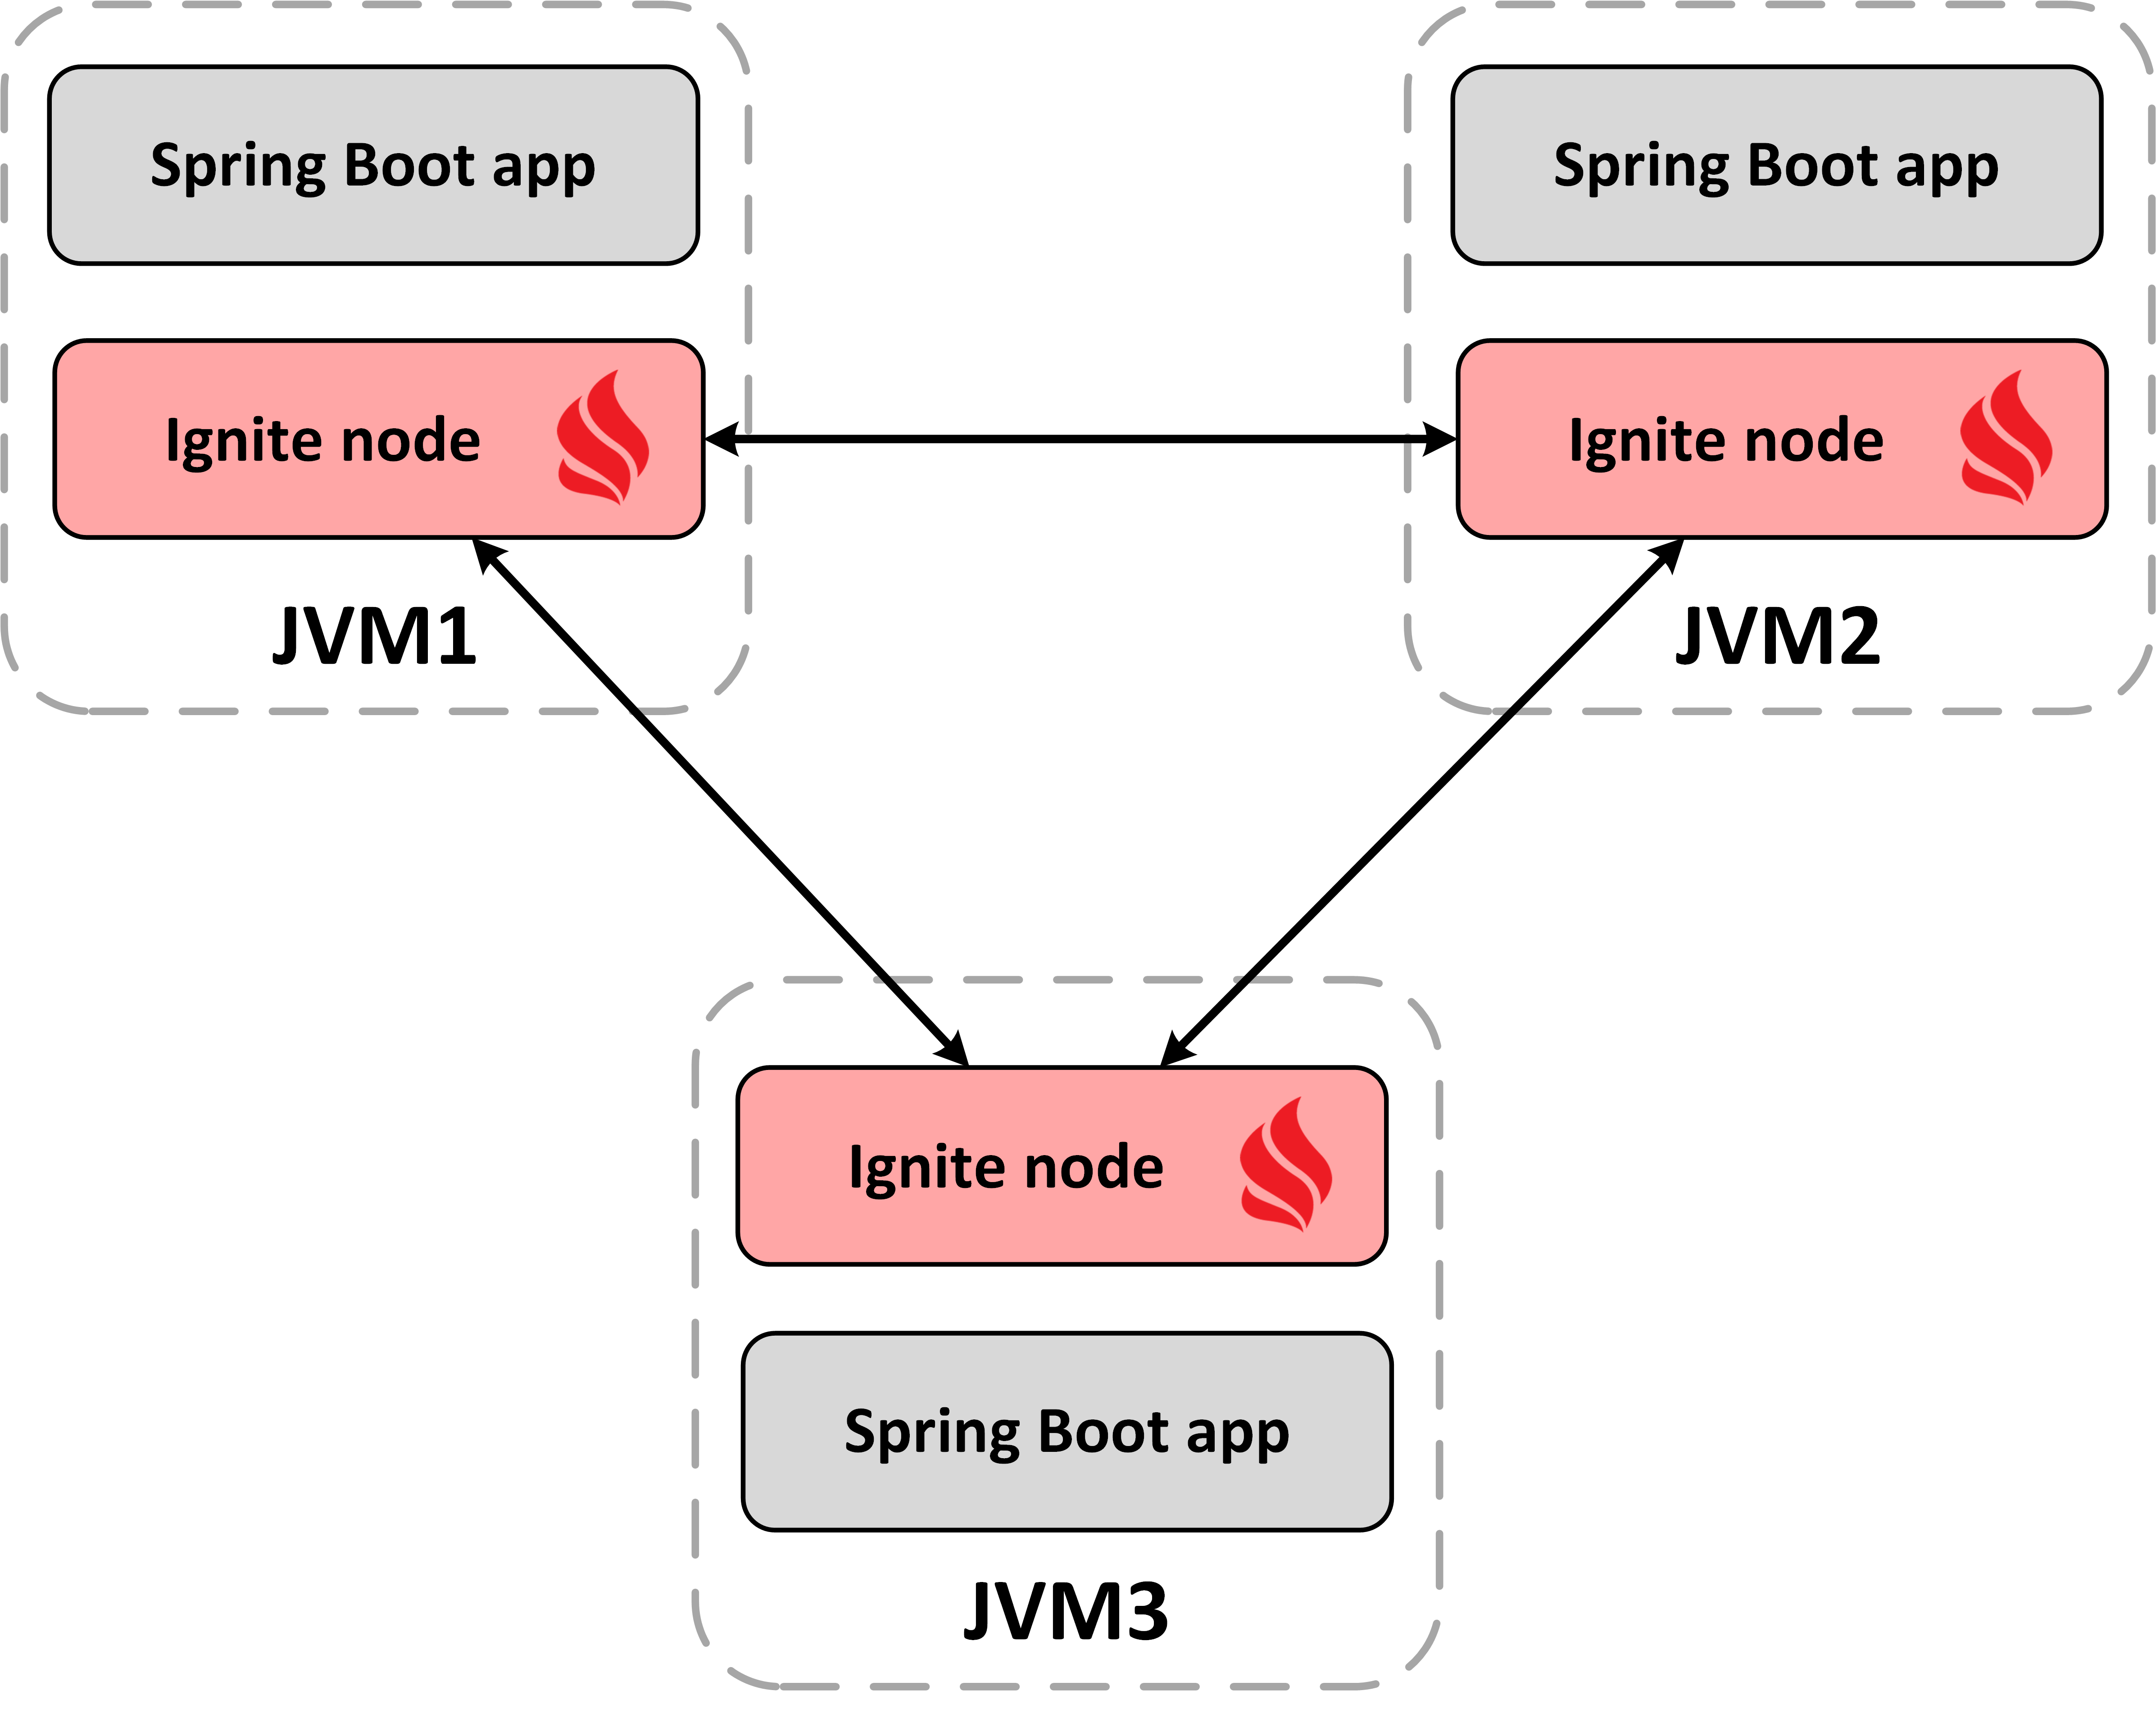
ignite-spring-boot-autoconfigure-ext — Provides autoconfiguration capabilities for Ignite server and client nodes within Spring Boot application. Ignite node (server/client) will be running on the same JVM that uses the Spring boot application (see figure 1 below). Read more about the Ignite cluster topology in the sample chapter of the book.
ignite-spring-boot-thin-client-autoconfigure-ext — Configure an Ignite thin client for the Spring Boot application to connect to the Ignite cluster.
In this blog post, I am going to develop a simple Spring Boot application with the "ignite-spring-boot-autoconfigure-ext" extension to explore the autoconfiguration capabilities of the module.
To effectively demonstrate the capabilities of "ignite-spring-boot-autoconfigure-ext," I am going to create a simple Spring Boot web application that will expose a REST API "/getQuote" and use the Ignite node as an in-memory database. The project we have you work within this post is fictitious and simplistic, it would be best for you to have the source code that accompanies the article. You can check out the source code from Github.
Now that you have had a moment to peruse the code, let's develop the application from scratch. It will take not more than five minutes.
Step 1. Create a Maven project. Use the following command to create a Maven project.
mvn archetype:generate -DartifactId=springboot-ext-for-ignite -DgroupId=com.blu.std -DarchetypeArtifactId=maven-archetype-quickstart -DinteractiveMode=false
Step 2. Add the following Spring Boot dependencies into the project POM file.
xxxxxxxxxx
<dependency>
<groupId>org.springframework.boot</groupId>
<artifactId>spring-boot-starter-web</artifactId>
</dependency>
<dependency>
<groupId>org.springframework.boot</groupId>
<artifactId>spring-boot-starter-test</artifactId>
<scope>test</scope>
<exclusions>
<exclusion>
<groupId>org.junit.vintage</groupId>
<artifactId>junit-vintage-engine</artifactId>
</exclusion>
</exclusions>
</dependency>
<dependency>
<groupId>org.springframework.boot</groupId>
<artifactId>spring-boot-starter-actuator</artifactId>
</dependency>
Also, add the snippet below into the project pom.xml file.
xxxxxxxxxx
<parent>
<groupId>org.springframework.boot</groupId>
<artifactId>spring-boot-starter-parent</artifactId>
<version>2.2.2.RELEASE</version>
<relativePath/>
</parent>
The spring-boot-starter-parent is a special Spring Boot starter project that provides default configurations for our project.
Step 3. Now, add Ignite Maven artifacts as dependencies show below.
xxxxxxxxxx
<dependency>
<groupId>org.apache.ignite</groupId>
<artifactId>ignite-core</artifactId>
<version>${ignite.version}</version>
</dependency>
<dependency>
<groupId>com.h2database</groupId>
<artifactId>h2</artifactId>
<version>${h2.version}</version>
</dependency>
<dependency>
<groupId>org.apache.ignite</groupId>
<artifactId>ignite-indexing</artifactId>
<version>${ignite.version}</version>
</dependency>
<dependency>
<groupId>org.apache.ignite</groupId>
<artifactId>ignite-log4j</artifactId>
<version>${ignite.version}</version>
</dependency>
<dependency>
<groupId>org.apache.ignite</groupId>
<artifactId>ignite-spring-boot-autoconfigure-ext</artifactId>
<version>1.0.0</version>
</dependency>
Here, ignite-spring-boot-autoconfigure-ext is the key Maven dependency. Once added, the Spring context will create an Ignite instance on startup automatically. Don't forget to replace the ignite.version parameter with your version of Ignite. I am going to Ignite version 2.8.0 for this project.
Step 4. Create a folder named resources under the /src/main directory and add the following Ignite node configuration into the application.yml file as shown below.
xxxxxxxxxx
ignite
igniteInstanceNamespring-boot-embeded-ignite-instance
communicationSpi
localPort5555
dataStorageConfiguration
defaultDataRegionConfiguration
initialSize10485760 #10MB
dataRegionConfigurations
namedataregion
initialSize104857600 #100MB
cacheConfiguration
namequote
queryEntities
tableNameQUOTE
keyFieldNameID
keyTypejava.lang.Long
valueTypejava.lang.Object
fields
IDjava.lang.Long
VALjava.lang.String
Most of the Ignite configurations are uses by default. However, we added a cache/table named QUOTE with two columns: ID, VAL.
Step 5. Add the Spring CommandLineRunner interface into the Java class App. The CommandLineRunner interface will run once after the application startup and fill the QUOTE table with a few test data.
x
public CommandLineRunner runner(){
return new CommandLineRunner() {
private Ignite ignite;
public void run(String... args) throws Exception {
LOGGER.info("Test Ignite node setup and run some queries!");
LOGGER.info("IgniteInstanceName: " + ignite.configuration().getIgniteInstanceName());
LOGGER.info("Init the table QUOTE!!");
// get the cache "quote" from the application.yml
IgniteCache<Long, String> cache_quote = ignite.cache("quote");
String qry = "MERGE into QUOTE(ID, VAL) values (?, ?)";
// insert a few rows
cache_quote.query(new SqlFieldsQuery(qry).setArgs(1L,"Today you are you!")).getAll();
cache_quote.query(new SqlFieldsQuery(qry).setArgs(2L,"Today was good.")).getAll();
cache_quote.query(new SqlFieldsQuery(qry).setArgs(3L,"Today is the only day.")).getAll();
cache_quote.query(new SqlFieldsQuery(qry).setArgs(4L,"What is not started today is never finished tomorrow.")).getAll();
}
};
}
Step 6. Add a new Java class with the name DemoController , which will be the REST controller for the web application.
xxxxxxxxxx
public class DemoController {
private Ignite ignite;
private static final Logger LOGGER = LoggerFactory.getLogger(DemoController.class);
private static final String QUOTE_CACHE_NAME= "quote";
("/")
public String index() {
return "Spring Boot Hello-world application for demo!";
}
("/getQuote")
public String getQuote() {
LOGGER.info("getQuote method executes");
final int ID = new Random().nextInt(4)+1;
IgniteCache<Long, String> cache_quote = ignite.cache(QUOTE_CACHE_NAME);
// Query the table QUOTE
String qry = "Select * from \"quote\".QUOTE q where q.ID=?";
List<List<?>> rows = cache_quote.query(new SqlFieldsQuery(qry).setArgs(ID)).getAll();
return rows.get(0).get(1).toString();
}
}
The above REST controller contains two methods: index(), getQuote(). The getQuote() method is mapped to the URL /getQuote. Whenever you invoke the REST API, the method will query the table QUOTE and return you a quote randomly each time.
Step 7. The last step to build & run the project. Execute the following command in your favorite terminal.
xxxxxxxxxx
mvn clean install && java -jar ./target/springboot-ext-for-ignite-1.0-SNAPSHOT.jar
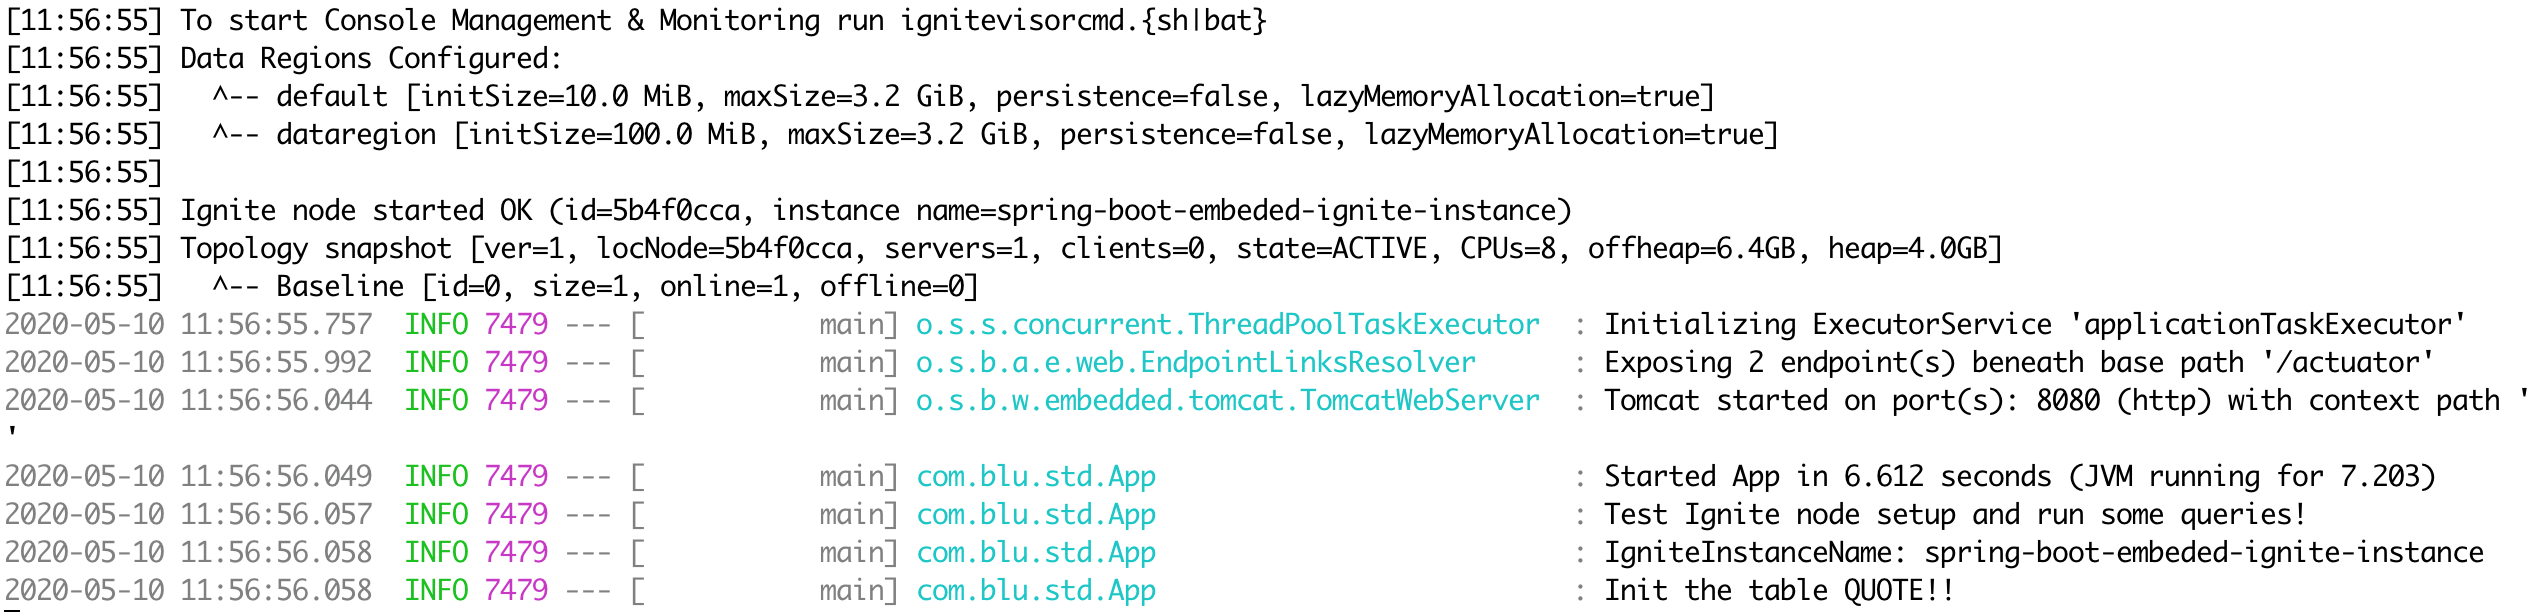
The above command should build the project and deploy (execute) a standalone Spring Boot application. You can see the results of the command in the console.
Now, if you invoke the /getQuote REST API through any command-line tool like curl or browser, you should have a similar output as shown below.

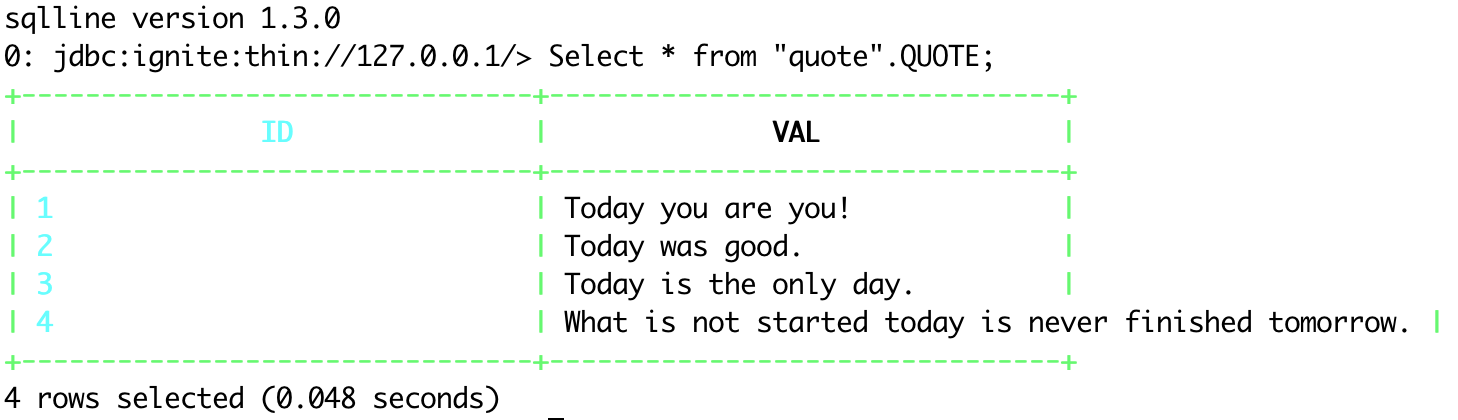
At these moments, you can also use the Ignite SQLLINE tool to connect to the Ignite node and run some queries. See the screenshot below.
Finally, create a few more instances of the same application. Just like you did before, execute the following command with a different port as follows.
xxxxxxxxxx
java -jar -Dserver.port=8888 ./target/springboot-ext-for-ignite-1.0-SNAPSHOT.jar
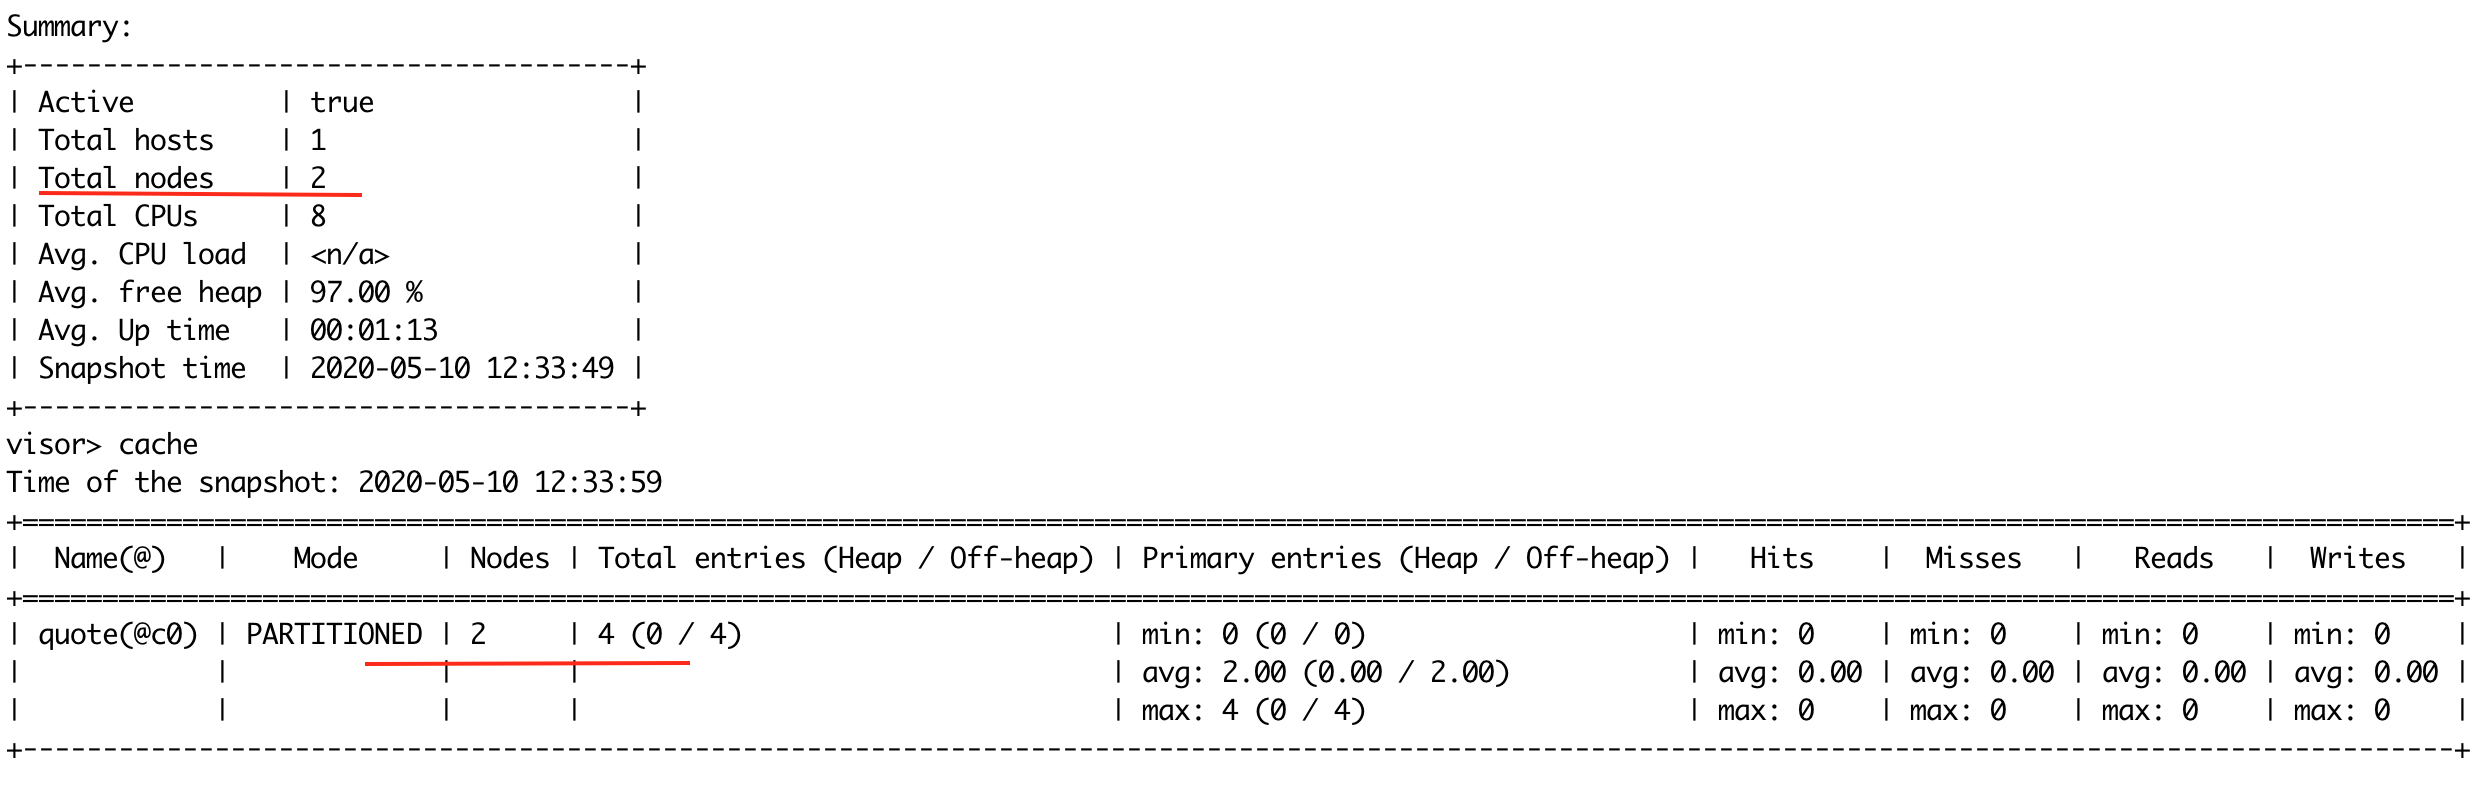
Now, you have two standalone applications that form an Ignite cluster with two nodes. Use the Ignite visor command-line tool to see a summary of the cluster.
Summary
In this short blog post, we have learned how to use an ignite-spring-boot-autoconfigure-ext extension to develop a full flagged Spring boot application with an in-memory database like Ignite.
Published at DZone with permission of Shamim Bhuiyan. See the original article here.
Opinions expressed by DZone contributors are their own.
Comments