How to Transfer Domains via API: Automate Domain Migrations Programmatically
Automate domain transfers with the Name.com API. Replace manual workflows with scalable scripts for bulk migrations, status tracking, and error handling.
Ten minutes per domain times 50 domains is roughly 8 hours of manual work, and that assumes nothing goes wrong. Stale auth codes, missed confirmation emails, forgotten unlock steps, and zero visibility into in-flight transfer status mean something frequently goes wrong. For platform engineers managing domain portfolios, the manual transfer workflow isn’t just slow. It’s a liability with no audit trail and no retry logic.
Every step of the transfer lifecycle maps directly to an API call. Scripting the workflow makes it idempotent, auditable, and repeatable. This tutorial walks through a complete implementation using the name.com API, from HTTP Basic Auth setup through bulk migration with status polling and error handling. You’ll leave with working curl commands and a Python skeleton you can ship today.
Why Manual Domain Transfers Break at Scale
The 5-to-7-day ICANN transfer window is fixed. You can’t script around it. But the human steps surrounding it are entirely the problem.
A typical manual transfer cycle looks like this: Log into the losing registrar’s UI to disable WHOIS privacy, unlock the domain, generate an auth code, copy it somewhere safe, initiate the transfer at the gaining registrar, wait for a confirmation email, click through an approval link, then check back daily until the transfer completes or times out. Each domain takes 8–12 minutes when everything works.
At 50 domains, you’re looking at 8+ hours spread across multiple sessions, with state tracked in a spreadsheet that has no retry logic, no idempotency, and no audit trail. The failure modes compound: auth codes expire (typically within 7 days, depending on TLD), unlock steps get skipped, confirmation emails land in spam, and you have no programmatic way to detect a stalled transfer until it has already failed.
The fix isn’t faster clicking. Every one of those steps, auth code retrieval, transfer initiation, status polling, cancellation, is available through a registrar API. Script them once, run them forever.
The Domain Transfer Lifecycle: What the Script Needs to Drive
Your script only needs to interact with the REST layer of the name.com API. The underlying EPP (Extensible Provisioning Protocol) standard is what registrars use to talk to each other. You don’t need to understand it to automate the workflow.
Before initiating any transfer, validate four preconditions:
- The domain is unlocked (
client transfer prohibitedflag cleared at the losing registrar) - WHOIS privacy is disabled on TLDs that require it for transfers (varies by registry)
- The domain is more than 60 days old since registration or last transfer (ICANN policy)
- Zone records are backed up, since DNS configuration doesn’t travel with the domain
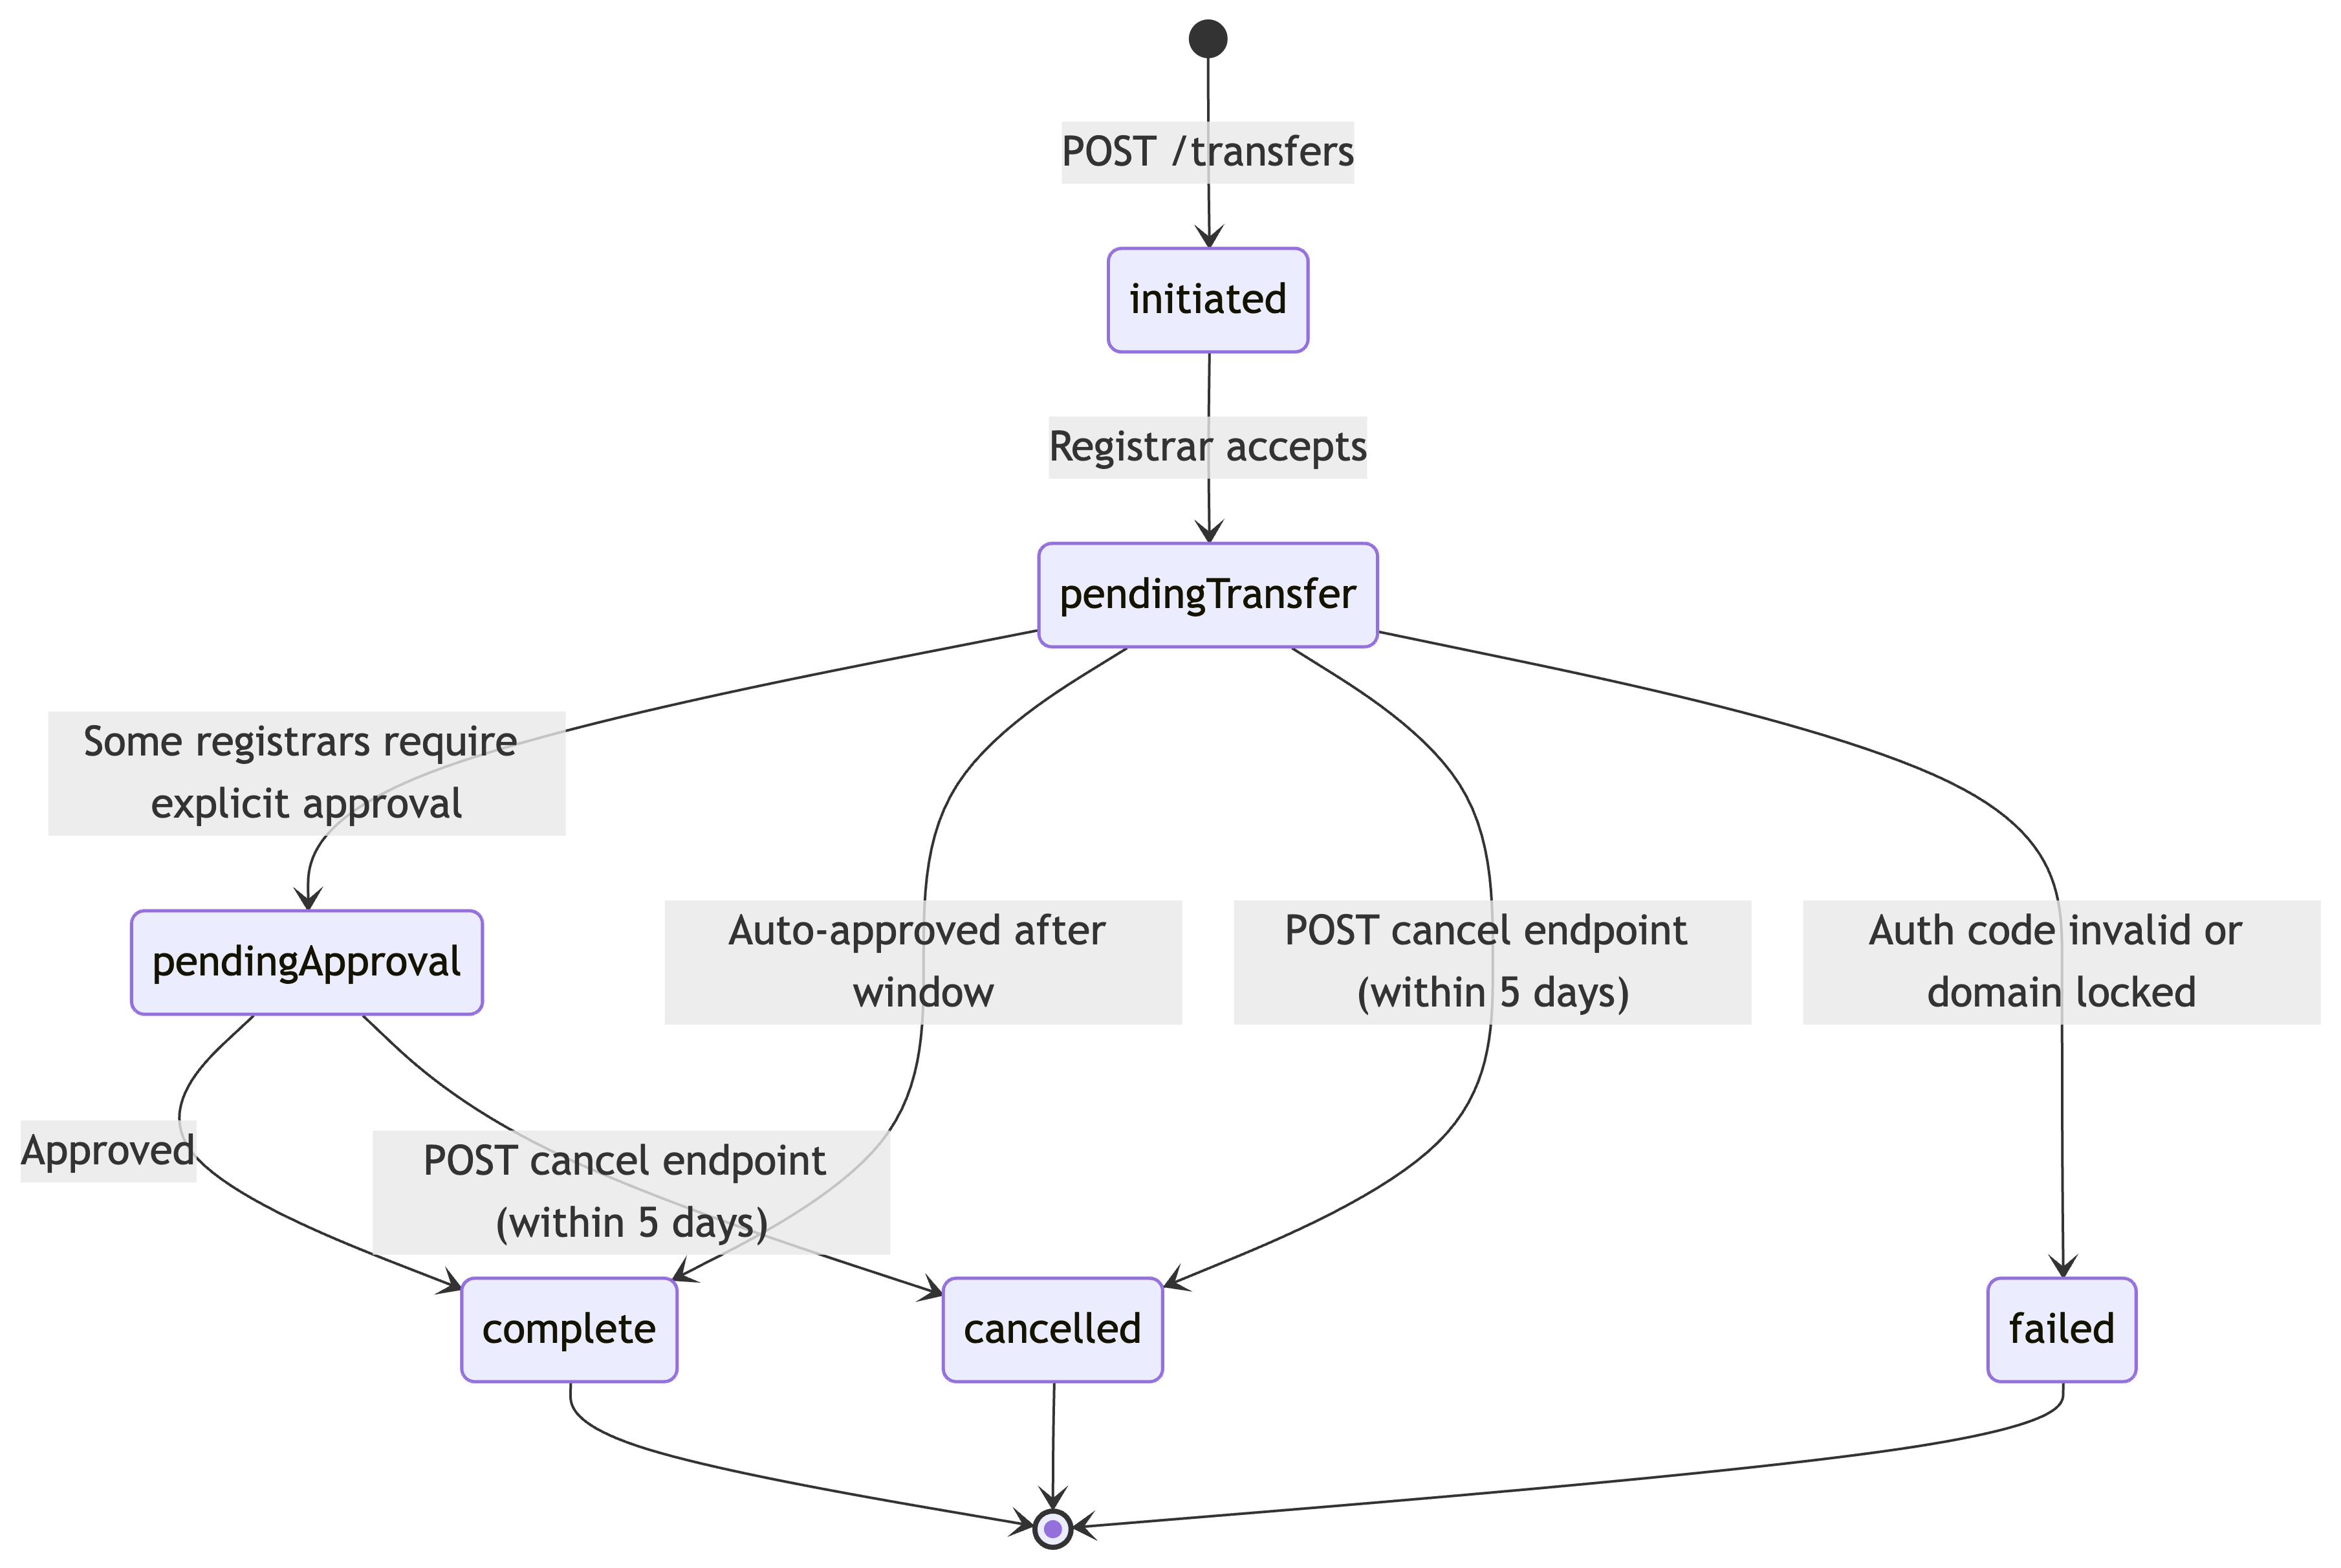
Once those pass, the transfer moves through a deterministic state machine:
The name.com API can play either role: as the losing registrar (where you retrieve auth codes for outbound transfers) or as the gaining registrar (where you initiate transfers in). This tutorial covers both.
Setting Up API Authentication for Domain Transfers
The name.com API uses HTTP Basic Auth over HTTPS. Every request requires an Authorization header containing your username and API token, Base64-encoded as username:api_token.
Generate your token at https://www.name.com/account/settings/api. It’s self-serve: no approval queue, no sales call. The token is available immediately. The same API powers domain operations for Vercel, Replit, and Netlify at production scale, so the endpoints in this tutorial are the same ones running in real infrastructure.
The base URL for all endpoints in this tutorial is https://api.name.com/core/v1. You can also use their sandbox environment at https://api.dev.name.com/core/v1.
With curl, use the -u flag:
curl -u "yourusername:your_api_token" \
  https://api.name.com/core/v1/domains
The -u flag Base64-encodes the credentials and sets the Authorization header automatically.
In Python, set up a requests.Session once and reuse it across all calls. This avoids re-encoding credentials on every request and gives you a single place to update auth when your token rotates:
import requests

session = requests.Session()
session.auth = ("yourusername", "your_api_token")
BASE_URL = "https://api.name.com/core/v1"
Retrieving the Domain Auth Code Programmatically
You’ll need this endpoint in two scenarios: scripting outbound transfers for domains you own at name.com, or building platform tooling that surfaces auth codes to your users programmatically.
One detail worth getting right: auth codes are time-sensitive. Retrieve them immediately before calling the transfer initiation endpoint, not as a pre-batch step hours earlier. For most TLDs, the codes are valid for up to 7 days, but if you pre-fetch codes for a 50-domain batch and hit unexpected errors midway through, the first codes in the set may expire before you reach them.
Endpoint: GET /domains/{domainName}/auth-code (docs)
curl -u "yourusername:your_api_token" \
  https://api.name.com/core/v1/domains/example.com:getAuthCode
Response:
{
  "authCode": "Xk9#mP2qL8wR"
}
In Python, extract the auth code and store it in a dict keyed by domain name. You’ll pass this directly into the transfer initiation call:
def get_auth_code(session, domain):
    resp = session.get(f"{BASE_URL}/domains/{domain}:getAuthCode")
    resp.raise_for_status()
    return resp.json()["authCode"]

auth_codes = {}
domains_to_transfer = []
domains_to_transfer.append('example.com') # or add more domains if you want to run with more
for domain in domains_to_transfer:
    auth_codes[domain] = get_auth_code(session, domain)

print(auth_codes)
With that in place, you can retrieve auth codes for any domains you own.
Initiating the Domain Transfer via API
Endpoint: POST /transfers (docs)
The request body requires two fields: domainName and authCode. Optionally, you can set whether you want privacy enabled by default, and the purchase/renewal price for the domain in question.
curl -u "yourusername:your_api_token" --request POST \
  --url https://api.name.com/core/v1/transfers \
  --header 'Content-Type: application/json' \
  --data '
{
  "authCode": "Xk9#mP2qL8wR",
  "domainName": "example.com",
  "privacyEnabled": true
}
'
A successful response returns HTTP 200 with the transfer status:
{
  "order": 12345,
  "totalPaid": 12.99,
  "transfer": {
    "domainName": "example.com",
    "status": "pending_transfer",
    "email": "[email protected]"
  }
Log that status field. Three error responses to handle explicitly:
409 Conflict: the domain is already in a transfer, and you cannot initiate another transfer.422 Unprocessable Entity: domain pricing is unavailable for that TLD, which typically means the TLD isn’t supported for transfer-in at this time.400 Bad Request: malformed request body. Check your command for missing required fields.
Here’s a Python function that wraps the POST. It returns the response data on success and raises with the full error body on failure, which becomes the core of the bulk migration loop in the next section:
def initiate_transfer(session, domain, auth_code):
    payload = {
        "domainName": domain,
        "authCode": auth_code
    }
    resp = session.post(f"{BASE_URL}/transfers", json=payload)
    if resp.status_code == 200:
        return resp.json()
    raise RuntimeError(f"Transfer failed for {domain}: {resp.status_code} {resp.text}")
Polling Transfer Status and Handling State Changes
Two endpoints handle status checks.
For a single transfer by domain name: GET /transfers/{domainname} (docs)
For all in-flight transfers at once, useful for a status dashboard: GET /transfers (docs)
The total transfer window is up to 7 days, so your polling loop needs to be patient. Use exponential backoff starting at 5-minute intervals, doubling each pass, capped at 60 minutes:
import time

def poll_transfer(session, domain, max_hours=168):  # 7 days
    interval = 300       # start at 5 minutes
    max_interval = 3600  # cap at 60 minutes
    elapsed = 0

    while elapsed < max_hours * 3600:
        resp = session.get(f"{BASE_URL}/transfers/{domain}")
        data = resp.json()
        status = data.get("status")

        if status == "complete":
            print(f"{domain}: transfer complete")
            return status
        elif status in ("cancelled", "failed"):
            print(f"{domain}: terminal state {status} - {data}")
            return status
        elif status == "pendingApproval":
            # Flag for manual review; expediting requires registrar dashboard action
            print(f"{domain}: pending approval - check registrar dashboard")
        elif status == None:
            # the domain is not listed for transfer
            print(f"{domain}: no transfers listed for this domain")
        # pendingTransfer is the normal in-progress state; keep polling


        time.sleep(interval)
        elapsed += interval
        interval = min(interval * 2, max_interval)

    raise TimeoutError(f"Transfer polling timed out for {domain}")

poll_transfer(session, 'example.com')
When you hit pendingApproval, some registrars allow expediting through their dashboard. A failed status deserves immediate investigation: the most common cause is a stale or incorrect auth code.
Cancellation is available via POST /transfers/{domainName}:cancel. Use it when the auth code is wrong, and you need to restart with a fresh one. Cancellation is only possible within the first 5 days of a transfer.
curl -u "yourusername:your_api_token" --request POST \
  --url https://api.name.com/core/v1/transfers/example.com:cancel
For production systems, subscribe to transfer status webhooks rather than running a long-lived polling loop. The name.com API supports webhooks that fire on state changes, which lets you react immediately without keeping a process alive for days.
Scripting a Bulk Domain Migration Workflow
The full bulk migration script reads from a CSV with two columns: domain and auth_code. Leave auth_code blank for domains already registered at name.com; the script retrieves it programmatically.
import csv
import time
import requests
from datetime import datetime

session = requests.Session()
session.auth = ("yourusername", "your_api_token")
BASE_URL = "https://api.name.com/core/v1"

def load_domains(input_csv):
    with open(input_csv) as f:
        return list(csv.DictReader(f))

def load_existing_transfers(output_csv):
    """Return domains that already have a transfer ID logged."""
    existing = {}
    try:
        with open(output_csv) as f:
            for row in csv.DictReader(f):
                if row.get("transfer_id"):
                    existing[row["domain"]] = row["transfer_id"]
    except FileNotFoundError:
        pass
    return existing

def log_result(output_csv, domain, transfer_id, status):
    with open(output_csv, "a", newline="") as f:
        writer = csv.writer(f)
        writer.writerow([domain, transfer_id, datetime.utcnow().isoformat(), status])

def run_bulk_transfer(input_csv, output_csv):
    domains = load_domains(input_csv)
    existing = load_existing_transfers(output_csv)

    for row in domains:
        domain = row["domain"]
        auth_code = row.get("auth_code", "").strip()

        # Idempotency: skip initiation if already logged
        if domain in existing:
            print(f"{domain}: already initiated, transfer ID {existing[domain]}")
            continue

        # Retrieve auth code if not in the CSV
        if not auth_code:
            try:
                resp = session.get(f"{BASE_URL}/domains/{domain}/auth-code")
                resp.raise_for_status()
                auth_code = resp.json()["authCode"]
            except Exception as e:
                print(f"{domain}: auth code retrieval failed - {e}")
                log_result(output_csv, domain, "", "auth_code_failed")
                continue

        # Initiate transfer
        try:
            payload = {
                "domainName": domain,
                "authCode": auth_code
            }
            resp = session.post(f"{BASE_URL}/transfers", json=payload)
            resp.raise_for_status()
            data = resp.json()
            log_result(output_csv, domain, domain, data.get("status"))
            print(f"{domain}: initiated, status={data.get('status')}")
        except Exception as e:
            print(f"{domain}: initiation failed - {e}")
            log_result(output_csv, domain, "", "initiation_failed")
            continue

        time.sleep(2)  # throttle between requests

if __name__ == "__main__":
    run_bulk_transfer("domains.csv", "transfer_log.csv")
Three implementation decisions in this script are worth understanding.
The idempotency check at the top of the loop prevents duplicate transfers on re-runs. If the script fails at domain 23 of 50, re-running it skips the first 22 already logged in the output CSV and picks up where it left off.
Sequential processing with a 2-second sleep is conservative by design. If you parallelize this script, handle 429 Too Many Requests with exponential backoff. The name.com API doesn’t publish a specific rate limit ceiling, so sequential processing is the safer default for batch operations.
The audit log captures domain, transfer_id, initiated_at, and status per row, with updates appended on each polling pass. Run the polling loop as a separate script pass against the same CSV rather than blocking the initiation loop for up to 7 days per domain.
Run Your First API Domain Transfer in 15 Minutes
Step 1: Generate your API token at https://www.name.com/account/settings/api. Self-serve, takes under 2 minutes.
Step 2: Run the auth code retrieval command against a domain you own at name.com:
curl -u "yourusername:your_api_token" \
  https://api.name.com/core/v1/domains/yourdomain.com:getAuthCode
Confirm you get a JSON response with an authCode field.
Step 3: Substitute the auth code into the POST /transfers curl command from the section above and fire the request. Note the status field in the response.
Step 4: Poll the status endpoint with that domain name:
curl -u "yourusername:your_api_token" \
  https://api.name.com/core/v1/transfers/yourdomain.com
Confirm the status returns pendingTransfer. From there, drop the curl commands into the Python skeleton, and you have a working bulk migration script.
For platform teams integrating domain operations into a product, the same name.com API spec covers domain search, registration, DNS management, and renewals. The transfer endpoints you’ve just used are part of a broader, consistent interface you don’t need to re-learn for each operation.
If you’ve run bulk domain migrations before, whether through a registrar API or a more manual process, what failure modes actually bit you? Auth code timing, rate limits, something else entirely? Drop it in the comments.
Comments