Easily Secure Your Spring Boot Applications With Keycloak
If you're looking for a great way to secure your Spring Boot and Java EE applications, read on to learn how to use Keycloak, an open-source server.
Join the DZone community and get the full member experience.
Join For FreeAlthough security is a crucial aspect of any application, its implementation can be difficult. Worse, it is often neglected, poorly implemented and intrusive in the code. But lately, security servers have appeared which allow for outsourcing and delegating all the authentication and authorization aspects. Of these servers, one of the most promising is Keycloak, open-source, flexible, and agnostic of any technology, it is easily deployable/adaptable in its own infrastructure.
Moreover, Keycloak is more than just an authentication server, it also provides a complete Identity Management system, user federation for third parties like LDAP and a lot more. Check it out here.
The project can also be found on GitHub.
Spring Boot and Keycloak
Keycloak provides adapters for an application that needs to interact with a Keycloak instance. There are adapters for WildFly/EAP, NodeJS, JavaScript, and, of course, for Spring Boot.
Setting Up a Keycloak Server
You have different options to set up a Keycloak server, but the easiest one is probably to grab a standalone distribution, unzip it, and voila! Open a terminal and go to your unzipped Keycloak server and from the bin directory simply run:
./standalone.sh(bat) Then open a browser and go to http://localhost:8080/auth.
Since it’s the first time that the server is running, you will have to create an admin user, so let’s create an admin user with admin as the username and admin for the password:
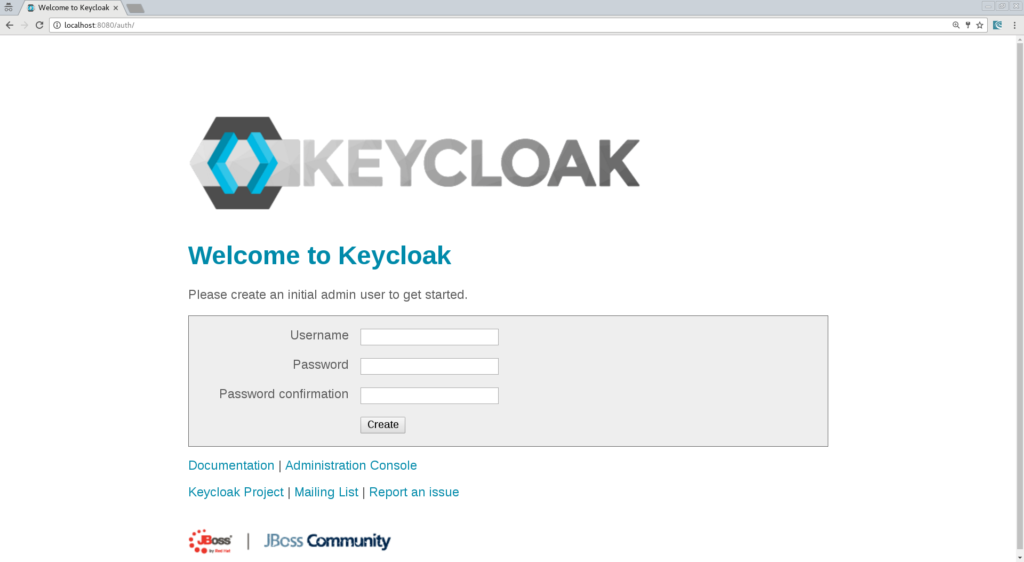
Now you can log in to your administration console and start configuring Keycloak.
Creating a New Realm
Keycloak defines the concept of a realm in which you will define your clients, which in Keycloak terminology means an application that will be secured by Keycloak. It can be a Web App, a Java EE backend, a Spring Boot, etc.
So let’s create a new realm by simply clicking the “Add realm” button:
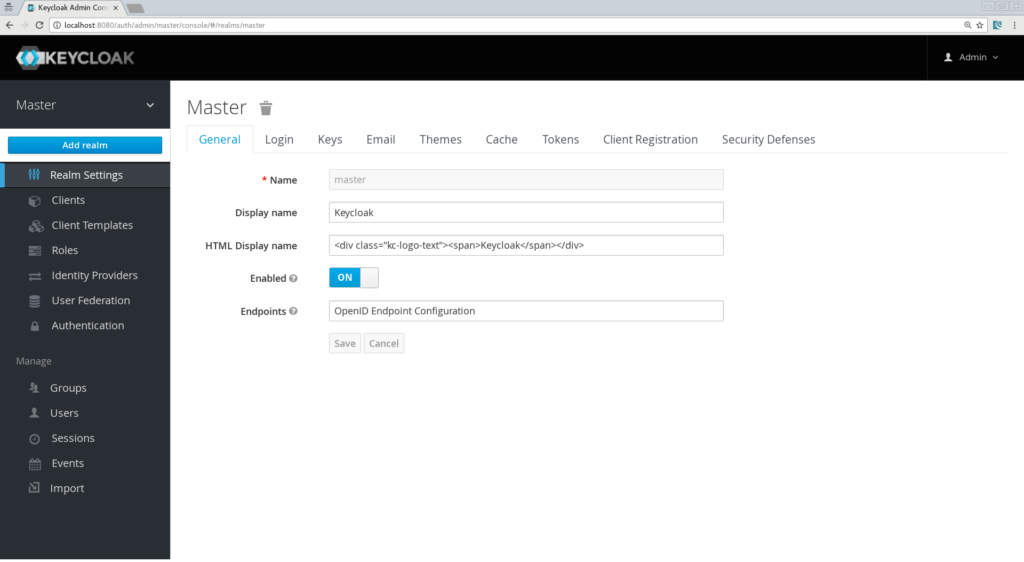
Let’s call it “SpringBoot.”
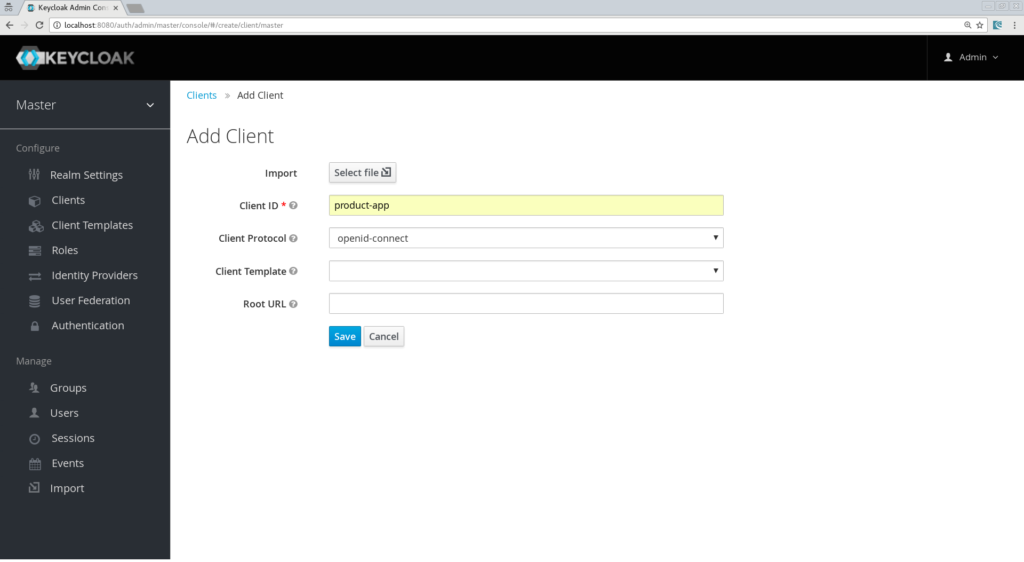
Creating the Client, the Role, and the User
Now we need to define a client, which will be our Spring Boot app. Go to the “Clients” section and click the “Create” button. We will call our client “product-app”:
On the next screen, we can keep the default settings, but just need to enter a valid redirect URL that Keycloak will use once the user is authenticated. As the value put: “http://localhost:8081/*”
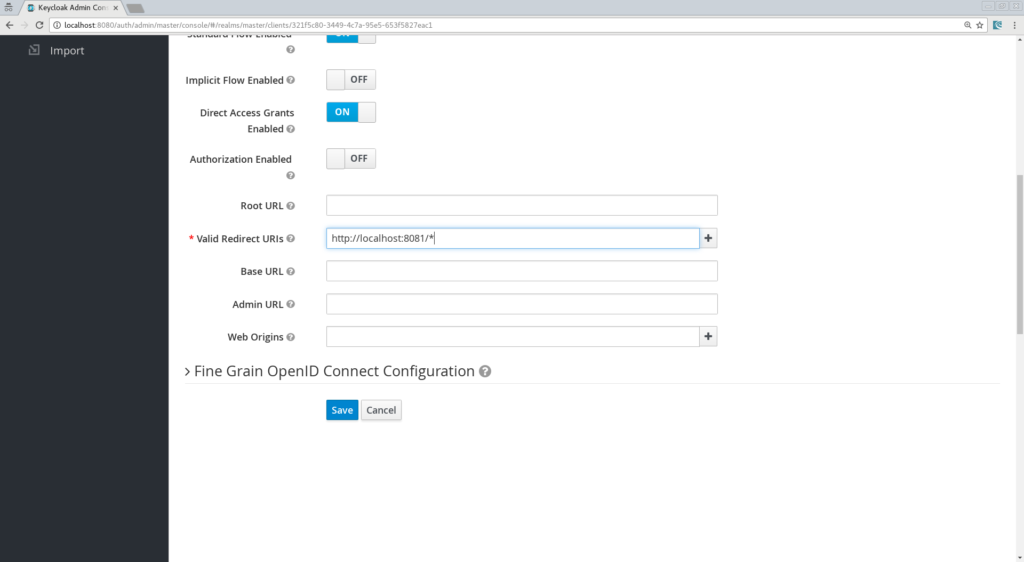
Don’t forget to Save!
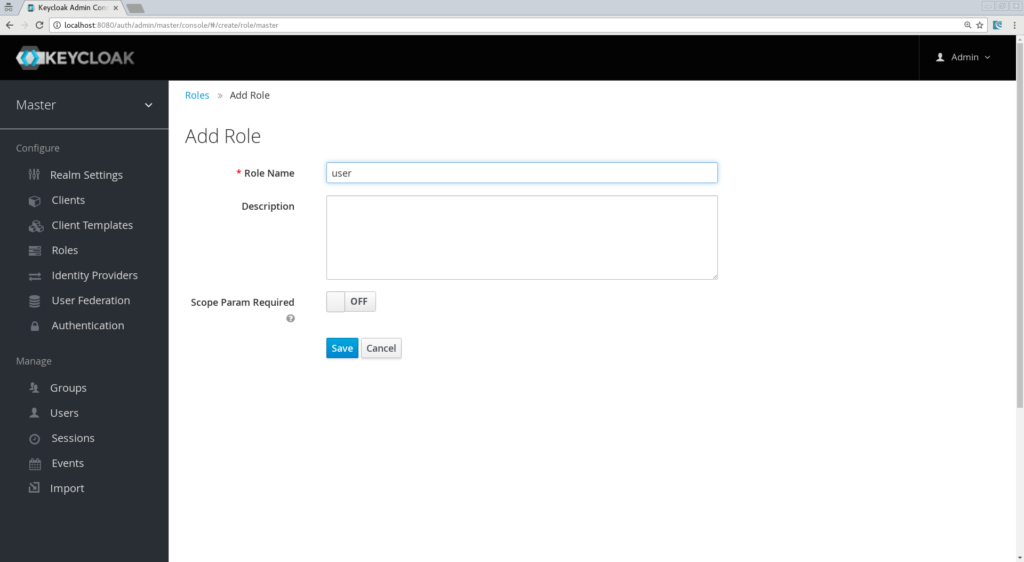
Now, we will define a role that will be assigned to our users. Let’s create a simple role called “user”:
And at last but not least let’s create a user. Only the username property is needed, so let’s call him “testuser”:

And finally, we need to set his credentials, so go to the Credentials tab of your user and choose a password. I will be using “password” for the rest of this article, and make sure to turn off the “Temporary” flag unless you want the user to have to change his password the first time he authenticates.
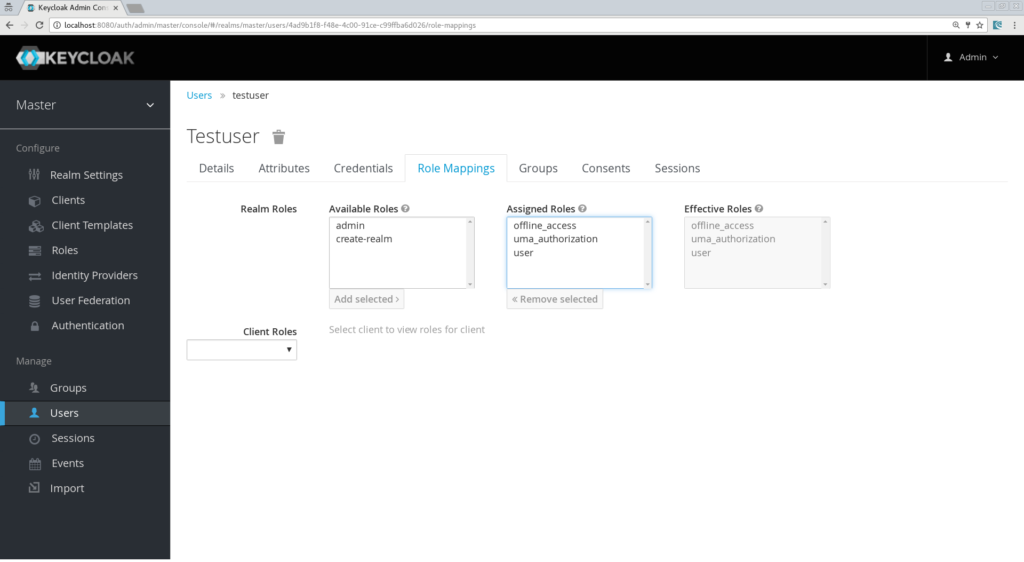
Now proceed to the “Role Mappings” tab and assign the role “user”:
We are done for now with the Keycloak server configuration and we can start building our Spring Boot App!
Creating a Simple App
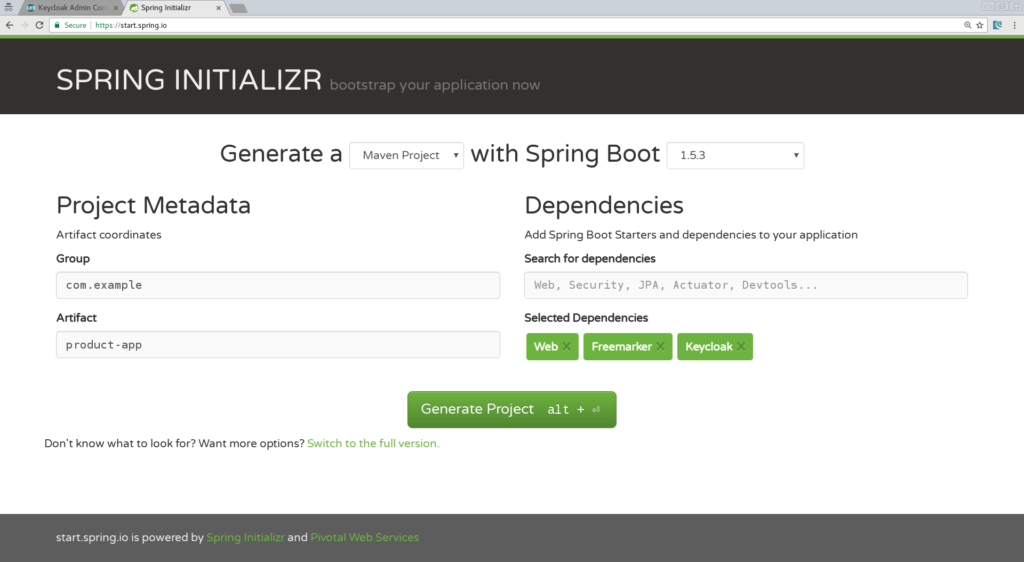
Let’s create a simple Spring Boot application. You might want to use the Spring Initializr and choose the following options:
- Web
- Freemarker
- Keycloak
Name your app “product-app” and download the generated project:
Import the application in your favorite IDE, I will be using IntelliJ.
Our app will be simple and will contain only 2 pages:
- An index.html which will be the landing page containing just a link to the product page.
- Products.ftl which will be our product page template and will only be accessible by authenticated users.
Let’s start by creating a simple index.html file in “/src/resources/static”:
<html>

  <head>
    <title>My awesome landing page</title>
  </head>

  <body>
    <h1>Landing page</h1> <a href="/products">My products</a>
  </body>

</html>
Now we need a controller:
@Controller
class ProductController {

   @Autowired ProductService productService;

   @GetMapping(path = "/products")
   public String getProducts(Model model){
      model.addAttribute("products", productService.getProducts());
      return "products";
   }

   @GetMapping(path = "/logout")
   public String logout(HttpServletRequest request) throws ServletException {
      request.logout();
      return "/";
   }
}
As you can see, it’s simple; we define a mapping for the product page and one for the logout action. You will also notice that we are calling a “ProductService” that will return a list of strings that we will put in our Spring MVC Model object, so let’s create that service:
@Component
class ProductService {
   public List<String> getProducts() {
      return Arrays.asList("iPad","iPod","iPhone");
   }
}
We also need to create the product.ftl template. Create this file in “src/resources/templates”:
<#import "/spring.ftl" as spring>
    <html>
    <h1>My products</h1>
    <ul>
        <#list products as product>
            <li>${product}</li>
        </#list>
    </ul>
    <p> <a href="/logout">Logout</a> </p>

    </html>
Here we simply iterate through the list of products that are in our Spring MVC Model object and we add a link to log out from our application.
All that is the left to do is to add some keycloak properties in our application.properties.
Defining Keycloak’s Configuration
Some properties are mandatory:
keycloak.auth-server-url=http://localhost:8080/auth keycloak.realm=springboot keycloak.public-client=true keycloak.resource=product-appThen we need to define some Security constraints, as you will do with a Java EE app in your web.xml:
keycloak.security-constraints[0].authRoles[0]=user keycloak.security-constraints[0].securityCollections[0].patterns[0]=/products/*Here, we simply define that every request to /products/* should be done with an authenticated user and that this user should have the role “user.”
Now, we just need one last property to make sure our application will be running on port 8081:
server.port=8081We are all set and we can run our app!
You have several options to run your Spring Boot application. With Maven, you can simply do:
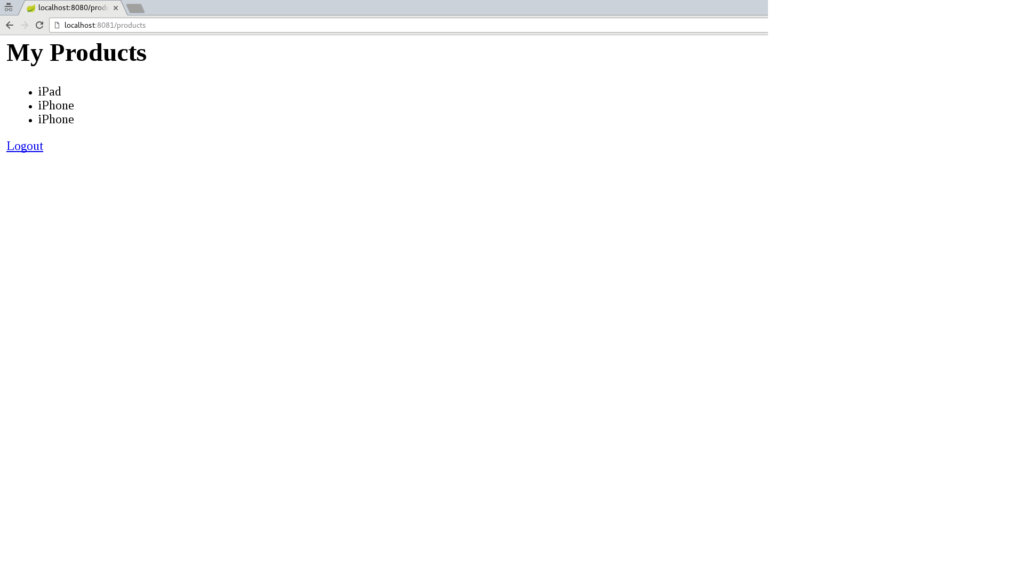
mvn clean spring-boot:runNow browse to “http://localhost:8080” and you should see the landing page. Click the “products” links and you will be redirected to the Keycloak login page:
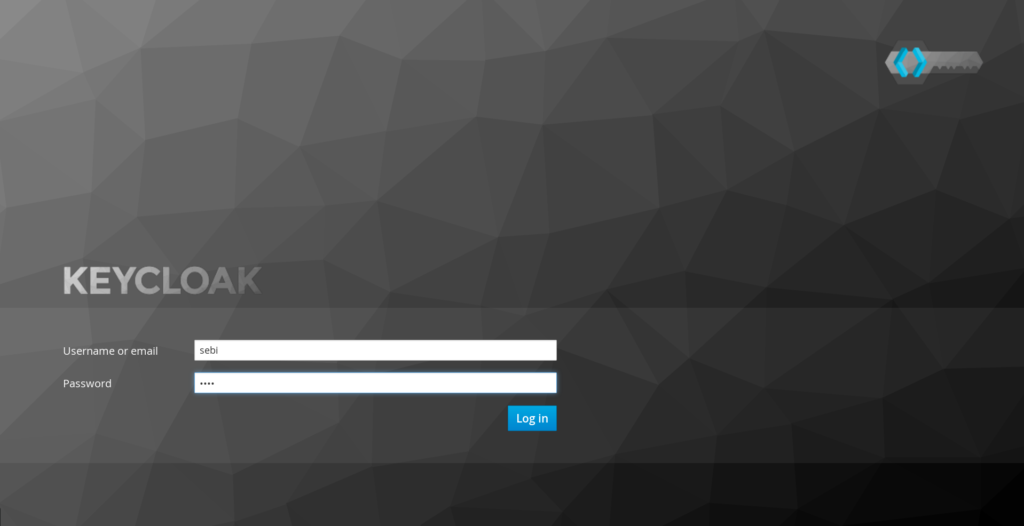
Login with our user “testuser/password” and you should be redirected back to your product page:
Congratulations! You have secured your first Spring Boot app with Keycloak. Now Log out and go back to the Keycloak administration console and discover how you can “tune” your login page. For instance, you can activate the “Remember Me” and the “User Registration” functions. To do this, hit the save button and go back to your login screen. There, you will see that these features have been added.
Introducing Spring Security Support
If you’re a Spring user and have been playing around with security, there is a big chance that you have been using Spring Security. Well, I have some good news: we also have a Keycloak Spring Security Adapter and it’s already included in our Spring Boot Keycloak Starter.
Let’s see how we can leverage Spring Security together with Keycloak.
Adding Spring Security Starter
First, we need the Spring Security libraries. The easiest way to do that is to add the spring-boot-starter-security artifact in your pom.xml:
<dependency>
    <groupId>org.springframework.boot</groupId>
    <artifactId>spring-boot-starter-security</artifactId>
</dependency>
Creating a SecurityConfig Class
Like any other project that is secured with Spring Security, a configuration class extending WebSecurityConfigurerAdapter is needed. Keycloak provides its own subclass that you can again subclass:
@Configuration
@EnableWebSecurity
@ComponentScan(basePackageClasses = KeycloakSecurityComponents.class)
 class SecurityConfig extends KeycloakWebSecurityConfigurerAdapter
{
   /**
    * Registers the KeycloakAuthenticationProvider with the authentication manager.
    */
   @Autowired
   public void configureGlobal(AuthenticationManagerBuilder auth) throws Exception {
      KeycloakAuthenticationProvider keycloakAuthenticationProvider = keycloakAuthenticationProvider();
      keycloakAuthenticationProvider.setGrantedAuthoritiesMapper(new SimpleAuthorityMapper());
      auth.authenticationProvider(keycloakAuthenticationProvider);
   }

   @Bean
   public KeycloakConfigResolver KeycloakConfigResolver() {
      return new KeycloakSpringBootConfigResolver();
   }

   /**
    * Defines the session authentication strategy.
    */
   @Bean
   @Override
   protected SessionAuthenticationStrategy sessionAuthenticationStrategy() {
      return new RegisterSessionAuthenticationStrategy(new SessionRegistryImpl());
   }

   @Override
   protected void configure(HttpSecurity http) throws Exception
   {
      super.configure(http);
      http
            .authorizeRequests()
            .antMatchers("/products*").hasRole("user")
            .anyRequest().permitAll();
   }
}
Let’s have a closer look at the most important methods:
- configureGlobal: Here we change the Granted Authority Mapper. By default in Spring Security, roles are prefixed with ROLE_. We could change that in our Realm configuration but it could be confusing for other applications that do not know this convention, so here we assign a SimpleAuthorityMapper that will make sure no prefix is added.
- keycloakConfigResolver: By default, the Keycloak Spring Security Adapter will look for a file named keycloak.json that's present on your classpath. But here we want to leverage the Spring Boot properties file support.
- configure: Here is where we define our security constraints. This is pretty simple to understand. All we do is secure the path “/products” with the role “user.”
Now we can remove the security constraints that we had defined previously in our application.properties file and add another property to map the Principal name with our Keycloak username:
keycloak.principal-attribute=preferred_username Now we can even inject the principal in our controller method and put the username in the Spring MVC model:
@GetMapping(path = "/products")
public String getProducts(Principal principal, Model model){
   model.addAttribute("principal",principal);
   model.addAttribute("products", productService.getProducts());
   return "products";
}
Finally, we update the product.ftl template to print out the username:
<#import "/spring.ftl" as spring>
<html>
<h1>Hello ${principal.getName()}</h1>
<ul>
<#list products as product>
<li>${product}</li>
</#list>
</ul>
<p> <a href="/logout">Logout</a> </p>
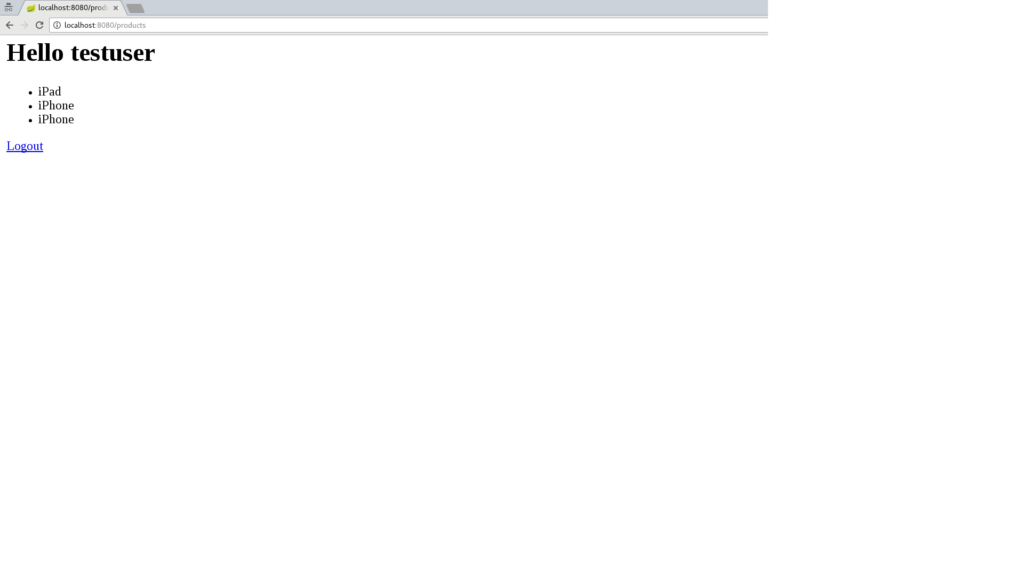
</html>Restart your app, authenticate again, and it should still work and you should also able to see your username printed on the product page:
Conclusion
We saw in this article how to deploy and configure a Keycloak Server and then secure a Spring Boot app, first by using Java EE security constraints and then by integrating Spring Security. In the next article, we will decompose this monolith application, which will give us the opportunity to:
- See how to secure a microservice.
- How microservices can securely “talk” to each other.
- How a Pure Web App built with AngularJS can be secured with Keycloak and call secured microservices.
Screencast
This article is also available in “screencast” format:
- https://developers.redhat.com/video/youtube/vpgRTPFDHAw/ (Part 1)
- https://developers.redhat.com/video/youtube/O5ePCWON08Y/ (Part 2)
Resources
- Github Project
- Keycloak website
- Spring Boot Keycloak Adapter Documentation
- Spring Security Keycloak Adapter Documentation
- Spring Initializr Site
For a framework for building enterprise Java microservices visit WildFly Swarm and download the cheat sheet.
Published at DZone with permission of Sébastien Blanc. See the original article here.
Opinions expressed by DZone contributors are their own.
Comments