GCP Cloud Functions Gen 2
Using GCP Cloud Function to connect to the Open Weather API, fetch weather data for a specific location, and insert the data into BigQuery.
Join the DZone community and get the full member experience.
Join For FreeThe article describes a process that uses a GCP Cloud Function to connect to the Open Weather API, fetch weather data for a specific location, and insert the data into BigQuery. The Cloud Function is triggered by a Pub/Sub topic, which is a messaging service that allows you to decouple different components of your application.
Once the Cloud Function is triggered, it fetches the weather data from the Open Weather API. The Cloud Function then uses the BigQuery API to insert the data into a BigQuery table.
Finally, the Cloud Function schedules itself to run again every hour. This ensures that the BigQuery table is always up to date with the latest weather data.
GCP Cloud Functions is a serverless computing platform that allows you to run functions without provisioning or managing servers. This makes it a good choice for tasks that need to be executed quickly and efficiently, such as fetching data from an OpenAPI and inserting it into BigQuery.
The Open Weather API provides historical and current weather data for locations all over the world. You can use the API to fetch data such as temperature, humidity, wind speed, and precipitation.
BigQuery is a fully managed, petabyte-scale analytics data warehouse that enables businesses to analyze all their data very quickly. You can use BigQuery to store and analyze large amounts of data, such as weather data, to gain insights into your business.
Monitoring Your Cloud Function
You can monitor your Cloud Function using the Cloud Functions dashboard. The dashboard shows you the number of invocations, errors, and latency for your function.
You can also use Cloud Monitoring to create alerts for your Cloud Function. For example, you could create an alert that triggers if your function fails to invoke for more than 10 minutes.
Prerequisites:
- A Google Cloud Platform (GCP) project
- Cloud Functions enabled
- BigQuery enabled
- Pub/Sub enabled
- Cloud Scheduler enabled
1. Create a Cloud Function
Create an HTTP Cloud Function that connects to the Open Weather API and fetches the data you want to publish. The function should also insert the data into BigQuery. You can use the following code as a starting point:
import requests

from google.cloud import bigquery


def fetch_open_weather_data():

   """Fetches weather data from the Open Weather API."""


  url = 'https://api.openweathermap.org/data/2.5/weather?q=London&appid=<your_api_key>'

  response = requests.get(url)

  data = response.json()

  return data


def insert_data_into_bigquery(data):

   """Inserts the given data into BigQuery."""


  client = bigquery.Client()

  dataset_id = 'my_dataset'

  table_id = 'weather_data'


  table_ref = client.dataset(dataset_id).table(table_id)

  table = bigquery.Table(table_ref, schema=[bigquery.SchemaField('temperature', 'FLOAT'), bigquery.SchemaField('humidity', 'FLOAT')])


  rows = []

  for row in data:

     rows.append((row['main']['temp'], row['main']['humidity']))


   client.load_table_from_json(rows, table)


def main(request):

   """Handles incoming HTTP requests."""


  data = fetch_open_weather_data()

   insert_data_into_bigquery(data)


  return 'Success!'


if __name__ == '__main__':

  main()
2. Create a Cloud Scheduler Job
Create a Cloud Scheduler job that triggers your Cloud Function every hour. You can do this in the Google Cloud console or using the following command:
gcloud scheduler jobs create hourly-weather-load \

  --schedule "0 0 * * *" \

  --function hourly-weather-loader
3. Create a Pub/Sub Topic
Create a Pub/Sub topic that will be used to communicate between your Cloud Scheduler job and Cloud Function.
4. Configure Your Cloud Scheduler Job To Publish an Event to the Pub/Sub Topic
In the Google Cloud console, go to the Cloud Scheduler job you created in step 2 and click the Targets tab. Under Pub/Sub topic, select the Pub/Sub topic you created in step 3.
5. Configure Your Cloud Function To Be Triggered by the Pub/Sub Topic
In the Google Cloud console, go to the Cloud Function you created in step 1 and click the Triggers tab. Under Event types, select Cloud Pub/Sub. Then, select the Pub/Sub topic you created in step 3.
6. Test Your System
Publish an event to the Pub/Sub topic and make sure that your Cloud Function is triggered and inserts the data into BigQuery.
Once you have tested your system and are satisfied that it is working correctly, you can deploy it to production.
Here is a diagram of your overall system architecture:
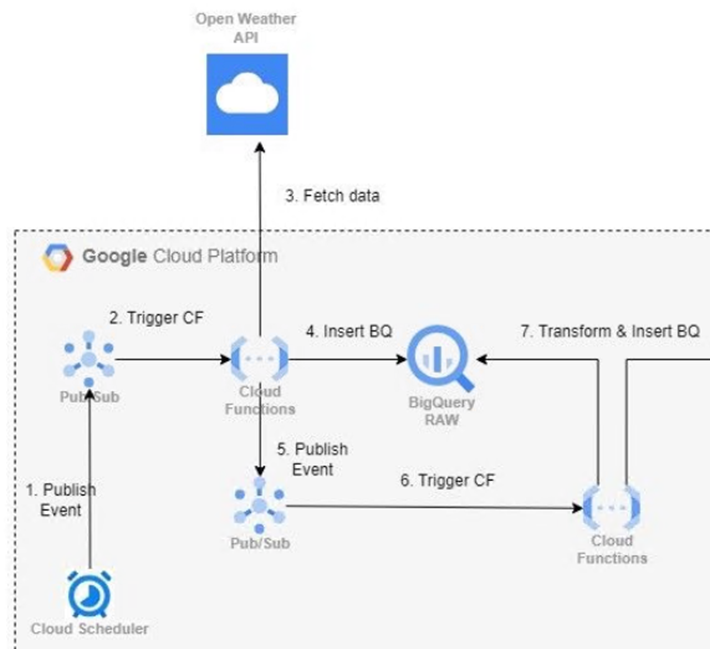
The system works as follows:
- The Cloud Scheduler job triggers every hour.
- The Cloud Scheduler job publishes an event to the Pub/Sub topic.
- The Cloud Function is triggered by the Pub/Sub topic.
- The Cloud Function fetches the latest weather data from the Open Weather API.
- The Cloud Function inserts the weather data into BigQuery.
You can also add additional steps to your system, such as:
- Sending an email notification when the data has been loaded into BigQuery.
- Publishing an event to another Pub/Sub topic to trigger downstream processing.
- Archiving the weather data to Cloud Storage.
You can deploy this Cloud Function using the Google Cloud console or the gcloud CLI. Once the Cloud Function is deployed, you can test it by sending an event to the Pub/Sub topic. To do this, you can use the Google Cloud console or the gcloud CLI.
Once you have tested the Cloud Function and verified that it is working correctly, you can publish the article. To do this, you can use the Google Cloud console or the gcloud CLI.
Conclusion
Using GCP Cloud Functions to connect to Open API and insert the data in BigQuery is a simple and effective way to automate your data pipeline. This solution is scalable, reliable, and cost-effective.
Here are the key benefits of using this solution:
- Scalability: Cloud Functions can scale automatically to handle any volume of data.
- Reliability: Cloud Functions are highly reliable and available.
- Cost-effectiveness: Cloud Functions are only charged when they are running, so you only pay for what you use.
In addition, this solution is easy to set up and manage. You can create and deploy a Cloud Function in minutes, and you can use Cloud Scheduler to schedule the Cloud Function to run at regular intervals.
Overall, using GCP Cloud Functions to connect to Open API and insert the data in BigQuery is a great way to automate your data pipeline and get the most out of your data.
Opinions expressed by DZone contributors are their own.
Comments