How To Integrate Quickbooks With Your SaaS Platform
Follow a recent task to build a Quickbooks Online (QBO) integration to process the Profit and Loss report.
Join the DZone community and get the full member experience.
Join For FreeRecently I was tasked with building a Quickbooks Online (QBO) integration to process the Profit and Loss (P&L) report and determine the revenues, cost of goods sold (COGS), and expenses of departments — here's how I did it.
This article is not about building an OAuth flow or pulling data from the Quickbooks API using a cron job. That process is relatively boilerplate and has been solved by tools such as the one I'll be using. If building that yourself interests you, check out my article on using Singer to do just that.
Instead, this article will walk you through the harder part — how to make sense of the data.
Get the Data
As I mentioned above, for this article, I'll be using hotglue to handle all the boilerplate of building a QBO integration for a SaaS platform. This includes:
- Creating an OAuth authorization flow
- Enables users to connect Quickbooks in your UI and monitor the connection
- Pulling the necessary data from the Quickbooks API
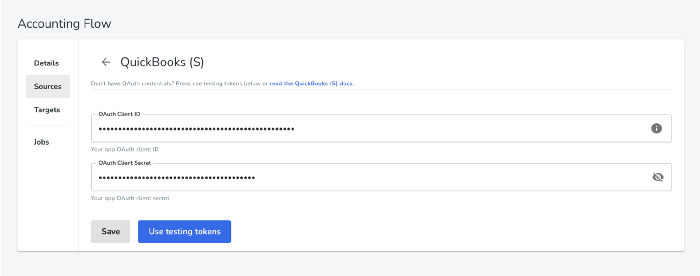
Create the Authorization Flow
In hotglue, I will create a new flow and add Quickbooks sandbox as a source. To do this, I merely provide my OAuth credentials and login to my Quickbooks sandbox account. If you do not have OAuth credentials already, you can just select 'Use testing tokens.'
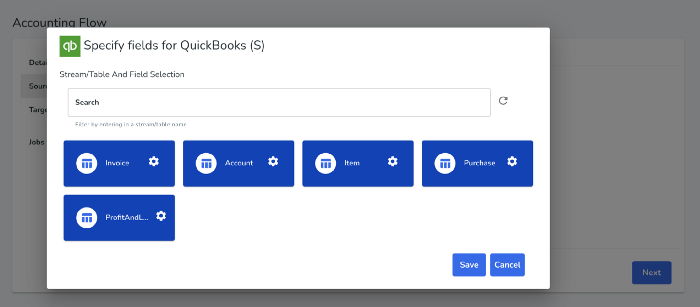
Select the Data We Need
Now we can select what data we need from Quickbooks. We will select Account (Chart of Accounts), Item (Products and Services), Purchase (Expenses), Invoice, and Profit and Loss Report.
This will provide us with the reference data we'll need to accurately categorize transactions.
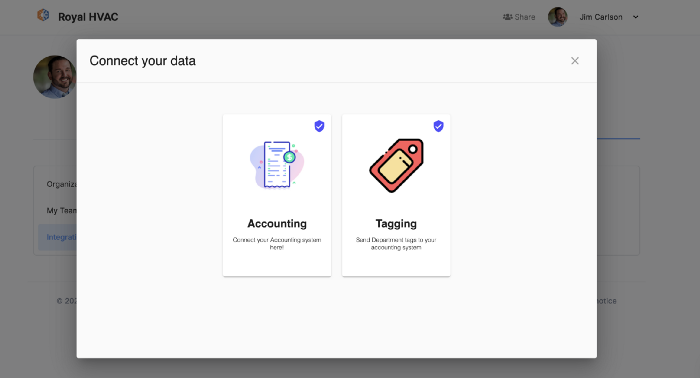
Add the Integration To Your UI
With some basic JavaScript, I was able to embed the hotglue widget, which enables users to connect their Quickbooks account, refresh the synced data, and monitor when it was last refreshed.
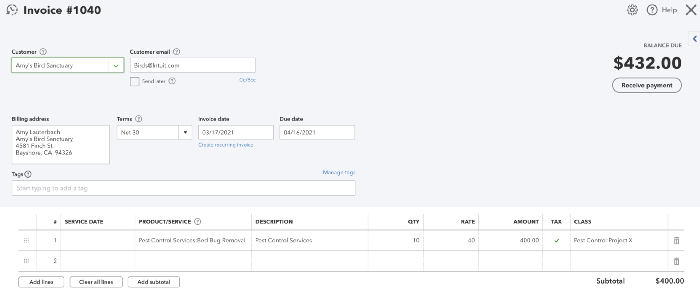
Tag the Transactions
Quickbooks does not natively support tagging transactions under a specific department or project. To accomplish this, I used the Quickbooks class field to tag transactions under a Department/Project. For example, the Invoice below has been tagged Pest Control:Project X meaning Pest Control department, Project X.
Process the Data
Now for the fun part. We'll use a Python script using pandas and gluestick to convert the data from Quickbooks into a JSON file that looks something like below.
What We’re Trying To Produce
As you can see below, the JSON file takes every transaction in our P&L report and categorizes it under Project Xin the Pest Control department. Further, it categorizes each transaction as revenue , cogs (Cost of Goods Sold), labor , and costs (Expenses).
{
  "Pest Control": {
    "Project X": {
      "revenues": {
        "2021-11": {
          "Pest Control Services": {
            "Pest Control Services": {
              "Bed Bug Removal": {
                "total": 350,
                "qty": "10",
                "rate": 35
              }
            }
          }
        }
      },
      "cogs": {
        "2021-11": {
          "Supplies & Materials - COGS": {
            "Pest Control Services": {
              "Bed Bug Removal": {
                "total": 100,
                "qty": 1,
                "rate": 100
              }
            }
          }
        }
      },
      "labor": {
        "2021-11": {
          "Employee": {
            "Inspector": {
              "Employee Benefits": 10.8,
              "Payroll Tax": 61.2,
              "Payroll Wage Expenses": 800
            }
          }
        }
      },
      "costs": {
        "2021-11": {
          "Project Expenses": {
            "Automobile": {
              "Fuel": 100
            }
          }
        }
      }
    }
  }
}
Write the Script
hotglue has built-in functionality to run a Python script every time new data is synced from the Quickbooks API and will avoid syncing old data again (incremental sync).
You can go through each step of the script on Gist or below:
x
import gluestick as gs
import pandas as pd
import os
import json
import ast
from datetime import datetime
from lib import util
# Let's establish the standard hotglue input/output directories
# standard directory for hotglue
ROOT_DIR = os.environ.get("ROOT_DIR", ".")
INPUT_DIR = f"{ROOT_DIR}/sync-output"
OUTPUT_DIR = f"{ROOT_DIR}/etl-output"
SNAPSHOT_DIR = f"{ROOT_DIR}/snapshots"
# Let's start by reading the data.
# We will use the gluestick package to read the raw data in the input folder into a dictionary of pandas dataframes using the read_csv_folder function.
# Read input data
input_data = gs.read_csv_folder(INPUT_DIR)
Process the snapshots
# Now we'll do some basic snapshotting to persist the data (you can skip this)
# Accounts
if input_data.get("Account") is not None:
util.update_snapshot(
SNAPSHOT_DIR,
"Account",
['Id'],
input_data["Account"]
)
# Invoices
if input_data.get("Invoice") is not None:
util.update_snapshot(
SNAPSHOT_DIR,
"Invoice",
['Id'],
input_data["Invoice"]
)
# Item
if input_data.get("Item") is not None:
util.update_snapshot(
SNAPSHOT_DIR,
"Item",
['Id'],
input_data["Item"]
)
# Purchase
if input_data.get("Purchase") is not None:
util.update_snapshot(
SNAPSHOT_DIR,
"Purchase",
['Id'],
input_data["Purchase"]
)
# Update the input_data with the snapshots, if they exist
input_data["Account"] = util.get_snapshot(SNAPSHOT_DIR, "Account")
input_data["Invoice"] = util.get_snapshot(SNAPSHOT_DIR, "Invoice")
input_data["Item"] = util.get_snapshot(SNAPSHOT_DIR, "Item")
input_data["Purchase"] = util.get_snapshot(SNAPSHOT_DIR, "Purchase")
# Process the P&L report
pl_df = input_data['ProfitAndLossDetailReport']
Split the class names into Department, Project, Worker Type, and Worker Role, if applicable
# Extract the class names into new columns
split_pl = pl_df.Class.str.split(pat=":", expand=True)
if len(split_pl.columns) == 4:
pl_df[['Department', 'Project', 'Worker Type', 'Worker Role']] = split_pl
else:
pl_df[['Department', 'Project']] = split_pl
Create the dictionary where all new data is saved (actuals)
# Process the actual data into a Python dict
actuals = {}
def handle_defaults(obj, args):
if len(args) == 0:
return
arg = args[0]
obj.setdefault(arg, {})
args.pop(0)
handle_defaults(obj[arg], args)
# Revenues
invoices_df = pl_df[pl_df['TransactionType'] == 'Invoice']
invoices = input_data['Invoice']
items = input_data['Item']
for index, row in invoices_df.iterrows():
categories = ast.literal_eval(row['Categories'])
department = row['Department']
project = row['Project']
docno = row['Num']
date = datetime.strptime(row['Date'], '%Y-%m-%d')
date = date.isocalendar()
period = f"{date[0]}-{date[1]}"
# Get item name
cat = categories[2]
invoice = invoices[invoices['DocNumber'] == docno].iloc[0]
invoice_line = ast.literal_eval(invoice['Line'])
for l in invoice_line:
if l['DetailType'] == 'SalesItemLineDetail':
item = ast.literal_eval(l['SalesItemLineDetail']['ItemRef'])
item_name = item['name']
item_data = items[items['FullyQualifiedName'] == item_name].iloc[0]
item_name = item_name.split(":")
item_category = item_name[0]
item_name = item_name[1]
handle_defaults(actuals, [department, project, 'revenues', period, cat, item_category, item_name])
actuals[department][project]['revenues'][period][cat][item_category][item_name] = {
'total': l['Amount'],
'qty': item['value'],
'rate': item_data['UnitPrice']
}
# Get all the expenses and extract the Product/Service + price
purchases = input_data['Purchase']
purchases = gs.explode_json_to_cols(purchases, "Line", max_level=1)
purchases = purchases[purchases['Line.ItemBasedExpenseLineDetail'].notnull()]
purchases = gs.explode_json_to_cols(purchases, 'Line.ItemBasedExpenseLineDetail', max_level=1)
purchases = gs.explode_json_to_cols(purchases, 'Line.ItemBasedExpenseLineDetail.ClassRef', max_level=1)
purchases = gs.explode_json_to_cols(purchases, 'Line.ItemBasedExpenseLineDetail.ItemRef', max_level=1)
purchases = purchases.rename(columns={
'Line.ItemBasedExpenseLineDetail.ClassRef.name': 'ClassName',
'Line.ItemBasedExpenseLineDetail.UnitPrice': 'ItemRate',
'Line.ItemBasedExpenseLineDetail.Qty': 'ItemQty',
'Line.ItemBasedExpenseLineDetail.ItemRef.name': 'ItemName'
})
purchases = purchases[purchases['ClassName'].notnull()]
# Process each expense
expenses_df = pl_df[pl_df['TransactionType'] == 'Expense']
for index, row in expenses_df.iterrows():
categories = ast.literal_eval(row['Categories'])
department = row['Department']
project = row['Project']
date = datetime.strptime(row['Date'], '%Y-%m-%d')
date = date.isocalendar()
period = f"{date[0]}-{date[1]}"
# COGS
if categories[1] == 'Cost of Goods Sold':
item = categories[2]
# Get items
relevant = purchases[purchases['ClassName'] == f'{department}:{project}']
for index, item_row in relevant.iterrows():
item_name = item_row['ItemName']
item_name = item_name.split(":")
item_category = item_name[0]
item_name = item_name[1]
handle_defaults(actuals, [department, project, 'cogs', period, item, item_category, item_name])
actuals[department][project]['cogs'][period][item][item_category][item_name] = {
'total': item_row['Line.Amount'],
'qty': item_row['ItemQty'],
'rate': item_row['ItemRate']
}
# Costs
if categories[1] == 'Expenses' and row['Worker Type'] is None:
print(categories)
expense_type = categories[2]
item_cat = categories[3]
item = categories[4]
handle_defaults(actuals, [department, project, 'costs', period, expense_type, item_cat, item])
actuals[department][project]['costs'][period][expense_type][item_cat][item] = row['Amount']
# Labor
if categories[1] == 'Expenses' and row['Worker Type'] is not None:
worker_type = row['Worker Type']
worker_role = row['Worker Role']
item_cat = categories[2]
handle_defaults(actuals, [department, project, 'labor', period, worker_type, worker_role, item_cat])
actuals[department][project]['labor'][period][worker_type][worker_role][item_cat] = row['Amount']
# Preview the result
print(json.dumps(actuals, indent=4))
# Export the data to a JSON file
with open(f'{OUTPUT_DIR}/actuals.json', 'w') as outfile:
json.dump(actuals, outfile)
If you're using hotglue to create your integration, you can learn how to write and deploy scripts in the docs.
Run It All Together
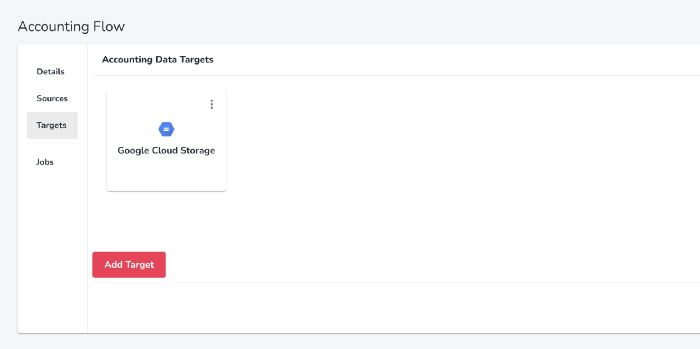
Choose Where the Data Should Go
If you're using hotglue, you need to specify a place for the final data to be delivered (a target). By default, hotglue will email new data to you using Mailgun. I used Google Cloud Storage for our Quickbooks integration.
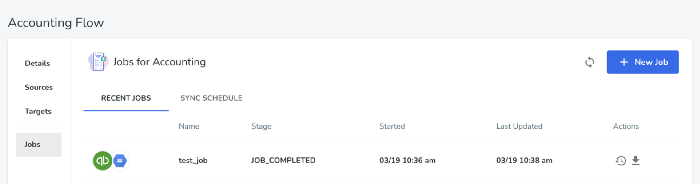
Run a Job
Now we can run a sync job. This will connect to the Quickbooks API, query any new data, save it as a CSV, run our transformation script, and upload the resulting data to our target (Google Cloud Storage).
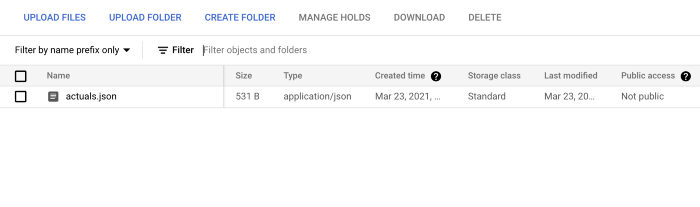
Now we can see the final actuals.json file in Google Cloud Storage!
Conclusion
In this article, we went through creating a Quickbooks integration and processing the resulting CSV data into a JSON payload that can be used by a SaaS application.
Hopefully, this helps you consider how to build your own SaaS integrations. I'd highly recommend using a tool like hotglue to handle the boilerplate integration steps so you can focus on extracting the data you need rather than authorization and orchestration issues.
Thanks for reading!
Opinions expressed by DZone contributors are their own.
Comments