How to Restore Poison Messages (Or Dead Letters) From Memphis Broker vs RabbitMQ
In this article, you will understand the possible causes of poison messages in a message broker. You will also learn how to restore them in both Memphis.dev and RabbitMQ.
Join the DZone community and get the full member experience.
Join For FreeWhat Is Service-Oriented Architecture?
Service Oriented Architecture (SOA) involves splitting different parts of your application into services. That way, you can have services for Authentication, Batch-Processing, Managing Videos, Notifications, etc.
Separating core functionalities into services help your platform to scale appropriately. You also get to enjoy the benefit of the whole system not breaking down when one service malfunctions. In addition, you can improve each service without tampering with others.
Such backend features usually carry out asynchronous tasks. These asynchronous activities don’t completed at the same time. If a user interacts with your platform, you don’t want the user to wait for long processes to complete. You want to continue interactivity. At the same time, you want a service to tell you when it is done with its job. This is where message brokers come in.
What Is a Message Broker?
A message broker is a communication tool used within service-oriented platforms. A message broker (or message queue) is a man-in-the-middle for services in your backend.
With message brokers, some services can send messages to the broker, whereas some can receive them. Services that send messages are called producers. On the other hand, services that receive messages are called consumers.
A “message” in message broker stands for what the service sends. It could be an event, a piece of data, a task, etc. A “message” represents what the services communicate.
As a broker, a message broker is an intermediary for messages. As a queue, a message broker permits you to stock up on messages till consumers get them. Message brokers complete the scaling of Service Oriented platforms. Message brokers ensure that services appropriately communicate with each other.
Memphis.dev and RabbitMQ are example message brokers. They are both open source. Both Memphis.dev and RabbitMQ have a dashboard (or UI) to visualize and manage “messages.”
You can install both of them on any Operating System with Docker. If you don’t have Docker installed, install Docker for your Operating System here.
About Memphis.dev
Memphis.dev is a real-time data processing platform. It is an open-source, real-time data processing platform for in-app streaming use cases.
Run the following command in your terminal to install Memphis.
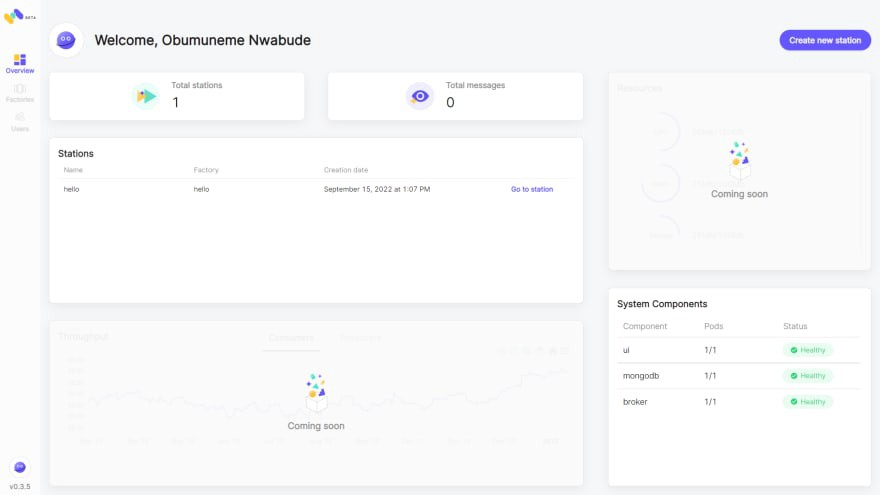
curl -s https://memphisdev.github.io/memphis-docker/docker-compose.yml -o docker-compose.yml && docker compose -f docker-compose.yml -p memphis upWhen the command completes, open localhost:9000 in the browser; it should show you the Memphis UI. Execute the following steps to get started:
- Enter your email and full name, and set a password. Your email address is important for account recovery. Create account.
- Enter
hellofor both factory and station names. These are just for demo purposes. Click Next. - Enter
hellofor the app username. Click next. - Click or skip through the next welcome onboarding code and steps. Then launch the dashboard.
About RabbitMQ
RabbitMQ is the most widely deployed open-source message broker. With tens of thousands of users, RabbitMQ is one of the most popular open-source message brokers.
Run the following command in your terminal to install RabbitMQ.
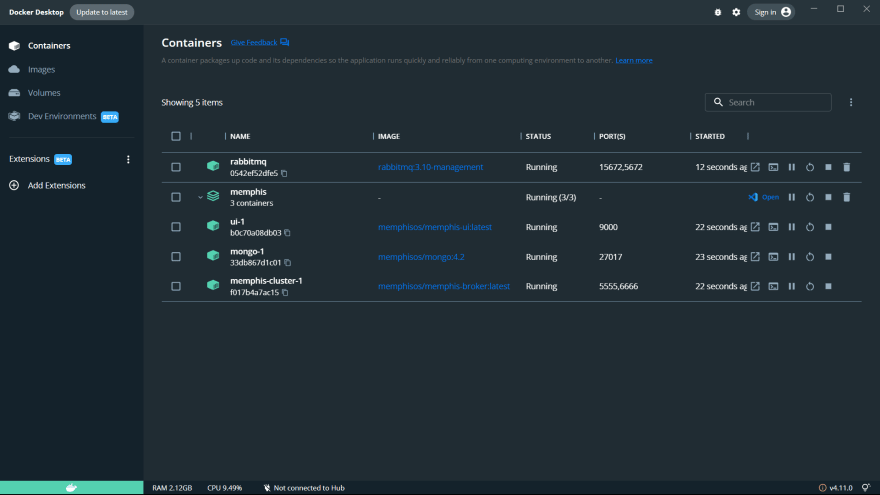
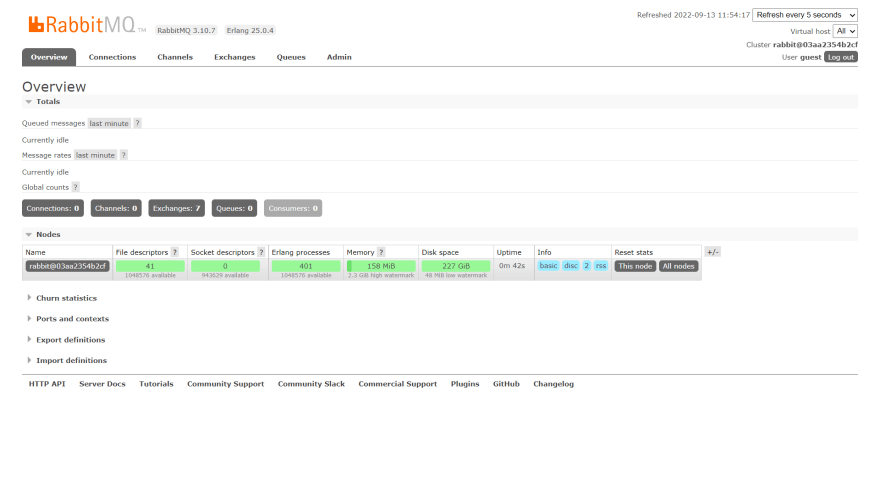
docker run -it --rm --name rabbitmq -p 5672:5672 -p 15672:15672 rabbitmq:3.10-managementWhen the command completes, open localhost:15672 in the browser; it should show you the RabbitMQ UI. Sign in with guest as both username and password. These are the default credentials when you set up RabbitMQ with Docker.
What Are Poison Messages?
Poison messages are those messages that have not reached their destination. The message broker had received them but found it hard to deliver them. At times, it could not deliver them because the consumer may be offline. So the broker will keep sending the messages till they finally become poison.
Another reason why poison messages could occur is because of acknowledgment. In a normal setup, when a consumer receives and uses up a message from the broker, the consumer acknowledges that message. Acknowledging a message tells the broker that that message has been received. Acknowledging is important. It is the broker’s way of ensuring proper communication across services.
Asides from acknowledging, a consumer can reject a message (negative acknowledgment). When a consumer receives a message and rejects it or does not acknowledge it, the message broker will keep retrying. It keeps retrying because it wants to ensure that the message gets across to the consumer. After all, that’s why it is a broker in the first place!
Also, there is usually a predefined number of times a broker would keep retrying messages before those messages become poison. You can also set this “number of times.” Also, you can instead configure a message broker to keep retrying but for a period of time (like 5 mins, 2 hours, seven days, etc.)
We call these failed messages poison because they introduce unintended effects to the system. If it was a user-initiated task, this user might never get the intended value delivered. If the value were a paid feature, such failure could cause a terrible customer experience (and loss of money). On the broker’s side, it could reduce platform fidelity as it could seem that the message broker is unreliable for its job.
Poison messages are also called dead letters. “Dead letters” suit properly for poison messages for two reasons:
- Messages are letters in the context of the broker’s transactions. A letter has a destination, likewise, a message.
- The letters are “dead” because they did not reach their appropriate destination.
Rather than discarding failed or unacknowledged messages, message brokers keep retrying, as stated above. If the retry time or the number of retries exceeds the preset maximum, message brokers store these poison messages (or dead letters). You then need to restore these poison messages to ensure the smooth running of your system. How you restore poison messages (or dead letters) depend on the message broker you are using.
How to Restore Poison Messages From Memphis
To restore poison messages in Memphis, resend the poison messages and acknowledge them.
To see this in action, let’s use NodeJS to create a simple “Hello World” use case of Memphis. We will write code that sends and receives “Hello World” messages to and from Memphis. However, the consuming part will not acknowledge the messages. This way, Memphis will keep sending them till they become poison messages.
Create a new memphis-poison folder, install Memphis, and run the code for the above setup. Run the following commands in your terminal to do the above.
mkdir memphis-poison
cd memphis-poison
npm init -y
npm install --save memphis-dev
Create a new index.js file inside the newly created memphis-poison folder. Paste the following JavaScript code inside.
const memphis = require('memphis-dev');

(async function () {
  try {
    await memphis.connect({
      host: 'localhost',
      username: 'hello',
      connectionToken: 'memphis'
    });

    const consumer = await memphis.consumer({
      stationName: 'hello',
      consumerName: 'hello_consumer1',
      consumerGroup: 'hello_consumer_group',
    });
    consumer.on('message', (message) => {
      console.log(message.getData().toString());

      // commented out the following line to produce poison messages
      message.ack();

    });
    consumer.on('error', (error) => {
      console.log(error);
    });

    const producer = await memphis.producer({
      stationName: 'hello',
      producerName: 'hello_producer1'
    });
    for (let index = 0; index < 10; index++) {
      await producer.produce({
        message: Buffer.from('Hello world')
      });
      console.log('Message sent');
    }
    console.log('All messages sent');
  } catch (ex) {
    console.log(ex);
    memphis.close();
  }
})();
The above code connects to the Memphis broker. It produces 10 “Hello World” messages and consumes them. Run the file by running the following command in the terminal. Ensure you are within the memphis-poison folder inside the terminal.
node index.jsNotice that the terminal keeps receiving the “Hello World” messages. This is because of the message.ack(); the line is commented out. That code is supposed to acknowledge the messages, but as commented out, the messages become poison messages.
The default Time-To-Live (TTL) for messages in Memphis is 30 seconds. So the code will keep receiving “Hello World”s for up to half a minute before it stops and becomes poison.
Check the Memphis UI dashboard to see the poison messages. It will create a Dead Letter Station (DLS) and keep the poison messages.
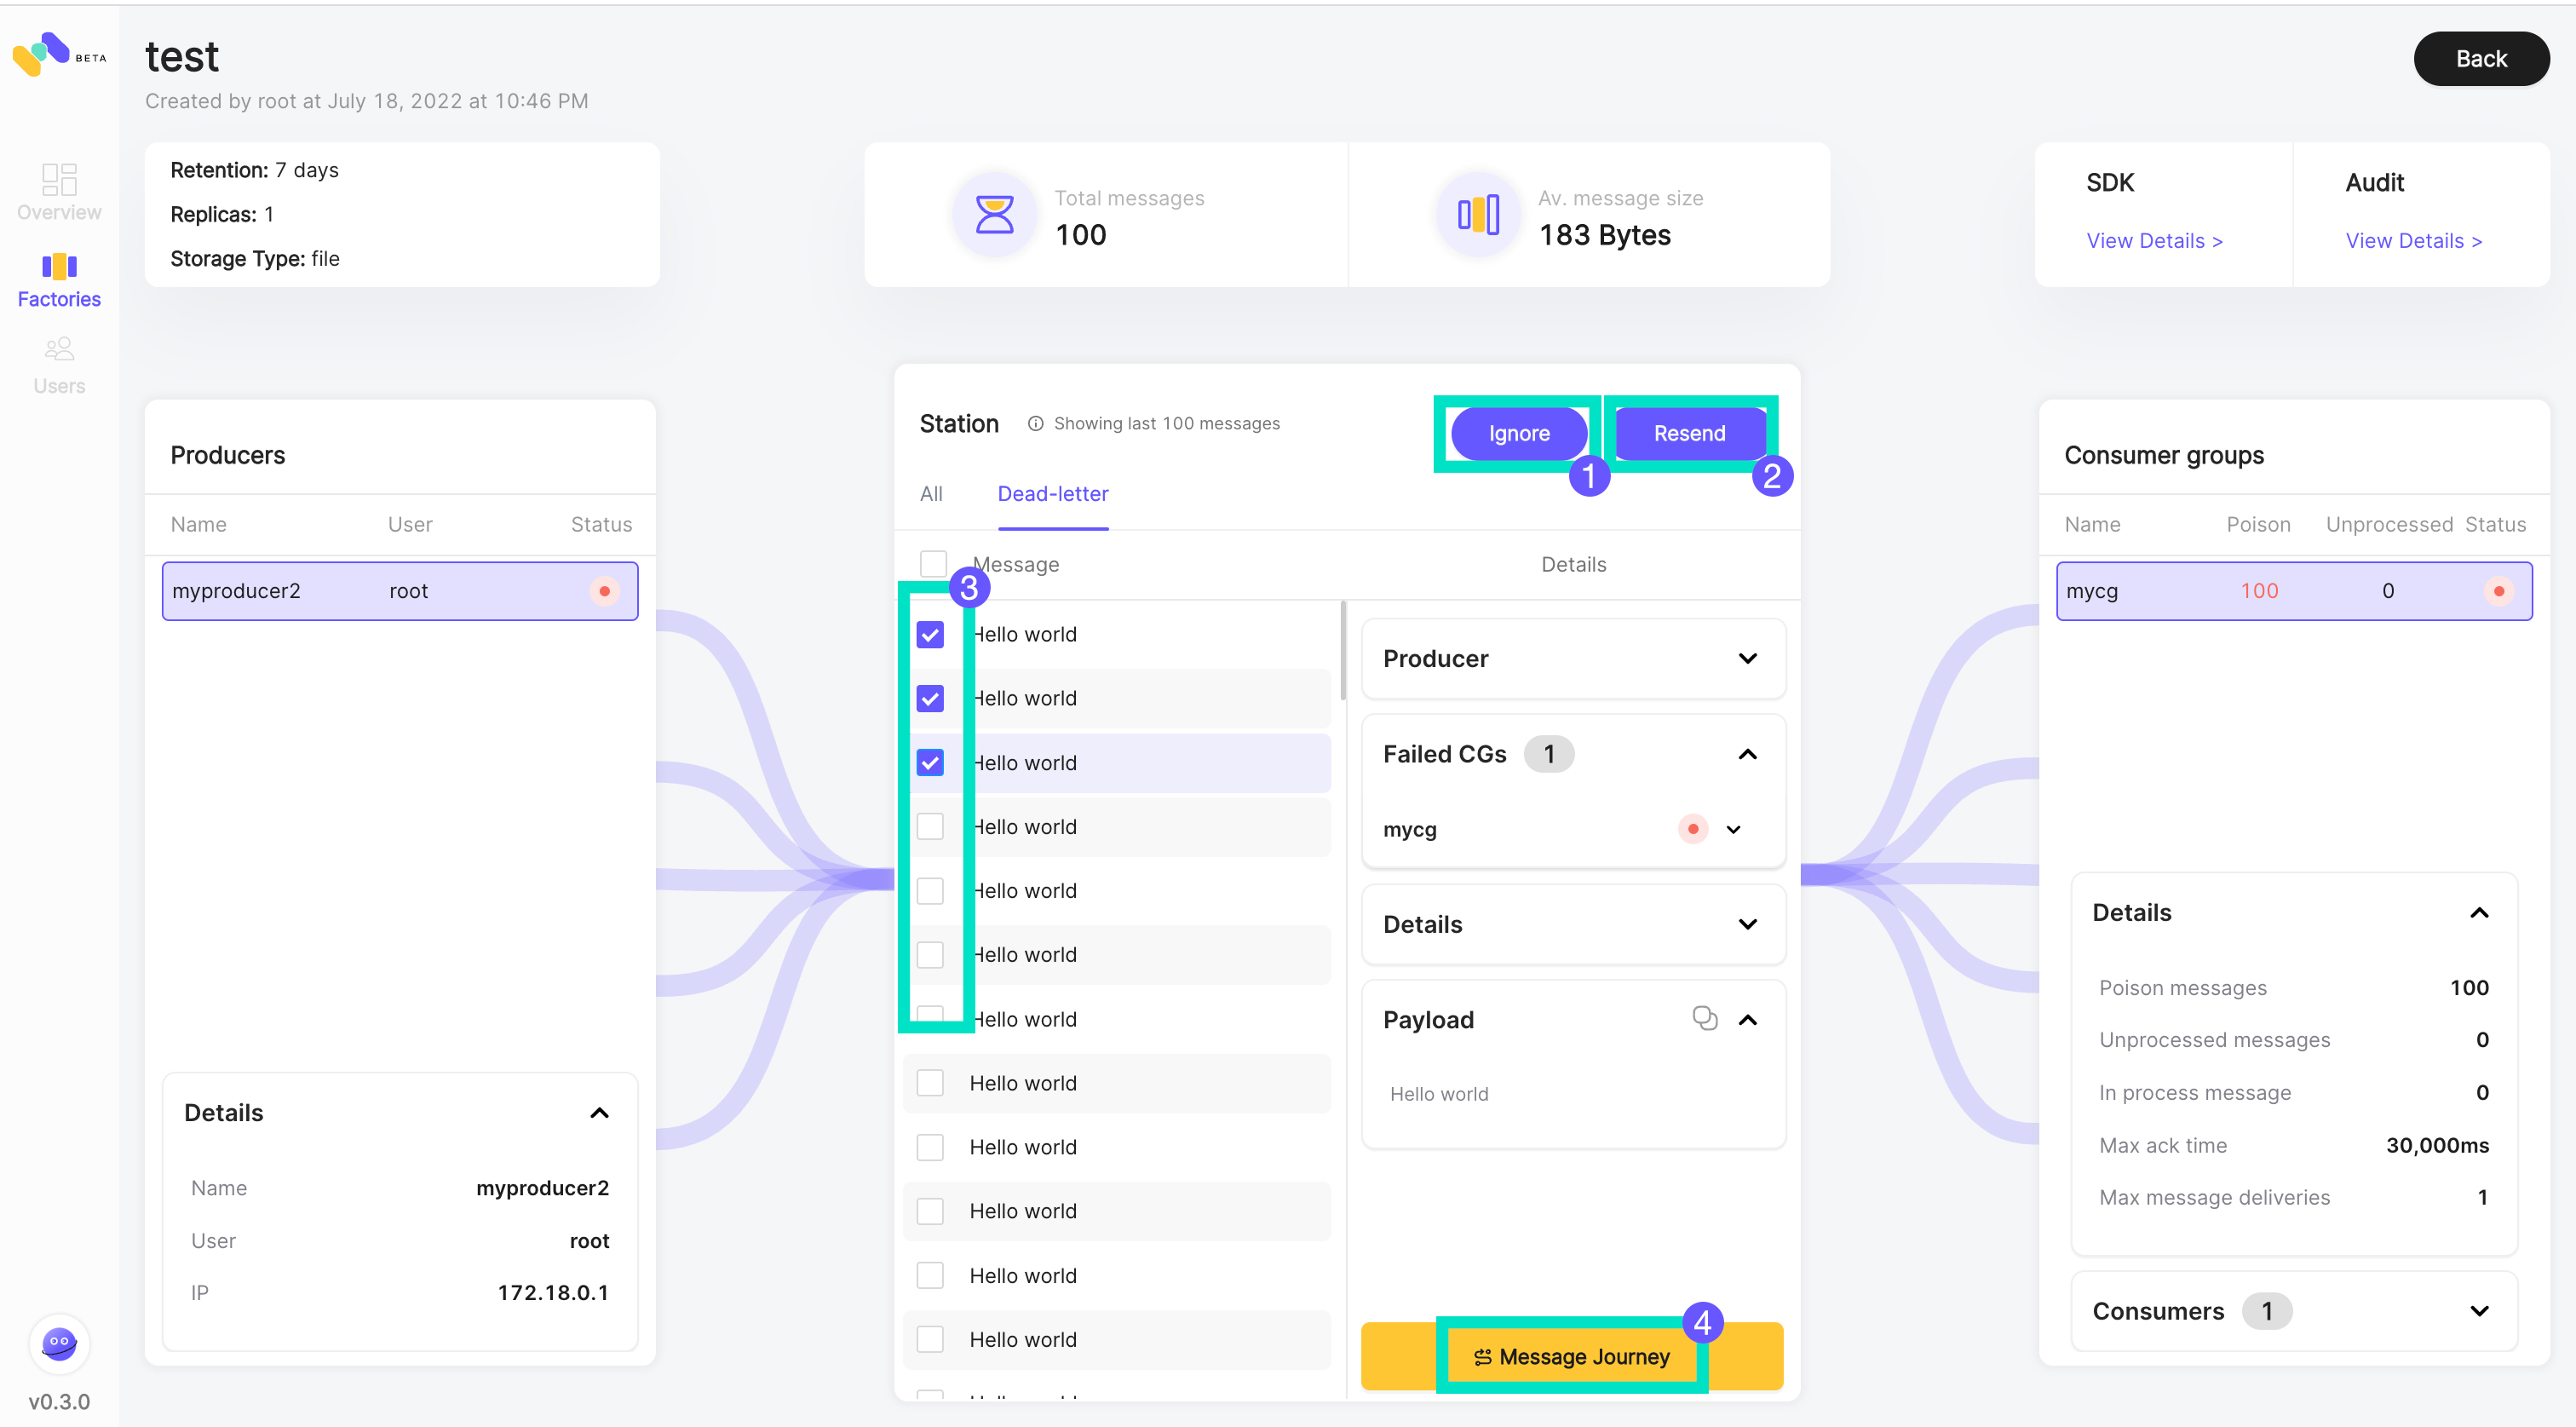
To restore the poison messages, restore and acknowledge them.
- Select all of the poison messages and click on resend.
- Get back to the code, and uncomment the
message.ack();line, and re-run the file.
This will re-produce 10 “Hello World”s, then consume them, and also restore the poison messages from the previous run. And that’s how to restore poison messages from Memphis broker.
How to Restore Poison Messages From RabbitMQ
To restore poison messages in RabbitMQ, create a Dead Letter Exchange (DLX) for those messages.
To see this in action, let’s use NodeJS to create a simple “Hello World” use case of RabbitMQ. We will write code that sends and receives “Hello World” messages to and from RabbitMQ. However, the consuming part will negatively acknowledge the messages. This way, RabbitMQ will keep sending till they become poison messages.
Create a new rabbitmq-poison folder, install rabbitmq, and run the code for the above setup. Run the following commands in your terminal to do the above.
mkdir rabbitmq-poison
cd rabbitmq-poison
npm init -y
npm install --save amqplib
Create a new index.js file inside the newly created rabbitmq-poison folder. Paste the following JavaScript code inside.
const amqp = require('amqplib/callback_api');

amqp.connect('amqp://localhost', function (error0, connection) {
  if (error0) throw error0;

  const queue = 'hello';
  const msg = 'Hello World!';

  connection.createChannel(function (error1, channel) {
    if (error1) throw error1;

    channel.assertQueue(queue, {
      durable: false,
      messageTtl: 10000
    });

    for (let index = 0; index < 10; index++) {
      channel.sendToQueue(queue, Buffer.from(msg));
      console.log(` [*] Sent ${msg}`);
    }
    console.log('All messages sent');

    console.log(` [*] Waiting for messages in ${queue}. To exit press CTRL+C`);
    let receiveCount = 1;
    channel.consume(queue, (msg) => {
      console.log(` [${receiveCount}] Received ${msg.content}`);
      receiveCount++;

      // the following negatively acknowledges the message to make it poison
      channel.nack(msg);
    });
  });
});
The above code connects to the RabbitMQ broker. It produces 10 “Hello World” messages and consumes them.
In channel.assertQueue, we’ve set the messageTtl (Messages’ Time To Live - TTL) to 10000 (10 seconds actually). We are setting this so that RabbitMQ can stop retrying after 10 seconds. RabbitMQ doesn’t set a default TTL. So we can say that RabbitMQ’s default TTL for messages is infinity. We are setting this TTL to ensure that the messages quickly become poison messages.
In channel.consume, we are keeping count of how many times the consumer received messages from RabbitMQ. The receiveCount quickly gets huge under 10 seconds and finally stops counting (the consumer stops receiving). It gets this high to tell how much RabbitMQ keeps retrying messages to ensure they get delivered.
Still in the channel.consume the channel.nack(msg); line causes the messages to be negatively acknowledged. Given that the messages have not been acknowledged and have a 10-second time-to-live, they become poison messages.
Run the file by running the following command in the terminal. Ensure you are within the rabbitmq-poison folder inside the terminal.
node index.jsTo restore the poison messages, create a Dead Letter Exchange (DLX) for those messages. To create this DLX, you will need to set up a different channel for consuming these dead letters (or poison messages). This DLX will consume the dead letters immediately after they get negatively acknowledged.
Create a different dlx.js file within the rabbitmq-poison folder. Paste the following code inside.
const amqp = require('amqplib/callback_api');

amqp.connect('amqp://localhost', function (error0, connection) {
  if (error0) throw error0;

  const queue = 'helloDlx';
  const msg = 'Hello World!';

  connection.createChannel(function (error1, channel) {
    if (error1) throw error1;

    channel.assertQueue(queue, { deadLetterExchange: 'dlx' });

    let sendCount = 1;
    const interval = setInterval(() => {
      channel.sendToQueue(queue, Buffer.from(msg));
      console.log(` [${sendCount}] Sent ${msg}`);

      if (sendCount > 10) {
        clearInterval(interval);
        console.log('All messages sent');
      } else {
        sendCount++;
      }
    }, 500);

    console.log(` [*] Waiting for messages in ${queue}. To exit press CTRL+C`);
    let receiveCount = 1;
    channel.consume(queue, (msg) => {
      console.log(` [${receiveCount}] Received ${msg.content}`);
      receiveCount++;

      // makes poison messages and send them to the dead letter exchange above
      channel.nack(msg);
    });
  });

  connection.createChannel(function (error2, channel) {
    if (error2) throw error2;

    channel.assertExchange('dlx', 'direct');

    let receiveCount = 1;
    channel.consume(queue, (msg) => {
      console.log(` [${receiveCount}] Restored Poison ${msg.content}`);
      receiveCount++;
    });
  });
});
The above code connects to the RabbitMQ broker. It uses a different queue (helloDlx) from the queue in index.js (hello) to show the restoring process. The main difference between this code and the code index.js is that this code introduces the Dead Letter Exchange (DLX).
In this example, the name of the DLX is simply dlx. You should use more meaningful DLX names in your codebases. DLX is a backup kind of service to ensure that the poison messages get properly handled.
When creating the DLX (inside the second channel), we used the channel.assertExchange('dlx', 'direct');. However, when setting the primary queue for the messages (inside the first channel), we indicated the DLX in the options parameter with the channel.assertQueue(queue, { deadLetterExchange: 'dlx' });.
The above code also sends a message every 0.5 seconds till they reach ten messages. This is to see the restoring process in action.
Run this dlx.js file in your terminal:
node dlx.jsThis consumes the dead letter messages immediately. Notice that the “Hello World” messages get restored after their first negative acknowledgment.
Summary
To restore poison messages in Memphis, simply acknowledge them. To restore poison messages in RabbitMQ, set up a dead letter exchange for them.
The manner of creating poison messages in this article was mainly for demo purposes. In real life, you will encounter poison messages from unforeseen circumstances. Consuming services could get faulty and hence cause unacknowledged messages. Either way, you’ve learned how to restore poison messages from Memphis broker and RabbitMQ.
Cheers!
Published at DZone with permission of Obumuneme Nwabude. See the original article here.
Opinions expressed by DZone contributors are their own.
Comments