How to Use a Camera in React Native
Join the DZone community and get the full member experience.
Join For FreeCapturing Memories! Camera in our smartphones allows us to quickly capture amazing moments in our lives. Moments which we most likely can never return to, but we can safely capture them up in the form of photos and videos. we are therefore left with a desire to share this amazing moment with our loved ones through our favorite mobile apps.
Building your next mobile app, you might want to add the capability to capture photos and videos. You also might not be exactly sure how to implement this. Well, look no further as we have recently implemented this feature in our social apps. You might want to check out how we have seamlessly implemented the camera feature with React Native.
I will describe here, the basic implementation of Capturing Photos and Videos in React Native.
Required Packages
For this project, we will be using:
- expo-camera. This package is required for capturing photos and videos.
- expo-av. Here, we will import video from this module to play our recorded video.
Now you can go ahead and install both packages.
$yarn add expo-camera expo-av
or
xxxxxxxxxx
$npm install expo-camera expo-av
Implementing the Camera Feature
Adding the camera component to a view in your project is quite straight forward.
import React, { useState, useRef, useEffect } from "react";
import {
StyleSheet,
Dimensions,
View,
Text,
TouchableOpacity,
SafeAreaView,
} from "react-native";
import { Camera } from "expo-camera";
import { Video } from "expo-av";
const WINDOW_HEIGHT = Dimensions.get("window").height;
const closeButtonSize = Math.floor(WINDOW_HEIGHT * 0.032);
const captureSize = Math.floor(WINDOW_HEIGHT * 0.09);
export default function App() {
const [hasPermission, setHasPermission] = useState(null);
const [cameraType, setCameraType] = useState(Camera.Constants.Type.back);
const [isPreview, setIsPreview] = useState(false);
const [isCameraReady, setIsCameraReady] = useState(false);
const [isVideoRecording, setIsVideoRecording] = useState(false);
const [videoSource, setVideoSource] = useState(null);
const cameraRef = useRef();
useEffect(() => {
(async () => {
const { status } = await Camera.requestPermissionsAsync();
setHasPermission(status === "granted");
})();
}, []);
const onCameraReady = () => {
setIsCameraReady(true);
};
const takePicture = async () => {
if (cameraRef.current) {
const options = { quality: 0.5, base64: true, skipProcessing: true };
const data = await cameraRef.current.takePictureAsync(options);
const source = data.uri;
if (source) {
await cameraRef.current.pausePreview();
setIsPreview(true);
console.log("picture source", source);
}
}
};
const recordVideo = async () => {
if (cameraRef.current) {
try {
const videoRecordPromise = cameraRef.current.recordAsync();
if (videoRecordPromise) {
setIsVideoRecording(true);
const data = await videoRecordPromise;
const source = data.uri;
if (source) {
setIsPreview(true);
console.log("video source", source);
setVideoSource(source);
}
}
} catch (error) {
console.warn(error);
}
}
};
const stopVideoRecording = () => {
if (cameraRef.current) {
setIsPreview(false);
setIsVideoRecording(false);
cameraRef.current.stopRecording();
}
};
const switchCamera = () => {
if (isPreview) {
return;
}
setCameraType((prevCameraType) =>
prevCameraType === Camera.Constants.Type.back
? Camera.Constants.Type.front
: Camera.Constants.Type.back
);
};
const cancelPreview = async () => {
await cameraRef.current.resumePreview();
setIsPreview(false);
setVideoSource(null);
};
const renderCancelPreviewButton = () => (
<TouchableOpacity onPress={cancelPreview} style={styles.closeButton}>
<View style={[styles.closeCross, { transform: [{ rotate: "45deg" }] }]} />
<View
style={[styles.closeCross, { transform: [{ rotate: "-45deg" }] }]}
/>
</TouchableOpacity>
);
const renderVideoPlayer = () => (
<Video
source={{ uri: videoSource }}
shouldPlay={true}
style={styles.media}
/>
);
const renderVideoRecordIndicator = () => (
<View style={styles.recordIndicatorContainer}>
<View style={styles.recordDot} />
<Text style={styles.recordTitle}>{"Recording..."}</Text>
</View>
);
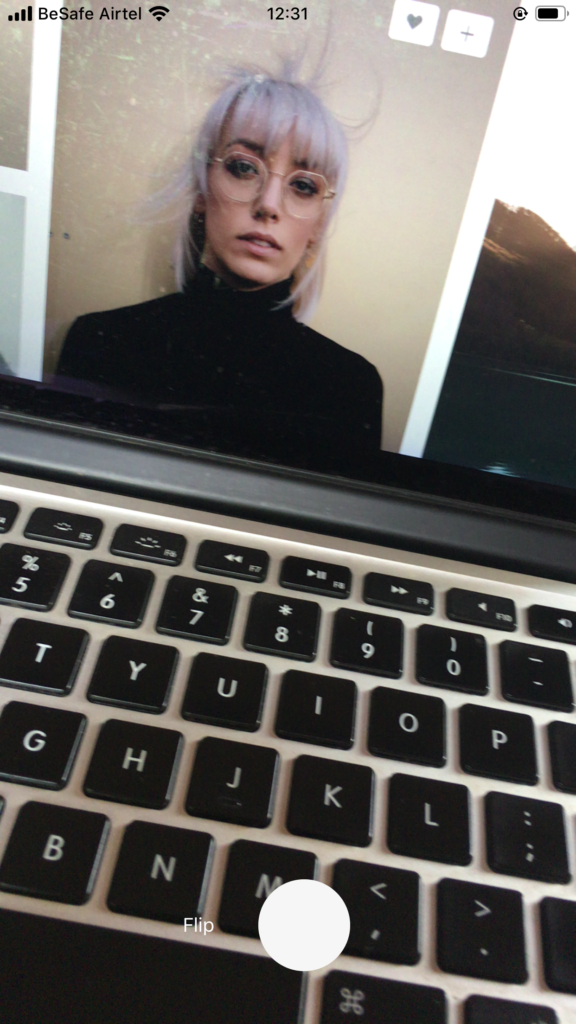
const renderCaptureControl = () => (
<View style={styles.control}>
<TouchableOpacity disabled={!isCameraReady} onPress={switchCamera}>
<Text style={styles.text}>{"Flip"}</Text>
</TouchableOpacity>
<TouchableOpacity
activeOpacity={0.7}
disabled={!isCameraReady}
onLongPress={recordVideo}
onPressOut={stopVideoRecording}
onPress={takePicture}
style={styles.capture}
/>
</View>
);
if (hasPermission === null) {
return <View />;
}
if (hasPermission === false) {
return <Text style={styles.text}>No access to camera</Text>;
}
return (
<SafeAreaView style={styles.container}>
<Camera
ref={cameraRef}
style={styles.container}
type={cameraType}
flashMode={Camera.Constants.FlashMode.on}
onCameraReady={onCameraReady}
onMountError={(error) => {
console.log("cammera error", error);
}}
/>
<View style={styles.container}>
{isVideoRecording && renderVideoRecordIndicator()}
{videoSource && renderVideoPlayer()}
{isPreview && renderCancelPreviewButton()}
{!videoSource && !isPreview && renderCaptureControl()}
</View>
</SafeAreaView>
);
}
const styles = StyleSheet.create({
container: {
StyleSheet.absoluteFillObject,
},
closeButton: {
position: "absolute",
top: 35,
left: 15,
height: closeButtonSize,
width: closeButtonSize,
borderRadius: Math.floor(closeButtonSize / 2),
justifyContent: "center",
alignItems: "center",
backgroundColor: "#c4c5c4",
opacity: 0.7,
zIndex: 2,
},
media: {
StyleSheet.absoluteFillObject,
},
closeCross: {
width: "68%",
height: 1,
backgroundColor: "black",
},
control: {
position: "absolute",
flexDirection: "row",
bottom: 38,
width: "100%",
alignItems: "center",
justifyContent: "center",
},
capture: {
backgroundColor: "#f5f6f5",
borderRadius: 5,
height: captureSize,
width: captureSize,
borderRadius: Math.floor(captureSize / 2),
marginHorizontal: 31,
},
recordIndicatorContainer: {
flexDirection: "row",
position: "absolute",
top: 25,
alignSelf: "center",
justifyContent: "center",
alignItems: "center",
backgroundColor: "transparent",
opacity: 0.7,
},
recordTitle: {
fontSize: 14,
color: "#ffffff",
textAlign: "center",
},
recordDot: {
borderRadius: 3,
height: 6,
width: 6,
backgroundColor: "#ff0000",
marginHorizontal: 5,
},
text: {
color: "#fff",
},
});
After adding this code, we should have our camera display ready. Make sure you run it on an actual device.
The implementation here is very simple and the logic has been broken down into the core methods below:
Before we analyze the core methods that make up the logic of our camera project, we should take note of where we have displayed the “Camera” component instance (<Camera… />).
Here we passed the already defined cameraRef to the ref prop of our Camera component.
Doing this, we now have access to beautiful methods like takePictureAsync(), recordAysnc()… on the cameraRef we had previously passed to the ref prop. This method will be key in helping us achieve the desired goal like taking a picture, recording a video and more.
- onCameraReady(). This callback method is implemented with the purpose of deciding when the camera is ready to capture photos or videos. You should note that it is important we check if this method was called before capturing pictures in any form.
- takePicture(). With the help of “takePictureAsync()” called on the ref of the Camera component instance (cameraRef.current.takePictureAsync), we are able to successfully capture a picture with this method.
- recordVideo(). This method act similarly to the takePicture() method. Triggered by onLongPress callback of our capture component, we capture moments in form of videos with the help of the recordAsync method called also on the ref of the Camera component instance (cameraRef.current.recordAsync()).
- stopVideoRecording(). This method is triggered by the user to stop the recording of a video.
- switchCamera(). This method switch between the front and back camera of ur device.
- cancelPreview(). This method cancels any form of photo or video preview is it a photo or video.
All the render methods such as renderCancelPreviewButton(), renderVideoPlayer()… simply renders a component for display on ur mobile screen.
Summary
Before we render any Component for display, we request necessary permissions with “requestPermissionsAsync” called on the instance of the Camera component (Camera.requestPermissionsAsync()). This method is called in the useEffect method. Our useEffect method is triggered only when the component is initially mounted.
We have implemented a simple condition rendering with our components for display. Here, only when we are previewing, we render a cancel button to cancel the preview of a photo or video after it has been captured. We render an indicator when we are recording. A video player after a video has been recorded and we have a video source.
We render a capture button only when we do not have a video source and we are not previewing.
User clicks on the capture button to record.
User can also press and hold on the capture button to record a video. Press out to stop recording and preview the recorded video.
Press the flip text to switch camera.
Conclusion
A picture is worth a thousand words and having the capability to capture photos and videos in your app is an essential feature. Photos and videos are believed to be the new keyboard, conveying more messages that can not be captured by words.
Remember to check out any of our demo apps to see how we have gone beyond the basic implementation of this feature.
Published at DZone with permission of krissanawatt kaewsanmunag. See the original article here.
Opinions expressed by DZone contributors are their own.
Comments