How To Use SingleStore With Spark ML for Fraud Detection
In this second article in our Fraud Detection series, we’ll load credit card data into our Spark environment.
Join the DZone community and get the full member experience.
Join For FreeAbstract
In the first part of this Fraud Detection series, we created and configured a Databricks CE cluster. In this second article, we’ll load credit card data into our Spark environment. We’ll also compare the performance of the SingleStore Spark Connector against JDBC for loading our data into SingleStore from Spark.
The notebook files used in this article series are available on GitHub in DBC, HTML, and iPython formats.
Introduction
This is a 3-part article series and it is structured as follows:
- Configure Databricks CE.
- Load the Credit Card data into SingleStore.
- Create and evaluate a Logistic Regression model.
This second article covers Part 2, Load the Credit Card data into SingleStore. If you are following along with this series, please ensure that you have successfully completed the setup and requirements described in the first article.
In our SingleStore Managed Service account, let’s use the SQL Editor to create a new database. Call this fraud_detection, as follows:
CREATE DATABASE IF NOT EXISTS fraud_detection;We’ll run the command and check that it successfully completed.
We need some data for our use case. We can find real credit card data on Kaggle. If you don’t have an account at Kaggle, simply create one and download the creditcard.csv file. On the Kaggle website, it states that this file is 143.84 MB in size.
The data are anonymized credit card transactions that contain both genuine and fraudulent cases. The transactions occurred over 2 days during September 2013 and the dataset contains a total of 284,807 transactions of which 492 are fraudulent, representing just 0.172% of the total. This dataset, therefore, presents some challenges for analysis as it is highly unbalanced. The dataset consists of the following fields:
- Time: The number of seconds elapsed between a transaction and the first transaction in the dataset.
- V1 to V28: Details not available due to confidentiality reasons.
- Amount: The monetary value of the transaction.
- Class: The response variable (0 = no fraud, 1 = fraud).
Upload CSV file
We can upload the CSV file into Databricks CE using the DBFS File Browser. We can check that the DBFS File Browser is enabled by first locating Settings in the left-hand navigation pane. Now we’ll select the Admin Console. On the Admin Console page, we can see 3 options:

We’ll select Workspace Settings.
Scrolling down on the Workspace Settings page, we’ll locate the DBFS File Browser, as follows:

In this case, we see that it is disabled. We just need to toggle the button on the right-hand side to enable this feature, as follows:

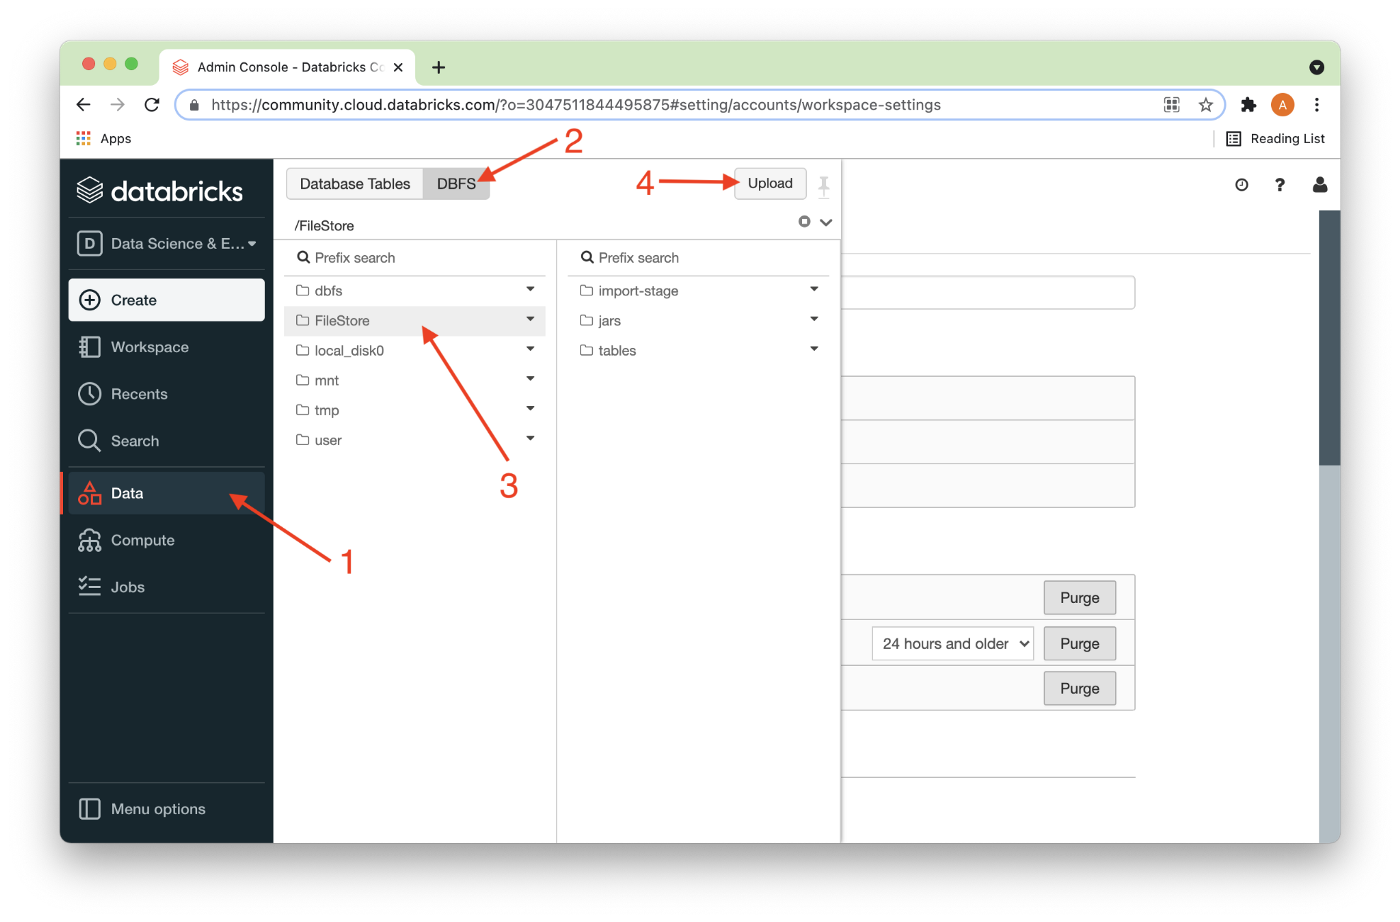
Next, we’ll need to reload this browser page to ensure that the feature is active. Once that is done, we’ll select Data (1) from the left navigation pane, followed by DBFS (2), then FileStore (3), and finally the Upload button (4), as shown in Figure 1.
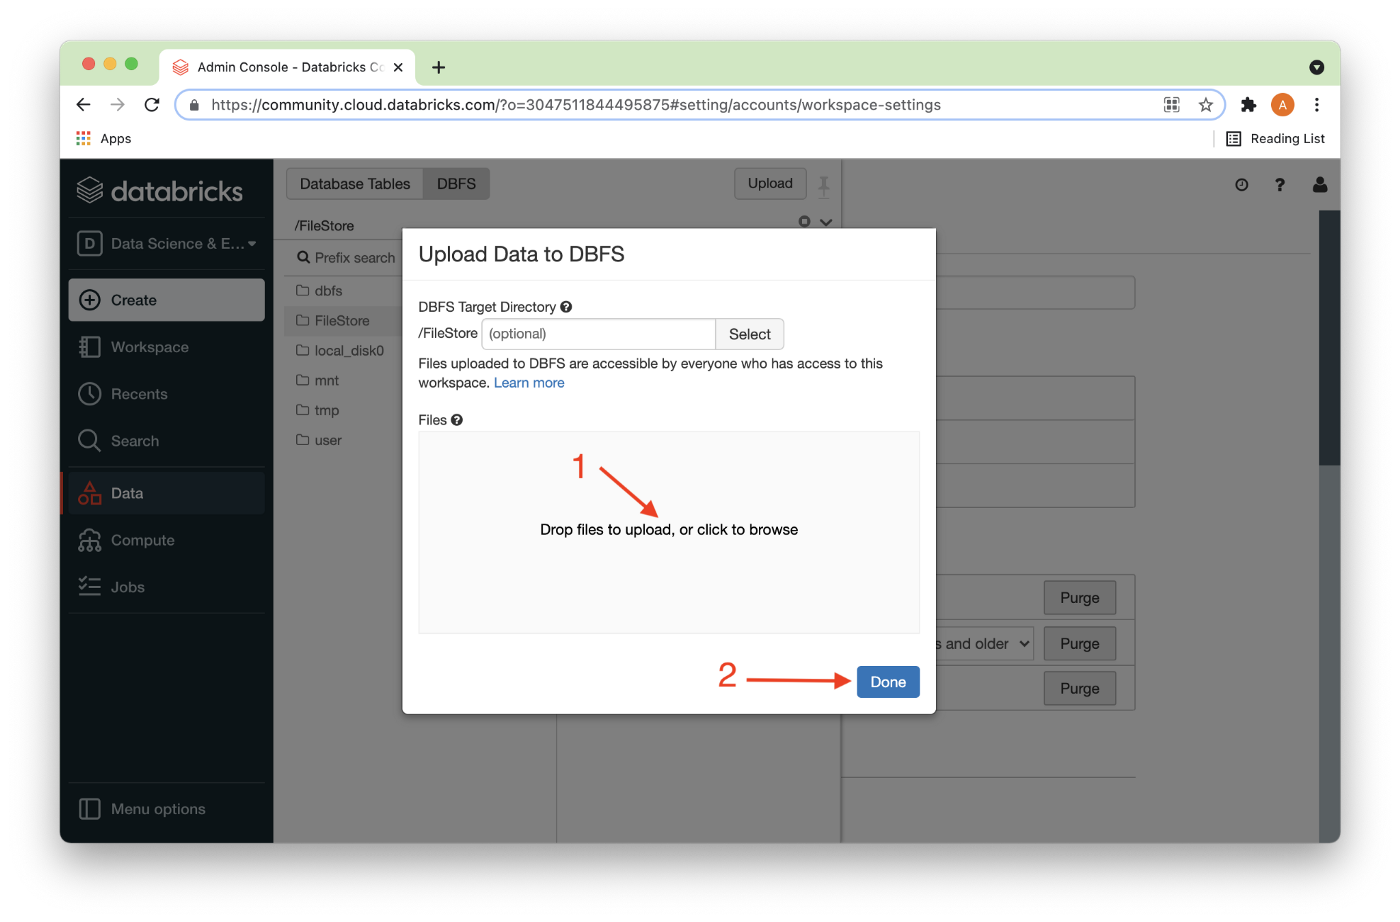
Next, we’ll locate the CSV file that we downloaded earlier and Drag files to upload or use the file browser (1) and then click Done (2) as shown in Figure 2.
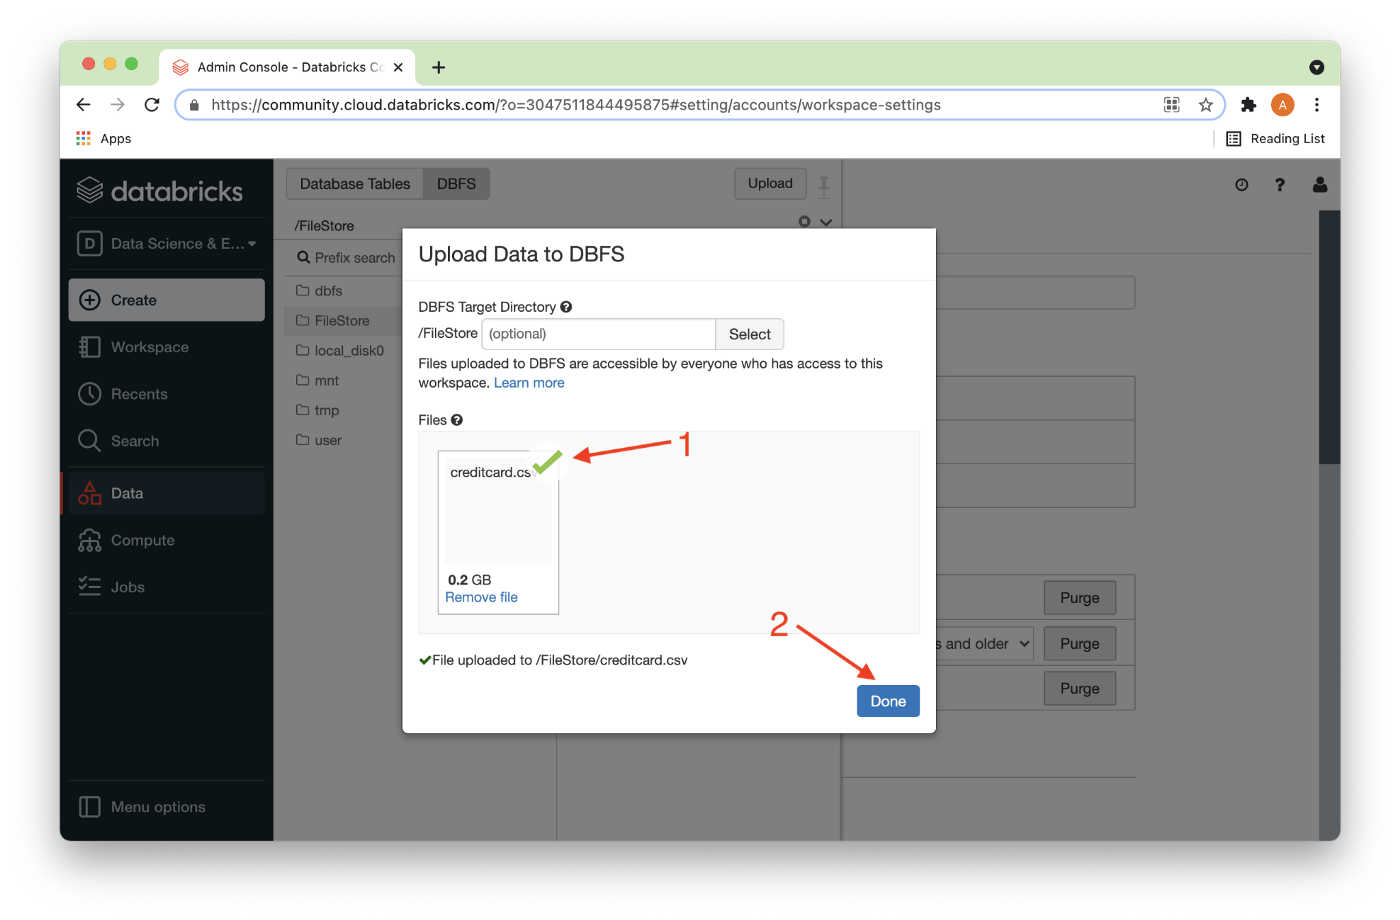
Once the CSV file has successfully uploaded, there should be a check mark next to the file (1) and we can click Done (2) as shown in Figure 3.
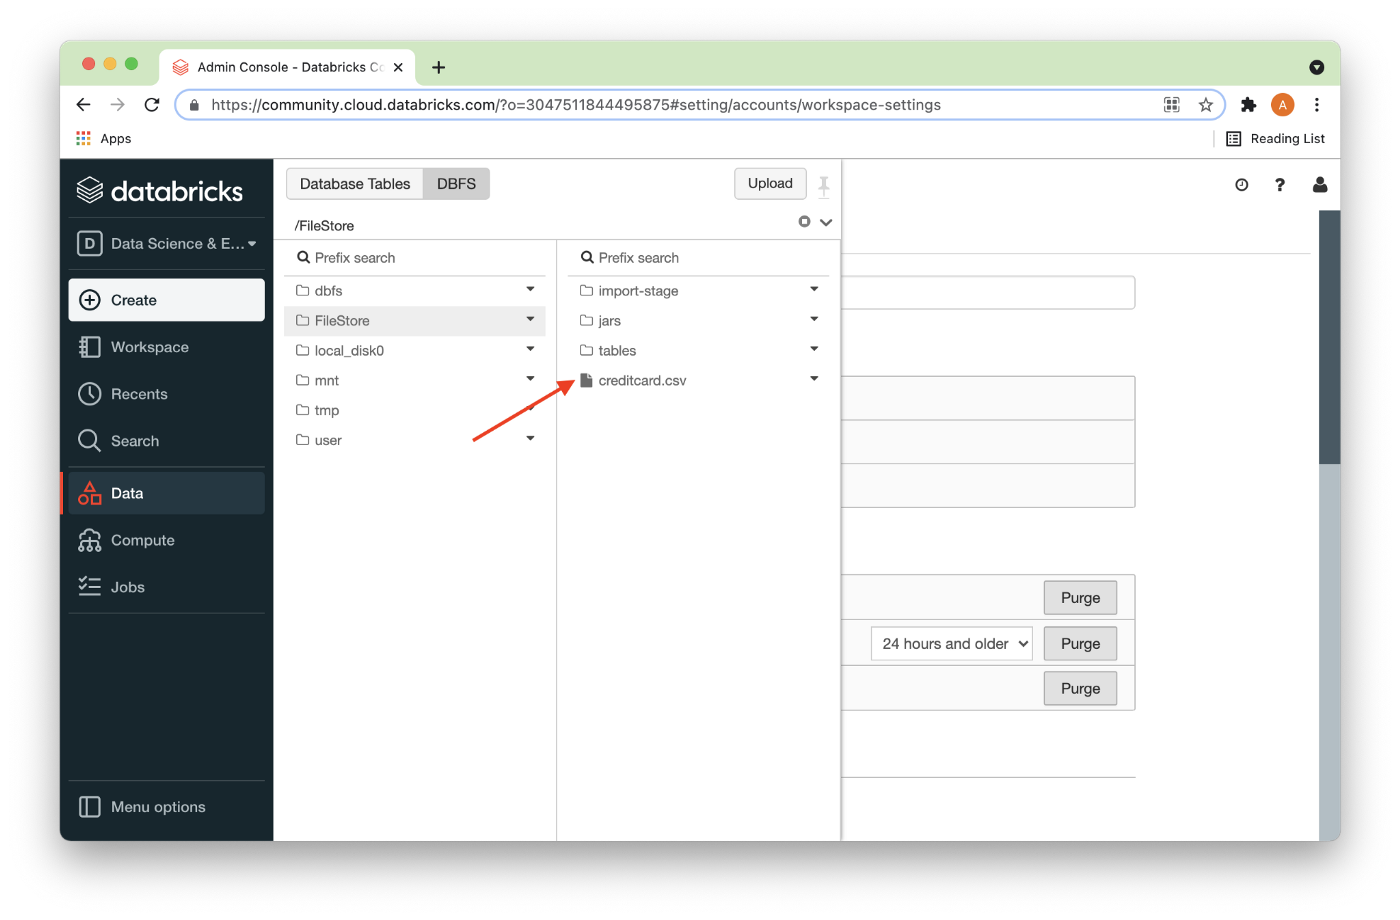
The CSV file should now be visible in the directory as shown in Figure 4.
Fill Out the Notebook
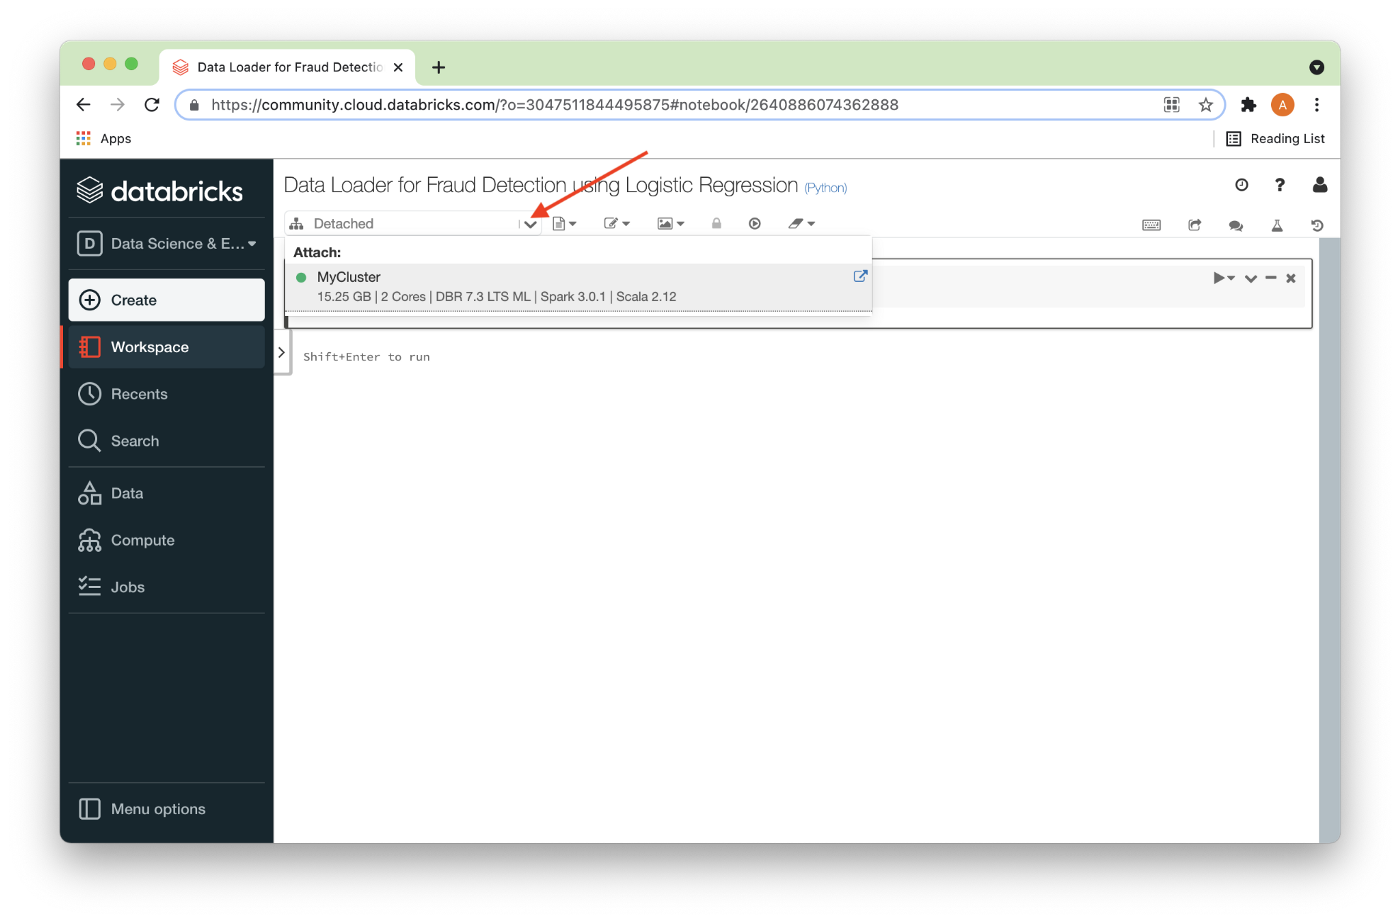
Let’s now create a new notebook. We’ll call it Data Loader for Fraud Detection using Logistic Regression. We’ll attach our new notebook to our cluster, as shown in Figure 5.
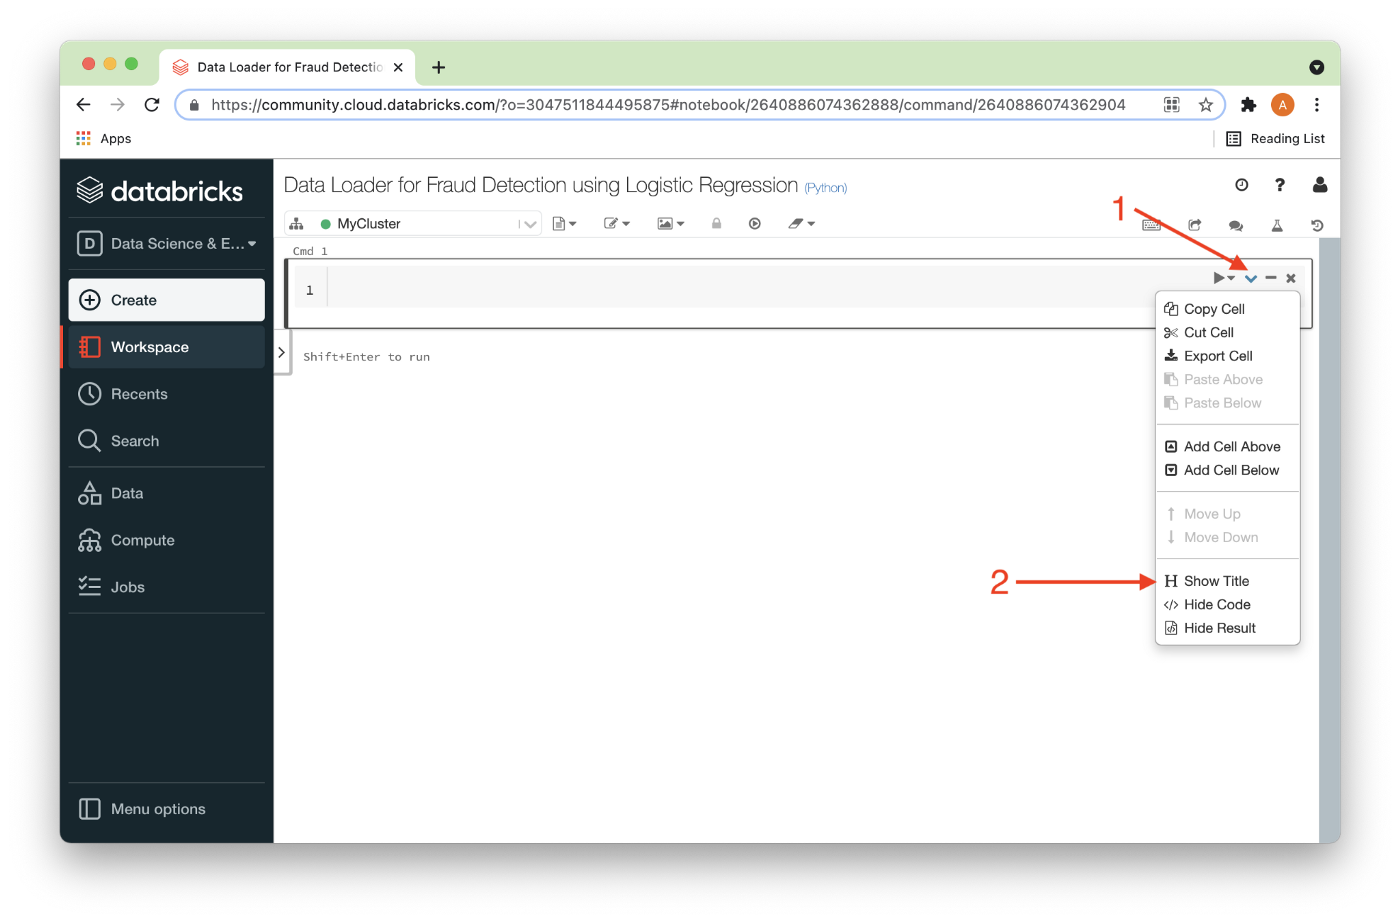
Using the options from the pull-down for a code-cell (1), we can show the title of a code cell (2) as shown in Figure 6.
This title can then be modified just by editing it (1), as shown in Figure 7. This will help us organize our code and remind us what we are trying to achieve in each code cell.
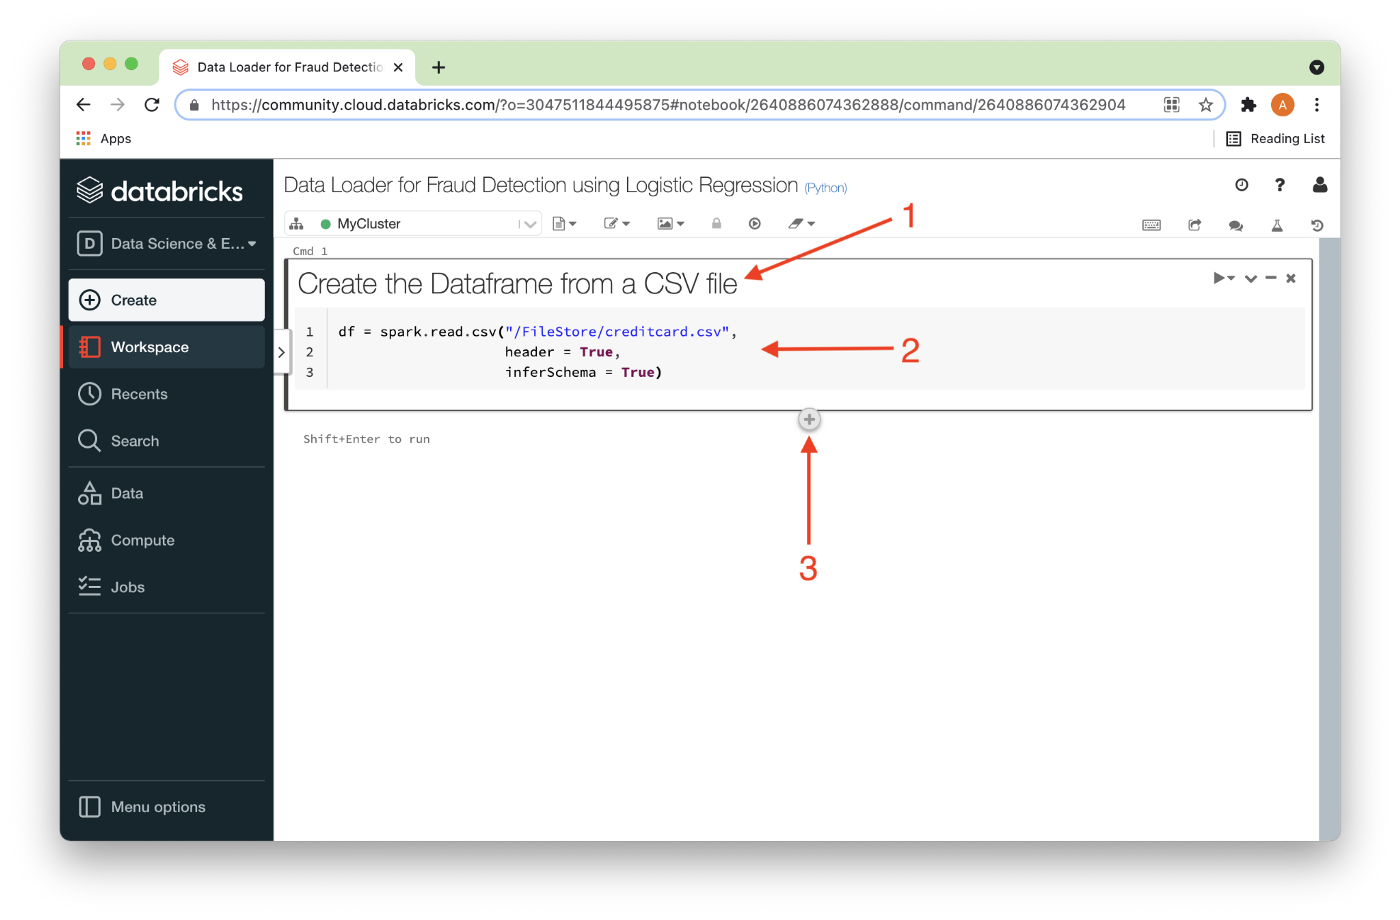
We’ll add the following code (2):
df = spark.read.csv("/FileStore/creditcard.csv",
                    header = True,
                    inferSchema = True)
This reads the CSV file and creates a Dataframe called df. We also tell Spark that there is a header row and ask it to determine what the data types are for each column. Finally, we can add a new code cell by hovering over the + sign below an existing code cell (3) and clicking it.
To execute each code cell, we can use Shift + Enter. In this first example, this will create the Dataframe.
In the next code cell, we’ll count the number of rows, as follows:
df.count()Executing this, we obtain the value 284807.
In the next code cell, to show the Dataframe, we can use:
display(df)In the next code cell, to find the number of fraudulent and non-fraudulent transactions, we can use:
display(df.groupBy("Class").count())This shows us that there are 492 (1 = fraud) and 284315 (0 = no fraud) transactions.
We are now ready to write the Dataframe to SingleStore. In the next code cell, we can add the following:
%run ./SetupThis will execute the notebook that we created in the previous article. We need to ensure that the server address and password have been added for our SingleStore Managed Service cluster.
In the next code cell we’ll set some parameters for the SingleStore Spark Connector, as follows:
spark.conf.set("spark.datasource.singlestore.ddlEndpoint", cluster)
spark.conf.set("spark.datasource.singlestore.user", "admin")
spark.conf.set("spark.datasource.singlestore.password", password)
spark.conf.set("spark.datasource.singlestore.disablePushdown", "false")
These are parameters for the SingleStore cluster, username, password, and whether Pushdown is enabled or disabled. We’ll discuss Pushdown in a separate article.
Finally, we are ready to write the Dataframe to SingleStore using the Spark Connector:
%%time

(df.write
   .format("singlestore")
   .option("loadDataCompression", "LZ4")
   .mode("overwrite")
   .save("fraud_detection.credit_card_tx"))
This will write the Dataframe to a table called credit_card_tx in the fraud_detection database. We can check that this table was successfully created from SingleStore. Using the %%time in the code cell allows us to measure the write operation. We can then compare this to using JDBC.
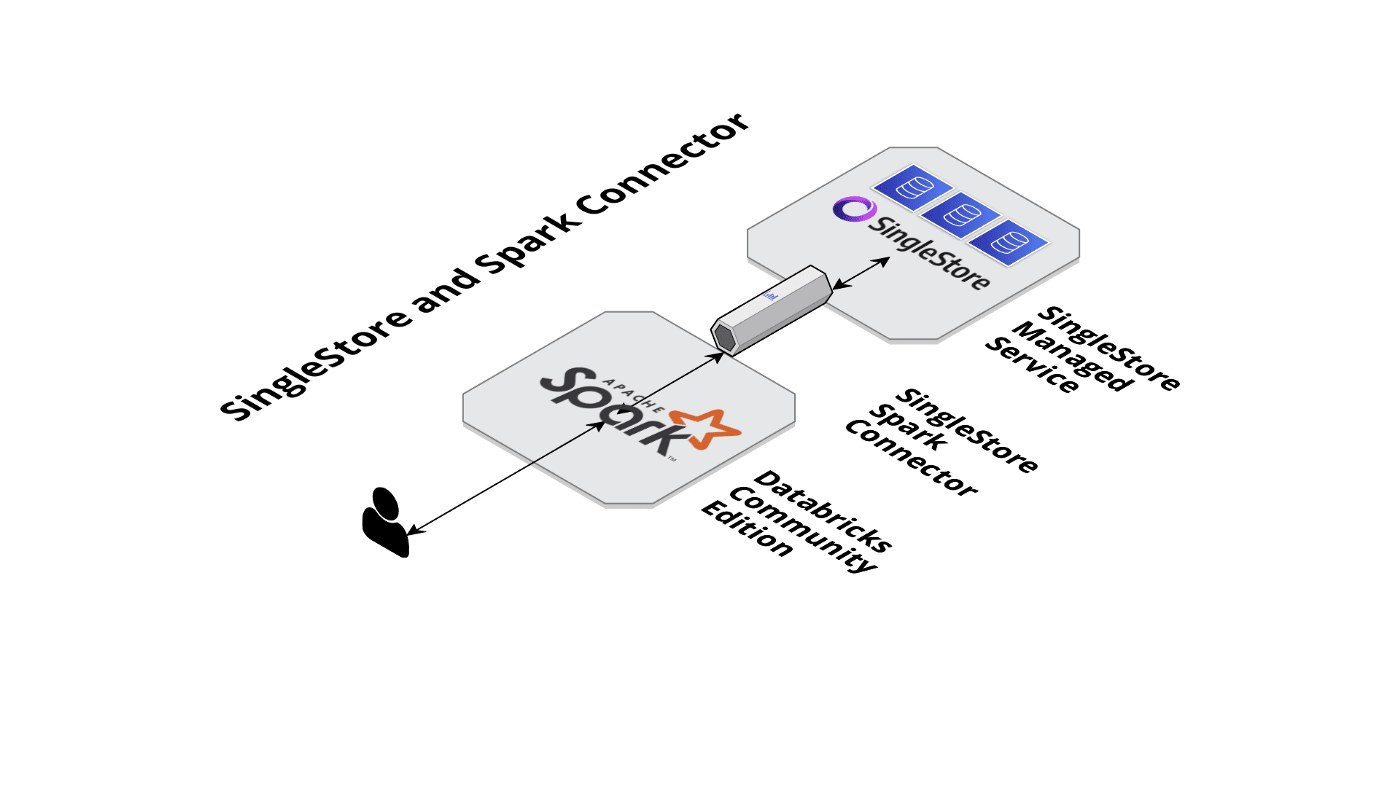
Visually, Figure 8 shows our Spark Connector setup.
In the next code cell, we can set the JDBC variables, as follows:
jdbc_url = "jdbc:mysql://{0}:{1}/{2}".format(server, port, "fraud_detection")

properties = {
  "user": "admin",
  "password": password,
}
In the next code cell, we can save the Dataframe to SingleStore using JDBC:
%%time

(df.write
   .jdbc(url = jdbc_url,
         table = "credit_card_tx2",
         mode = "overwrite",
         properties = properties))
This will write the Dataframe to a table called credit_card_tx2 in the fraud_detection database. We can check that this table was successfully created from SingleStore. Using the %%time in the code cell allows us to measure the write operation.
Visually, Figure 9 shows our JDBC setup.
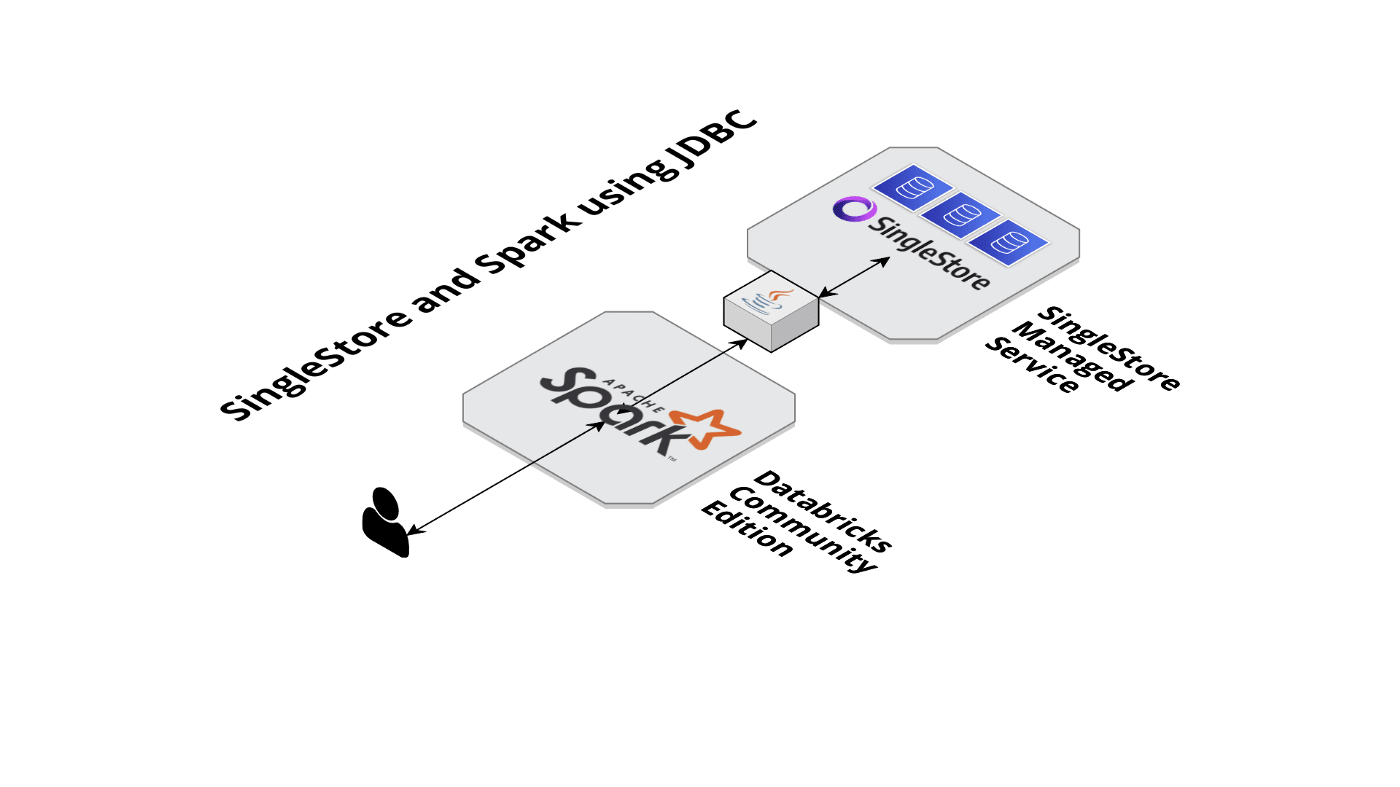
Comparing the two values of %%time it should be clear that, out of the box, the SingleStore Spark Connector is much faster than JDBC. Therefore, we could use Spark to perform ETL operations with SingleStore.
Summary
In this second article in this Fraud Detection series, we have successfully loaded our credit card data into a Spark Dataframe, checked the number of rows, and then written the Dataframe to SingleStore using both the SingleStore Spark Connector and JDBC. Comparing the performance of these two approaches we should see that, out of the box, the SingleStore Spark Connector is much faster than JDBC.
Published at DZone with permission of Akmal Chaudhri. See the original article here.
Opinions expressed by DZone contributors are their own.
Comments