Implement Pagination in .NET Core MVC Application With Custom HTML Helpers
In this tutorial, follow the steps to achieve pagination in a .NET Core MVC application by simply creating a custom HTML helper.
Join the DZone community and get the full member experience.
Join For FreeIn this article, let us try to build custom HTML helpers to provide pagination in the .NET Core MVC application.
This article expects the user to have basic knowledge of HTML helpers.
For those who do not have an idea of HTML helpers, here is a brief explanation.
- HTML helpers make it easy and fast for developers to create HTML pages.
- In most cases, an HTML helper is just a method that returns a string.
- MVC comes with built-in HTML helpers like @Html.TextBox(), @Html.CheckBox(), @Html.Label, etc.
- HTML helpers render html controls in razor view. For example, @Html.TextBox() renders <input type="textbox"> control, @Html.CheckBox() renders <input type="checkbox"> control, etc.
Please go through the Microsoft documentation on HTML helpers for more information.
Need
In a web application, if a large number of records are to be displayed, it is required to provide pagination. In this article, we achieve pagination in a .NET Core MVC application by simply creating a custom HTMLHelper. To keep it simple, we just use numbers to represent data.
Say we need to display 55 records in multiple pages with 10 items on each page. With 10 items per page, we can display all the items in 6 pages as shown above. In real-time, the data could be a number of records that are fetched from a database, file, etc.
Let's see how it can be done.
Steps
Open Visual Studio 2019 > Create .NET Core MVC Application as shown below.

Name your project as HTMLHelpersApp.
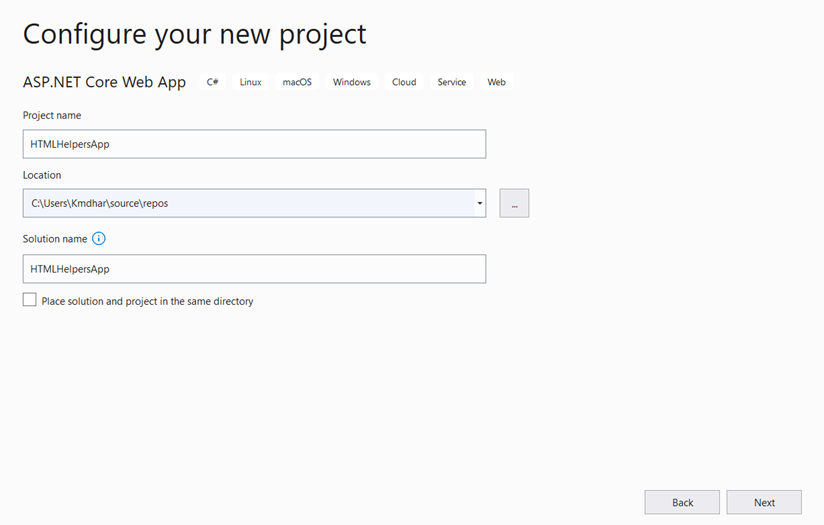
Select .NET Framework Version.

Create the required models and helper files.
- Create a new model "Number’."
- Right-click on the Model folder and add the "Number" class.


Add code in Number.cs. This model captures the user input. It has only one property: "InputNumber."
using System;
using System.ComponentModel.DataAnnotations;

namespace HTMLHelpersApp.Models
{
    public class Number
    {
        //validation for required, only numbers, allowed range-1 to 500
        [Required(ErrorMessage = "Value is Required!. Please enter value between 1 and 500.")]
        [RegularExpression(@"^\d+$", ErrorMessage = "Only numbers are allowed. Please enter value between 1 and 500.")]
        [Range(1, 500, ErrorMessage = "Please enter value between 1 and 500.")]
        public int InputNumber = 1;
    }
}
Now let us add a common class PageInfo.cs. Create new folder Common and add PageInfo.cs class.
- Right-click on the project folder and add a new folder.

Add code in PageInfo.cs:
- Page Start indicates the first item on the current page.
- Page End indicates the last item on the current page.
- Items per page indicated the number of items to be displayed on a page.
- Last Page indicates the number of pages/last page number.
- Total Items indicate the total number of items.
Based on total items and items per page, the total number of pages, the first item, and the last items on a page are calculated.
using System;
using System.Collections.Generic;
using System.Linq;
using System.Threading.Tasks;

namespace HTMLHelpersApp.Common
{
    public class PageInfo
    {
        public int TotalItems { get; set; }
        public int ItemsPerPage { get; set; }
        public int CurrentPage { get; set; }

        public PageInfo()
        {
            CurrentPage = 1;
        }
        //starting item number in the page
        public int PageStart
        {
            get { return ((CurrentPage - 1) * ItemsPerPage + 1); }
        }
        //last item number in the page
        public int PageEnd
        {
            get
            {
                int currentTotal = (CurrentPage - 1) * ItemsPerPage + ItemsPerPage;
                return (currentTotal < TotalItems ? currentTotal : TotalItems);
            }
        }
        public int LastPage
        {
            get { return (int)Math.Ceiling((decimal)TotalItems / ItemsPerPage); }
        }

    }
}
Now we come to the most important part: creating the custom HTML helpers.
- Create custom HTML helper PageLinks which renders the page numbers, previous and next links.
- Add a new class "PagingHtmlHelpers.cs" in "Common" folder.
- Add code in "PagingHtmlHelpers.cs."
- Extend HtmlHelper class and add new functionality to add Page links.
public static IHtmlContent PageLinks(this IHtmlHelper htmlHelper, PageInfo pageInfo, Func<int, string> PageUrl)5. Takes 2 parameters
- pageInfo: to add the page numbers
- delegate to a function: takes an integer and string as parameters to add the parameters required in controller action method
Use tag builders to create anchor tags.
TagBuilder tag = new TagBuilder("a");
Add attributes
tag.MergeAttribute("href", hrefValue);
tag.InnerHtml.Append(" "+ innerHtml + " ");
Styles also can be applied as attributes.
using Microsoft.AspNetCore.Html;
using Microsoft.AspNetCore.Mvc.Rendering;
using System;
using System.Text;

namespace HTMLHelpersApp.Common
{
    public static class PagingHtmlHelpers
    {
        public static IHtmlContent PageLinks(this IHtmlHelper htmlHelper, PageInfo pageInfo, Func<int, string> PageUrl)
        {
            StringBuilder pagingTags = new StringBuilder();
            //Prev Page
            if (pageInfo.CurrentPage > 1)
            {
                pagingTags.Append(GetTagString("Prev", PageUrl(pageInfo.CurrentPage - 1)));

            }
            //Page Numbers
            for (int i = 1; i <= pageInfo.LastPage; i++)
            {
                pagingTags.Append(GetTagString(i.ToString(), PageUrl(i)));
            }
            //Next Page
            if (pageInfo.CurrentPage < pageInfo.LastPage)
            {
                pagingTags.Append(GetTagString("Next", PageUrl(pageInfo.CurrentPage + 1)));
            }
            //paging tags
            return new HtmlString(pagingTags.ToString());
        }

        private static string GetTagString(string innerHtml, string hrefValue)
        {
            TagBuilder tag = new TagBuilder("a"); // Construct an <a> tag
            tag.MergeAttribute("class","anchorstyle");
            tag.MergeAttribute("href", hrefValue);
            tag.InnerHtml.Append(" "+ innerHtml + "  ");
            using (var sw = new System.IO.StringWriter())
            {
                tag.WriteTo(sw, System.Text.Encodings.Web.HtmlEncoder.Default);
                return sw.ToString();
            }
        }
    }
}

Add a new class "ShowPaging.cs" in "Models" folder.
DisplayResultwill display the list of numbers on each page.PageInfowill capture all the page details like the number of pages, total items, start item and last item on each page, etc.
using HTMLHelpersApp.Common;
using System;
using System.Collections.Generic;
using System.ComponentModel.DataAnnotations;

namespace HTMLHelpersApp.Models
{
    public class ShowPaging
    {

        //validation for required, only numbers, allowed range-1 to 500
        [Required(ErrorMessage = "Value is Required!. Please enter value between 1 and 500.")]
        [RegularExpression(@"^\d+$", ErrorMessage = "Only positive numbers are allowed. Please enter value between 1 and 500.")]
        [Range(1, 500, ErrorMessage = "Please enter value between 1 and 500.")]
        public int InputNumber { get; set; }

        public List<string> DisplayResult { get; set; }

        public PageInfo PageInfo;
    }
}
Now that we have the required models and helpers, let us create controllers and views.
Add a New Controller
Add a new controller: "HTMLHelperController"
Right-click on the controller folder and select controller in the context menu.

Select "MVCController-Empty."

Add Code in "HTMLHelperController."
- Number action is called for the user to enter the input number.
- ShowPaging action is called to display the data on multiple pages.
- Called when page links are clicked
using HTMLHelpersApp.Common;
using HTMLHelpersApp.Models;
using Microsoft.AspNetCore.Mvc;
using System.Collections.Generic;

namespace HTMLHelpersApp.Controllers
{
    public class HTMLHelperController : Controller
    {
        private const int PAGE_SIZE = 10;
        public IActionResult Number()
        {
            return View();
        }

        public IActionResult ShowPaging(ShowPaging model, int page = 1, int inputNumber = 1)
        {
            if (ModelState.IsValid)
            {
                var displayResult = new List<string>();
                string message;

                //set model.pageinfo
                model.PageInfo = new PageInfo();
                model.PageInfo.CurrentPage = page;
                model.PageInfo.ItemsPerPage = PAGE_SIZE;
                model.PageInfo.TotalItems = inputNumber;

                //Set model.displayresult - numbers list
                for (int count = model.PageInfo.PageStart; count <= model.PageInfo.PageEnd; count++)
                {
                    message = count.ToString();
                    displayResult.Add(message.Trim());
                }
                model.DisplayResult = displayResult;
            }
            //return view model
            return View(model);
        }
    }
}
- Create a new folder "HTMLHelper" in the Views folder.
- Follow the same steps mentioned above to add a new folder.
- Create a new view "Number.cshtml."
- Right-click on Views > HTMLHelper folder and add a new view.

Add Code in "Number.cshtml."
@model HTMLHelpersApp.Models.Number

<h4>Number</h4>
<hr />
<div class="row">
    <div class="col-md-4">
        <form asp-action="ShowPaging" method="get">
            <div asp-validation-summary="ModelOnly" class="text-danger"></div>
            <div class="form-group">
                <input asp-for="InputNumber" class="form-control"/>
            </div>
            <div class="form-group">
                <input type="submit" value="Submit" class="btn btn-primary" />
            </div>
        </form>
    </div>
</div>
Similarly, create a new view "ShowPaging.cshtml."
- Follow the same steps as mentioned above.
- Add code in "ShowPaging.cshtml."
@model HTMLHelpersApp.Models.ShowPaging
@using HTMLHelpersApp.Common

<link rel="stylesheet" href ="~/css/anchorstyles.css"/>
<form>
    <h4>Show Paging</h4>
    <hr />
    <div asp-validation-summary="All" class="text-danger"></div>
    <dl class="row">
        <dt class="col-sm-2">
            <b>Number: </b> @Html.DisplayFor(model => model.InputNumber)
        </dt>
        <dd>
            <a asp-action="Number">Change Number</a>
        </dd>
    </dl>

    <div>
        @if (Model != null && Model.DisplayResult != null)
        {
            <ul>
                @foreach (var item in Model.DisplayResult)
                {
                    <li>@Html.Raw(item)</li>
                }
            </ul>
            <div>
                @Html.PageLinks(@Model.PageInfo, x => Url.Action("ShowPaging",
                    new { page = x.ToString(), inputNumber = @Model.InputNumber }))
            </div>
        }
    </div>
 </form>
Solution Explorer will be as follows:

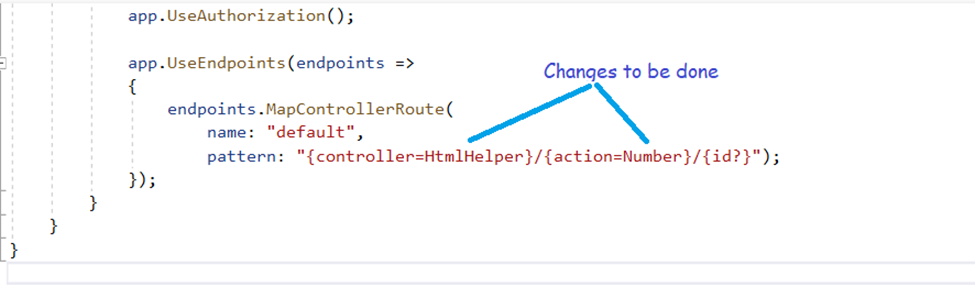
We added all the required files. Before we run, let us configure the default controller and action in "startup.cs."
Compile and run the application. Enter the input number as 35.

Click on Submit.

You see the paging at the bottom. 10 numbers are displayed on each page, so there will be 4 pages to display 35 numbers. As this is the first page, the "Prev" link is not displayed. Click on the page 2 link to see the "Prev" link.

You can apply stylings to the page links as required.

Opinions expressed by DZone contributors are their own.
Comments