Installing WebSphere Liberty Profile Server Then Adding Features
IBM WebSphere Liberty Profile is a really fast and easy to to use application server that is now Java EE 6 Web Profile-certified.
Join the DZone community and get the full member experience.
Join For FreeIBM WebSphere Liberty Profile is a really fast and easy to to use application server. According to theAbout page, the latest stable release of Liberty is Java EE 6 Web Profile-certified and they’re gradually adding Java EE 7 technologies. Any Java EE 6 applications you write on Liberty can be deployed in production, without changes, on WebSphere Application Server which is certified for the full Java EE 6 platform. You can, of course, deploy to production on Liberty too. Bellow we will see how to start working on it and adding some features to it.
1. Download the Liberty server from this link as a stand alone server.
https://developer.ibm.com/wasdev/downloads/liberty-profile-using-non-eclipse-environments/
Also you can embed it in Eclipse after installing the WebSphere Developer Tools through this link:
https://developer.ibm.com/wasdev/downloads/liberty-profile-using-eclipse/
The Eclipse Marketplace would start like this for installing an adapter for the Eclipse.
The WebSphere Developer Tools adds an adapter for the Eclipse to be able to create new server instance that points to the WebSphere Liberty Profile.
2. After downloading the zip file of the stand alone Liberty, extract it and it should contain an image that is packaged as a Java archive file, for example: wlp-edition-runtime-version.jar.
3- Extract the distribution image by using the interactive install wizard, run the following command line after changing the directory to the image directory: java -jar wlp-edition-runtime-version.jar.
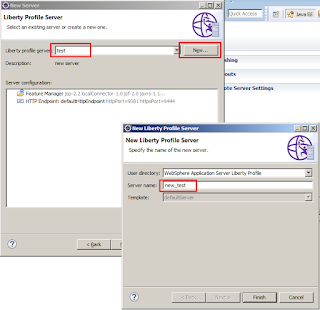
4- You can add a new WebSphere Liberty Profile server from the view Servers then right click and choose New->Server. Now go through the wizard bellow to point to the Liberty Profile directory.
4. For a stand alone usage, navigate from the command line to the source folder and then to the bin directory that contains some utilities to interact with the server through this command cd path_to_liberty\wlp\bin.
5. Now run the command server create server_name to create a new server.
6. If the server is created successfully, you receive message: server_name created.
7. Now you can start this server with the default settings through the command server start server_name also you can stop the server through server stop server_name .
8. As mentioned in point# 5, the server is created with the default settings that are configured in the server.xml under the server directory in path_to_liberty\wlp\usr\servers\server_name. It should look like this:
<?xml version="1.0" encoding="UTF-8"?>
<server description="new server">

    <!-- Enable features -->
    <featureManager>
        <feature>jsp-2.2</feature>
    </featureManager>

    <!-- To access this server from a remote
 client add a host attribute to the
following element, e.g. host="*" -->
    <httpEndpoint id="defaultHttpEndpoint"
                  httpPort="9080"
                  httpsPort="9443" />

</server>
9- You add more features and more configuration through the server.xml directly or from Eclipse if you embedded the server to it, for example it could be like this. Finally this is a link for a complete list of the Liberty Features.
References:
- Installing the Liberty profile by extracting a Java archive file.
- Creating a Liberty profile server manually.
- Download Liberty profile in Eclipse.
- Download the WAS Liberty runtime.
- Getting started with Liberty profile.
- Preparing and running an application client.
- About WebSphere Liberty.
Published at DZone with permission of Belal Galal. See the original article here.
Opinions expressed by DZone contributors are their own.


Comments