Jenkins Pipeline With Sonarqube and Gitlab
In this guide, we are going to deploy a continuous integration process between Jenkins, GitLab, and SonarQube. The end goal will be to review the code qualit...
Join the DZone community and get the full member experience.
Join For FreeIn this guide, we are going to deploy a continuous integration process between Jenkins, GitLab, and SonarQube.
The end goal will be to review the code quality through SonarQube for GitLab repository using Jenkins. Following is the process flow we need to manage:
- Push code to GitLab from the local machine.
- Next, checkout code and run tests in Jenkins, here it is acting as a Continuous Integrator.
- Generate quality reports via SonarQube as a code analyzer.
Setup Jenkins, SonarQube, and GitLabs
In case, if you haven't set up the required software yet, go through the below-mentioned steps:
Step 1:Make sure that your host machine has enough power to run these components, as GitLab alone requires 4 GB of RAM to perform its operations smoothly. To run all three together, you need at least 8 GB of RAM and 20 GB of hard disk space.
Step 2:For SonarQube, you need to set the recommended values as a root user on the host machine:
xxxxxxxxxx
$ sysctl -w vm.max_map_count=262144
$ sysctl -w fs.file-max=65536
$ ulimit -n 65536
$ ulimit -u 4096
Step 3:
For this guide, we are going to use a simple docker-compose.yml file. However, you are free to edit the file as per your requirement.
Before launching the containers, please make sure that you change the value of GITLAB_SECRETS_DB_KEY_BASE, GITLAB_HOST, SONARQUBE_JDBC_PASSWORD, and POSTGRES_PASSWORD. Although, along with this, you can also modify the define ports in the file.
xxxxxxxxxx
version: "3.2"
services:
jenkins:
image: jenkinsci/jenkins:lts
container_name: jenkins-container
restart: always
ports:
- "8080:8080"
- '50000:50000'
volumes:
- '/var/run/docker.sock:/var/run/docker.sock'
- '/data/jenkins/jenkins_home:/var/jenkins_home'
environment:
- "JENKINS_OPTS=--prefix=/jenkins"
gitlab:
image: gitlab/gitlab-ce:latest
container_name: gitlab-container
restart: always
environment:
- GITLAB_SECRETS_DB_KEY_BASE=long-and-random-alphanumeric-string
- GITLAB_HOST=your-host-ip-here
- GITLAB_PORT=10080
- GITLAB_SSH_PORT=10022
ports:
- "10080:80"
- "10022:22"
volumes:
- '/data/gitlab/config:/etc/gitlab'
- '/data/gitlab/logs:/var/log/gitlab'
- '/data/gitlab/data:/var/opt/gitlab'
sonarqube:
image: sonarqube:7.9.2-community
container_name: sonar-container
restart: always
networks:
- sonarnet
environment:
- SONARQUBE_JDBC_USERNAME=sonar
- SONARQUBE_JDBC_PASSWORD=your-strong-password-here
- SONARQUBE_JDBC_URL=jdbc:postgresql://postgressdb:5432/sonarqube
ports:
- "9000:9000"
- "9092:9092"
volumes:
- '/data/sonar/sonarqube_conf:/opt/sonarqube/conf'
- '/data/sonar/sonarqube_data:/opt/sonarqube/data'
- '/data/sonar/sonarqube_extensions:/opt/sonarqube/extensions'
- '/data/sonar/sonarqube_bundled-plugins:/opt/sonarqube/lib/bundled-plugins'
postgressdb:
image: postgres:12.1
container_name: postgres-container
restart: always
networks:
- sonarnet
environment:
- POSTGRES_USER=sonar
- POSTGRES_PASSWORD=your-strong-password-here
- POSTGRES_DB=sonarqube
volumes:
- '/data/postgresql/sonarqube_db:/var/lib/postgresql'
- '/data/postgresql/postgresql_data:/var/lib/postgresql/data'
networks:
sonarnet:
driver: bridge-
Now, run the following command to launch the stack:
xxxxxxxxxx
$ docker-compose up -d
Note that the installation process is going to take some time, so sit back and have some coffee. You deserve it!
Now, to verify if all systems are up and running, run this command:
xxxxxxxxxx
$ docker ps
CONTAINER ID IMAGE COMMAND CREATED STATUS PORTS NAMES
f54e223417fa gitlab/gitlab-ce:latest "/assets/wrapper" 1 minute ago 1 minute ago (healthy) 443/tcp, 0.0.0.0:10022->22/tcp, 0.0.0.0:10080->80/tcp gitlab-container
9102f03f69b8 sonarqube "./bin/run.sh" 1 minute ago 1 minute ago 0.0.0.0:9000->9000/tcp sonar-container
05f554da39fc jenkinsci/jenkins:lts "/bin/tini --..." 1 minute ago 1 minute ago 0.0.0.0:8080->8080/tcp, 0.0.0.0:50000->50000/tcp jenkins-container
If all went well, then you can access all three of them by following mentioned URLs:
As you are visiting your Jenkins environment for the first time, it is going to prompt you to enter the administrator password, which was generated during the installation process. To access the password from the container, you can run the following command:
xxxxxxxxxx
$ docker exec -it <your-jinkins-container-id> cat /var/jenkins_home/secrets/initialAdminPassword
$ gSzHTGfbtXSpcBXMyJ6gzmNfNH7BjhK23
Once you enter the password, you can select the option Install suggested plugin. Wait until the download finishes.
For SonarQube, the default username and password are admin and admin, respectively. Whereas, for GitLab, you will be prompted to enter the new password for the default username root.
Configuring Jenkins Pipeline with SonarQube and GitLab integration
SonarQube Configuration:
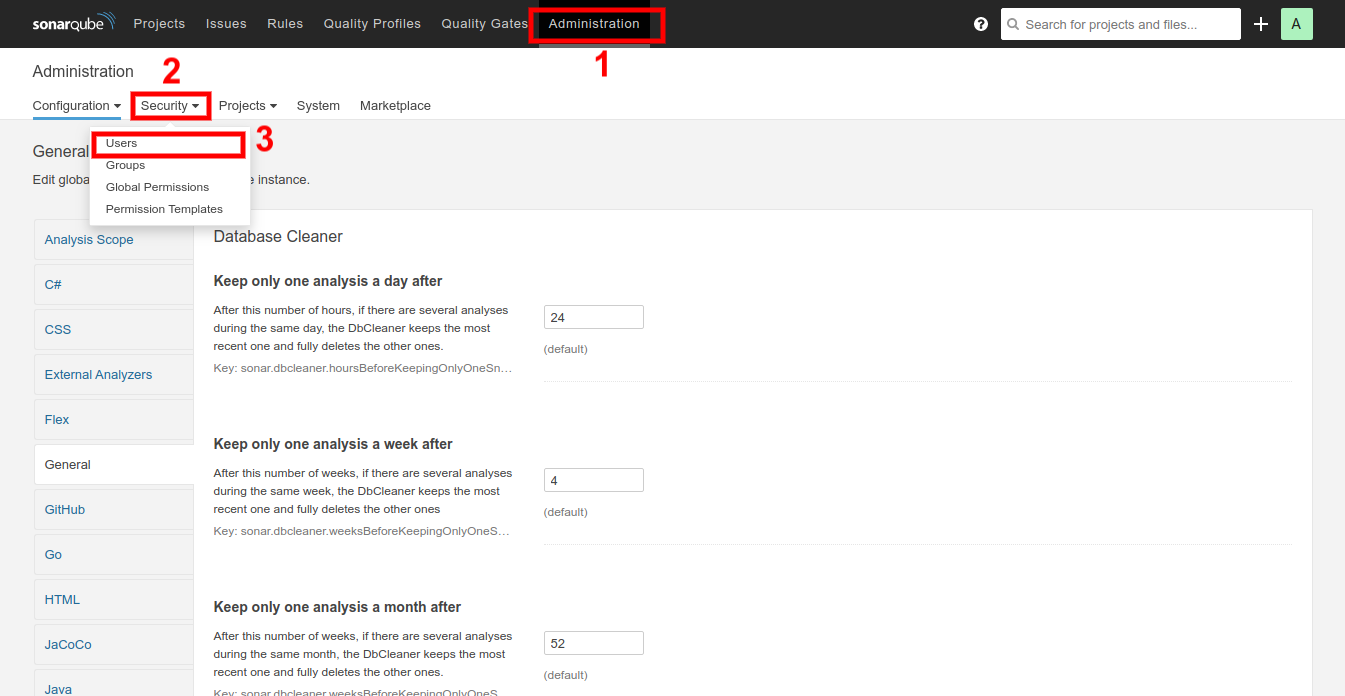
We will begin with SonarQube. To connect it with Jenkins, you need to generate the token to access the SonarQube instance.
Login into the SonarQube dashboard and go to the Administrator tab. In the Security drop-down menu, select User tab as shown in the below image:
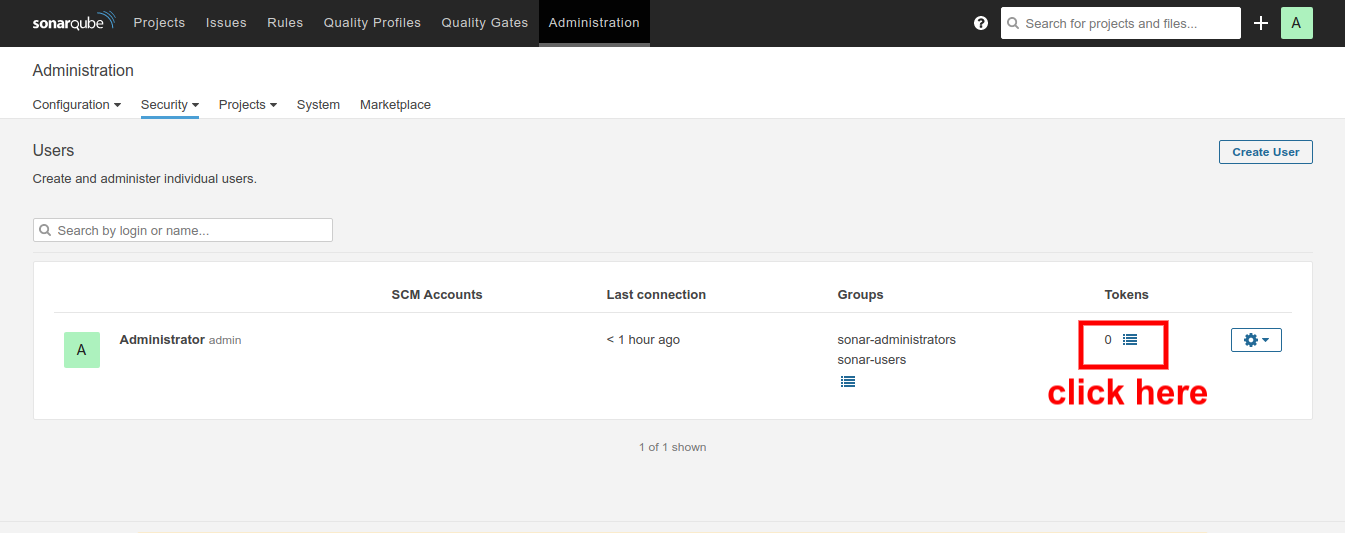
Here you will find Administrator user, for which you are going to generate the access token:
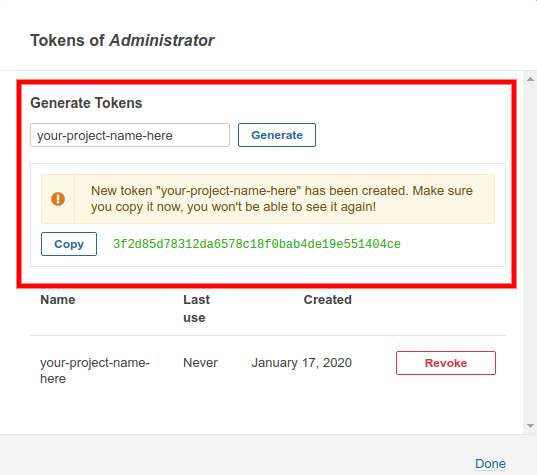
In the pop-up that displays on your screen, enter the desired name and click on the Generate button. Copy the newly generated token and save it somewhere safe, as you won't be able to view/copy the generated token again.
GitLab Configuration:
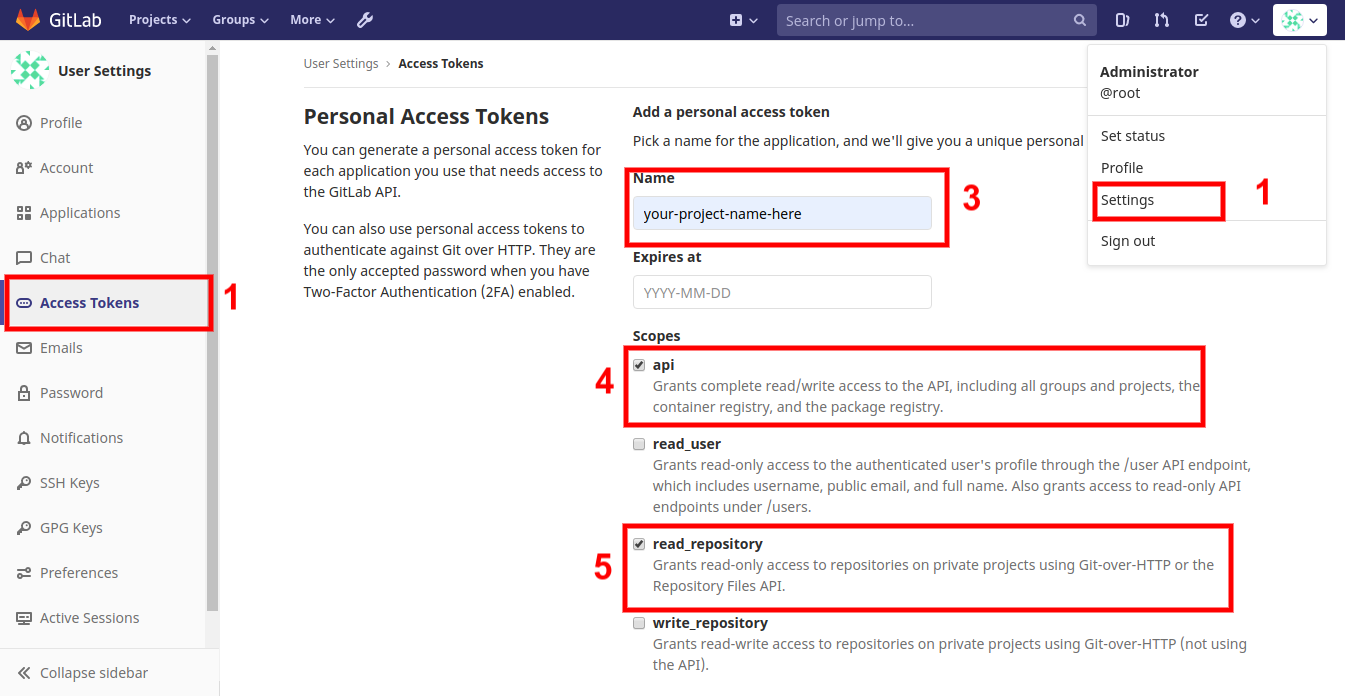
To establish a connection between GitLab and Jenkins, again, we need to generate an access token, which can be done as mentioned below:
To generate an access token, go to your GitLab dashboard and follow Dashboard > Setting > Access Tokens. Once you have the token with you, copy it for further use.
Integrating SonarQube and GitLabs in Jenkins:
This guide assumes that you have already done the basic setup for Jenkins. Now, let's move to configure GitLab and SonarQube in the Jenkins server.
First, we are going to integrate SonarQube. Go Dashboard > Manage Jenkins > Manage Plugins and search for SonarQube.
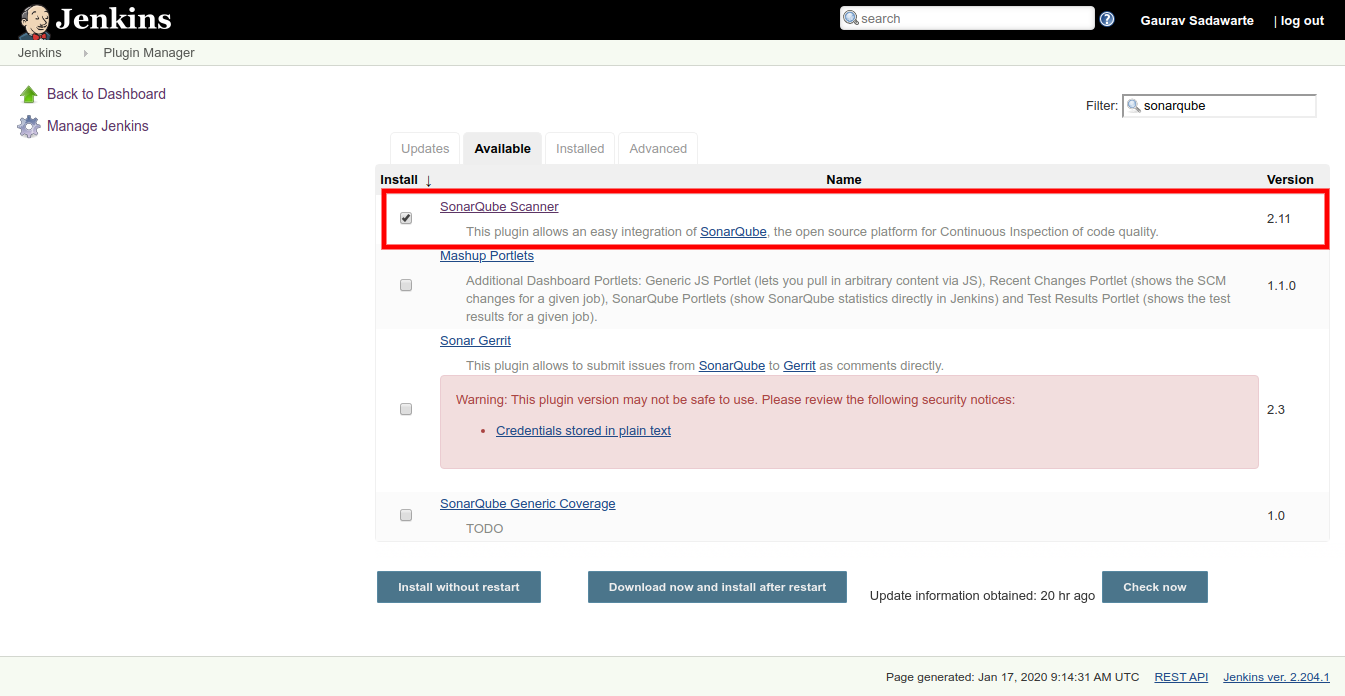
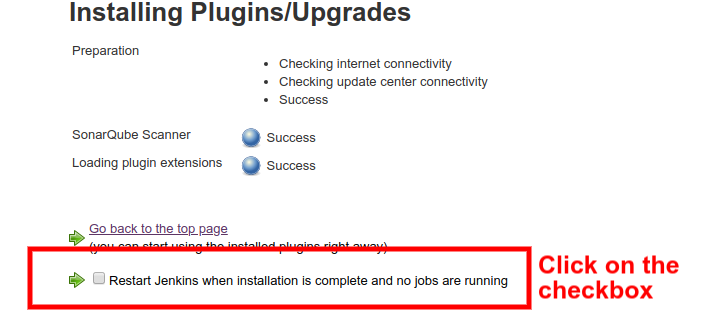
Make sure you restart Jenkins once the plugin is successfully installed.
Once the restart is completed, you have to set up Sonar Scanner, which is a standalone tool used for scanning the source code and send the result to SonarQube Server. Here you are going to install it in the Jenkins container itself, although you are free to launch a separate container for the same purpose.
xxxxxxxxxx
$ docker exec -it <your-jinkins-container-id> bash $ cd /var/jenkins_home $ wget https://binaries.sonarsource.com/Distribution/sonar-scanner-cli/sonar-scanner-cli-4.2.0.1873-linux.zip $ unzip sonar-scanner-cli-4.2.0.1873-linux.zip
Go back to the Manage Jenkins page and select Global Tool Configuration.
In this page, find SonarQube Scanner and add complete the installation:
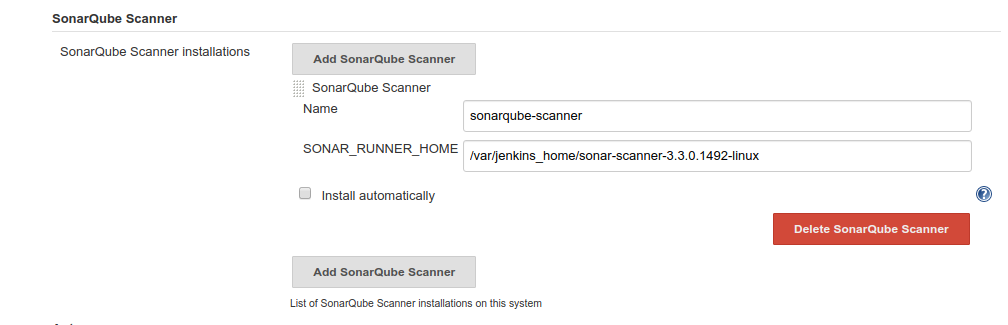
Don't forget to uncheck Install automatically as you have to define the installation path of Sonar Scanner explicitly.
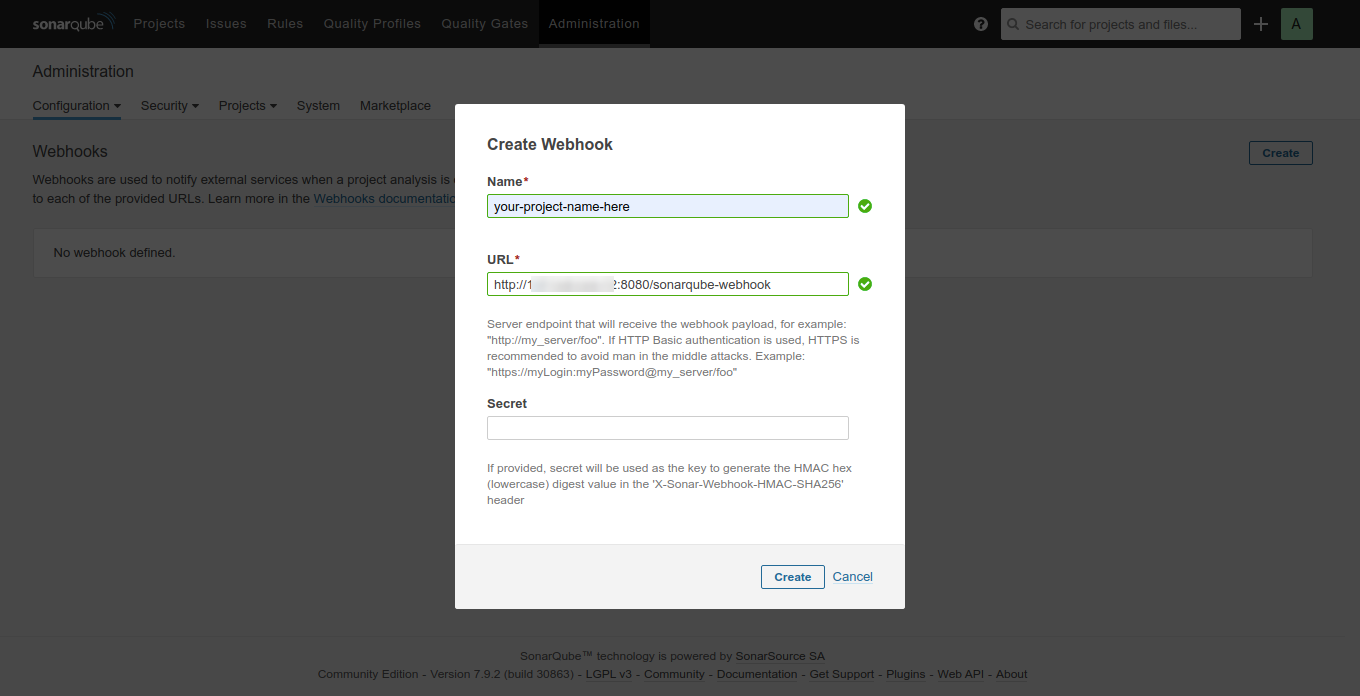
As Jenkins and SonarQube are running in separate docker containers, we need to create a Webhook at SonarQube Server so that both can communicate with each other. To do so, follow Dashboard > Administrator > Configuration > Webhook:
Lastly, you have to add the access token you generated on your SonarQube server in Jenkins. Follow the URL http://your-ip-addr-here:8080/credentials/store/system/ or go to Dashboard > Credentials > System, as shown below:
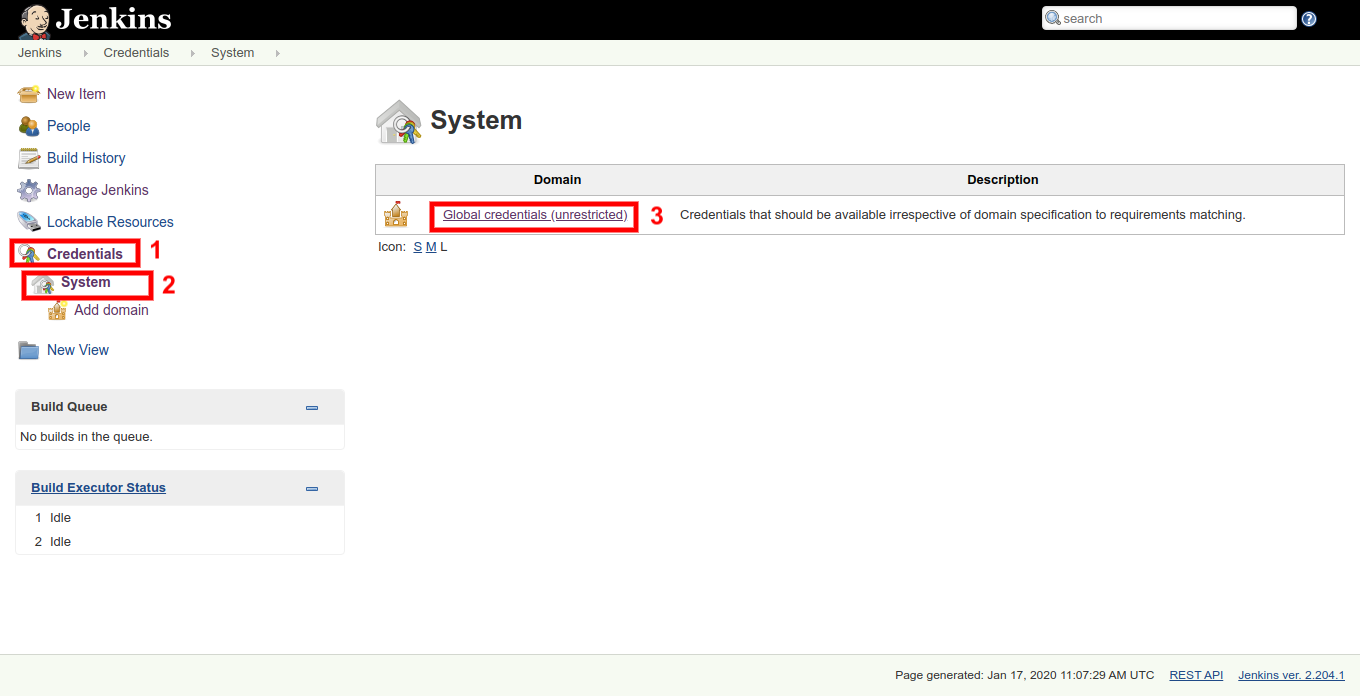
Click on Add Credentials link and select "Secret Text" field under Kind:
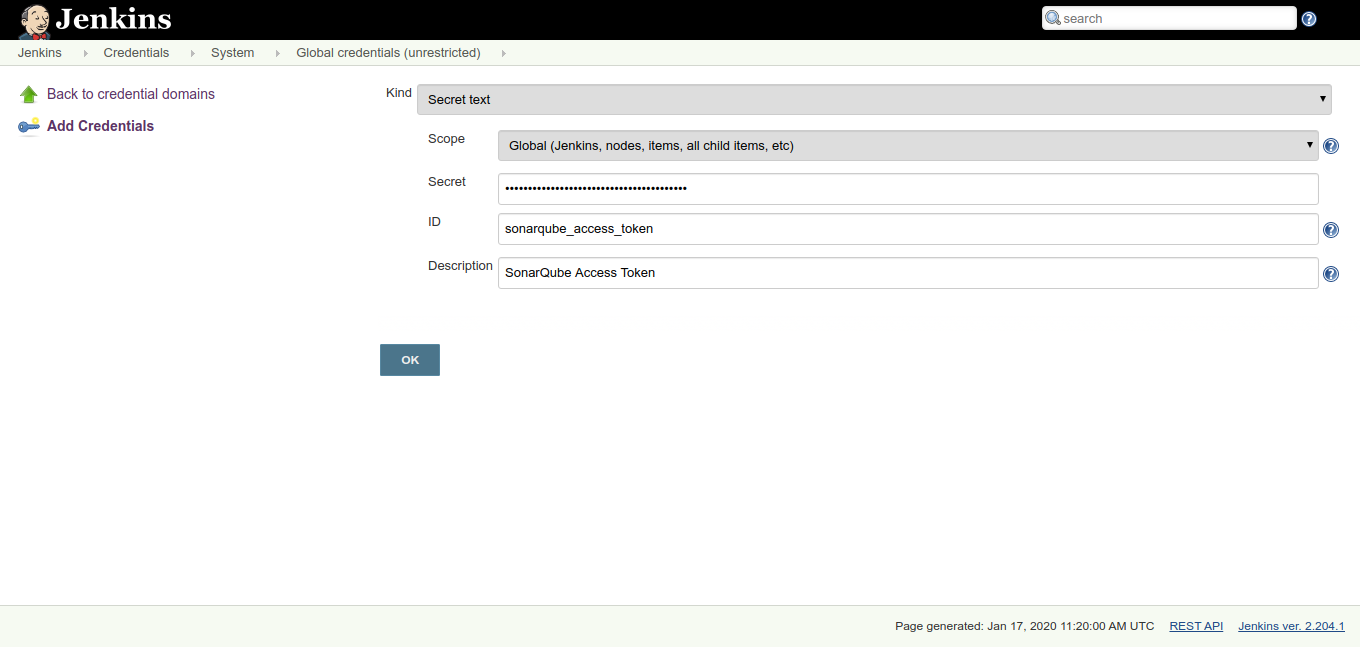
In the Secret field, paste the generated token from SonarQube that you previously created.
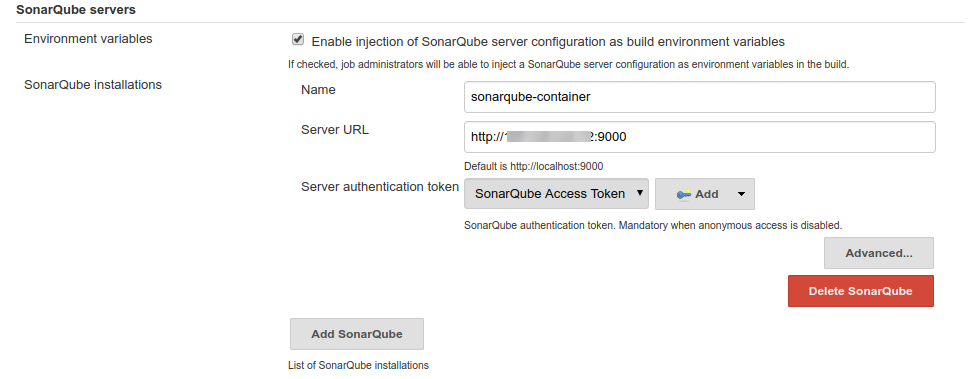
Now, add the SonarQube server to your Jenkins environment. Go to Dashboard > Manage Jenkins > Configure System. Find SonarQube server on the page and add the required details as mentioned below:
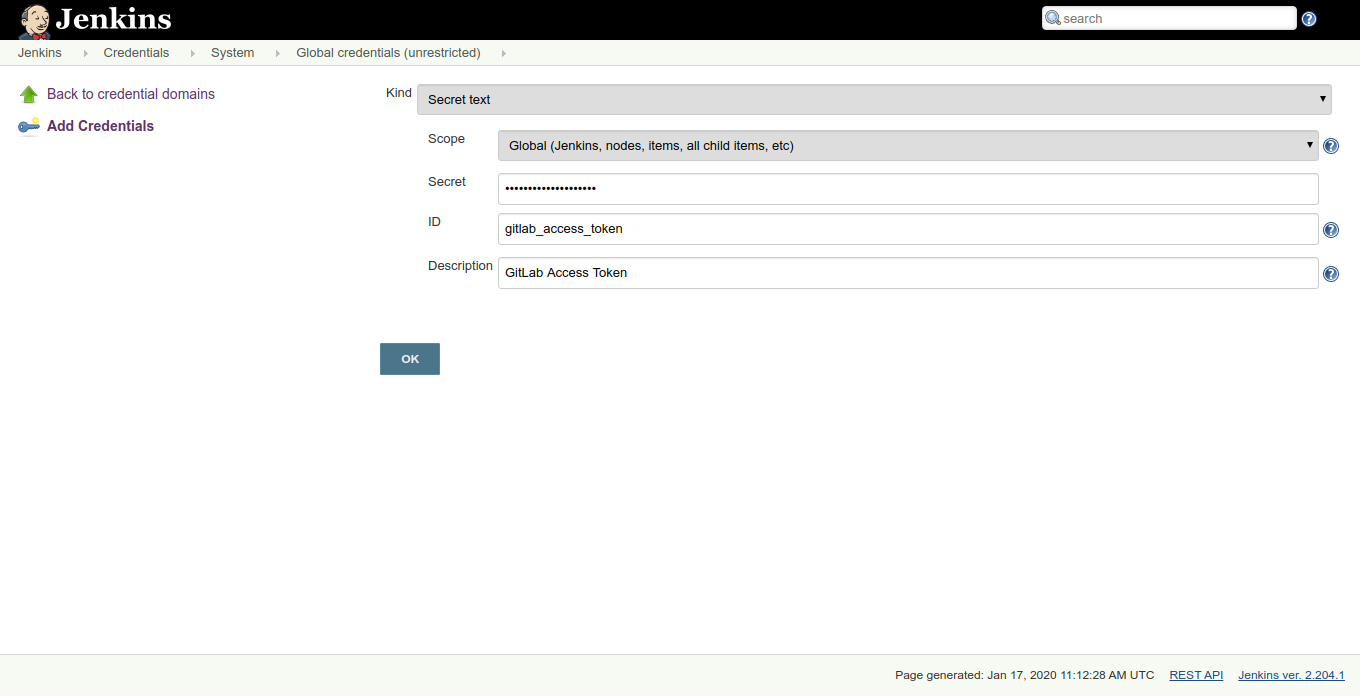
Now, you have to add Gitlab in Jenkins, visit Dashboard > Credentials > System. Here, you are going to add the access token you previously created to your Jenkins server. Although, you can also use Kind with username and password.
As you are through with the SonarQube and GitLab integration in Jenkins, it's time to manage other dependencies. In this guide, we are going to use a simple NodeJs application; hence it's time to install NodeJS on your Jenkins Server.
NodeJS Environment in Jenkins:
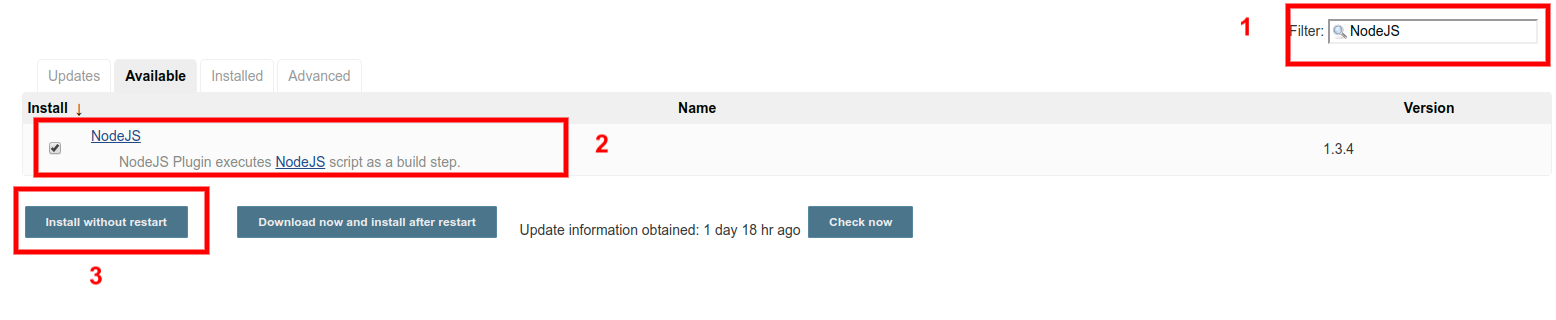
To install NodeJS plugin, go to Dashboard > Manage Jenkins > Manage Plugins > Available and search and select NodeJS. Click on the Install without restart button, as shown in the figure below.
Upon successful installation of NodeJS plugin in Jenkins, make sure that you restart Jenkins.
To configure NodeJS plugin, go to Dashboard > Manage Jenkins > Global Tool Configuration and find "NodeJS". Click on NodeJS installation button and add the necessary details, as shown in the figure:
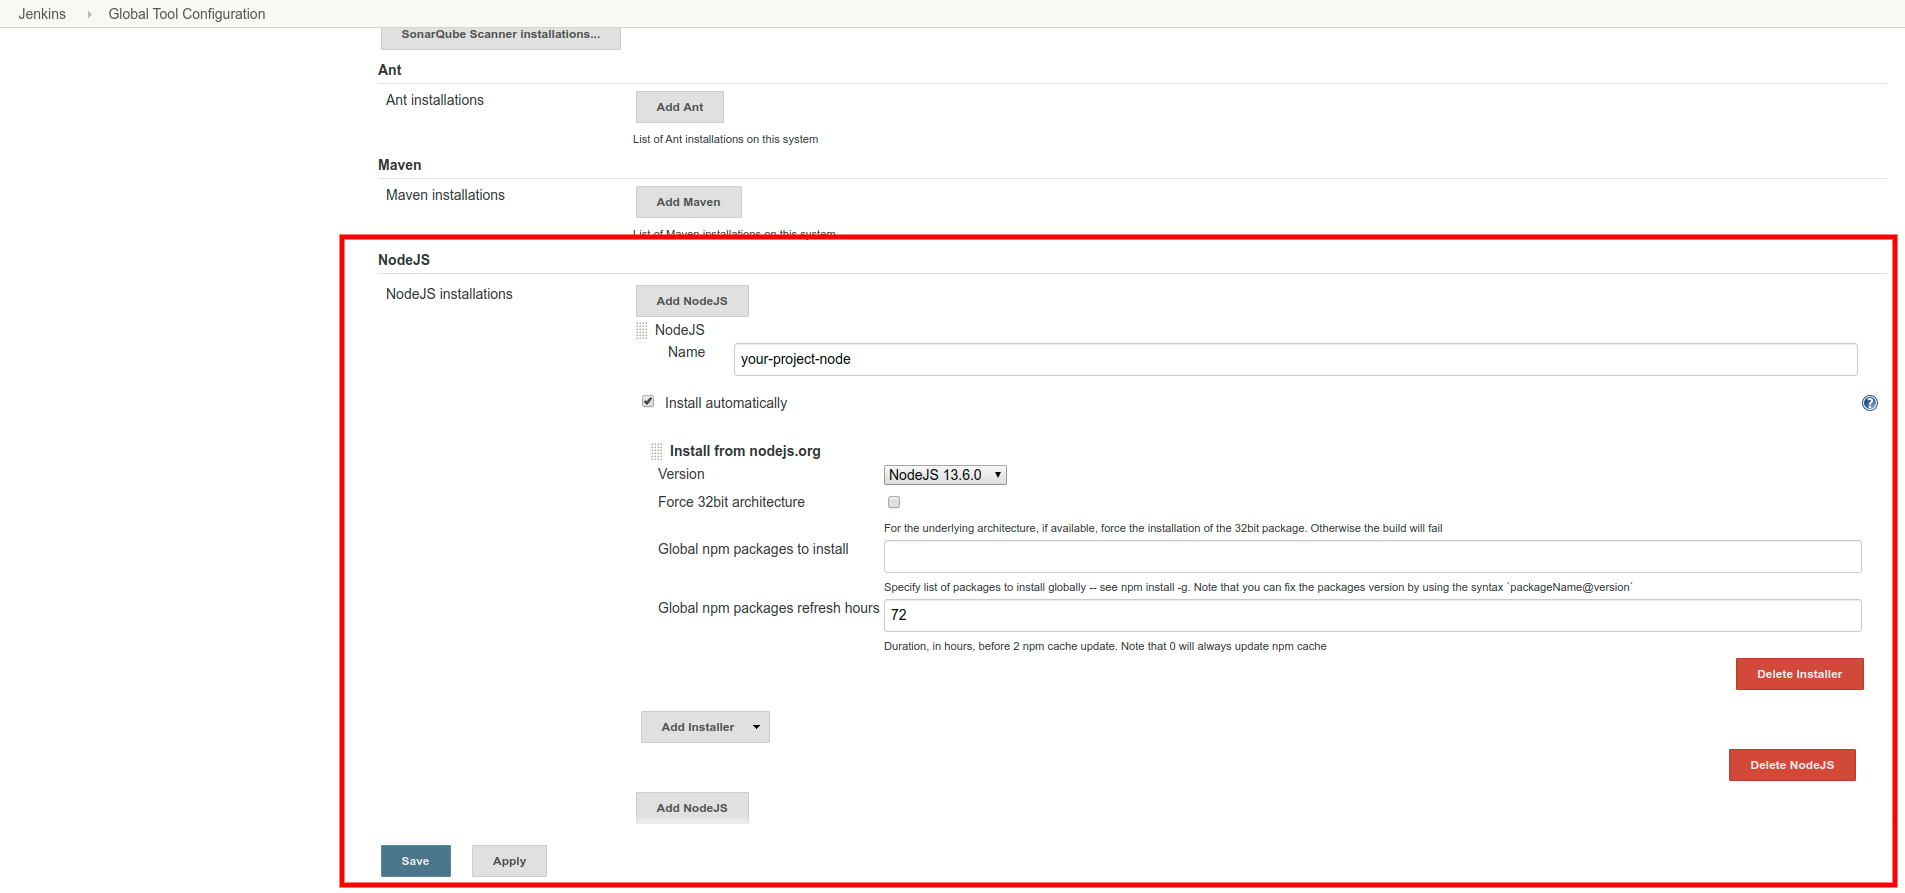
Give a name and select the NodeJS version as per your requirement; you can also install Global NPM packages and set the refresh rate depending upon the project requirements.
Once done, you need to save the configuration. As we are through with the gruesome part of installing and configuring the environment, it's time to create the project pipeline.
Creating Jenkins Pipeline
Here you are going to create a pipeline using Declarative Scripted Pipeline. Follow the below steps to get started:
Step 1 - Create a New Job
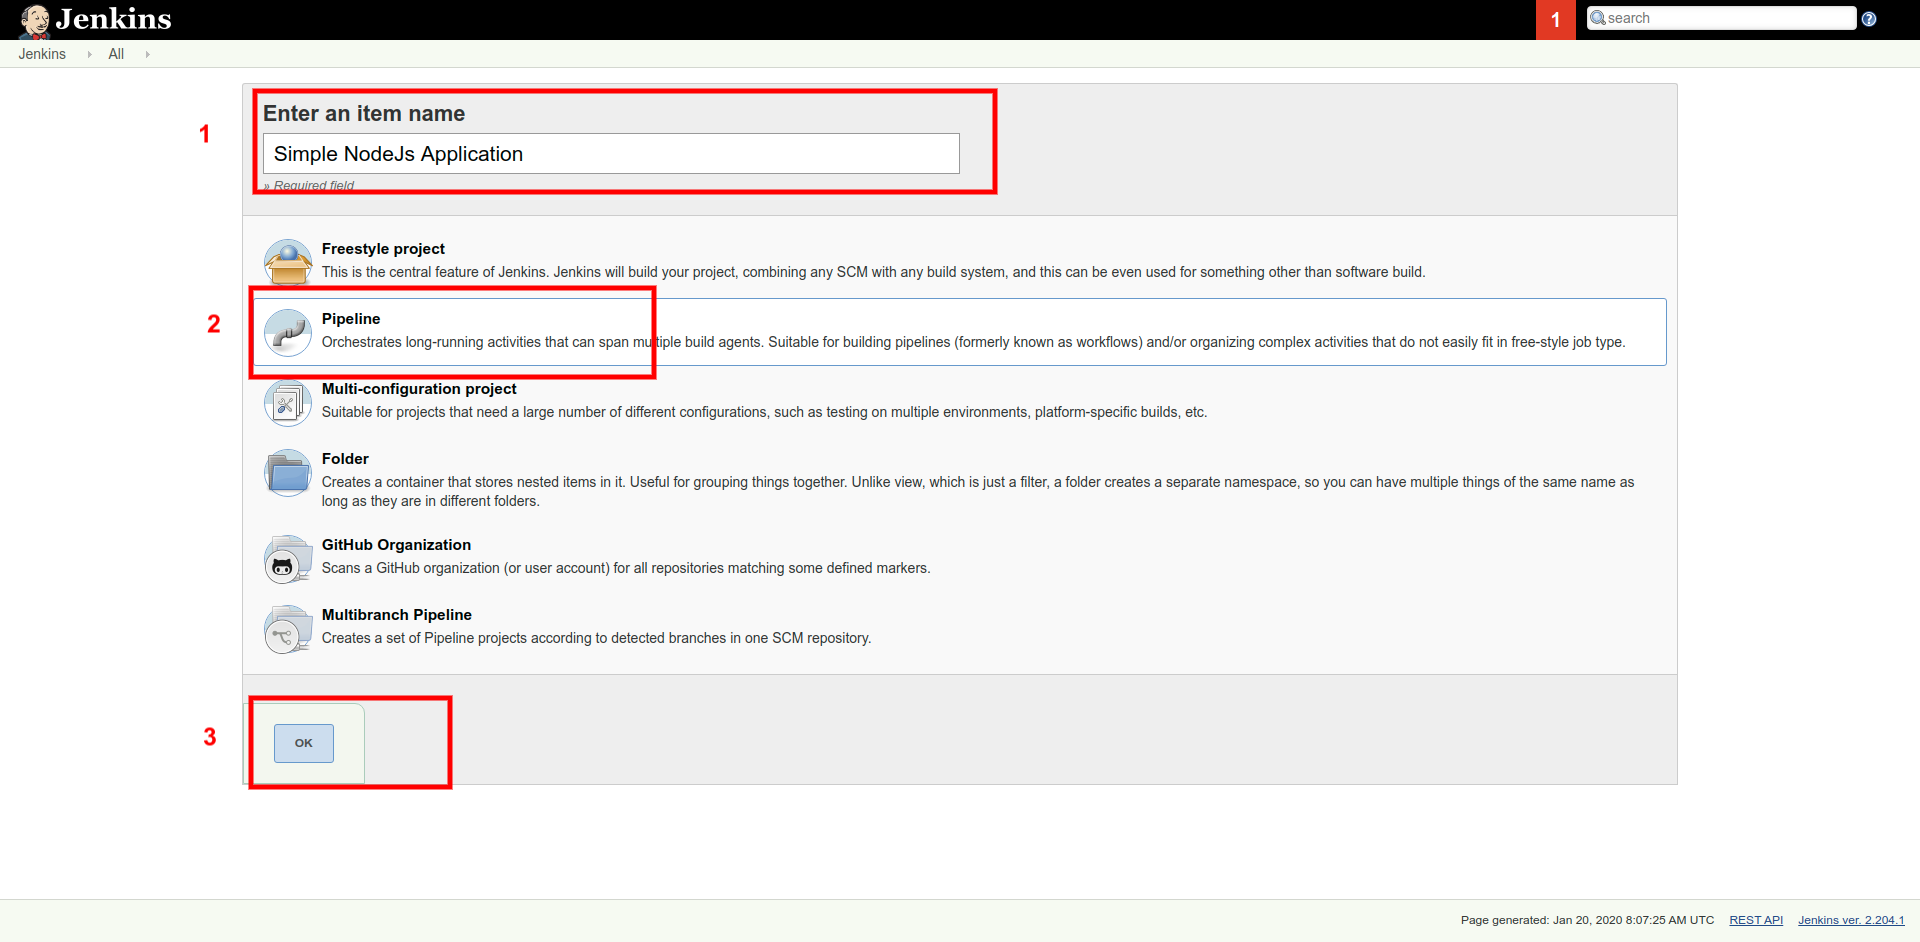
Go to Jenkins' Dashboard and click on the "New Item" link. Now, enter the item name and select Pipeline option as shown in the figure:
Step 2 - Pipeline
The below-mentioned simple pipeline script helps you to pull the code from GitLab, quality check via SonarQube, and use NodeJS.
xxxxxxxxxx
pipeline {
agent any
tools {nodejs "nodenv"}
stages {
stage("Code Checkout from GitLab") {
steps {
git branch: 'master',
credentialsId: 'gitlab_access_token',
url: 'http://your-ip-here:10080/root/test-project.git'
}
}
stage('Code Quality Check via SonarQube') {
steps {
script {
def scannerHome = tool 'sonarqube';
withSonarQubeEnv("sonarqube-container") {
sh "${tool("sonarqube")}/bin/sonar-scanner \
-Dsonar.projectKey=test-node-js \
-Dsonar.sources=. \
-Dsonar.css.node=. \
-Dsonar.host.url=http://your-ip-here:9000 \
-Dsonar.login=your-generated-token-from-sonarqube-container"
}
}
}
}
stage("Install Project Dependencies") {
steps {
nodejs(nodeJSInstallationName: 'nodenv'){
sh "npm install"
}
}
}
}
}
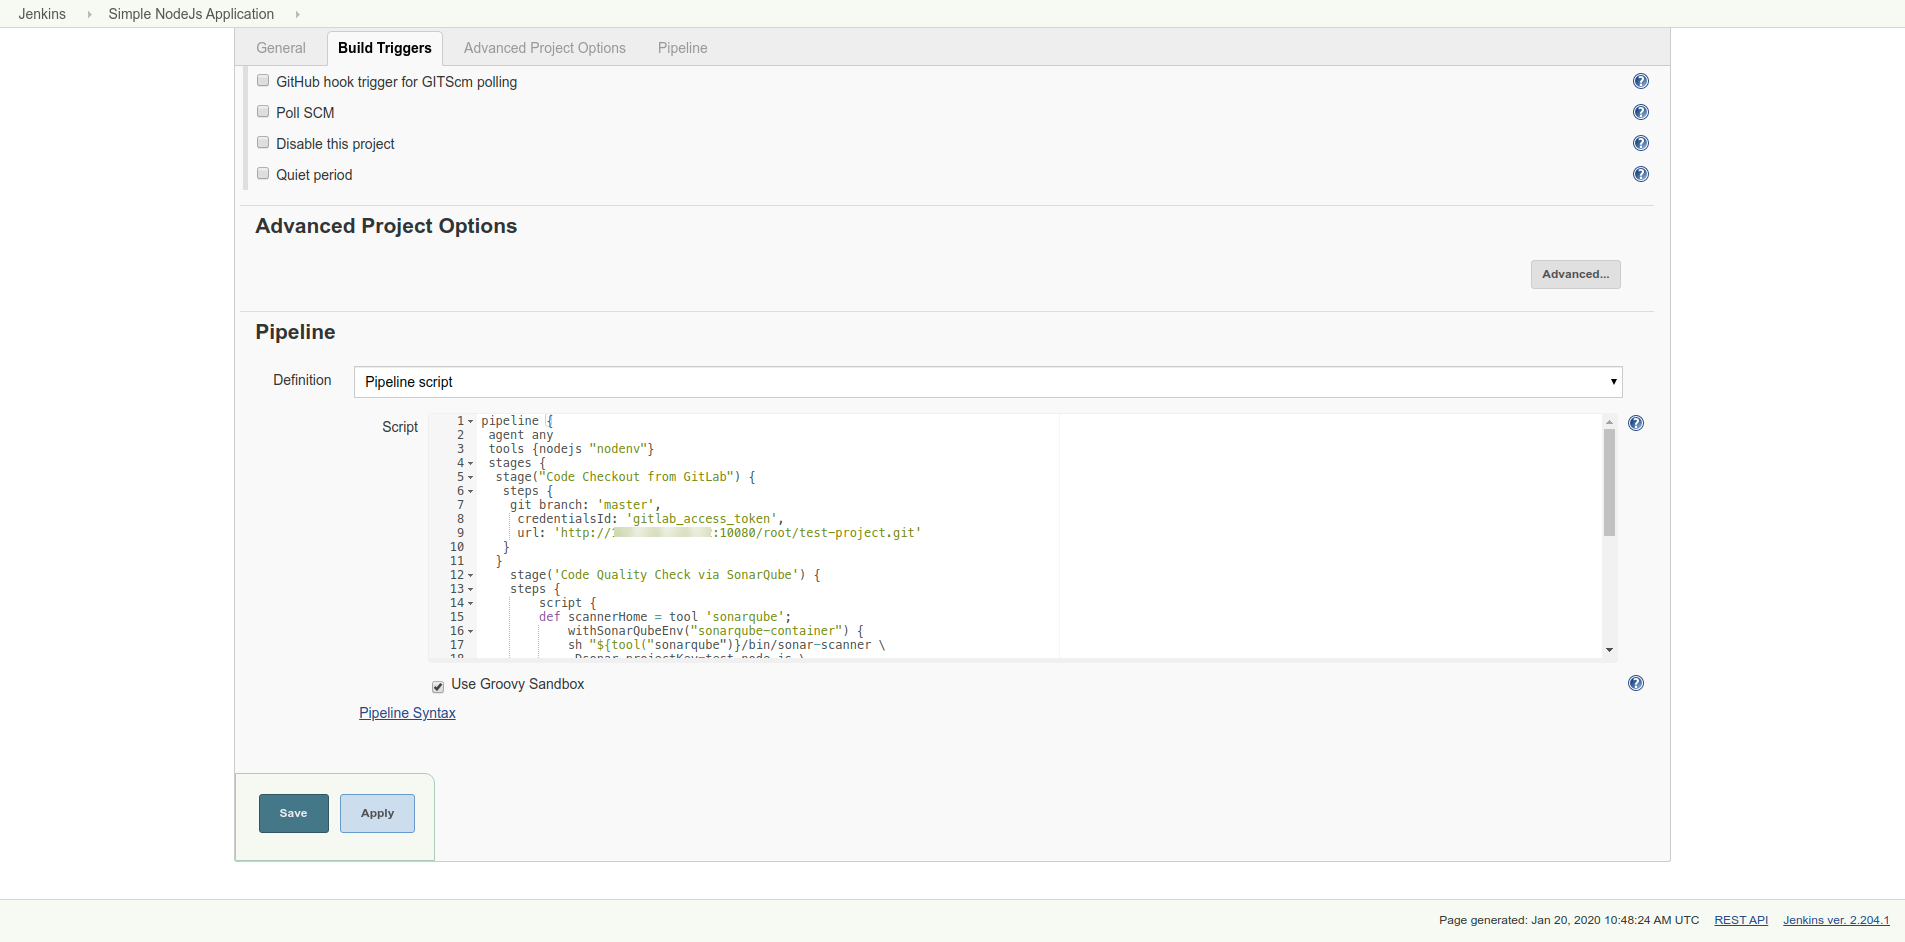
Make sure that you change the values of GitLab repo URL, SonarQube host URL, and its access token.
Add the above-mentioned pipeline script and save it, as shown in the below figure:
Step 3 - Run Pipeline
Now, as you have saved the pipeline script, it's time to build your application in Jenkins. Go to Dashboard > YOUR PROJECT > Build Now.
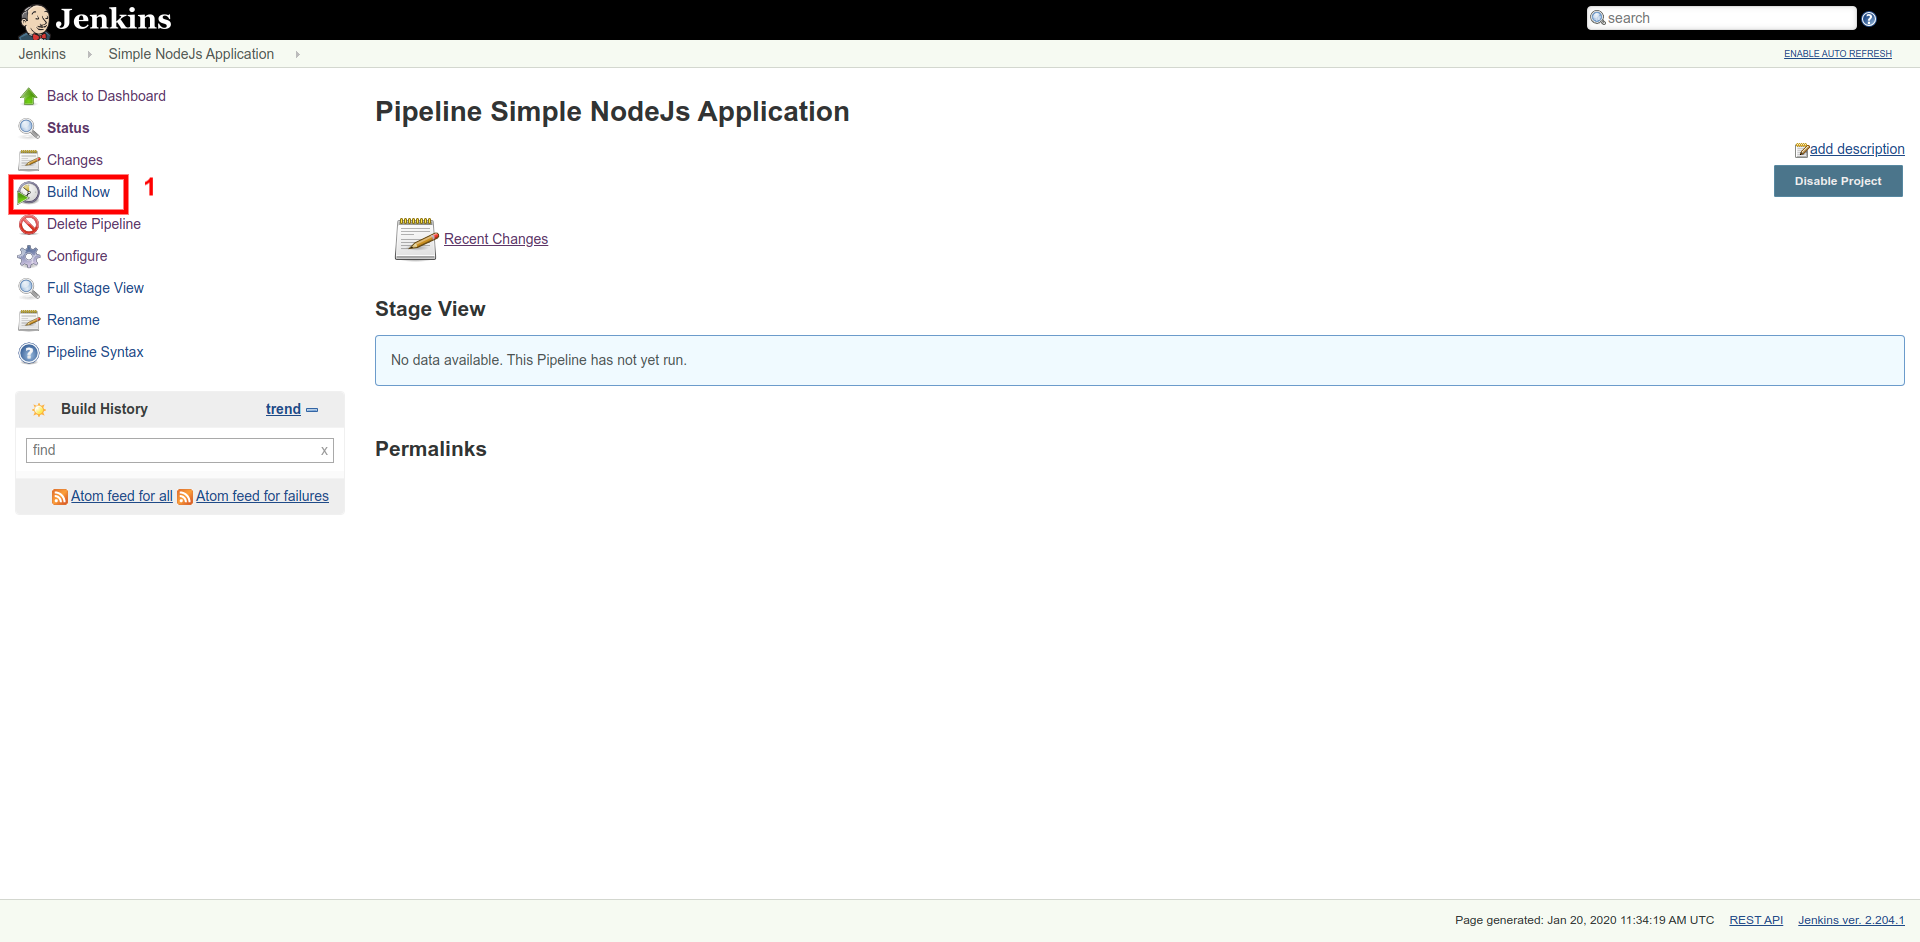
As soon as you click the Build Now link, Jenkins will start building project as per pipeline script. In Build History, you will see the progress bar for the current build along with the Stage View:

If your build runs successfully, you will be able to see the time taken by each stage, in Stage View:
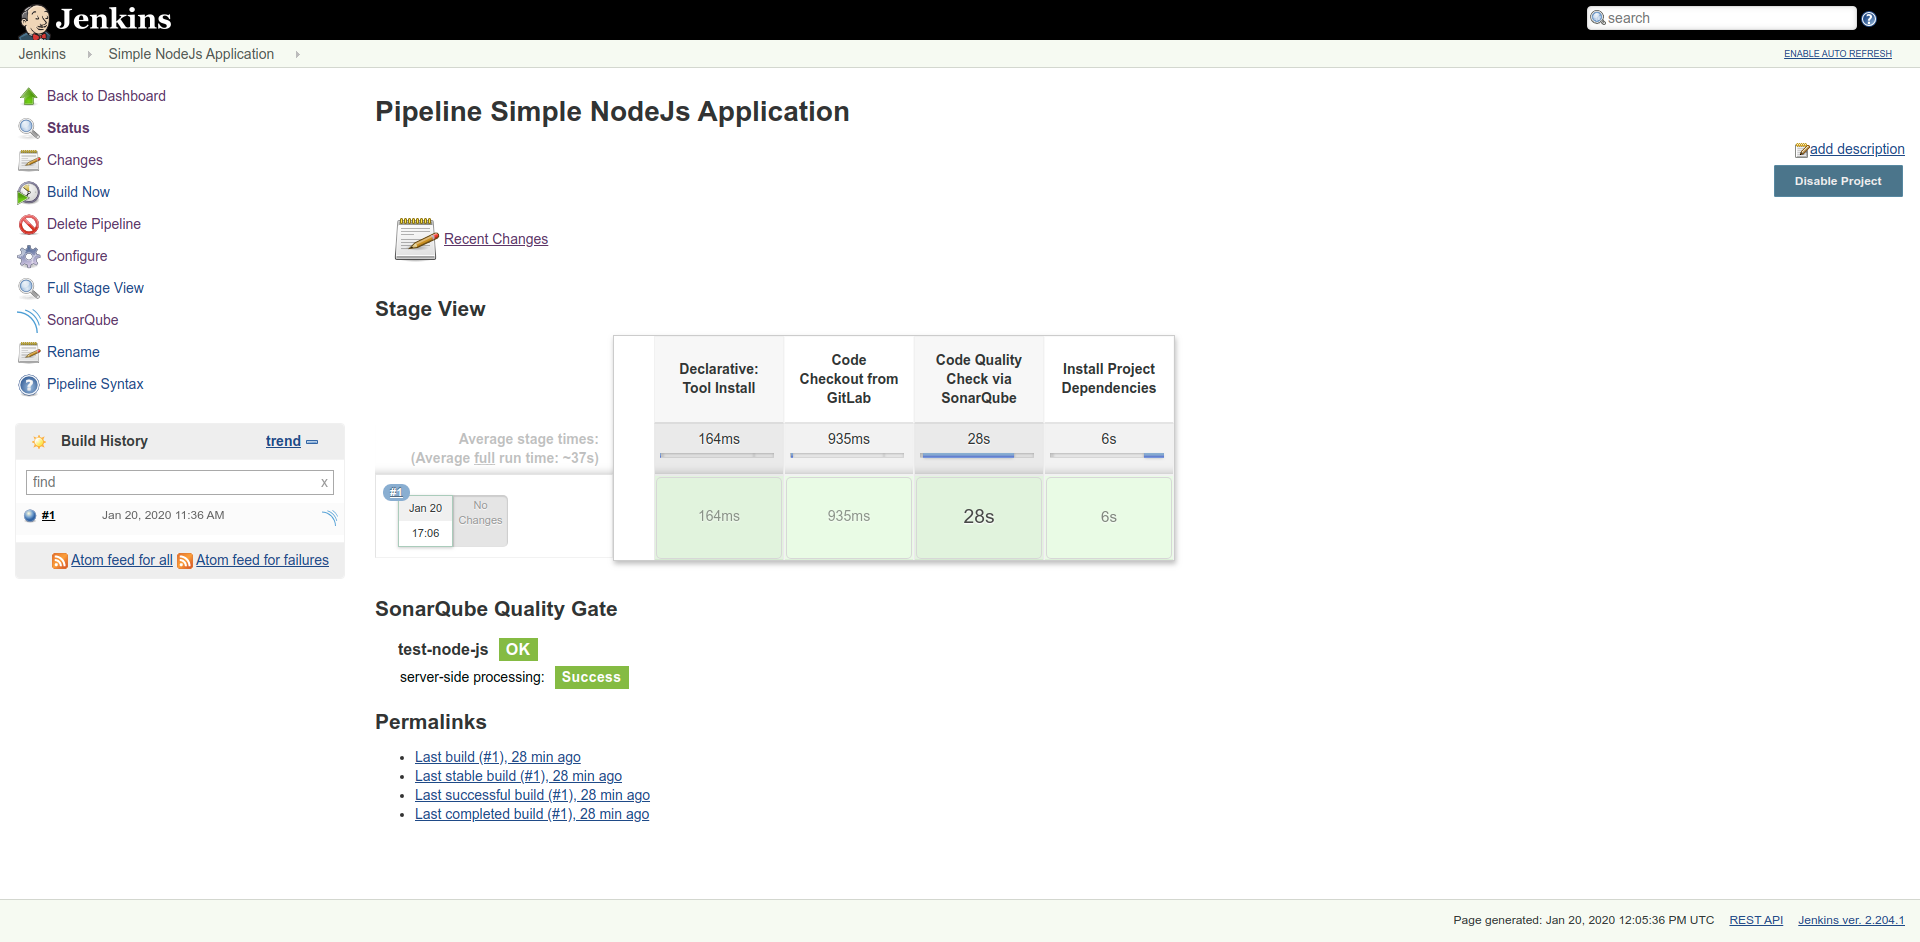
Also, you can visit the SonarQube dashboard to see the project code report, by visiting the link named, "SonarQube" on the project pipeline page.
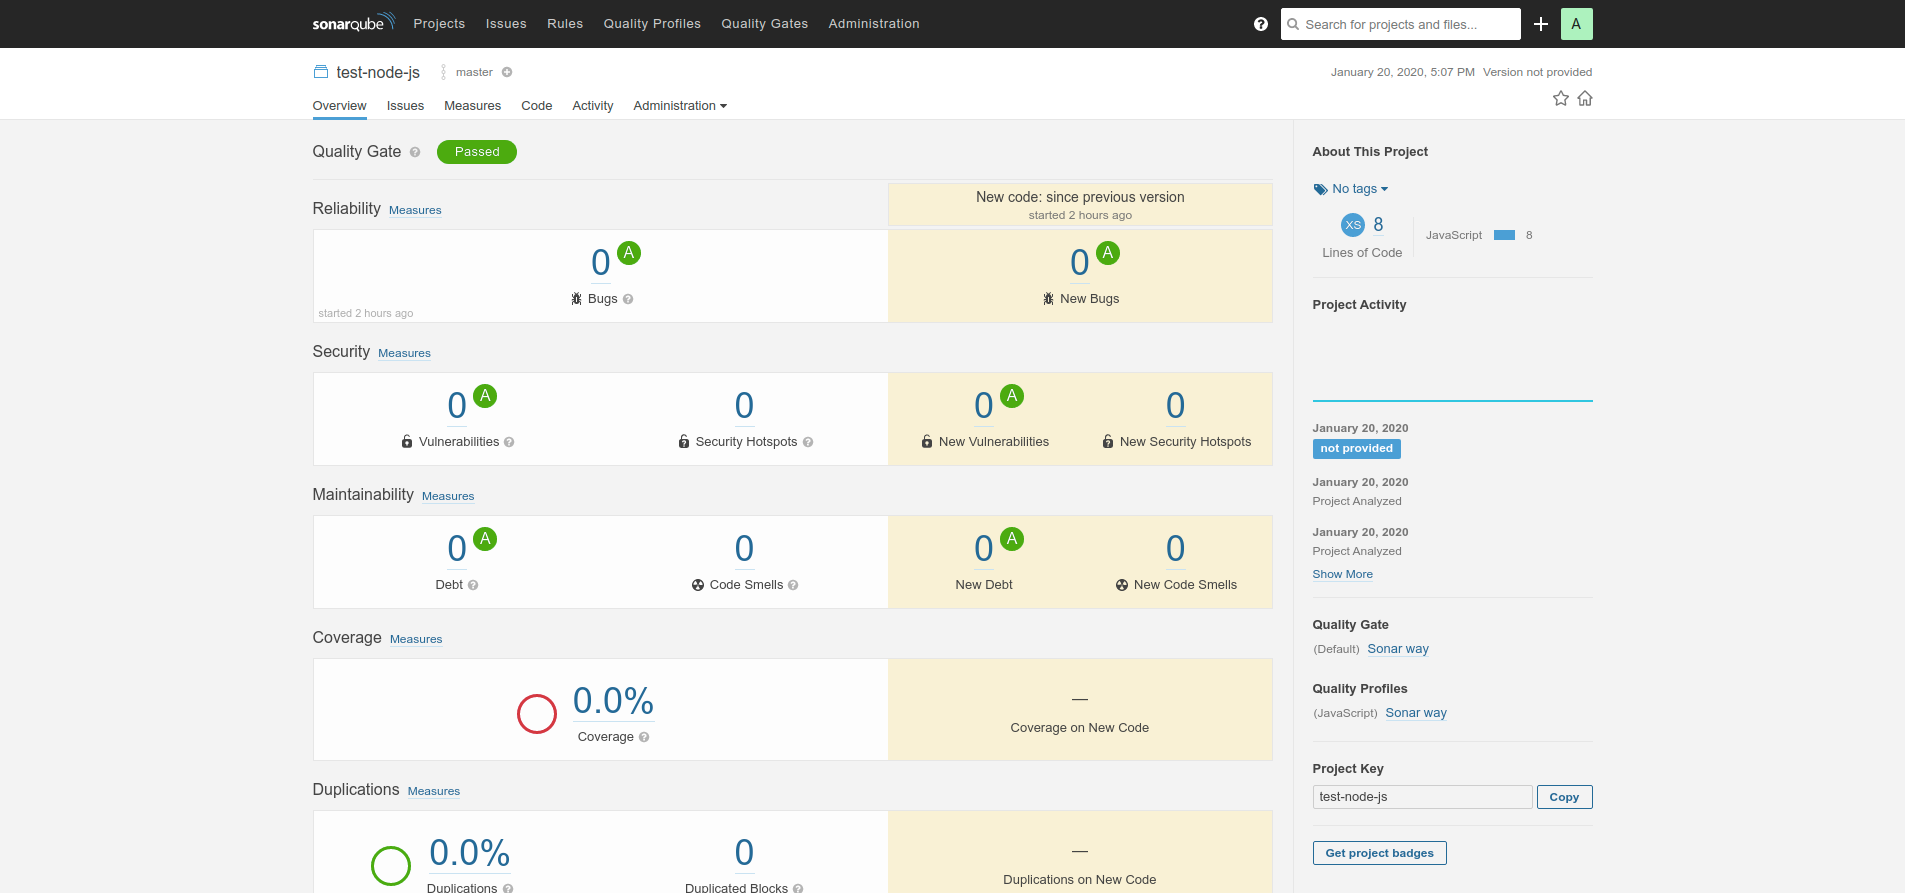
That's it! You have successfully created a Jenkins Pipeline while using SonarQube and GitLab. Now, every time you push the code to the repo, you can build the project, which will show the code quality.
Published at DZone with permission of Sudip Sengupta. See the original article here.
Opinions expressed by DZone contributors are their own.
Comments