JMeter WebSocket Samplers - How to Use Config Elements and Assertions
This article will introduce you to the many config elements and assertions of JMeter WebSocket Samplers and examples of how to use them.
Join the DZone community and get the full member experience.
Join For FreeThis is our second blog post about a great plugin: JMeter WebSocket Samplers by Peter Doornbosch. The first blog post contains detailed information about samplers which can be added to Apache JMeter™ using this plugin. This blog post contains information and examples of WebSocket Text Frame Filter, WebSocket Binary Frame Filter, WebSocket Ping/Pong Frame Filter and Binary Response Assertion.
First of all, you need to add this plugin to your JMeter. Skip this part if you already have it. If you don't, follow these three easy steps:
- Download the most recent plugin JAR file from this link.
- Copy the file to the lib/ext directory of your JMeter.
- Restart JMeter.
You should also install the Plugin Manager:
- Click "Options" and then "Plugins Manager"
- Click "Available plugins"
- Choose "WebSocket Samplers by Peter Doornbosch" and then click "Apply Changes and Restart JMeter"
This plugin will add new Config elements, Samplers and Assertions to JMeter. This blog post will explain the Config elements and Assertions:
- WebSocket Text Frame Filter config element - Discards any text frames that satisfy the condition described in it
- WebSocket Binary Frame Filter config element - Discards any binary frames that satisfy the condition described in it
- WebSocket Ping/Pong Frame Filter config element - Discards all ping and pong frames
- Binary Response Assertion - Verifies binary responses
Similar to our first WebSocket blog post, let's create a real script to test filters and assertions in action. We will use a free public Gateway Echo service to create our script (ws://echo.websocket.org). This service echoes all messages sent to it.
We'll start by creating a small script to try the WebSocket Text Frame Filter config element.
1. Add a Thread Group to the Test plan.
Test plan -> Add -> Thread (Users) -> Thread Group
2. Add a WebSocket Text Frame Filter to the Thread Group. This element is needed to filter unsolicited frames from the server.
Thread Group -> Add -> Config Element -> WebSocket Text Frame Filter
Fill in the following values:
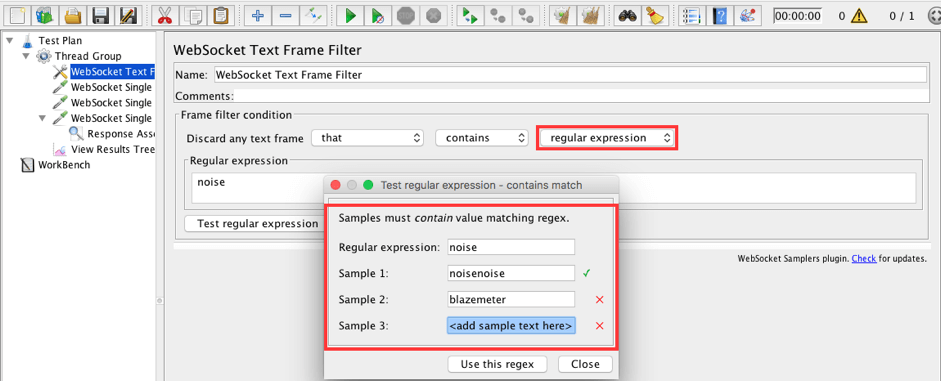
- Discard any text frame: that contains text
- Text: noise
This configuration means that JMeter will discard any frame from the websocket server that contains the text "noise."
As you can see, the frame filter condition area has enough options to create flexible criteria for discarding incoming frames. Available options: that or that does NOT; contains, starts with, equals or ends with; text or regular expression. The most powerful option is regular expressions with the ability to test your expressions on your samples.
3. Add a WebSocket Single Write Sampler to the Thread Group (we covered this element last time). This sampler will send the message 'noise' to the server and the server will echo it back.
Thread Group -> Add -> Sampler -> WebSocket Single Write Sampler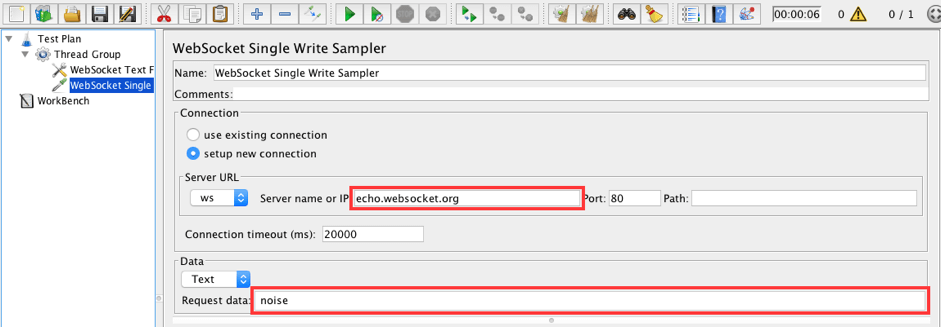
Fill in the following values:
- Server name or IP: echo.websocket.org
- Data type: Text
- Request data: noise
4. Add another WebSocket Single Write Sampler to the Thread Group. This sampler will send the message 'blazemeter' to the server and the server will echo it back.
Thread Group -> Add -> Sampler -> WebSocket Single Write Sampler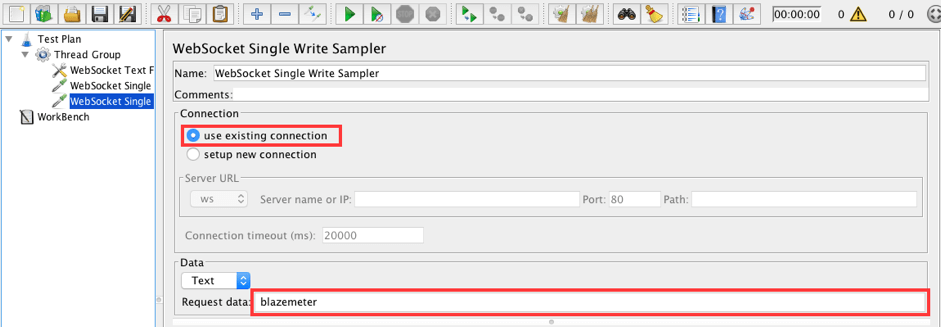
Fill in the following values:
- Connection: use existing connection
- Data type: Text
- Request data: blazemeter
5. Add a WebSocket Single Read Sampler to the Thread Group. The read sampler will receive the first frame from the server.
Thread Group -> Add -> Sampler -> WebSocket Single Read Sampler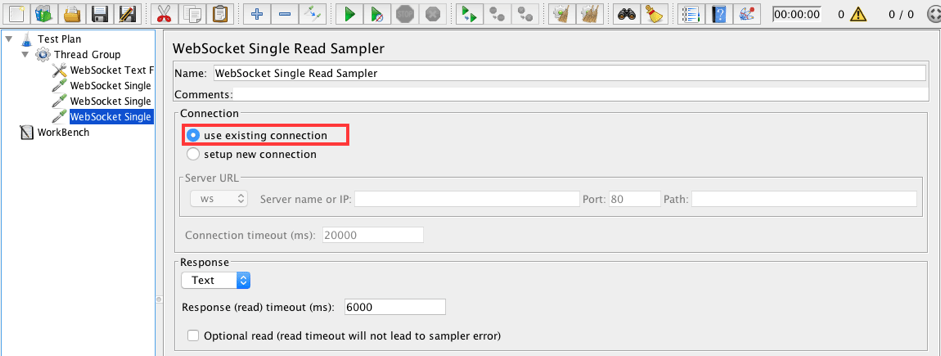
6. Add a Response Assertion to the WebSocket Single Read Sampler. The goal of this script is to filter the 'noise' frame and accept the 'blazemeter' frame, so let's use this assertion to verify that.
WebSocket Single Read Sampler -> Add -> Assertions -> Response Assertion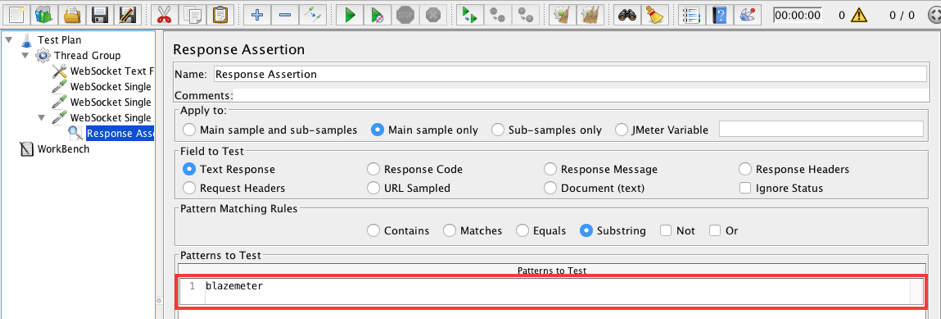
Fill in the following values:
- Patterns to Test: blazemeter
The read sampler will pass if the message is 'blazemeter' and fail otherwise.
7. Add a View Results Tree listener to the Thread Group.
Thread Group -> Add -> Listener -> View Results Tree
8. Run the script!

As you can see above the script passed successfully. The read sampler received the correct frame and the 'noise' frame was filtered out. We can find all filtered frames as sub-elements to the read sampler.
9. Disable the WebSocket Text Frame Filter and Run the script again.

The read sampler got a frame with the text 'noise' and subsequently failed by assertion. So we can make the conclusion that the WebSocket Text Frame Filter works fine.
Let's create another small script to try the WebSocket Binary Frame Filter config element.
10. Add a Thread Group to the Test plan.
Test plan -> Add -> Thread (Users) -> Thread Group
11. Add a WebSocket Binary Frame Filter to the Thread Group. This element is needed to filter unsolicited frames from the server, but in binary format.
Thread Group -> Add -> Config Element -> WebSocket Binary Frame Filter
Fill in the following values:
- Discard any binary frame: that contains
- Binary data: 6e 6f 69 73 65
Filtering with these settings will filter all binary frames that contain ' 6e 6f 69 73 65'. ' 6e 6f 69 73 65' is ' noise ' in hexadecimal format.
Binary Filter has the capabilities to create flexible conditions just like the Text Filter. The frame filter condition area contains options: that or that does NOT; contains, starts with, equals, ends with. The field 'starting at position' is designed to ignore a certain number of first characters in an incoming message. Example: 0 means JMeter will search from 1st element; 10 means JMeter will search from 11th element; etc.
12. Add a WebSocket Single Write Sampler to the Thread Group. We will use this sampler to send a 'noise' frame.
Thread Group -> Add -> Sampler -> WebSocket Single Write Sampler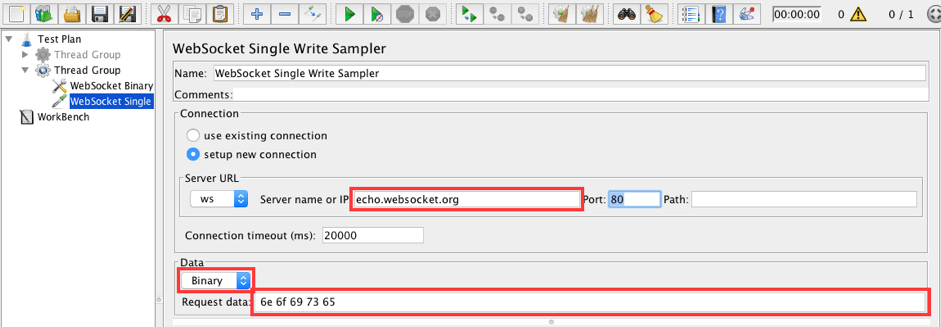
Fill in the following values:
- Server name or IP: echo.websocket.org
- Data type: Binary
- Request data: 6e 6f 69 73 65
6e 6f 69 73 65 is noise in hexadecimal format.
13. Add a WebSocket Single Write Sampler to the Thread Group. This sampler will be used to send a 'blazemeter' message.
Thread Group -> Add -> Sampler -> WebSocket Single Write Sampler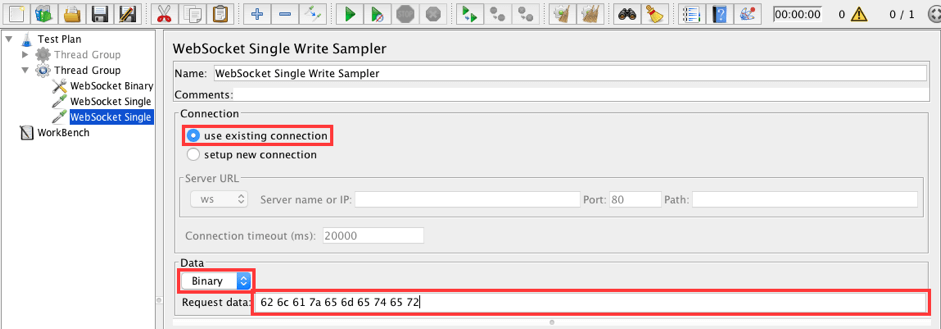
Fill in the following values:
- Connection: use existing connection
- Data type: Binary
- Request data: 62 6c 61 7a 65 6d 65 74 65 72
62 6c 61 7a 65 6d 65 74 65 72 is blazemeter in hexadecimal format.
14. Add a WebSocket Single Read Sampler to the Thread Group. The read sampler should receive the first binary message from the Echo service.
Thread Group -> Add -> Sampler -> WebSocket Single Read Sampler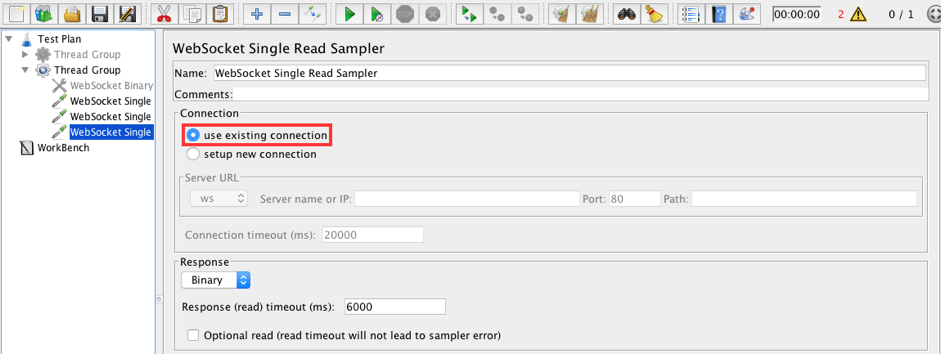
15. Add a Binary Response Assertion to the WebSocket Single Read Sampler. The goal of this script is to filter the binary 'noise' frame and accept the 'blazemeter' frame. This assertion will check for this.
WebSocket Single Read Sampler -> Add -> Assertions -> Binary Response Assertion
Fill in the following values:
- Assert response: does contain
- Patterns to Test: 62 6c 61 7a 65 6d 65 74 65 72
62 6c 61 7a 65 6d 65 74 65 72 is blazemeter in hexadecimal format. The read sampler will pass in the case of 'blazemeter' and fail for other messages.
The available options a Binary Response Assertion are: does or does NOT; contain, start with or equal. These options allow us to create flexible conditions for our assertions.
This element was added to JMeter by the WebSocket plugin. But it isn't limited to only WebSocket tests. It can be used with any sampler in JMeter. For example, we can check images with this assertion.
16. Add a View Results Tree listener to the Thread Group.
Thread Group -> Add -> Listener -> View Results Tree
17. Start the script!

The read sampler received 'blazemeter' binary message. 'Noise' message was filtered out. Check subelements for read sampler.
18. Disable the WebSocket Binary Frame Filter and run the script again.

The read sampler got the 'noise' frame. Just like our Text Filter earlier we can make the conclusion that the WebSocket Binary Frame Filter works fine.
Now we will create a script to test the WebSocket Ping/Pong Frame Filter config element.
19. Add a Thread Group to the Test plan.
Test plan -> Add -> Thread (Users) -> Thread Group
20. Add a WebSocket Ping/Pong Frame Filter to the Thread Group. This element is needed to filter unsolicited ping and pong incoming frames from the server.
Thread Group -> Add -> Config Element -> WebSocket Ping/Pong Frame Filter
As we can see this config element has an option to automatically respond to ping frames with pong frames.
21. Add a WebSocket Open Connection sampler to the Thread Group. The current sampler will explicitly set up a WebSocket connection.
Thread Group -> Add -> Sampler -> WebSocket Open Connection
Fill in the following values:
- Server name or IP: echo.websocket.org
22. Add a WebSocket Ping/Pong sampler to the Thread Group. We need this sampler to make the Ping request to the server.
Thread Group -> Add -> Sampler -> WebSocket Ping/Pong
23. Add a View Results Tree listener to the Thread Group.
Thread Group -> Add -> Listener -> View Results Tree
24. Run the script.
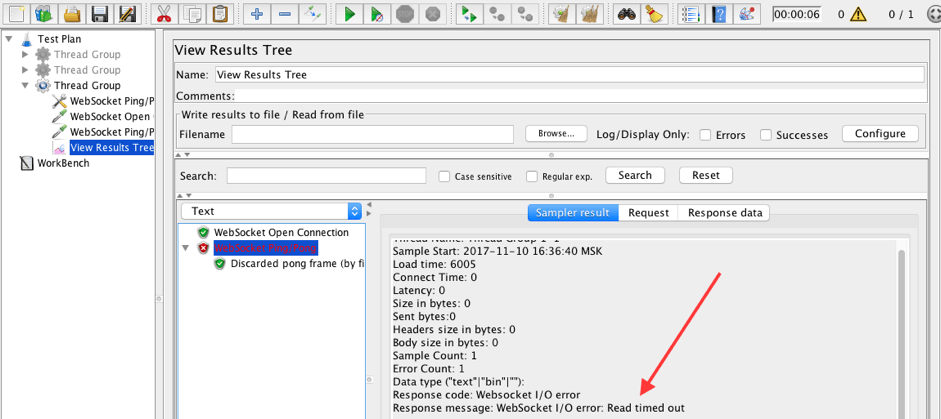
The Ping/Pong sampler failed, since our filter is active and the Pong frame was discarded.
25. Disable the WebSocket Ping/Pong Frame Filter and the start script again.
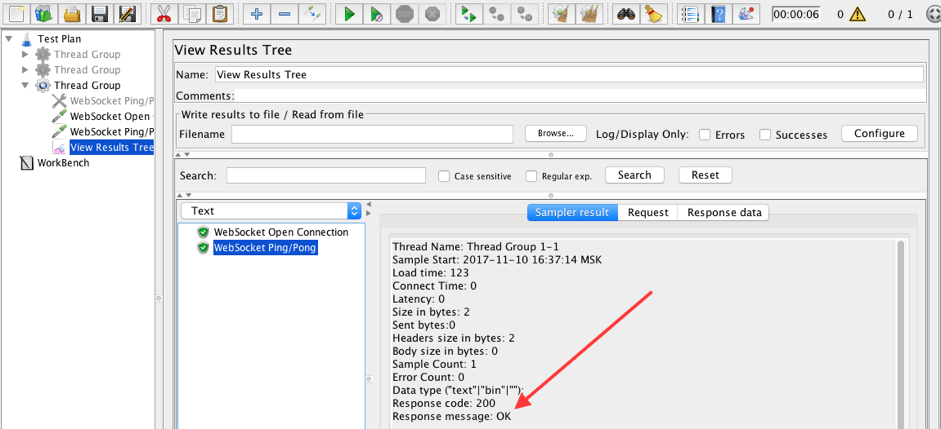
The Ping/Pong sampler passed, since our filter is inactive and the sampler got the Pong frame from the server.
Nice! We are done. We used all three filters and a binary assertion. Let me know if you have any questions, in the comments section. To get the full picture about this awesome plugin, I recommend you start with our first blog post, "JMeter WebSocket Samplers - A Practical Guide".
Now that you know how to use the JMeter Websocket Plugin, you are ready to take our advanced JMeter course, free from our JMeter academy.
Published at DZone with permission of George Maksimenko, DZone MVB. See the original article here.
Opinions expressed by DZone contributors are their own.

Comments