JWT Token Authentication Using the .NET Core 6 Web API
In this article, we are going to learn about and discuss JWT Token authentication and implementation using .NET Core API 6.
Join the DZone community and get the full member experience.
Join For FreeIn this article, we are going to discuss JWT Token authentication and implementation using .NET Core API 6.
Before looking into this blog, visit my previous blog: Introduction and Details about JWT Token Authentication and Authorization, to understand the basics and details of JWT Token Authentication and Authorization and how things work using JWT.
Let’s start the implementation of the .NET Core 6 Web API.
Step 1
Create the .NET Core 6 Web API Application.
Step 2
Install the following NuGet packages, which we are going to use throughout the application.
- Microsoft.AspNetCore.Authentication.JwtBearer
- Microsoft.EntityFrameworkCore
- Microsoft.EntityFrameworkCore.Design
- Microsoft.EntityFrameworkCore.SqlServer
- Microsoft.EntityFrameworkCore.Tools
- Newtonsoft.Json
- StackExchange.Redis
- Swashbuckle.AspNetCore
Step 3
Next, create a new folder called Models inside the solution and create a Product class inside that.
namespace WebAPI.Model
{
    public class Product
    {
        public int ProductId { get; set; }
        public string? ProductName { get; set; }
        public string? ProductDescription { get; set; }
        public int ProductCost { get; set; }
        public int ProductStock { get; set; }
    }
}
Step 4
Create one DbContextClass inside the Data folder used for Database operations.
using Microsoft.EntityFrameworkCore;
using WebAPI.Model;
namespace WebAPI.Data
{
    public class DbContextClass : DbContext
    {
        protected readonly IConfiguration Configuration;
        public DbContextClass(IConfiguration configuration)
        {
            Configuration = configuration;
        }
        protected override void OnConfiguring(DbContextOptionsBuilder options)
        {
            options.UseSqlServer(Configuration.GetConnectionString("DefaultConnection"));
        }
    public DbSet<Product> Products { get; set; }
    }
}
Step 5
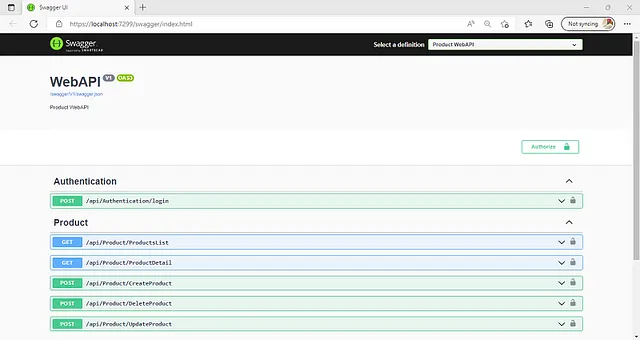
Later on, create a product controller inside the Controllers folder.
using Microsoft.AspNetCore.Authorization;
using Microsoft.AspNetCore.Mvc;
using Microsoft.EntityFrameworkCore;
using WebAPI.Cache;
using WebAPI.Data;
using WebAPI.Model;
namespace WebAPI.Controllers
{
    [Route("api/[controller]")]
    [ApiController, Authorize]
    public class ProductController : ControllerBase
    {
        private readonly DbContextClass _context;
        private readonly ICacheService _cacheService;
        public ProductController(DbContextClass context, ICacheService cacheService)
        {
            _context = context;
            _cacheService = cacheService;
        }
        [HttpGet]
        [Route("ProductsList")]
        public async Task<ActionResult<IEnumerable<Product>>> Get()
        {
            var productCache = new List<Product>();
            productCache = _cacheService.GetData<List<Product>>("Product");
            if (productCache == null)
            {
                var product = await _context.Products.ToListAsync();
                if(product.Count > 0)
                {
                    productCache = product;
                    var expirationTime = DateTimeOffset.Now.AddMinutes(3.0);
                    _cacheService.SetData("Product", productCache, expirationTime);
                }
            }
            return productCache;
        }

        [HttpGet]
        [Route("ProductDetail")]
        public async Task<ActionResult<Product>> Get(int id)
        {
            var productCache = new Product();
            var productCacheList = new List<Product>();
            productCacheList = _cacheService.GetData<List<Product>>("Product");
            productCache = productCacheList.Find(x => x.ProductId == id);
            if (productCache == null)
            {
                productCache = await _context.Products.FindAsync(id);
            }
            return productCache;
        }

        [HttpPost]
        [Route("CreateProduct")]
        public async Task<ActionResult<Product>> POST(Product product)
        {
            _context.Products.Add(product);
            await _context.SaveChangesAsync();
            _cacheService.RemoveData("Product");
            return CreatedAtAction(nameof(Get), new { id = product.ProductId }, product);
        }
        [HttpPost]
        [Route("DeleteProduct")]
        public async Task<ActionResult<IEnumerable<Product>>> Delete(int id)
        {
            var product = await _context.Products.FindAsync(id);
            if (product == null)
            {
                return NotFound();
            }
            _context.Products.Remove(product);
            _cacheService.RemoveData("Product");
            await _context.SaveChangesAsync();
            return await _context.Products.ToListAsync();
        }

        [HttpPost]
        [Route("UpdateProduct")]
        public async Task<ActionResult<IEnumerable<Product>>> Update(int id, Product product)
        {
            if (id != product.ProductId)
            {
                return BadRequest();
            }
            var productData = await _context.Products.FindAsync(id);
            if (productData == null)
            {
                return NotFound();
            }
            productData.ProductCost = product.ProductCost;
            productData.ProductDescription = product.ProductDescription;
            productData.ProductName = product.ProductName;
            productData.ProductStock = product.ProductStock;
            _cacheService.RemoveData("Product");
            await _context.SaveChangesAsync();
            return await _context.Products.ToListAsync();
        }
    }
}
Step 6
Now, we are going to use the Redis cache inside this application. If you understand how distributed Redis caches work, check my following blog: Implementation of Redis Cache in the.NET Core Web API.
Step 7
Create the Cache folder inside the solution and create a few classes for Redis and Connection Helper. So, first, create ICacheService and CacheService for Redis Cache.
namespace WebAPI.Cache
{
    public interface ICacheService
    {
        /// <summary>
        /// Get Data using key
        /// </summary>
        /// <typeparam name="T"></typeparam>
        /// <param name="key"></param>
        /// <returns></returns>
        T GetData<T>(string key);
        /// <summary>
        /// Set Data with Value and Expiration Time of Key
        /// </summary>
        /// <typeparam name="T"></typeparam>
        /// <param name="key"></param>
        /// <param name="value"></param>
        /// <param name="expirationTime"></param>
        /// <returns></returns>
        bool SetData<T>(string key, T value, DateTimeOffset expirationTime);
        /// <summary>
        /// Remove Data
        /// </summary>
        /// <param name="key"></param>
        /// <returns></returns>
        object RemoveData(string key);
    }
}
Next, create CacheService class for Redis Cache-related functionality.
using Newtonsoft.Json;
using StackExchange.Redis;
namespace WebAPI.Cache
{
    public class CacheService : ICacheService
    {
        private IDatabase _db;
        public CacheService()
        {
            ConfigureRedis();
        }
        private void ConfigureRedis()
        {
            _db = ConnectionHelper.Connection.GetDatabase();
        }
        public T GetData<T>(string key)
        {
            var value = _db.StringGet(key);
            if (!string.IsNullOrEmpty(value))
            {
                return JsonConvert.DeserializeObject<T>(value);
            }
            return default;
        }
        public bool SetData<T>(string key, T value, DateTimeOffset expirationTime)
        {
            TimeSpan expiryTime = expirationTime.DateTime.Subtract(DateTime.Now);
            var isSet =_db.StringSet(key, JsonConvert.SerializeObject(value), expiryTime);
            return isSet;
        }
        public object RemoveData(string key)
        {
            bool _isKeyExist = _db.KeyExists(key);
            if (_isKeyExist == true)
            {
                return _db.KeyDelete(key);
            }
            return false;
        }
    }
}
Step 8
Create ConfigurationManager class which we use to configure theappsetting.json file.
namespace WebAPI
{
    static class ConfigurationManager
    {
        public static IConfiguration AppSetting { get; }
        static ConfigurationManager()
        {
            AppSetting = new ConfigurationBuilder()
                    .SetBasePath(Directory.GetCurrentDirectory())
                    .AddJsonFile("appsettings.json")
                    .Build();
        }
    }
}
Step 9
Next, create a ConnectionHelper class inside the cache folder to get the RedisURL and configure that in the application.
using StackExchange.Redis;
namespace WebAPI.Cache
{
    public class ConnectionHelper
    {
        static ConnectionHelper()
        {
            ConnectionHelper.lazyConnection = new Lazy<ConnectionMultiplexer>(() =>
            {
                return ConnectionMultiplexer.Connect(ConfigurationManager.AppSetting["RedisURL"]);
            });
        }
        private static Lazy<ConnectionMultiplexer> lazyConnection;
        public static ConnectionMultiplexer Connection
        {
            get
            {
                return lazyConnection.Value;
            }
        }
    }
}
Step 10
Now, we are going to create Login and JWTTokenResponse class for the JWT Authentication part.
namespace WebAPI.Model
{
    public class Login
    {
        public string? UserName { get; set; }
        public string? Password { get; set; }
    }
}
Also, create JWTTokenResponse class for token.
namespace WebAPI.Model
{
    public class JWTTokenResponse
    {
        public string? Token { get; set; }
    }
}
Step 11
Later, create an authentication controller inside the Controllers for user authentication.
using Microsoft.AspNetCore.Mvc;
using Microsoft.IdentityModel.Tokens;
using System.IdentityModel.Tokens.Jwt;
using System.Security.Claims;
using System.Text;
using WebAPI.Model;
namespace WebAPI.Controllers
{
[Route("api/[controller]")]
[ApiController]
public class AuthenticationController : ControllerBase
{
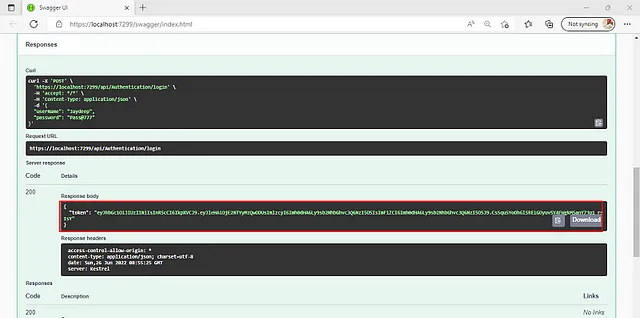
[HttpPost("login")]
public IActionResult Login([FromBody] Login user)
{
if (user is null)
{
return BadRequest("Invalid user request!!!");
}
if (user.UserName == "Jaydeep" && user.Password == "Pass@777")
{
var secretKey = new SymmetricSecurityKey(Encoding.UTF8.GetBytes(ConfigurationManager.AppSetting["JWT:Secret"]));
var signinCredentials = new SigningCredentials(secretKey, SecurityAlgorithms.HmacSha256);
var tokeOptions = new JwtSecurityToken(
issuer: ConfigurationManager.AppSetting["JWT:ValidIssuer"],
audience: ConfigurationManager.AppSetting["JWT:ValidAudience"],
claims: new List<Claim>(),
expires: DateTime.Now.AddMinutes(6),
signingCredentials: signinCredentials
);
var tokenString = new JwtSecurityTokenHandler().WriteToken(tokeOptions);
return Ok(new JWTTokenResponse { Token = tokenString });
}
return Unauthorized();
}
}
}- As you see in the above class, we take the Username and Password from the User, then take the secret key, which we put inside the appsettings.json file
- Next, create signing credentials using a secret key using the HMAC SHA256 Crypto Algorithm for the encoded string.
- Later on, we added a few attributes while creating tokens like signing credentials, expiration time, issuer, audience, and different types of claims as per our needs and requirements.
- Finally, using the token handler, create the token, which is in encoded form and sent to the end-user.
Step 12
Add a few Environmental Variables inside the appsetting.json file.
{
  "Logging": {
    "LogLevel": {
      "Default": "Information",
      "Microsoft.AspNetCore": "Warning"
    }
  },
  "AllowedHosts": "*",
  "RedisURL": "127.0.0.1:6379",
  "JWT": {
    "ValidAudience": "http://localhost:7299",
    "ValidIssuer": "http://localhost:7299",
    "Secret": "JWTAuthentication@777"
  },
  "ConnectionStrings": {
    "DefaultConnection": "Data Source=Server;Initial Catalog=JWTDemo;User Id=sa;Password=****;"
  }
}
Step 13
Next, register all servers related to JWT Authentication, Swagger UI for Authentication, CORS Policy, and Cache Services inside the Program class as shown below.
using Microsoft.AspNetCore.Authentication.JwtBearer;
using Microsoft.IdentityModel.Tokens;
using Microsoft.OpenApi.Models;
using System.Text;
using WebAPI.Cache;
using WebAPI.Data;
using ConfigurationManager = WebAPI.ConfigurationManager;
var builder = WebApplication.CreateBuilder(args);
// Add services to the container.
builder.Services.AddControllers();
// Learn more about configuring Swagger/OpenAPI at https://aka.ms/aspnetcore/swashbuckle
builder.Services.AddEndpointsApiExplorer();
builder.Services.AddSwaggerGen(options =>
{
    options.SwaggerDoc("V1", new OpenApiInfo
    {
        Version = "V1",
        Title = "WebAPI",
        Description = "Product WebAPI"
    });
    options.AddSecurityDefinition("Bearer", new OpenApiSecurityScheme
    {
        Scheme = "Bearer",
        BearerFormat = "JWT",
        In = ParameterLocation.Header,
        Name = "Authorization",
        Description = "Bearer Authentication with JWT Token",
        Type = SecuritySchemeType.Http
    });
    options.AddSecurityRequirement(new OpenApiSecurityRequirement
    {
        {
            new OpenApiSecurityScheme
            {
                Reference = new OpenApiReference
                {
                    Id = "Bearer",
                    Type = ReferenceType.SecurityScheme
                }
            },
            new List<string>()
        }
    });
});
builder.Services.AddScoped<ICacheService, CacheService>();
builder.Services.AddDbContext<DbContextClass>();
builder.Services.AddAuthentication(opt => {
    opt.DefaultAuthenticateScheme = JwtBearerDefaults.AuthenticationScheme;
    opt.DefaultChallengeScheme = JwtBearerDefaults.AuthenticationScheme;
})
    .AddJwtBearer(options =>
    {
        options.TokenValidationParameters = new TokenValidationParameters
        {
            ValidateIssuer = true,
            ValidateAudience = true,
            ValidateLifetime = true,
            ValidateIssuerSigningKey = true,
            ValidIssuer = ConfigurationManager.AppSetting["JWT:ValidIssuer"],
            ValidAudience = ConfigurationManager.AppSetting["JWT:ValidAudience"],
            IssuerSigningKey = new SymmetricSecurityKey(Encoding.UTF8.GetBytes(ConfigurationManager.AppSetting["JWT:Secret"]))
        };
    });
var app = builder.Build();
// Configure the HTTP request pipeline.
if (app.Environment.IsDevelopment())
{
    app.UseSwagger();
    app.UseSwaggerUI(options => {
        options.SwaggerEndpoint("/swagger/V1/swagger.json", "Product WebAPI");
    });
}
app.UseHttpsRedirection();
app.UseAuthentication();
app.UseAuthorization();
app.MapControllers();
app.UseCors(x => x
        .AllowAnyOrigin()
        .AllowAnyMethod()
        .AllowAnyHeader());
app.Run();
Step 14
Finally, execute the following command in the Package Manager Console for the entity framework for data migration and database updates:
add-migration “First”
update-database
Step 15
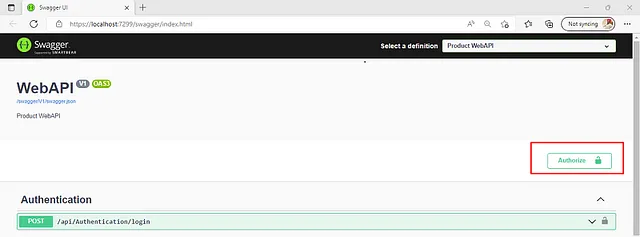
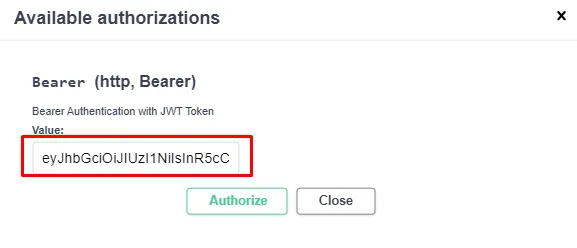
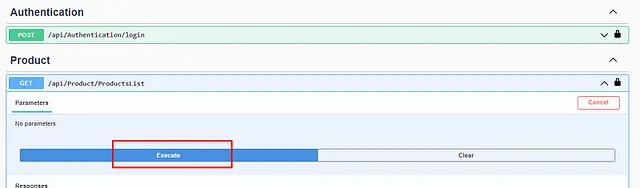
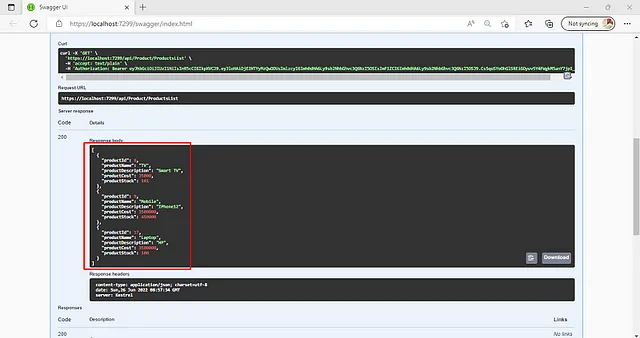
Run the application, create the token after providing credentials, and put it into the Authorize tab inside Swagger UI, as shown in the below image:

So, this is all about JWT Authentication in the.NET Core 6 Web API.
I hope you understood these things and now have an idea of how things work.
Happy coding!ET
Published at DZone with permission of Jaydeep Patil. See the original article here.
Opinions expressed by DZone contributors are their own.
Comments