Kubernetes Multi-Node On-Premise Installation With k0s Distribution
Explore this written and video tutorial to learn more about Kubernetes multi-node on-premise installation with k0s distribution.
Join the DZone community and get the full member experience.
Join For FreeThis post is part of the Kubernetes series.
Today I am going to install Kubernetes on-premise. In order to do this, I need some VM’s to simulate multiple nodes.
There are options to create VM such as VirtualBox and Vagrant, but I used Multipass. It is a tool from canonical (Ubuntu Parent company) to create Ubuntu-based VM easily. It uses multiple backends like LXD, VirtualBox, and KVM.
Cloud-init is a tool that integrates nicely with Multipass. Cloud-init is a software package that automates the initialization of cloud instances during system boot.
Step 1:
Create cloud-init.yaml. Include ssh public key and what package you want to install when VM is booted up. We can automate this using cloud-init:
ssh_authorized_keys:

  - ssh-rsa AAAAB3NzaC1yc2EAAAADAQABAAABAQCwj/GIk1hUKTDYzylerSCfXbYnkYZ5Im80pNvzIF8C0fZ/fhu8dgHckyuhc+Jkn4ty9SDqgB9paGhuc4EuITvxQpmHMqsxOm8kqShJB43h7YOb2ZXo/vgUyL8zYlIXch1OKN9j6jkHBtYrEAS96Ojz5x4G0FQLHulJmECz8XOOgyzi9CFx3ElOGZ1oF4M4CcEp5KWLI4zjNhvWyObMON5KLmB7Pwl37zQissOJe/Ic69tdNGaWY3NOY+33IrEowD7KN6JW10x/opZJrOd4FErDh/6PRw5kEXDTF15inOxFhZI5hkneZLnmGJDmQp47m7wmCJeB+NDWD6bWVXc9HP+7 ramki@ramki

packages:

  - open-iscsi

  - nfs-common
Step 2:
Using Multipass create 5 VM’s. Each VM has 15 CPUs, 20G RAM, 100G HDD. We specify the cloud-init.yaml file. For post-VM boot up, install the custom tools (here install open-iscsi, nfs-common using apt install).
multipass launch -c 15 -m 20G -d 100G -n master --cloud-init cloud-init.yaml

multipass launch -c 15 -m 20G -d 100G -n worker1 --cloud-init cloud-init.yaml

multipass launch -c 15 -m 20G -d 100G -n worker2 --cloud-init cloud-init.yaml

multipass launch -c 15 -m 20G -d 100G -n worker3 --cloud-init cloud-init.yaml

multipass launch -c 15 -m 20G -d 100G -n worker4 --cloud-init cloud-init.yaml
Step 3:
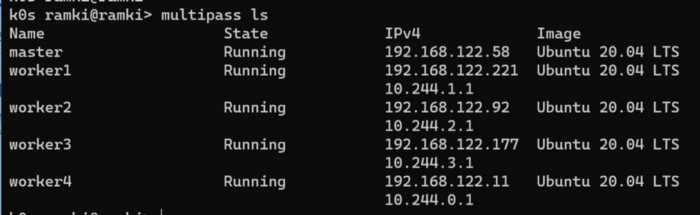
Check VM ip address using multipass ls command.
Step 4:
Create a Cluster config file using the following command.
k0sctl init --k0s > k0sctl.yaml
Update the IP address accordingly based on VM’s IP address.
apiVersion: k0sctl.k0sproject.io/v1beta1
kind: Cluster
metadata:
  name: bio-kubernetes

spec:
  hosts:
  - ssh:
      address: 192.168.122.58
      user: ubuntu
      port: 22
      keyPath: /home/htvam/.ssh/id_rsa
    role: controller

  - ssh:
      address: 192.168.122.221
      user: ubuntu
      port: 22
      keyPath: /home/htvam/.ssh/id_rsa
    role: worker

  - ssh:
      address: 192.168.122.92
      user: ubuntu
      port: 22
      keyPath: /home/htvam/.ssh/id_rsa
    role: worker

  - ssh:
      address: 192.168.122.177
      user: ubuntu
      port: 22
      keyPath: /home/htvam/.ssh/id_rsa
    role: worker

  - ssh:
      address: 192.168.122.11
      user: ubuntu
      port: 22
      keyPath: /home/htvam/.ssh/id_rsa
    role: worker

  k0s:
    version: 1.21.3+k0s.0
    config:
      apiVersion: k0s.k0sproject.io/v1beta1
      kind: Cluster
      metadata:
        name: k0s

      spec:
        api:
          k0sApiPort: 9443
          port: 6443
          sans:
          - 192.168.122.125
        images:
          calico:
            cni:
              image: docker.io/calico/cni
              version: v3.18.1
            kubecontrollers:
              image: docker.io/calico/kube-controllers
              version: v3.18.1
            node:
              image: docker.io/calico/node
              version: v3.18.1
          coredns:
            image: docker.io/coredns/coredns
            version: 1.7.0
          default_pull_policy: IfNotPresent
          konnectivity:
            image: us.gcr.io/k8s-artifacts-prod/kas-network-proxy/proxy-agent
            version: v0.0.16
          kubeproxy:
            image: k8s.gcr.io/kube-proxy
            version: v1.21.1
          kuberouter:
            cni:
              image: docker.io/cloudnativelabs/kube-router
              version: v1.2.1
            cniInstaller:
              image: quay.io/k0sproject/cni-node
              version: 0.1.0
          metricsserver:
            image: gcr.io/k8s-staging-metrics-server/metrics-server
            version: v0.3.7
        installConfig:
          users:
            etcdUser: etcd
            kineUser: kube-apiserver
            konnectivityUser: konnectivity-server
            kubeAPIserverUser: kube-apiserver
            kubeSchedulerUser: kube-scheduler
        konnectivity:
          adminPort: 8133
          agentPort: 8132
        network:
          kuberouter:
            autoMTU: true
          podCIDR: 10.244.0.0/16
          provider: kuberouter
          serviceCIDR: 10.96.0.0/12
        podSecurityPolicy:
          defaultPolicy: 00-k0s-privileged
        storage:
          type: etcd
        telemetry:
          enabled: true
Step 5:
Install Kubernetes using k0sctl command.
k0sctl apply --config k0sctl.yaml
Kubernetes is installed!
Setup the Kube Config file:
k0sctl kubeconfig --config k0sctl.yaml > ~/.kube/config
Video Tutorial:
Published at DZone with permission of Ramakrishnan E.P.. See the original article here.
Opinions expressed by DZone contributors are their own.
Comments