Mixing Fluids in Houdini
Combining fluids can be a frustrating experience for Houdini developers. From the point cloud to the Blast nodes, here's how to get your fluids swirling around.
Join the DZone community and get the full member experience.
Join For Free
I suspect that mixing two or more disparate fluids is one of the first challenges Houdini newbies, like myself, set for themselves. I blogged about an approach recently in Stripy Viscous Fluid Impacts in Houdini — I created a single point cloud to act as the fluid's initial location, with different colors depending on the position of each point.
The slight problem with this approach is that because the fluid has a single surface, Houdini doesn't render any interior detail showing how different fluids interact. To simulate the effect in the video above, where drops of a blue liquid fall into a body of a red liquid, my new approach creates two separate fluid surfaces, and that missing interior detail is visible.
As well as looking better, this technique allows for totally different materials on each fluid. You could, for example, animate pouring mercury or oil into water.
Creating the Liquid Geometry Source
The first step is to create the point cloud that is used to define the initial location of the fluid — the body of the liquid and the three drops. This is a geometry node with a tube for the liquid body and three spheres for the drops:
There are some important extra steps:
- The two wrangle nodes set the density: My drips are more dense than the main liquid body, so I explicitly set the density of each in VEX with @density = 4; for the drips and 1 for the body.
- The two group nodes assigns groups to the different liquids, DRIP and BODY, these will be used later when creating the surfaces.
- The Point Separation in both Scatter nodes is set to 0.2 which will match the Particle Separation in the FLIP Object.
With the geometry in place, I used the FLIP Fluid from Object shelf tool to create a fluid from the geometry.
Building the Glass
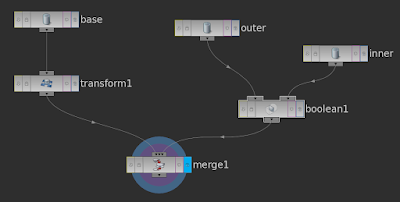
The drinking glass was created from two tubes with slightly different radii subtracted from each other with a Cookie node. A third, shorter tube acts as the base:
Containing the Fluid
After building the glass, I went ahead and converted it to a rigid body hoping it would contain the fluid. However, no amount of fiddling would make its concave shape work nicely.
The solution was to create a rigid body from another tube (with end caps) and check "invert sign" in the static object node inside the DOP Network.
Creating Multiple Fluid Surfaces
Now for the magic. The FLIP Fluid from Object shelf too creates a network to render the fluid surface. Using a Blast node (added just before the Fluid Compress), I delete all the points from one group (i.e. check Delete Non Selected and set the Group Type to points), then copy the entire network and change the group name in the Blast node to the other group.
These two fluid surface networks can be assigned their own materials. In my project, I simply copied the basic liquid and changed the colors so that I have red and blue liquids.
The Object Merge node in the fluid interior network allows for multiple objects and I simply add the copied render node to that.
Gotchas
All well and good. However, since I slowed time down quite a lot, my fluid (especially the drips) was quite jittery. My first attempt to resolve this was to add smoothing to the Particle Fluid Surface. This went some way to helping, but fluid blobs would magically appear and vanish depending on smoothing.
My solution is to increase the fluid substeps, up the Velocity Smoothing in FLIP Solver to 1, and check Limit Refinementin the Particle Fluid Nodes.
@cgcris_com has also suggested turning off Rebuild SDF in the Particle Fluid Surface node. The video above hasn't implemented this suggestion, but I'll try that soon.
Published at DZone with permission of Simon Gladman, DZone MVB. See the original article here.
Opinions expressed by DZone contributors are their own.


Comments