MuleSoft: Encouraging Teamwork to Enhance Productivity
This article will explain how to install the EGit plugin for Anypoint Studio and use it during project development.
Join the DZone community and get the full member experience.
Join For FreeFor a simple integration project, a developer can configure the project on its own machine and then deploy it to server once it is finished. However, like other software development activities, integration projects may be not as simple as that. It can be complicated and requires collaboration from many developers. They might be working with the same resources, which probably leads to confusion or conflict.
Actually, there is no doubt that every developer is aware of this issue. And obviously, they will implement version control. So everyone can work together focusing on their own task and then merge the changes to the same resources. There are many options to do this. One of popular version control system is Git. an open-source version control system that is widely used for software development.
The thing is: Anypoint Studio does not have Git support out of the box!
Therefore, to enable our team members to work together using Git in Anypoint Studio, we have to install an EGit plugin. This article will explain how to install the EGit plugin for Anypoint Studio and use it during project development.
EGit Plugin for Anypoint Studio
- Open Anypoint Studio and go to Help >> Install New Software…
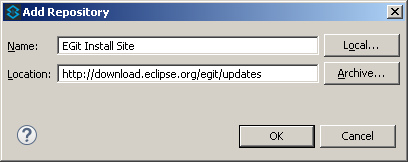
- Click the Add… button, and then enter the following information:
- If you have any problem with the URL, then download it first from http://www.eclipse.org/egit/download/ to a local folder and change the Location above with the downloaded file address.
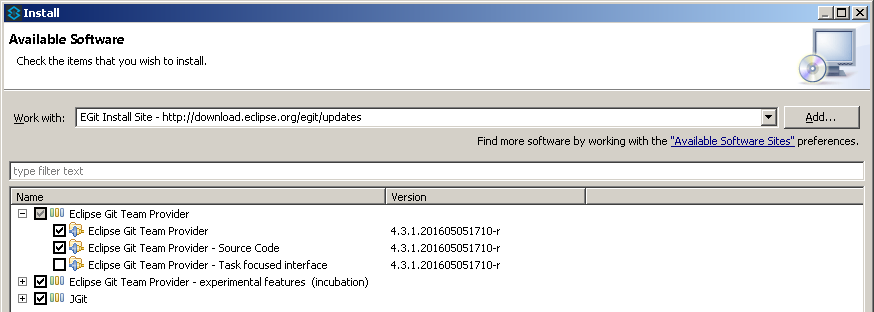
- After clicking the OK button, then the value of “Work with…” will be updated. Eventually the relevant plugins available from the URL which we just entered will be showed.
- Click Select All button.
- Expand the first plugin: Eclipse Git Team Provider.
- Uncheck/deselect the “Eclipse Git Team Provider - Task focused interface” option.
- Click the Next button. Eclipse then shall check the URL and the requirements needed for installation.
- Then just follow the installation instruction, e.g.: click Next button.
- Click “I accept the terms…” on the license agreement.
- Click the Finish button. Then Eclipse will install the plugin.
Name = EGit Install Site
Location = http://download.eclipse.org/egit/updates

Upon completing the installation, Anypoint Studio will require a restart. After that add another perspective by the following steps:
- Go to Window >> Perspective >> Open Perspective >> Other…
- Or click Open Perspective button on the top of right Anypoint Studio.
- Select Git and then click OK button.
- A perspective button will appear:
- By clicking it we will be able to manage Git repository within Anypoint Studio.


Setup Git Project
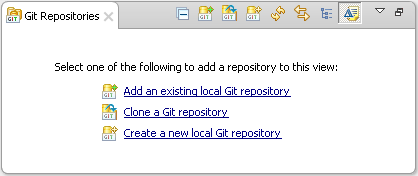
There are several ways to setup Git project, such as Import or Clone a Git repository. Both of them are accommodated by Anypoint Studio. In this article, we use the first option (use Import). Later we will see its association with Git Repositories perspective above:
- File >> Import
- Inside the Import window expand Git.
- Select Project from Git, and click Next button to move to the next step.
- Select Clone URI.
- Fill all required fields, or just put the correct URI then other fields will be automatically populated.
- Select the preferred Branches.
- Set the Destination Directory.
- Select the wizard to import the project: Import using the New Project wizard.
After the Finish button is clicked, a new window will be displayed. Now we have to configure the new project which will be imported:
- Expand Mule, select Mule Project, and then click Next button to move to the next step.
- Fill the Project Name.
- Uncheck/deselect Use default location option.
- Fill the Location (type it directly or click Browse button) with the value of Destination Directory (step #7 above).
- Click Finish button.
A new Mule project will be imported and displayed in Package Explorer. Also the new Git repository will be listed in Git Repositories perspective. The same result when we choose the second option: Clone a Git Repository.

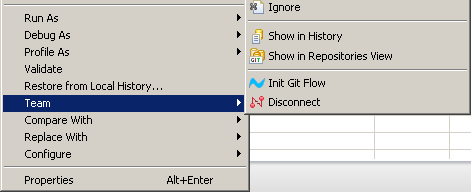
By installing EGit plugin, we can easily execute any Git actions. The suggested actions will be provided based on the selected resources: project, folder, or file. Right click and choose Team menu on resources, alternately to see the different options.

Switch Branch
For some reason a project might be consist of some branches. To switch from one branch to another one: right click on the project name, choose Team >> Switch To… >> and select the branch name. In case there are too many branches then select Team >> Switch To… >> Other …
Manage the Changes
Any file modification will be tracked and marked. There are three common marks that are used to notify developers when they modify the code. Each mark represents different meaning:
- ? = represent an untracked file, which is not under Git version control yet
- + = new file
- > = modified file
To follow up those changes there are many Git actions that can be chosen, such as: fetch, pull, commit, or push. These actions are also provided after right click >> Team.
Compare the Contents
To make sure that current modification fits the requirement and it does not break current implementation, we can compare with its original one. For another purpose, we might need to compare our recent changes among last commit, the index, or the current working tree. To confirm it, select the resources and right click >> Compare With.

Rather than evaluate the contents, we also able to see each resource’s changes history. A comments or notes of modification which recorded every time it is committed. The History View can be displayed by right click >> Team >> Show in History.

Revert the Changes
Due to some circumstances we need to revert back to a previous version. Instead of rewriting the latest code, we can easily go back to the previous one. Still similar as other actions, select the resources and right click >> Replace With: Head, Index, Previous Revision, etc.
That is few examples on how to use EGit plugin in Anypoint Studio. Please feel free to explore other features and other Git action options.
Credits:
Gama Ogi Prayogo for his guidance via internal company blog: How to install EGit plugin
Opinions expressed by DZone contributors are their own.

Comments