OrientDB Intro and HTTP REST API Tutorial
If you don't have an HTTP REST API, you may have a mess of database tables that require several requests to construct a meaningful interface. Here's how to deal with it.
Join the DZone community and get the full member experience.
Join For FreeData access is a foundational consideration of any software application.
Should your data be stored locally or in the cloud? Is it currently organized and logical, or is it a mess of database tables that require several requests to construct a meaningful interface?
If you and your team face these questions day-to-day, you’ll want to read on.
Data access on the go is what brings real power to our cutting-edge apps. If you’re a developer, you know that an HTTP REST API is the standard for communicating data online, and is practically a requirement of any internet technology.
As our devices get faster and our applications get bigger and more complex, this interface can often be the choke point slowing down our applications and is becoming an increasingly important piece of our stack to master.

So, how do we handle this problem?
We must be careful about the technologies that we choose to power our applications — from the data layer and all the way up.
As a developer myself, I’ve worked with a variety of technologies, from IBM enterprise platforms to iOS mobile apps. With each new project, I need to choose a reliable and fast database solution to fuel my applications.
Lately, OrientDB has been my database of choice. In this article, I’ll walk you through how to use it and its HTTP REST API.
Case Study
Many times, I find that a case study is the easiest way to walk through a technology.
Recently, I have been developing e-commerce applications and web apps, and I think that illustrating how better technology can literally make you more money (and save a lot of headaches) will help anyone understand the power of OrientDB.
So, let’s say we’re going to sell electronics online… we’ll call it ComputerStore.
For the sake of readability, I’ll keep it simple.
ComputerStore
Let's say our store has different types of devices, like laptops, phones, and computer parts. These may be components of each other; some may be compatible and some may not. Visitors to our site can make purchases and enter in their payment and shipping information. We may want to view a past order and know what item we bought.
Let’s say those devices are going to be an Android phone, a MacBook laptop, and a Dell desktop. All of those have memory components of different sizes, and the phone and the laptop have an accelerometer.
For the less technical, what I just described above are a series of “requirements” or user stories for our simple application. Now image the requirements necessary to support a major brand name’s e-commerce website.
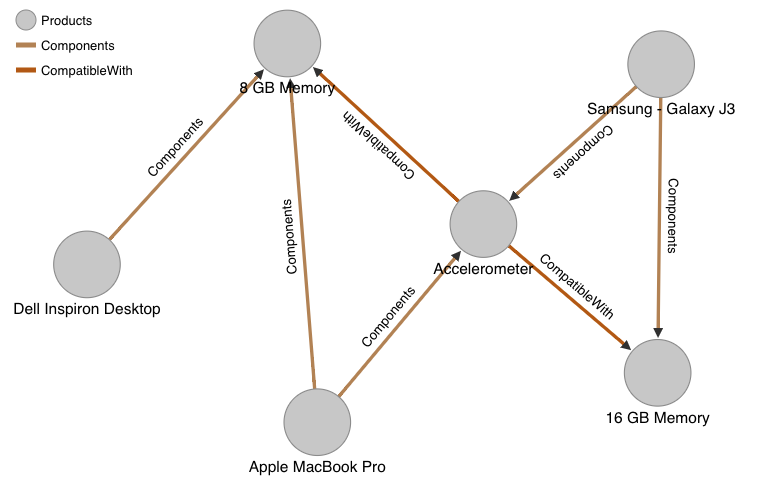
Enterprises literally need documentation of their documentation to keep track of everything. These data models get pretty complex, to say the least. Thankfully, we’ll see how OrientDB simplifies many of these relationships. Here’s what our data model will look like soon:
That graph above is probably a much easier way to understand the store we have planned. The circles indicate products in our store, and those arrows represent the relationships between our products.
Here, you can already visualize the value in a graph database, such as OrientDB, versus a traditional relational database. Tables are nice, but not when we get to the production level.
Build This Data Model in OrientDB
We'll look at the schema and relationships.
Schema
Our products need to have some more information, such as their prices, a description, and an image that we can display on our store. We’ll choose a few products to stock our store with here
Here’s a spreadsheet of the data we’ll plan to use.
Start up your OrientDB server and launch the OrientDB Studio Editor by navigating to http://localhost:2480 in a web browser.
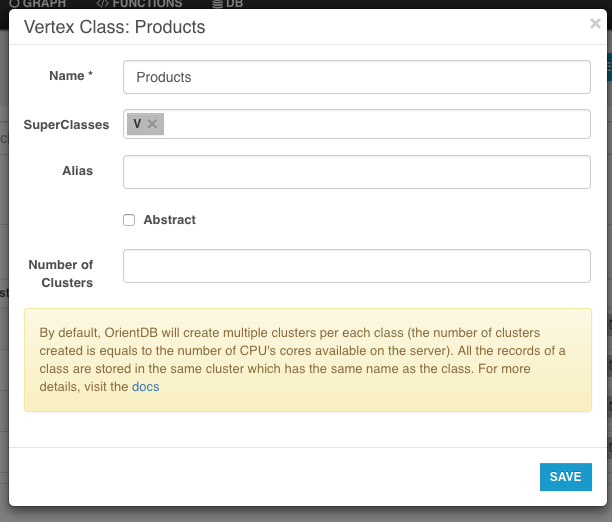
Using the Schema Manager page, create a new vertex named Products. You’ll see it appear under Vertex Classes.
Select our new Products vertex, and once inside, create a new property for each of the attributes in our spreadsheet.
That’ll be:
Price: Double
ProductDescription: String
ProductImageURL: String
ProductName: String
ProductNameShort: String
Next, create the Orders vertex with the following properties:
- TotalPrice: Double
- ShippingInformation: String
- PaymentInformation: String
Lastly, we’re going to use the built-in OUser system class to represent our users. When a visitor registers with our store, we’ll give them an option to store their payment and shipping information.
By default, OUser is a document. We’re going to use it as a vertex, so we’ll need to alter it and then add those properties.
Execute the following command:
ALTER CLASS OUser SUPERCLASS VAnd then add properties to OUser for:
- Address: String
- PaymentInformation: String
- FullName: String
This is a good time to mention that OrientDB is a multi-model database that supports relational, graph, key-value, and document database styles. That’s a really powerful feature that deserves some deeper reading here. Basically, it can support different access patterns and logical representations depending on what makes the most sense for each system and interface that’s talking to it.
Relationships
Next, we’re going to represent the relationships between our products, an order, and a customer, using graph edges.
Graph edges represent a directional relationship. Here, we’re going to say products can be components of other products. OrdersItemInOrder is the product that was purchased, and the OUser customer sends an order (HasOrder) to an orders record.
Having trouble following along? Feel free to refer back to our earlier graph graphic.
From the Schema Manager, select + NEW EDGE.
Create these edges:
- Components: From: Product, To: Product
- CompatibleWith: From: Product, To: Product
- HasOrder: From: OUser, To: Orders
- ItemInOrder: From: Orders, To: Products
Then, we’ll populate our edges by connecting them in the OrientDB Studio’s Graph Editor, which has a great interactive interface to plug our nodes into each other.
To start, navigate to the Graph tab, and then enter SELECT from PRODUCTS. You’ll see nodes for all of the devices we entered. To make this easier to read, click on one of the nodes and hit the Properties button. Then toggle over to the Settings tab on the left-side menu to change Display: ProductNameShort.
Select the nodes and hit the Create Edge button, which looks like a link or chain icon. An arrow will show, which you’ll drag to the other corresponding node. Then, a pop-up will display where you can select the class of edge for each relationship.
Perfect! Now, one more thing we’ll need to do before we dive into the HTTP REST API is to define a server-side function for creating orders. Making a purchase can be a multi-step operation that includes sensitive information, such as credit card information, much of which is best handled by the server side.
We’ll keep our case study simple, but follow this best practice. OrientDB allows the definition of server-side functions using JavaScript, Groovy, and SQL, which can all be programmed in the Functions Management Interface.
We’ll name the function CreateOrder and set the language to JavaScript. Select + PARAMETER to accept inputs for ProductID and BuyerID .
Grab our CreateOrder code below or at this link. Server-side functions could be a lengthy tutorial on their own!
var graph = orient.getGraph();

// Check valid parameters
if( ProductID == "" || BuyerID == "" ){
  response.send(404, "Product or Buyer Missing", "text/plain", "Error: Missing ProductID or BuyerID Parameter" );
}

// Query for objects
var product = graph.getVertex(ProductID);
var buyer = graph.getVertex(BuyerID);

// Extract information
var productPrice = product.getProperty('Price');
var buyerPaymentInformation = buyer.getProperty('PaymentInformation');
var buyerShippingInformation = buyer.getProperty('Address');

// Check for valid lookups
if( product == null || buyer == null ){
  response.send(404, "Product or Buyer Not Found", "text/plain", "Error: Invalid ProductID or BuyerID" );
} else {

  //db.begin();
  try{

    // Create and save the new order
    var order = graph.addVertex("class:Orders");
    order.setProperty("PaymentInformation", buyerPaymentInformation);
    order.setProperty("ShippingInformation", buyerShippingInformation);
    order.setProperty("TotalPrice", productPrice);

    // Commit so that we have a valid rid
    graph.commit();

    var OrderID = order.getProperty('@rid');

    // Add Edges
    // HasItem Edge from Order to Product
    // HasOrder Edge from OUser to Order
    var ItemInOrder = graph.addEdge(null, order, product, "ItemInOrder");
    var HasOrder = graph.addEdge(null, buyer, order, "HasOrder");

    graph.commit();

    return "success";

  }catch ( err ){
    graph.rollback();
    response.send(500, "Error on creating new order", "text/plain", err.toString() );
  }
}
OrientDB’s RESTful HTTP API
Great! Now our database should be ready to go. Trust me — that setup was pretty easy compared to many other tools and enterprise platforms I’ve used in the past.
Now, we can start interacting with our server through OrientDB’s RESTful HTTP API. This is available right out of the box with no configuration or programming needed.
Now, let’s say we’re planning to build a public website or mobile app which customers will use to browse and make purchases from our store.
What are the API endpoints that we’ll want to use?
- A user arrives at our store and wants to sign in (Connect).
- A user views our catalog of products (Products).
- A user drills down to view the components of a product (Components)
- A user decides to make a purchase (CreateOrder).
- A user wants to see their orders (Orders).
In this tutorial, we’ll use the Chrome app Postman to simulate interactions with our OrientDB HTTP API. If you’re not using the Google Chrome browser, you’ll have to use another HTTP client.
Connect
GET http://{{server}}:{{port}}/connect/{{database}}
GET http://localhost:2480/connect/ComputerStore
This method connects to a remote server using basic authentication. It verifies that our server and database exist and that our user is properly logged in.
A successful request will just give us back a 204 OK.
Products
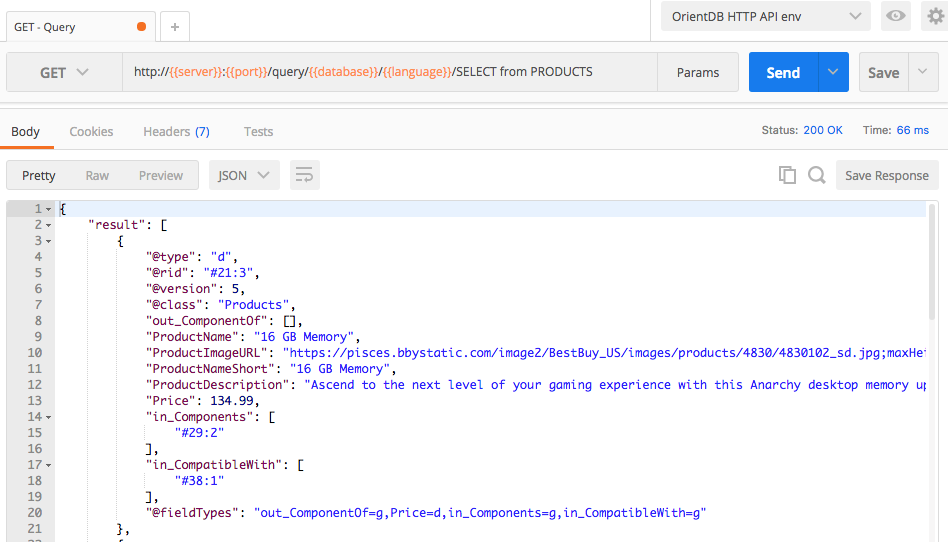
GET http://{{server}}:{{port}}/query/{{database}}/{{language}}/SELECT from PRODUCTS
GET http://localhost:2480/query/ComputerStore/sql/SELECT from PRODUCTS
To get our list of products, we’ll query our database passing in an SQL SELECT statement.
Keep in mind that if you have a large database, such an enterprise store, you’ll probably want to add additional filters or limit the number of records returned.
We receive a JSON response containing an array result object. That result object is a list of our products records, containing a dictionary of our properties, such as @rid, ProductName, and Price, which is the data we need to render our store’s catalog to our customers.
Want to see it another way? With your server running on localhost, type the following into your web browser: http://admin:admin@localhost:2480/query/ComputerStore/sql/SELECT from PRODUCTS.
Components
GET http://{{server}}:{{port}}/query/{{database}}/{{language}}/SELECT expand(out(‘Components’)) from <<@rid>>
GET http://localhost:2480/query/ComputerStore/sql/SELECT expand(out(‘Components’)) from 23:1
Here, we’re traversing through the edges of our graph database to retrieve the related products that we want to display to the user. These edges have in and out properties, which are Type:LINK, AKA the @rid numbers of the products we want to display.
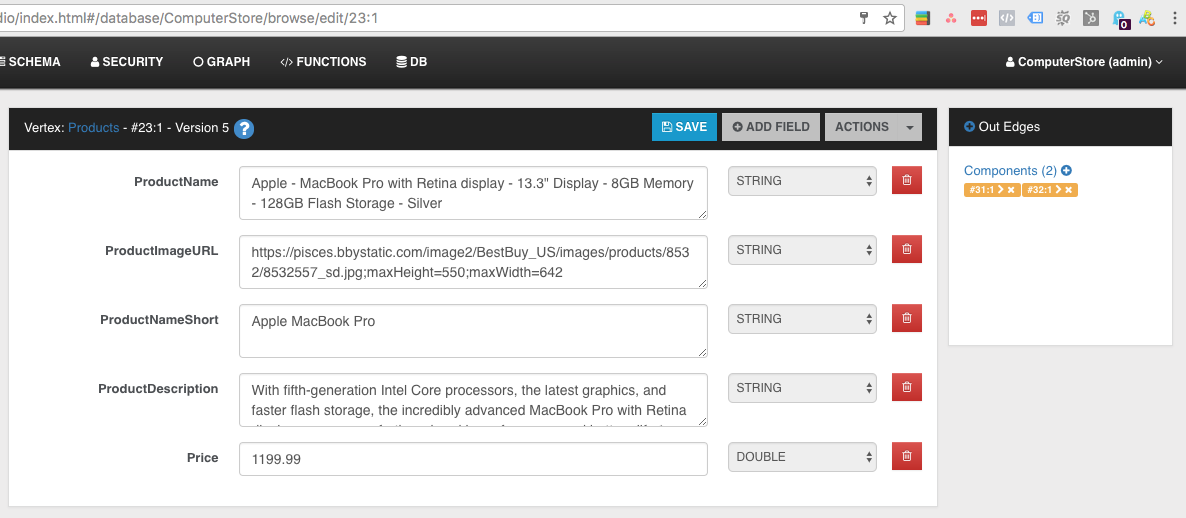
So, say we are viewing our Apple MacBook product, which is @rid=#23:1. The Apple MacBook has two out edges of type components, with @rid of#31:1 and #32:1, which link to #23:2 (Accelerometer) and #22:3 (8 GB Memory), respectively.
This request allows us to traverse from our Apple MacBook to Accelerometer and 8 GB Memory.
CreateOrder
POST http://{{server}}:{{port}}/function/{{database}}/{{name}}/{{argument1}}/{{argument2}}
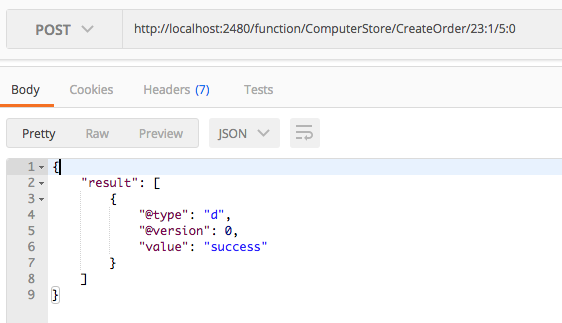
POST http://localhost:2480/function/ComputerStore/CreateOrder/23:1/5:0
Now we want to execute our server-side function that we had previously defined through the OrientDB Studio Functions Management interface, called CreateOrder with parameters ProductID and BuyerID .
In our store example, when a customer clicks purchase on one of our products, we’ll execute the CreateOrder function, passing in the @rid for that product, and the current user’s @rid, as well.
Note that this is a POST request since our function will be creating records and is not idempotent.
In Postman, a successful invocation will display the Success response we defined in our function.
Which creates the following in our graph view of the database:
Orders
GET http://{{server}}:{{port}}/query/{{database}}/{{language}}/SELECT expand(in) from HasOrder where out = <<@rid>>
GET http://localhost:2480/query/ComputerStore/sql/SELECT expand(in) from HasOrder where out = 5:0
Once a user makes a purchase, we imagine they’ll want to be able to see their past orders and details of what they’ve purchased.
So, we’ll retrieve existing orders tied to our current user’s @rid.
In the data model that we’ve created, there are many ways to retrieve these records. Given our user ID, we’ll follow our HasOrder edge to the associated orders.
Selecting the IN property of the edge will give us an @rid and applying expand(…) to that property gives us the actual record for that@rid.
More Resources
Great, if you’ve followed along with our tutorial through everything — congrats! You’ve learned a bit of background on multi-model databases, HTTP REST APIs, and the power of OrientDB.
We’ve just scratched the surface here into what’s possible. OrientDB is capable of supporting enterprise applications that are many magnitudes more complex in terms of schema, relationships, and datatypes.
Most of our interactions here were retrieving data from the database. OrientDB implements role-based access and security features to enforce access rules that you may want to leverage. These are used to limit certain sensitive data and sensitive functions to users with the right level of access, such as admins.
Here are a few resources available for additional reading. There’s a lot of good documentation on OrientDB’s website and helpful colleagues on the Internet. Good luck!
Published at DZone with permission of Anthony Blatner. See the original article here.
Opinions expressed by DZone contributors are their own.





Comments