Part 2: Airflow DAGs for Migrating PostgreSQL Data to Distributed SQL
In this post we are going to build a simple Airflow DAG that detects new records that have been inserted into PostgreSQL and migrate them to YugabyteDB.
Join the DZone community and get the full member experience.
Join For FreeWelcome to part two of our series on how to integrate Apache Airflow and YugabyeDB. In part one we showed you how to get Airflow configured to use YuagbyteDB as a backend. In this second post we’ll show you how to build an Airflow workflow that will migrate data between PostgreSQL and YugabyteDB.
What’s YugabyteDB? It is an open source, high-performance distributed SQL database built on a scalable and fault-tolerant design inspired by Google Spanner. Yugabyte’s SQL API (YSQL) is PostgreSQL wire compatible.
About the Demo
In this post we are going to build a simple Airflow DAG – or a Directed Acyclic Graph – that detects new records that have been inserted into PostgreSQL and migrate them to YugabyteDB. In a subsequent post we’ll dive deeper into DAGs and create more complex YugabyteDB workflows.
We’ll cover the following steps in this post:
- Install PostgreSQL
- Configure GCP firewall rules
- Configure Airflow database connections
- Create an Airflow task file
- Run the task
- Monitor and verify the results
Prerequisites
Below is the environment that we’ll be using for the purposes of this blog.
- YugabyteDB – version 2.1.6
- Apache Airflow – version 1.10.10
- PostgreSQL – version 10.12
- A Google Cloud Platform account
Note: For the purposes of this demo, we aren’t creating a particularly secure deployment, instead we are focusing on demonstrating how to wire everything up with the least amount of fuss. In a production deployment you’ll want to enforce additional security measures throughout the stack.
Step 1: Deploy a VM for PostgreSQL
For the purposes of this demo, I have specified the following configuration for the Google Compute Engine VM that will be hosting my PostgreSQL server.
- Name: postgresqlvm
- Machine Type: n1-standard-2 (2vCPU, 7.5 GB memory)
- OS: Ubuntu 18.04 LTS
- Disk: 100 GB
- Firewall: Allow HTTP/HTTPS traffic
Step 2: Install PostgreSQL on the VM
Install PostgreSQL
To install PostgreSQL on the postgresqlvm VM run the following commands:
$ cd ~/
$ sudo apt-get install postgresql-contrib
Verify that PostgreSQL is installed by running the following command:
xxxxxxxxxx
$ psql --version
psql (PostgreSQL) 10.12 (Ubuntu 10.12-0ubuntu0.18.04.1)
Configure PostgreSQL for remote access
By default, PostgreSQL doesn’t allow remote connections. In order for Airflow to communicate with PostgreSQL, we’ll need to change this setting.
To enable remote connections we’ll need to make a few tweaks to the pg_hba.conf file using the following steps:
xxxxxxxxxx
$ cd ../etc/postgresql/10/main/
$ sudo vim pg_hba.conf
Scroll down to the bottom of the file and add the following lines:
xxxxxxxxxx
# IPv4 remote connections:
host all all 0.0.0.0/0 md5
Next, edit the postgresql.conf file.
xxxxxxxxxx
$ sudo vim postgresql.conf
Scroll down to the line that begins with #listen_addresses = 'localhost' in the Connections and Authentication section.
Uncomment the line and replace localhost with *
xxxxxxxxxx
listen_addresses = '*'
Finally, restart PostgreSQL.
xxxxxxxxxx
$ sudo /etc/init.d/postgresql restart
Download the sample Northwind database and data
There are DDL and INSERT scripts we’ll need to download onto our PostgreSQL VM so we can build our demo.
xxxxxxxxxx
$ wget https://raw.githubusercontent.com/yugabyte/yugabyte-db/master/sample/northwind_ddl.sql
xxxxxxxxxx
$ wget https://raw.githubusercontent.com/yugabyte/yugabyte-db/master/sample/northwind_data.sql
Create a password for the default PostgreSQL user
For Apache Airflow to be able to connect to the PostgreSQL database, we need to create a password for the default postgres user which by default has none. Either execute the following script in your shell or use your favorite GUI tool.
Log into PostgreSQL.
xxxxxxxxxx
$ sudo -u postgres psql
Assign postgres a password:
xxxxxxxxxx
postgres=# ALTER USER postgres WITH PASSWORD 'password';
ALTER ROLE
Create the Northwind sample database
Create a database called northwind that we’ll be using for our demo.
xxxxxxxxxx
postgres=# CREATE DATABASE northwind;
xxxxxxxxxx
postgres=# \c northwind;
Create the Northwind objects and load the data
xxxxxxxxxx
northwind=# \i /home/jimmy/northwind_ddl.sql
xxxxxxxxxx
northwind=# \i /home/jimmy/northwind_data.sql
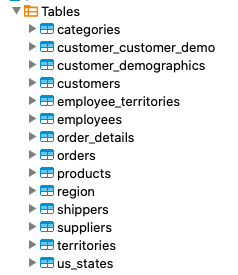
You should now see 14 tables loaded with data.
At this point we have PostgreSQL running on a Google Compute Engine virtual machine with remote connections enabled and the Northwind sample database built.
Step 3: Install Northwind on YugabyteDB
Log into YugabyteDB
xxxxxxxxxx
$ kubectl --namespace yb-demo exec -it yb-tserver-0 -- /home/yugabyte/bin/ysqlsh -h yb-tserver-0
Create the Northwind sample database
Create a database called northwind that we’ll be using for our demo.
xxxxxxxxxx
yugabyte=# CREATE DATABASE northwind;
xxxxxxxxxx
yugabyte=# \c northwind;
Create the Northwind objects and load the data
xxxxxxxxxx
northwind=# \i /home/yugabyte/share/northwind_ddl.sql
xxxxxxxxxx
northwind=# \i /home/yugabyte/share/northwind_data.sql
You should now see 14 tables populated with data.
Step 4: Setup Ingress and Egress Firewall Rules for PostgreSQL and YugabyteDB
The next two steps involve opening up ingress and egress points for PostgreSQL and YugabyteDB in GCP. This can be accomplished in the same way we illustrated in the first post, part 1 step 2, where we configured the Airflow networking rules. Inside of the GCP Console, navigate to VPC Network > Firewall Rules.
PostgreSQL – 2 rules
- Names: postgres-ingress and postgres-egress
- Direction of Traffic: ingress and egress
- Targets: All instances on the network
- Source IP ranges: 0.0.0.0/0. <External GCP IP of Airflow VM>/32
- Protocols and ports: tcp 5432
YugabyteDB – 2 rules
- Names: yugabyte-ingress and yugabyte-egress
- Direction of Traffic: ingress and egress
- Targets: All instances on the network
- Source & Destination IP ranges: 0.0.0.0/0. <External GCP IP of Airflow VM>/32
- Protocols and ports: tcp 5433
Step 5: Add Airflow Connections to Postgres and YugabyteDB
To add the connection configuration that Apache Airflow will use to connect to the PostgreSQL and YugabyteDB databases, go to Admin > Connections in the Airflow UI.
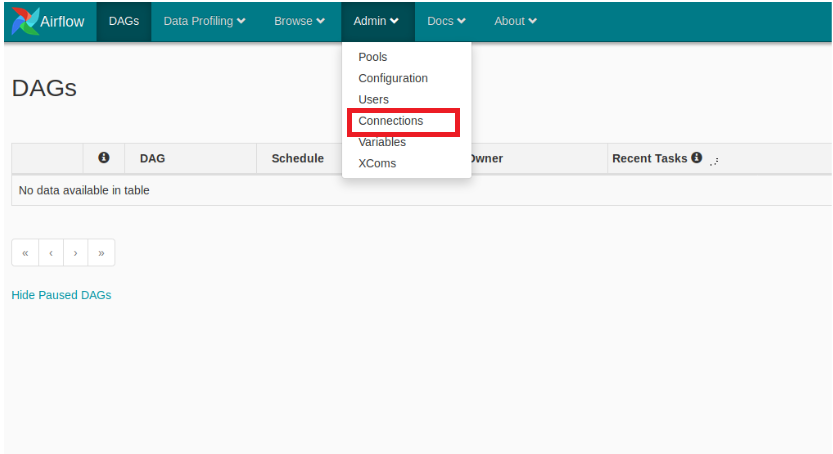
Select Create.
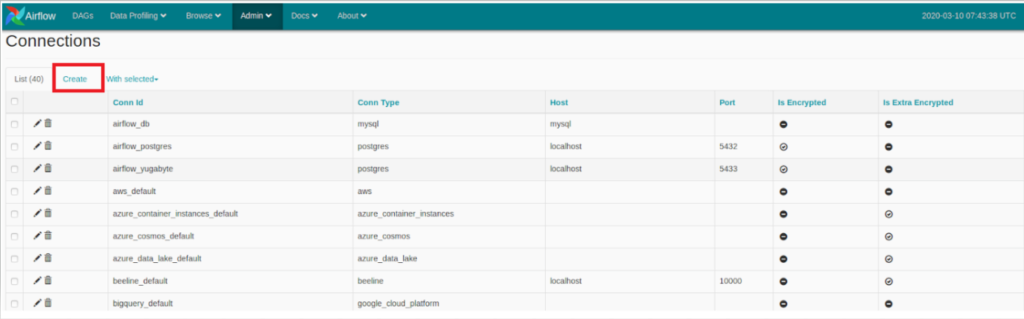
Add an airflow_postgres connection with the following configuration:
- Conn Id: airflow_postgres
- Conn Type: Postgres
- Host: <postgresqlvm’s External IP>
- Schema: northwind
- Login: postgres
- Password: password
- Port: 5432
Repeat the process to add an airflow_yugabyte connection with the following configuration:
- Conn Id: airflow_yugabyte
- Conn Type: Postgres
- Host: <yugabytedbgke’s External IP>
- Schema: northwind
- Login: yugabyte
- Password: password
- Port: 5433
Step 6: Create an Apache Airflow Task File to Migrate Data
Airflow task files are written in Python and need to be placed in ${AIRFLOW_ HOME} /dags. To create a Python file called db_migration.py by running the following commands:
xxxxxxxxxx
$ mkdir ${AIRFLOW_HOME}/dags && cd ${AIRFLOW_HOME}/dags
$ touch db_migration.py
$ vim db_migration.py
Add the following code to the db_migration.py file:
xxxxxxxxxx
from datetime import datetime, timedelta
from airflow import DAG
from airflow.operators.postgres_operator import PostgresOperator
from airflow.hooks.postgres_hook import PostgresHook
dag_params = {
'dag_id': 'postgres_yugabyte_migration',
'start_date':datetime(2020, 4, 20),
'schedule_interval': timedelta(seconds=60)
}
with DAG(**dag_params) as dag:
src = PostgresHook(postgres_conn_id='airflow_postgres')
dest = PostgresHook(postgres_conn_id='airflow_yugabyte')
src_conn = src.get_conn()
cursor = src_conn.cursor()
dest_conn = dest.get_conn()
dest_cursor = dest_conn.cursor()
dest_cursor.execute("SELECT MAX(product_id) FROM products;")
product_id = dest_cursor.fetchone()[0]
if product_id is None:
product_id = 0
cursor.execute("SELECT * FROM products WHERE product_id > %s", [product_id])
dest.insert_rows(table="products", rows=cursor)
dest_cursor.execute("SELECT MAX(order_id) FROM orders;")
order_id = dest_cursor.fetchone()[0]
if order_id is None:
order_id = 0
cursor.execute("SELECT * FROM orders WHERE order_id > %s", [order_id])
dest.insert_rows(table="orders", rows=cursor)
The DAG above finds the new product_id and order_id’s in PostgreSQL and then updates the same product and order tables in YugabyteDB with the rows greater than that maximum id. The job above is scheduled to run every minute starting on today’s date.
Step 7: Verifying and Scheduling the Task Using the Airflow Web UI
It might take a minute or two to populate, but the task should now be available under the DAGs tab.
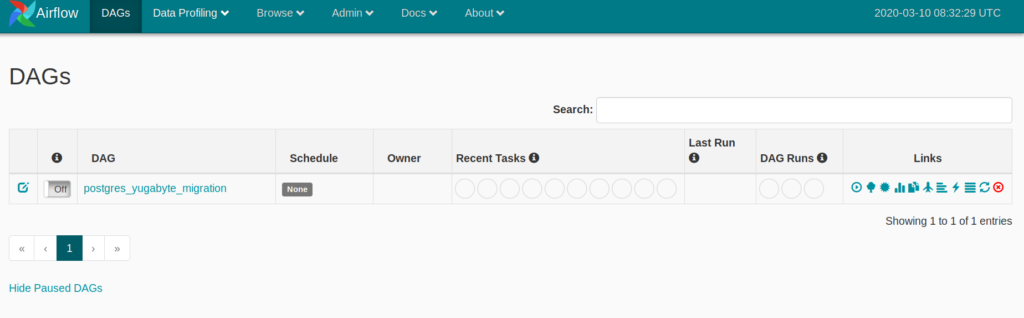
Manually execute the task by clicking on the execute button as show below:

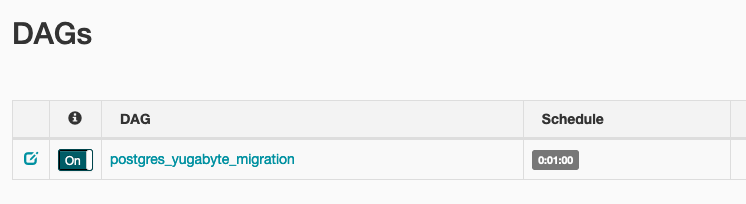
You can also verify that the task has been executed by looking at the log files located at ${AIRFLOW_HOME}/logs/scheduler/latest/db_migration.py.log
Finally, enable the one minute schedule of the postgres_yugabyte_migration task by toggling the On button as show below:
Step 8: Verifying Updates and Monitoring DAGs
Verify the number of rows in the product and order tables in both the PostgreSQL and YugabyteDB with a simple SELECT COUNT(*). You should see the following:
- Products: 77 rows
- Orders: 830 rows
Log into the PostgreSQL database and update the products and orders tables with two additional rows in each table.
xxxxxxxxxx
INSERT INTO
PUBLIC.products (product_id, product_name, supplier_id, category_id, quantity_per_unit, unit_price, units_in_stock, units_on_order, reorder_level, discontinued)
VALUES
(80, 'Salty Dog Chips', 2, 2, '6 - 12 oz bags', 22, 3, 50, 20, 0),
(81, 'Neals Dog Treats', 2, 2, '24 - 8 oz bags', 17, 4, 100, 20, 0);
xxxxxxxxxx
INSERT INTO
public.orders (order_id, customer_id, employee_id, order_date, required_date, shipped_date, ship_via, freight, ship_name, ship_address, ship_city, ship_region, ship_postal_code, ship_country)
VALUES
(12002, 'BLONP', 4, '1996-11-22', '1996-12-20', '1996-12-02', 3, 131.69999695, 'Blondel père et fils', '24, place Kléber', 'Strasbourg', NULL, '67000', 'France'),
(12003, 'LEHMS', 8, '1997-05-12', '1997-06-09', '1997-05-14', 2, 27.94000053, 'Lehmanns Marktstand', 'Magazinweg 7', 'Frankfurt a.M.', NULL, '60528', 'Germany') ;
After the next scheduled run of the task, you can query YugabyteDB and find both the products and orders tables and verify that they have been updated with the new records.
- Products: 79 rows
- Orders: 832 rows
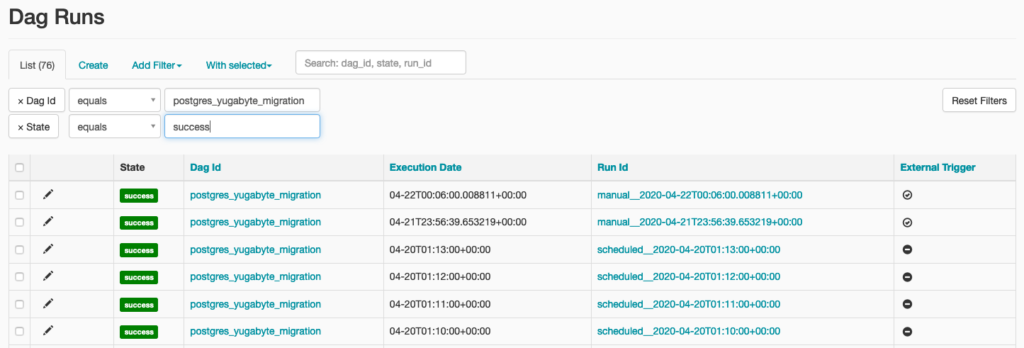
As the DAG continues to run, you can insert additional data on the PostgreSQL side, have Airflow move the data to YugabyteDB, and track the runs in the Airflow UI by going to Browse > Dag Runs.
What’s Next?
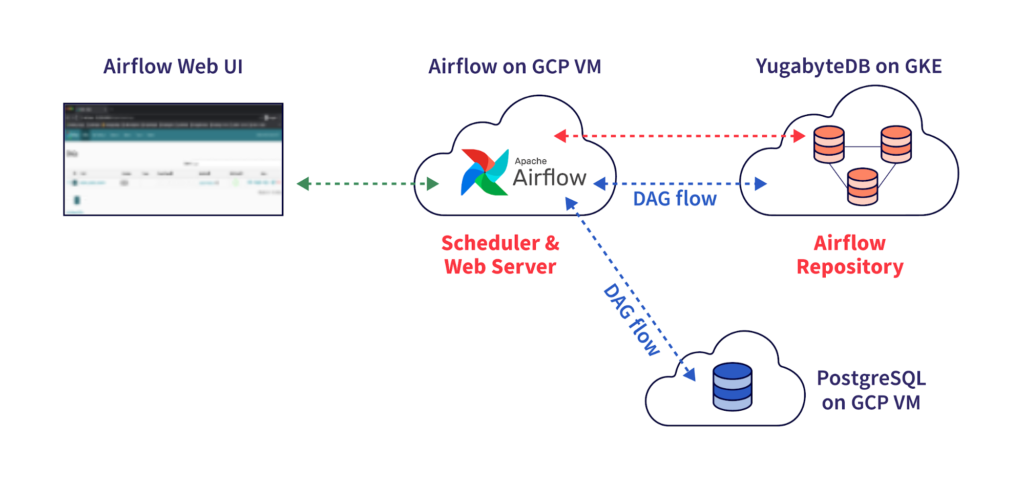
That’s it! If you have worked through the steps in part one and part two (this post) of this series, you now have the following deployed:
- Airflow running on a Google Compute Engine VM with a YugabyteDB backend running on Google Kubernetes Engine
- PostgreSQL running on a Google Compute Engine VM connected to Airflow
- A DAG that runs every minute that detects updates to PostgreSQL and migrates them to YugabyteDB
We are just getting started! Stay tuned for an upcoming blog post where we will dive deeper into creating more complex DAGs that integrate Airflow, YugabyteDB, and a variety of other cloud native technologies.
Published at DZone with permission of Jimmy Guerrero. See the original article here.
Opinions expressed by DZone contributors are their own.
Comments