

Nextcloud and Kubernetes in the Cloud With Kuma Service Mesh
Want a powerful, self-hosted personal cloud? Then look no further than Nextcloud running on Kubernetes with a service mesh to add all the help and features you need.
 CORE
·
CORE
·
Join the DZone community and get the full member experience.
Join For FreeI recently decided I wanted to start cutting third-party cloud services out of my life. I purchased a shiny Raspberry Pi 400 (which reminded me of the Amiga computers of my youth) and decided to try Nextcloud on it as a personal cloud. It was a far quicker process than I expected thanks to the awesome NextCloudPi project. Within twenty minutes, I had a running Nextcloud instance. However, I could only access it locally on my internal network, and accessing it externally is complicated if you don’t have a static IP address, or use dynamic DNS on a router that supports it.
There are of course myriad ways to solve these problems (and NextCloudPi offers convenient solutions to many of them), but I was also interested in how Kubernetes might handle some of the work for me. Of course, this can mean I am using cloud providers of a different kind, but I would have portability, and with a combination of an Ingress and Service Mesh, could move my hosting around as I wanted.
In this post (and an accompanying video), I walk through the steps I took to use Kong Ingress Controller and Kuma Service Mesh to accomplish at least some of what I was aiming for.
Prerequisites
To follow along, you need the following.
A running Kubernetes cluster, I used Google Kubernetes Engine (GKE) so I wouldn't spend most of my time setting up a cluster, but most options should work for you. If you do use GKE, make sure you don’t use the "autopilot" option. I initially did and hit issues later with the certification manager for creating SSL connections.
Another important change to make is that when you create the cluster, change the Nodes in the "Default pool" to use the COS (not COS_CONTAINERD) image type. There are some underlying issues when using Kuma with GKE, as noted in this GitHub issue, and this is the currently recommended workaround. Otherwise, you will hit pod initializing issues that affect certificate provisioning.
The GCloud CLI tool makes interacting with clusters much easier. I recommend you install it, and run gcloud init before continuing.
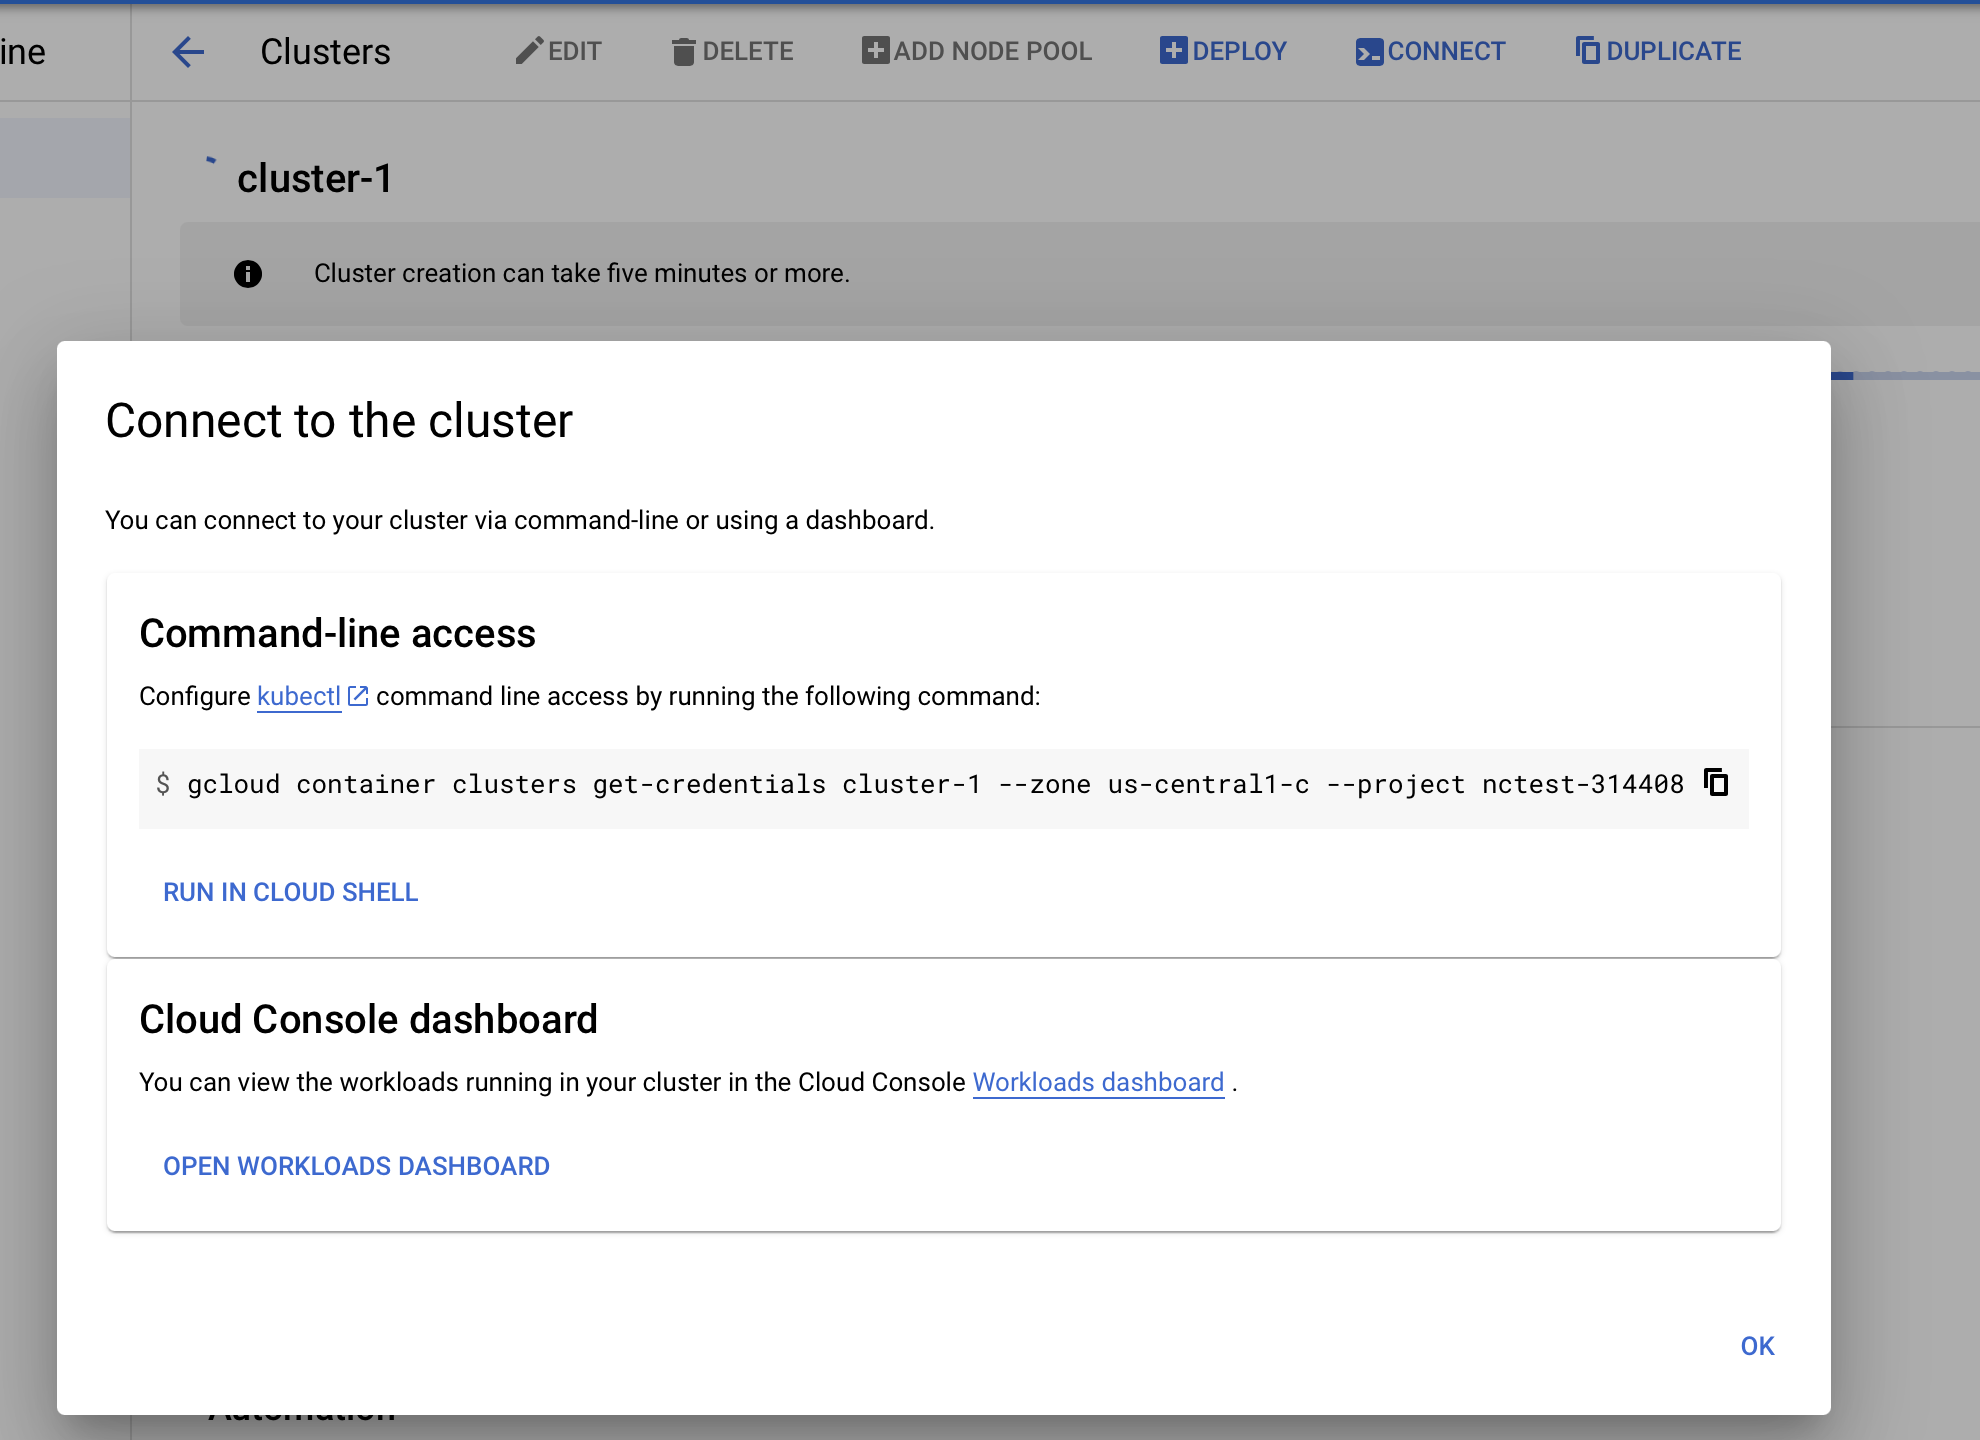
When the cluster is ready, make sure you are connected to it by clicking on the cluster, the connect icon, and then copy the command under "Command-line access", pasting, and running it in your terminal.
I used Helm to roll out the resources that Nextcloud needed because it seemed easiest to me. But again, there are other options available.
To install the Kubernetes certification manager for managing the cluster’s certificates needed to make it publicly accessible, I followed these installation instructions, and no changes were needed.
kubectl apply -f https://github.com/jetstack/cert-manager/releases/download/v1.4.0/cert-manager.yamlIf you use GKE, then note the installation step about elevating permissions.
kubectl create clusterrolebinding cluster-admin-binding \
    --clusterrole=cluster-admin \
    --user=$(gcloud config get-value core/account)
1. Install Kuma
A service mesh takes your cluster a step further and is useful for long-running or well-used clusters. The features between service meshes differ slightly, but most provide security, routing, and observability as a minimum. For this post, I used Kuma, but other options are available.
To add Kuma, follow steps one and two of the Kuma installation guide with Helm, which are the following:
helm repo add kuma https://kumahq.github.io/charts
kubectl create namespace kuma-system
helm install --namespace kuma-system kuma kuma/kuma
2. Install and Set Up Nextcloud
Create a Namespace for Nextcloud. This does mean that you need to namespace some of your commands throughout the rest of this walkthrough. You do this by adding the -n nextcloud argument. The namespace adds Kuma as a sidecar annotation, meaning that Kuma connects to any resources that are part of the namespace.
Save the following manifest as a file called namespace.yaml:
apiVersion: v1
kind: Namespace
metadata:
  name: nextcloud
  namespace: nextcloud
  annotations:
    kuma.io/sidecar-injection: enabled
Send it to the cluster:
kubectl apply -f namespace.yamlCreate a persistent volume claim. In my case, it uses a pre-defined GKE storage class.
Save the following as gke-pvc.yaml:
apiVersion: v1
kind: PersistentVolumeClaim
metadata:
  name: pvc-nc
  namespace: "nextcloud"
spec:
  accessModes:
    - ReadWriteOnce
  resources:
    requests:
      storage: 3Gi
Send it to the cluster:
kubectl apply -f gke-pvc.yamlAdd the Nextcloud Helm repository:
helm repo add nextcloud https://nextcloud.github.io/helm/Copy the default configuration values for Nextcloud to make it easier to make any future changes. You can also do this with command-line arguments, but I found using the configuration file tidier and easier to follow.
helm show values nextcloud/nextcloud >> nextcloud.values.yamlChange the values to match your setup and suit your preferences. For this example, I changed the following to match my domain and persistent volume claim. You can find a full list of the configuration in the GitHub repository for the chart.
...
nextcloud:
  host: nextcloud.chrischinchilla.com
...
mariadb:
  master:
    persistence:
      enabled: true
      existingClaim: "pvc-nc"
      accessMode: ReadWriteOnce
      size: "3Gi"
Install the Nextcloud chart with Helm:
helm install nextcloud nextcloud/nextcloud \
  --namespace nextcloud \
  --values nextcloud.values.yaml
The Nextcloud setup tells you what steps to take to access the service. Ignore those for now, as the next steps expose the cluster to the wide web.
3. Add Kong Ingress Controller
With kubectl or any Kubernetes dashboard, wait until all the needed containers are running and initialized.
You need to set up the ingress in a couple of phases, and the order is important to get a certificate for secure connections. I followed the Kong ingress instructions with a couple of changes to suit my use case.
- I installed cert-manager earlier (Read the section).
- I used my personal DNS host (Netlify) to create an
Arecord and match it to the external IP address. - As I used GKE, I updated cluster permissions following the steps here.
Install the Ingress controller with:
kubectl create -f https://bit.ly/k4k8sYou need to apply the Ingress manifest twice, with and without a certificate. This is because you cannot generate a certificate without a domain that responds.
The first time I applied the ingress to the cluster, I used the following manifest, saved as ingress.yaml. If you want to use the same, change the name and host values to match your domain:
apiVersion: networking.k8s.io/v1
kind: Ingress
metadata:
  name: nextcloud-chrischinchilla-com
  namespace: nextcloud
  annotations:
    kubernetes.io/ingress.class: kong
spec:
  rules:
  - host: nextcloud.chrischinchilla.com
    http:
      paths:
      - path: /
        pathType: Prefix
        backend:
          service:
            name: nextcloud
            port:
              number: 8080
Apply with:
kubectl apply -f ingress.yamlNext, you need the cluster’s external IP address, which you can find with kubectl get service -n kong kong-proxy or from your provider dashboard.
Create a DNS record with your domain registrar or local router. Once the DNS changes propagate (probably the slowest part of this whole blog), open the URL for the Nextcloud instance. The server only responds on a non-secure (HTTP) connection. If you switch to a secure connection (HTTPS), you see a warning. To fix this, you need to take some further steps.
First, request a TLS Certificate from Let’s Encrypt. I used the following ClusterIssuer definition, saved as issuer.yaml. I used the email address that matches my GKE account just to be sure.
apiVersion: cert-manager.io/v1
kind: ClusterIssuer
metadata:
  name: letsencrypt-prod
  namespace: cert-manager
spec:
  acme:
    email: {EMAIL_ADDRESS}
    privateKeySecretRef:
      name: letsencrypt-prod
    server: https://acme-v02.api.letsencrypt.org/directory
    solvers:
    - http01:
        ingress:
          class: kong
Apply with:
kubectl apply -f issuer.yamlUpdate ingress.yaml to include new annotations for the cert-manager and a tls section. Again, make sure to change the name, secretName, and host values to match your domain:
apiVersion: networking.k8s.io/v1
kind: Ingress
metadata:
  name: nextcloud-chrischinchilla-com
  namespace: nextcloud
  annotations:
    kubernetes.io/tls-acme: "true"
    cert-manager.io/cluster-issuer: letsencrypt-prod
    kubernetes.io/ingress.class: kong
spec:
  tls:
  - secretName: nextcloud-chrischinchilla-com
    hosts:
    - nextcloud.chrischinchilla.com
  rules:
  - host: nextcloud.chrischinchilla.com
    http:
      paths:
      - path: /
        pathType: Prefix
        backend:
          service:
            name: nextcloud
            port:
              number: 8080
Apply with:
kubectl apply -f ingress.yamlNow the secure connection and certificate work, and you can log in to use the Nextcloud instance. You can also confirm the certificate exists with the following command:
kubectl -n nextcloud get certificates4. Add Features to Service Mesh
The Ingress works as intended. While the service mesh also works, it’s not adding much, so I decided to leverage the built-in metrics monitoring. I followed the steps in the Kubernetes Quickstart, including updating and reapplying the mesh.
You need to install the kumactl tool to manage some Kuma features, read the Kuma CLI guide for more details.
Enable Kuma metrics on the cluster with:
kumactl install metrics | kubectl apply -f -This command provisions a new kuma-metrics namespace with all the services required to run the metric collection and visualization. This can take a while as Kubernetes downloads all the required resources.
Create a file called mesh.yaml that contains the following:
apiVersion: kuma.io/v1alpha1
kind: Mesh
metadata:
  name: default
spec:
  mtls:
    enabledBackend: ca-1
    backends:
    - name: ca-1
      type: builtin
  metrics:
    enabledBackend: prometheus-1
    backends:
    - name: prometheus-1
      type: prometheus
Apply the manifest:
kubectl apply -n kuma-system -f mesh.yamlIgnore the artificial metrics step, and instead enable Nextcloud metrics by updating the metrics section of nextcloud.values.yaml to enable metrics. Set the metrics exporter image to use, and add annotations to the pods. Some of these lines are already in the nextcloud.values.yaml file, and you need to uncomment them:
metrics:
  enabled: true

  replicaCount: 1
  https: false
  timeout: 5s

  image:
    repository: xperimental/nextcloud-exporter
    tag: v0.3.0
    pullPolicy: IfNotPresent

  service:
    type: ClusterIP
    annotations:
      prometheus.io/scrape: "true"
      prometheus.io/port: "9205"
    labels: {}
You then need to delete and reinstall Nextcloud with the new values. Do so using the following commands:
helm delete nextcloud nextcloud/nextcloud \
  --namespace nextcloud
helm install nextcloud nextcloud/nextcloud \
  --namespace nextcloud \
  --values nextcloud.values.yaml
Open the Grafana dashboard with:
kubectl port-forward svc/grafana -n kuma-metrics 3000:80And then start watching and analyzing metrics by opening port 3000 on the domain setup above.
Next(cloud) Steps
In this post, I looked at creating a Nextcloud instance with Kubernetes, enabling web access to the cluster with an ingress, and enabling some features specific to a service mesh. There’s a lot more mesh-relevant functionality that you could add to something like Nextcloud.
For example, you could create and enforce regional data sovereignty by hosting Kubernetes instances in different regional data centers. Or you could use the multi-zone feature to manage routing or the DNS feature to manage domain resolution instead of an external provider.
Finally, at the moment, the cluster uses account details for various services as defined in the nextcloud.values.yaml file. This is partially secure as you don’t need to check this file into version control. Instead, I could use the secrets feature to rotate access details at run time, enabling maximum security.
Opinions expressed by DZone contributors are their own.
Comments