Your Network, Your Rules: Take Charge With Own DNS
Set up your own DNS nameserver using the same open-source tools that power today's state-of-the-art public DNS nameservers.
Join the DZone community and get the full member experience.
Join For FreeMaintaining online privacy has become a top priority for individuals and organizations alike. With the ever-present risk of data breaches and internet surveillance, it's essential to have control over your network's online activity. One often overlooked yet crucial aspect of this control is the way you resolve domain names on your devices.
Currently, relying on public DNS providers can compromise your online privacy, as they may track user activity and device usage. This raises essential questions about privacy and anonymity in the digital realm from malicious actors such as spammers, phishing attackers, and social engineers. Fortunately, there is a more private and cost-effective alternative to traditional services: self-hosted DNS nameservers.
In this article, I'll explain how to set up your own DNS nameserver, exploring various configurations to safeguard your online presence with confidence.
What Is a DNS Nameserver?
A DNS nameserver is a directory that maps internet services to their corresponding IP addresses. Since every internet service is assigned to one or more unique IP addresses, which change over time, using domain names like google.com makes it easier to remember and access these services. A DNS nameserver's primary function is to translate domain names into IP addresses.
Why Do You Need Your Own DNS Nameserver?
There are numerous free DNS nameservers available worldwide, catering to various priorities, including consumer privacy. Some providers anonymize consumer data by not storing IP addresses on disk and not keeping them in memory for more than 24 hours. However, even with these measures, some data trends and volumes may be captured. Maintaining online privacy is crucial, but it shouldn't come at a significant financial cost.
The goal of this article is to set up a DNS nameserver that resolves DNS queries for devices connected to your network. This setup allows you to resolve private zones, use free DNS nameservers for public zones occasionally, and respond from the cache when needed. By doing so, we achieve several benefits:
- We reduce the risk of exposing all devices in our network to the internet.
- We assign zone records or domains that are internal to our network.
- We minimize the number of DNS queries sent to the internet.
While this DNS nameserver setup does not provide full privacy, it offers some level of protection stated above.
DNS Nameserver Primer
Understanding different types of nameservers and their functions is crucial. It's essential to have a good grasp of how they operate. You may already be familiar with Root nameservers, which are the foundation of the DNS hierarchy, managed by organizations such as VeriSign, NASA, and ICANN, which direct queries to appropriate top-level domain (TLD) nameservers, like .com, .org, or .dev. The other types of Nameservers are as follows.
- Authoritative nameserver – stores and serves DNS records for one or more domains it owns. It serves as the authority for the DNS records it manages.
- Recursive nameserver – resolves DNS queries on behalf of a client by traversing the DNS hierarchy. For example, www.google.com is resolved by first checking the .com nameservers, followed by 'com.google,' and finally to its authoritative server.
- Caching nameserver – as its name suggests, caches previously resolved DNS queries to improve performance. It resolves new queries from the cache instead of requerying the internet.
- Forwarding nameserver – forwards DNS queries to another server for resolution. Typically, it acts as an intermediary between clients and other nameservers to distribute DNS traffic evenly.
What Does It Take to Set Up Your Nameserver?
Setting up a DNS nameserver is relatively straightforward, involving the use of a single software tool for basic needs and becoming more complex when addressing advanced use cases and scaling requirements. Fortunately, the industry's best DNS tools are open-source, which allows us to leverage them in this setup. Among these tools, Berkeley Internet Name Domain (BIND) is the most widely used and will be our primary tool for a simple setup. BIND can function as both an authoritative and recursive nameserver, as well as a caching nameserver when serving from the cache (generated from resolving recursive queries).
That being said, this article aims to go beyond the simple setup, introducing additional DNS tools and providing insight into how they work together. Exploring BIND in combination with other tools enables you to explore more complex setups that interest you. Alongside BIND, this setup will also utilize Unbound (a lightweight recursive nameserver) and dnsdist (a front-end load balancer for forwarding DNS queries).
Here is the DNS nameserver setup that we are going to use. Let's approach this setup from two perspectives: configuration and execution flow. The former illustrates how the components are wired together, and their characteristics controlled via configuration files; the latter details the flow of execution under two important scenarios.
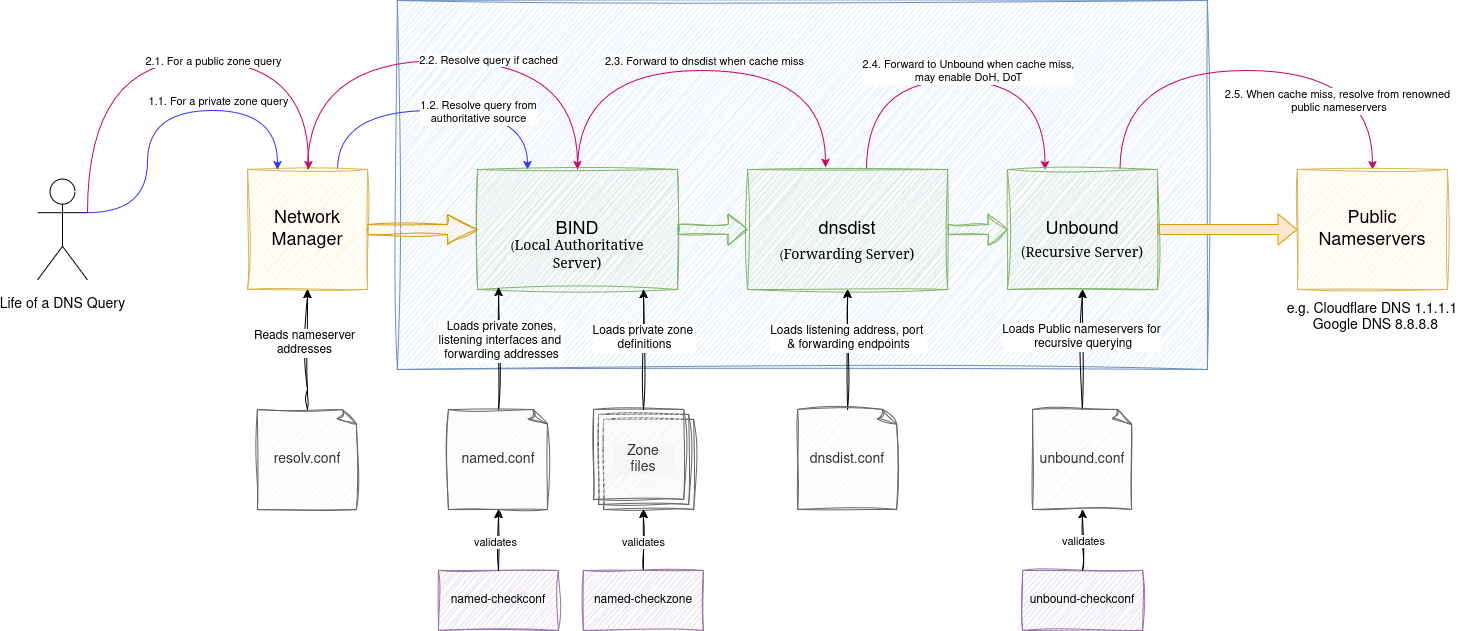
Configuration Flow
All the components at play here — network manager, BIND, dnsdist, and Unbound can bootstrap independently in no particular order and remain operational as long as their configurations are found to be valid. They are also configured as daemons or long-running processes that have the ability to fail, retry, and recover when dependencies are met. Without further ado, let's understand the components at a high level in this section, which sets the stage for later topics.
BIND
BIND, a nameserver that can host private or local zones, understands the zones it supports as well as control information such as interface, port number, and access control policies to determine whether to allow traffic or the type of protocol to allow — all of which are inferred from a configuration file named named.conf. For each zone mentioned in the configuration file, the detailed definitions include SOA (also known as Start of Authority), nameserver, and additional metadata records, including TTL value to refresh the cache.
Without a valid zone file backing a zone entry in the configuration file, it will not start. This also applies to the lack of permissions to either the configuration or zone files. It is highly recommended to validate the configuration using named-checkconf and named-checkzone for zone files. In this setup, BIND delegates non-authoritative zone resolution to dnsdist.
dnsdist
dnsdist acts as a load balancer for resolving non-authoritative (a.k.a. recursive) DNS query resolution across one or more Unbound servers. dnsdist adds some DNS-specific capabilities, such as DNS over HTTP, DNS over TLS, or caching responses. The configuration file dnsdist.conf defines the listener, port, downstream servers to handle traffic, etc. dnsdist also provides a console execution mode to query and validate the configuration in real time.
Unbound
Unbound, a recursive nameserver, resolves public zones using the public nameservers configured in unbound.conf. The configuration can be validated using the unbound-checkconf utility. It is worth mentioning that Unbound is widely used for blocking ads and other trackers that monitor our internet usage.
Execution Flow
The two important flows that are essential to the scope of this article are private and public DNS query resolution.
1. Life of a Private DNS Query
- Any DNS query from the browser or other utilities is routed to a Network manager. The network manager forwards the query to BIND for private DNS resolution.
- If the DNS zone is found, BIND responds with the requested DNS zone record and defaults to A record type.
- If the requested zone is found but not the requested zone record type in BIND, it returns NOERROR but no answer.
- If the requested zone is not found, BIND would not be able to distinguish an invalid private zone from a public; therefore, it forwards to dnsdist and unbound subsequently.
- If the requested zone is publicly available, Unbound returns NOERROR; otherwise, NXDOMAIN (meaning an error).
2. Life of a Public DNS Query
- Any DNS query from the browser or other utilities is routed to a Network manager.
- The network manager forwards the query to BIND for private DNS resolution.
- If the DNS zone is found in the BIND cache, it responds with the requested DNS zone record with NOERROR status.
- If not, BIND redirects the request to dnsdist.
- If the DNS zone is found in the dnsdist cache, it returns the DNS zone record with NOERROR status.
- If not, it forwards the query to Unbound.
- If the requested zone is publicly available, Unbound returns NOERROR; otherwise, NXDOMAIN.
It is worth mentioning that all DNS query activity is logged at the component level, providing complete visibility into DNS activity in your network. This allows you to configure and control DNS query traffic, such as blocking queries from specific domains and IP addresses.
How to Set Up?
We will go through the setup instructions for each component, starting from Unbound and working our way back, tracing all the necessary steps from setting up Network Manager service to utilizing our local nameserver, which in turn helps you understand how each component adds value and functionality while complementing the entire setup.
Unbound
Unbound is a lightweight, recursive, caching DNS resolver designed for resolving DNS queries against public DNS nameservers. It is relatively easy to set up for basic needs, and offers over 1000 configuration options for more advanced setups. Unbound supports Domain Name System Security Extensions (DNSSEC), which verifies the integrity of DNS query responses when enabled, thereby ensuring that DNS query responses are not tampered with or altered during transit. As a result, it also functions as a validating nameserver.
However, given our scope is broader, we won't delve into details about DNSSEC in this article. Unbound is sufficient for enhancing your DNS privacy by allowing you to send queries to public nameservers and serve from cache for subsequent requests until TTL expires. This setup helps prevent the tracking of your DNS activity, giving you greater control over your online privacy.
Step 1: Install Unbound
sudo apt install -y unbound
Step 2: Configure Unbound
Edit the configuration file at /etc/unbound/unbound.conf.
server:# Basic settingsverbosity: 1interface: 127.0.0.1port: 5353do-ip4: yesdo-ip6: nodo-udp: yesdo-tcp: yes# Cache settingsmsg-cache-size: 50mrrset-cache-size: 100mcache-max-ttl: 86400cache-min-ttl: 3600# Access controlaccess-control: 127.0.0.1/8 allow# Forward unresolved queries to public DNS nameserversforward-zone: name: "." forward-addr: 1.1.1.1 # Cloudflare's public primary nameserver forward-addr: 1.0.0.1 # Cloudflare's public secondary nameserver
Step 3: Validate Unbound Configuration
The following should return nothing with exit code 0.
sudo unbound-checkconf
Step 4: Start Unbound Service
sudo systemctl start unboundsudo systemctl enable unbound
Step 5: Resolve Recursive DNS Query
dig linkedin.com @127.0.0.1 -p 5353Expect a similar output:
; <<>> DiG 9.20.4 <<>> linkedin.com @127.0.0.1 -p 5353;; global options: +cmd;; Got answer:;; ->>HEADER<<- opcode: QUERY, status: NOERROR, id: 24446;; flags: qr rd ra; QUERY: 1, ANSWER: 1, AUTHORITY: 0, ADDITIONAL: 1;; OPT PSEUDOSECTION:; EDNS: version: 0, flags:; udp: 1232;; QUESTION SECTION:;linkedin.com. IN A;; ANSWER SECTION:linkedin.com. 300 IN A 13.107.42.14;; Query time: 36 msec;; SERVER: 127.0.0.1#5353(127.0.0.1) (UDP);; WHEN: Thu Jan 02 23:37:20 CST 2025;; MSG SIZE rcvd: 57
dnsdist
dnsdist is a DNS-aware load balancer that routes traffic to one or more authoritative or recursive nameserver backends. Its primary goal is to deliver the best performance to legitimate users while blocking or redirecting abusive traffic. As a load balancer, dnsdist does not handle DNS resolving or serving itself; instead, it forwards queries to downstream servers. To ensure that downstream servers are available, dnsdist runs health checks every second. You can customize these checks to define what constitutes a valid response (e.g., ignoring NXDomain, ServFail, or Refused) and set limits on the number of failures tolerated within a specific interval. By default, any response other than ServFail is considered valid, and the failure tolerance is set to one. However, you can adjust these settings as needed.
The distribution of queries is controlled by load-balancing rules, which offer options such as leastOutstanding, firstAvailable, and wrandom. Alternatively, you can create custom policies using the Lua service policy object. These rules enable flexible and dynamic traffic management. dnsdist also enables grouping backend servers into pools and steering traffic based on protocols (such as TLS, HTTP, or UDP) as well as source IPs or network interfaces. For security, dnsdist supports DNS over TLS (DoT) and DNS over HTTPS (DoH), providing secure connections to backend servers.
Step 1: Install dnsdist
apt-get install -y dnsdist
Step 2: Configure dnsdist
Edit the configuration file at /etc/dnsdist.conf. If the config. file doesn't exist but etc/dnsdist.conf-dist, make the config. file out of it.
addLocal("127.0.0.1:5200")-- define downstream servers, aka backendsnewServer({address="127.0.0.1:5353", pool="unbound1"}) -- Unbound on port 5353-- Use Unbound for recursive queriesaddAction(AllRule(), PoolAction("unbound1"))-- Configure cache settings for unbound poolpc = newPacketCache(100000)getPool("unbound1"):setCache(pc)
Step 3: Start dnsdist Service
sudo systemctl start dnsdistsudo systemctl enable dnsdist
Step 4: Validate Forwarding Nameserver Query
dig @127.0.0.1 -p 5200 microsoft.com; <<>> DiG 9.20.4 <<>> @127.0.0.1 -p 5200 microsoft.com; (1 server found);; global options: +cmd;; Got answer:;; ->>HEADER<<- opcode: QUERY, status: NOERROR, id: 35145;; flags: qr rd ra; QUERY: 1, ANSWER: 5, AUTHORITY: 0, ADDITIONAL: 1;; OPT PSEUDOSECTION:; EDNS: version: 0, flags:; udp: 1232;; QUESTION SECTION:;microsoft.com. IN A;; ANSWER SECTION:microsoft.com. 686 IN A 20.236.44.162microsoft.com. 686 IN A 20.231.239.246microsoft.com. 686 IN A 20.70.246.20microsoft.com. 686 IN A 20.112.250.133microsoft.com. 686 IN A 20.76.201.171;; Query time: 23 msec;; SERVER: 127.0.0.1#5200(127.0.0.1) (UDP);; WHEN: Thu Jan 02 23:49:32 CST 2025;; MSG SIZE rcvd: 122
BIND
BIND, or Berkeley Internet Name Domain, is a fully functional, standalone DNS nameserver that acts as an authority source for DNS zones it owns and recursively processes user queries using configured revolvers for others. The authoritative nameserver can serve zones that are either primary or secondary. Primary zones are configured in a file system and served by the nameserver when requested. In contrast, secondary zones are obtained from nameservers that own primary zones via zone transfer protocols such as AXFR (or Complete Zone Transfers) or IXFR (or Incremental Zone Transfers).
Each zone file contains a Start of Authority (SOA) record with a refresh rate and serial number. The secondary nameserver periodically reads the SOA record according to the refresh rate, identifies zone state changes by comparing the incremented serial number with the value obtained from previous readings, and updates its zone data accordingly. This process differs from polling, where the primary nameserver can also be configured to notify secondary nameservers when load or reload zones are applied.
BIND supports various advanced features such as Split-DNS, which sets up different views for internal and external DNS resolution, allowing internal users to use private DNS names while external users use the public version of the DNS name exposed on the internet. It also supports DNSSEC capability, which adds digital signatures to DNS records in authoritative nameservers. The revolvers then verify the integrity of zone records resolved and protect them from cache poisoning attacks, making BIND an essential tool for networking professionals and aspirants to explore and develop mastery in the field of DNS management.
BIND is a powerful tool for networking professionals and aspiring experts alike. It's a great way to learn and master DNS management. As a colleague jokingly puts it: "No one gets fired" for using BIND, making it a must-know for anyone serious about networking.
Step 1: Install BIND
sudo apt install -y bind9Step 2: Configure BIND
Edit the configuration file at /etc/named.conf. The BIND configuration file follows Lua syntax.
options {directory "/var/named";pid-file "/run/named/named.pid";recursion yes;allow-recursion { any; }; // Allow queries for all networksallow-transfer { none; };allow-update { none; };forwarders {127.0.0.1 port 5200; // Forward to dnsdist}}// Optional: Setup mywebsite.dev zone (Authoritative)zone "mywebsite.dev" IN {type master;file "/var/named/mywebsite.dev.zone";allow-update { none; };};// Optional: Setup Reverse zone filezone "1.168.192.in-addr.arpa" {type master;file "/var/named/1.168.192.in-addr.arpa.zone"};// Optional: Setup logginglogging {channel default_log {file "/var/log/named.log" versions 3 size 250k;severity info;};// Write DNS query output to a log filechannel queries_log {file "/var/log/queries.log" versions 3 size 250k;severity info;};category default { default_log; };category queries { queries_log; };};Make sure the log files are created with the necessary permissions and ownership:
sudo touch /var/log/named.log /var/log/queries.logsudo chmod 640 /var/log/named.log /var/log/queries.logsudo chown named:named /var/log/named.log /var/log/queries.log
Step 3: Configure Zone Files (Optional)
Create a Forward zone file at /var/named/mywebsite.dev.zone.
$TTL 86400@ IN SOA ns1.mywebsite.dev. admin.mywebsite.dev. (2024123101 ; Serial3600 ; Refresh1800 ; Retry1209600 ; Expire86400 ) ; Minimum TTLIN NS ns1.mywebsite.dev.IN NS ns2.mywebsite.dev.ns1 IN A 192.168.1.3ns2 IN A 192.168.1.4@ IN A 192.168.1.1www IN A 192.168.1.2
Create a Reverse zone file at /var/named/1.168.192.in-addr.arpa.zone.
TTL 86400@ IN SOA ns1.mywebsite.dev. admin.mywebsite.dev. (2024123101 ; Serial3600 ; Refresh1800 ; Retry1209600 ; Expire86400 ) ; Minimum TTLIN NS ns1.mywebsite.dev.IN NS ns2.mywebsite.dev.2 IN PTR www.mywebsite.dev.Let's not forget to set permissions.
sudo chmod 640 /var/named/mywebsite.dev.zone /var/named/1.168.192.in-addr.arpa.zonesudo chown named:named /var/named/mywebsite.dev.zone /var/named/1.168.192.in-addr.arpa.zone
Step 4: Validate the BIND Configuration
If successful, this command should return no output:
sudo named-checkconfStep 5: Validate Zones
Run the following commands to verify the correctness of zone files.
For Forward zone:
sudo named-checkzone mywebsite.dev /var/named/mywebsite.dev.zoneIt should return this output:
zone mywebsite.dev/IN: loaded serial 2024123101OKFor Reverse zone:
sudo named-checkzone 1.168.192.in-addr.arpa /var/named/1.168.192.in-addr.arpa.zoneIt should return this output:
zone 1.168.192.in-addr.arpa/IN: loaded serial 2024123101OKAuthoritative DNS Query Validation
dig @127.0.0.1 mywebsite.dev; <<>> DiG 9.20.4 <<>> @127.0.0.1 mywebsite.dev; (1 server found);; global options: +cmd;; Got answer:;; ->>HEADER<<- opcode: QUERY, status: NXDOMAIN, id: 53301;; flags: qr rd ra ad; QUERY: 1, ANSWER: 0, AUTHORITY: 1, ADDITIONAL: 1;; OPT PSEUDOSECTION:; EDNS: version: 0, flags:; udp: 1232; COOKIE: d55ad73c78264d04010000006784b3a3b0f4fb5896157833 (good);; QUESTION SECTION:;mywebsite.dev. IN A;; AUTHORITY SECTION:dev. 300 IN SOA ns-tld1.charlestonroadregistry.com. cloud-dns-hostmaster.google.com. 1 21600 3600 259200 300;; Query time: 46 msec;; SERVER: 127.0.0.1#53(127.0.0.1) (UDP);; WHEN: Mon Jan 13 00:33:07 CST 2025;; MSG SIZE rcvd: 168Networking is a crucial technology implementation that connects and facilitates communication between all distributed systems across the world. DNS represents the foundation upon which it begins; ensuring its security is vital to maintaining reliable DNS resolution, enabling others to build businesses, organizations, and governments. Throughout history, DNS has played a critical role, enduring today and poised for the future; there will never be a dull moment as new challenges and disruptions continue to emerge and fill the void.
There is always a right time for networking professionals and aspirants to explore and develop mastery in the field of DNS management. Fortunately, we have many great tools available for our use, with some discussed at good length in this article already. If there's one DNS tool to start with today, choose BIND — it's a powerful, open-source DNS tool that is feature-rich, backed by a strong community, and proven successful.
As a colleague jokingly puts it: "No one gets fired" for using BIND, making it an essential skill for anyone serious about DNS networking.
Opinions expressed by DZone contributors are their own.
Comments