PySimpleGUI: How to Draw Shapes on an Image With a GUI
Let's add some flair to that image.
Join the DZone community and get the full member experience.
Join For FreeDrawing shapes on images is neat. But wouldn’t it be nice if you could draw the shapes interactively? That is the point of this tutorial. You will create a user interface using PySimpleGUI to allow you to draw shapes on images!
The purpose of this user interface is to show you how you can make a GUI that wraps some of the shapes that Pillow supports. The GUI won’t support all of them though. In fact, this GUI only supports the following:
- ellipse
- rectangle
The reason for this is that these two shapes take the same arguments. You can take on the challenge yourself to add the other shapes to the GUI!
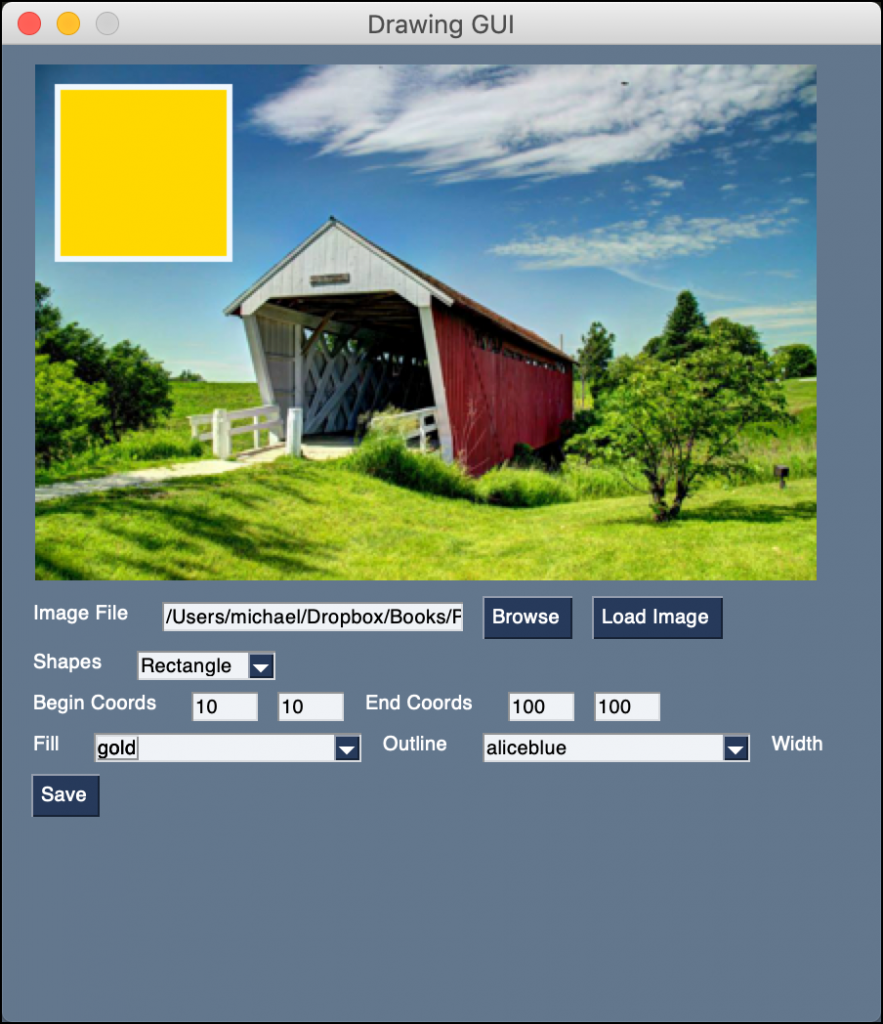
When your GUI is finished, it will look like this:
Getting Started
You will need PySimpleGUI and Pillow to be able to follow along with this tutorial. Here’s how to install them with pip:
python3 -m pip install PySimpleGUI pillow
Now you’re ready to create your GUI!
Creating the GUI
Now open up your Python editor and create a new file named drawing_gui.py. Then add this code to your new file:
# drawing_gui.py
import io
import os
import PySimpleGUI as sg
import shutil
import tempfile
from PIL import Image, ImageColor, ImageDraw
file_types = [("JPEG (*.jpg)", "*.jpg"), ("All files (*.*)", "*.*")]
tmp_file = tempfile.NamedTemporaryFile(suffix=".jpg").name
def get_value(key, values):
value = values[key]
if value.isdigit():
return int(value)
return 0
def apply_drawing(values, window):
image_file = values["-FILENAME-"]
shape = values["-SHAPES-"]
begin_x = get_value("-BEGIN_X-", values)
begin_y = get_value("-BEGIN_Y-", values)
end_x = get_value("-END_X-", values)
end_y = get_value("-END_Y-", values)
width = get_value("-WIDTH-", values)
fill_color = values["-FILL_COLOR-"]
outline_color = values["-OUTLINE_COLOR-"]
if os.path.exists(image_file):
shutil.copy(image_file, tmp_file)
image = Image.open(tmp_file)
image.thumbnail((400, 400))
draw = ImageDraw.Draw(image)
if shape == "Ellipse":
draw.ellipse(
(begin_x, begin_y, end_x, end_y),
fill=fill_color,
width=width,
outline=outline_color,
)
elif shape == "Rectangle":
draw.rectangle(
(begin_x, begin_y, end_x, end_y),
fill=fill_color,
width=width,
outline=outline_color,
)
image.save(tmp_file)
bio = io.BytesIO()
image.save(bio, format="PNG")
window["-IMAGE-"].update(data=bio.getvalue())
def create_coords_elements(label, begin_x, begin_y, key1, key2):
return [
sg.Text(label),
sg.Input(begin_x, size=(5, 1), key=key1, enable_events=True),
sg.Input(begin_y, size=(5, 1), key=key2, enable_events=True),
]
def save_image(values):
save_filename = sg.popup_get_file(
"File", file_types=file_types, save_as=True, no_window=True
)
if save_filename == values["-FILENAME-"]:
sg.popup_error(
"You are not allowed to overwrite the original image!")
else:
if save_filename:
shutil.copy(tmp_file, save_filename)
sg.popup(f"Saved: {save_filename}")
def main():
colors = list(ImageColor.colormap.keys())
layout = [
[sg.Image(key="-IMAGE-")],
[
sg.Text("Image File"),
sg.Input(
size=(25, 1), key="-FILENAME-"
),
sg.FileBrowse(file_types=file_types),
sg.Button("Load Image"),
],
[
sg.Text("Shapes"),
sg.Combo(
["Ellipse", "Rectangle"],
default_value="Ellipse",
key="-SHAPES-",
enable_events=True,
readonly=True,
),
],
[
*create_coords_elements(
"Begin Coords", "10", "10", "-BEGIN_X-", "-BEGIN_Y-"
),
*create_coords_elements(
"End Coords", "100", "100", "-END_X-", "-END_Y-"
),
],
[
sg.Text("Fill"),
sg.Combo(
colors,
default_value=colors[0],
key="-FILL_COLOR-",
enable_events=True,
readonly=True
),
sg.Text("Outline"),
sg.Combo(
colors,
default_value=colors[0],
key="-OUTLINE_COLOR-",
enable_events=True,
readonly=True
),
sg.Text("Width"),
sg.Input("3", size=(5, 1), key="-WIDTH-", enable_events=True),
],
[sg.Button("Save")],
]
window = sg.Window("Drawing GUI", layout, size=(450, 500))
events = [
"Load Image",
"-BEGIN_X-",
"-BEGIN_Y-",
"-END_X-",
"-END_Y-",
"-FILL_COLOR-",
"-OUTLINE_COLOR-",
"-WIDTH-",
"-SHAPES-",
]
while True:
event, values = window.read()
if event == "Exit" or event == sg.WIN_CLOSED:
break
if event in events:
apply_drawing(values, window)
if event == "Save" and values["-FILENAME-"]:
save_image(values)
window.close()
if __name__ == "__main__":
main()
That’s a bunch of code! To make things easier, you will go over this code in smaller chunks.
The first chunk is the code at the top of the file:
xxxxxxxxxx
# drawing_gui.py
import io
import os
import PySimpleGUI as sg
import shutil
import tempfile
from PIL import Image, ImageColor, ImageDraw
file_types = [("JPEG (*.jpg)", "*.jpg"), ("All files (*.*)", "*.*")]
tmp_file = tempfile.NamedTemporaryFile(suffix=".jpg").name
These lines of code define the imports of the packages and modules that you need. It also sets up two variables:
file_types– Which you will use for browsing and saving your imagestmp_file– A temporary file that is created to save your intermediate image file
Now you can take a look at your first function:
xxxxxxxxxx
def get_value(key, values):
value = values[key]
if value.is_digit():
return int(value)
return 0
This function is used to convert strings to integers. If you enter an alphabetical character or a special character, it will cause this code to throw an error. Feel free to catch those kinds of things here or implement a filter to prevent users from entering anything other than integers.
If the user empties the Element of its contents, you force it to return a zero. This allows the user interface to continue to function. Another improvement that you could add here is to take the image bounds into account. You could make it so that the user cannot enter negative numbers or numbers that are larger than the image.
The next function is a meaty one:
xxxxxxxxxx
def apply_drawing(values, window):
image_file = values["-FILENAME-"]
shape = values["-SHAPES-"]
begin_x = get_value("-BEGIN_X-", values)
begin_y = get_value("-BEGIN_Y-", values)
end_x = get_value("-END_X-", values)
end_y = get_value("-END_Y-", values)
width = get_value("-WIDTH-", values)
fill_color = values["-FILL_COLOR-"]
outline_color = values["-OUTLINE_COLOR-"]
if image_file and os.path.exists(image_file):
shutil.copy(image_file, tmp_file)
image = Image.open(tmp_file)
image.thumbnail((400, 400))
draw = ImageDraw.Draw(image)
if shape == "Ellipse":
draw.ellipse(
(begin_x, begin_y, end_x, end_y),
fill=fill_color,
width=width,
outline=outline_color,
)
elif shape == "Rectangle":
draw.rectangle(
(begin_x, begin_y, end_x, end_y),
fill=fill_color,
width=width,
outline=outline_color,
)
image.save(tmp_file)
bio = io.BytesIO()
image.save(bio, format="PNG")
window["-IMAGE-"].update(data=bio.getvalue())
This code is used for creating the two shapes you want to draw on your image. It gets all the various settings that you need to create an ellipse or a rectangle. The settings that you can change are:
- The image filename
- The shape combobox
- The beginning coordinates (
-BEGIN_X-,-BEGIN_Y-) - The ending coordinates (
-END_X-,-END_Y-) - The width of the outline
- The fill color to be used (uses color names)
- The outline color (uses color names)
If the user has opened up an image, then your code will automatically draw a shape using the default settings. When you edit any of those settings, this function will get called and the image will update.
Note: The drawing is applied to a thumbnail version of the image rather than a copy of the image. This is done to keep the image visible in your GUI. Many photos have a higher resolution than can be shown on a typical monitor.
The next function to look at is called create_coords_elements():
x
def create_coords_elements(label, begin_x, begin_y, key1, key2):
return [
sg.Text(label),
sg.Input(begin_x, size=(5, 1), key=key1, enable_events=True),
sg.Input(begin_y, size=(5, 1), key=key2, enable_events=True),
]
This function returns a Python list that contains three Elements in it. One label (sg.Text) and two text boxes (sg.Input). Because these elements are in a single list, they will be added as a horizontal row to your user interface.
Now you’re ready to go on to the save_image() function:
x
def save_image(values):
save_filename = sg.popup_get_file(
"File", file_types=file_types, save_as=True, no_window=True
)
if save_filename == values["-FILENAME-"]:
sg.popup_error(
"You are not allowed to overwrite the original image!")
else:
if save_filename:
shutil.copy(tmp_file, save_filename)
sg.popup(f"Saved: {save_filename}")
This function asks the user where to save your file. It will also prevent the user from trying to overwrite the original image.
The last function is your main() one:
x
def main():
colors = list(ImageColor.colormap.keys())
layout = [
[sg.Image(key="-IMAGE-")],
[
sg.Text("Image File"),
sg.Input(
size=(25, 1), key="-FILENAME-"
),
sg.FileBrowse(file_types=file_types),
sg.Button("Load Image"),
],
[
sg.Text("Shapes"),
sg.Combo(
["Ellipse", "Rectangle"],
default_value="Ellipse",
key="-SHAPES-",
enable_events=True,
readonly=True,
),
],
[
*create_coords_elements(
"Begin Coords", "10", "10", "-BEGIN_X-", "-BEGIN_Y-"
),
*create_coords_elements(
"End Coords", "100", "100", "-END_X-", "-END_Y-"
),
],
[
sg.Text("Fill"),
sg.Combo(
colors,
default_value=colors[0],
key="-FILL_COLOR-",
enable_events=True,
readonly=True
),
sg.Text("Outline"),
sg.Combo(
colors,
default_value=colors[0],
key="-OUTLINE_COLOR-",
enable_events=True,
readonly=True
),
sg.Text("Width"),
sg.Input("3", size=(5, 1), key="-WIDTH-", enable_events=True),
],
[sg.Button("Save")],
]
window = sg.Window("Drawing GUI", layout, size=(450, 500))
This is one of the most complex user interfaces you have written. It adds lots of Elements in rows. You can also see that you are using a special syntax to extract items from a list:
*create_coords_elements()
When you call create_coords_elements(), it returns a list. But you want both the beginning and ending coordinates on the same line. So you extract the elements from the list.
This little code example illustrates what is happening:
x
>>> def get_elements():
... return ["element_one", "element_two"]
...
>>> [*get_elements()]
['element_one', 'element_two']
If you don’t use the asterisk, you will end up with a nested list instead of a list that has three elements in it.
Here are the last few lines of code from the main() function:
x
events = [
"Load Image",
"-BEGIN_X-",
"-BEGIN_Y-",
"-END_X-",
"-END_Y-",
"-FILL_COLOR-",
"-OUTLINE_COLOR-",
"-WIDTH-",
"-SHAPES-",
]
while True:
event, values = window.read()
if event == "Exit" or event == sg.WIN_CLOSED:
break
if event in events:
apply_drawing(values, window)
if event == "Save" and values["-FILENAME-"]:
save_image(values)
window.close()
if __name__ == "__main__":
main()
The first line defines the events that you use to know when to update the drawing. The last conditional will save the image where the user chooses. Give your new GUI a try. Then you can start planning how you will improve it!
Wrapping Up
Now you have a handy tool for testing out a couple of Pillow’s drawing functions. You can make this GUI even better by adding some of Pillow’s other shapes to the mix. You could do that by adding a tabbed interface with the different options under different tabs, for example.
Give it a try and see what you can come up with!
Published at DZone with permission of Mike Driscoll. See the original article here.
Opinions expressed by DZone contributors are their own.
Comments