Realm by Example: CRUD on Android in 200 Lines of (Very Readable) Java
Introduction to Realm, a mobile database with an OO-optimized persistence engine.
Join the DZone community and get the full member experience.
Join For FreeNowadays working with databases is an integral part of programming. Android allows you to apply the database SQLite for storing information on devices. Standard ways of using it are uncomfortable. Working with SQLite sometimes makes code difficult to understand, and the writing of some SQL queries can take too much time. Using ORM partially solves some problems, but today we have an alternative way, known as Realm.
Realm is a mobile database and a good substitute for SQLite (Android) & CoreData (iOS).
Prerequisites:
- Realm is supported in Android only, not available for Java at the moment.
- Android Studio version 0.8.6
- JDK version 7
- Android API Level minimum 9 (Android 2.3 Gingerbread)
Installation
Add compile 'io.realm:realm-android:0.83.0+' in your build.gradle and sync a project. Or, you can download a realm-VERSION.jar and add it into app/libs.
Models
If you want a class to be stored in Realm, it should extend from RealmObject. Realm supports the following field types: boolean, byte, short, ìnt, long, float, double, String, Date. Moreover, subclasses of RealmObject and RealmList<? extends RealmObject> support model relationships.
The boxed types Boolean, Byte, Short, Integer, Long, Float, and Double can also be used in model classes. With their help, you can set the value of a field to null.
Annotations
@Required - tells Realm to enforce checks that disallow null values.
@Ignore - supposes that a field should not be persisted to disk.
@Index - will add a search index to the field. Due to this queries will be faster, although inserts will become slower and the data file will get larger.
@PrimaryKey - supposes that the field is indexed.
Start Using Realm
Initialize Realm in Application:
public class MyApplication extends Application {
  @Override
  public void onCreate() {
    super.onCreate();
    RealmConfiguration config = new RealmConfiguration.Builder(context).build();
    Realm.setDefaultConfiguration(config);
  }
}
Initialize Realm in Activity:
public class MyActivity extends Activity {
  @Override
  protected void onCreate(Bundle savedInstanceState) {
    super.onCreate(savedInstanceState);
    Realm realm = Realm.getDefaultInstance();
  }
}
Writing in the Database
If you want to write something in the database you just need to call:
Realm realm = Realm.getInstance(this);
realm.beginTransaction();
//... add or update objects here ...
realm.commitTransaction();
You always have an opportunity to cancel your transactions, just call:
realm.cancelTransaction();Creating Objects
If you want to save an object in the Realm database, the class of that object should extend RealmObject:
public class University extends RealmObject {
    @Index
    private int id;
    private String name;
// Standard getters & setters generated by your IDE…
}
Realm realm = Realm.getInstance(this);
realm.beginTransaction();
University university = realm.createObject(University.class); // Create a new object
user.setName("John");
realm.commitTransaction();
Practical Use
Let’s see how this database can be applied to a real application. MLSDev developers made an Android app using Realm. You can find it in our repository to learn more about its integration.
One of the app’s features is to add and delete universities, as well as add students to and delete them from these universities. This function is important for us in regards to the topic. In this article, we will show you only the main parts of the code.
So, two classes are required (University and Student):
public class Student extends RealmObject {
    @PrimaryKey
    private String id;
    @Required
    private String name;
    @Required
    private Date birthday;
    @Required
    private String email;
    // getters and setters
}
public class University extends RealmObject {
    @PrimaryKey
    private String id;
    @Required
    private String name;
    private RealmList students;
   // getters and setters
}
Then, create a class called "module" and include the University and Student classes in the annotation.
@RealmModule(classes = {Student.class, University.class})
public class SimpleRealmModule {}
In the Application class, initialize the Realm database using the previous class.
public class SimpleRealmApp extends Application {

    private static SimpleRealmApp instance;

    @Override
    public void onCreate() {
        super.onCreate();
        instance = this;
        RealmConfiguration config = new RealmConfiguration.Builder(getApplicationContext()).setModules(new SimpleRealmModule()).build();
        Realm.setDefaultConfiguration(config);
    }

     public static SimpleRealmApp getInstance() {
        return instance;
    }
}
And, now it's time for the most interesting part. We will create two classes (UniversityRepository and StudentRepository) and write queries.
UniversityRepository will be able to add a university, delete a university by id, get a university by id from the database, etc.
public class UniversityRepository implements IUniversityRepository {

    @Override
    public void addUniversity(University university, OnAddUniversityCallback callback) {
        Realm realm = Realm.getInstance(SimpleRealmApp.getInstance());
        realm.beginTransaction();
        University u = realm.createObject(University.class);
        u.setId(UUID.randomUUID().toString());
        u.setName(university.getName());
        realm.commitTransaction();

        if (callback != null)
            callback.onSuccess();
    }

    @Override
    public void deleteUniversityById(String Id, OnDeleteUniversityCallback callback) {
        Realm realm = Realm.getInstance(SimpleRealmApp.getInstance());
        realm.beginTransaction();
        University university = realm.where(University.class).equalTo(RealmTable.ID, Id).findFirst();
        university.removeFromRealm();
        realm.commitTransaction();

        if (callback != null)
            callback.onSuccess();
    }

    @Override
    public void deleteUniversityByPosition(int position, OnDeleteUniversityCallback callback) {
        Realm realm = Realm.getInstance(SimpleRealmApp.getInstance());
        realm.beginTransaction();
        RealmQuery query = realm.where(University.class);
        RealmResults results = query.findAll();
        results.remove(position);
        realm.commitTransaction();

        if (callback != null)
            callback.onSuccess();
    }

    @Override
    public void getUniversityById(String id, OnGetUniversityByIdCallback callback) {
        Realm realm = Realm.getInstance(SimpleRealmApp.getInstance());
        University result = realm.where(University.class).equalTo(RealmTable.ID, id).findFirst();

        if (callback != null)
            callback.onSuccess(result);
    }

    @Override
    public void getAllUniversities(OnGetAllUniversityCallback callback) {
        Realm realm = Realm.getInstance(SimpleRealmApp.getInstance());
        RealmQuery query = realm.where(University.class);
        RealmResults results = query.findAll();

        if (callback != null)
            callback.onSuccess(results);
    }

}
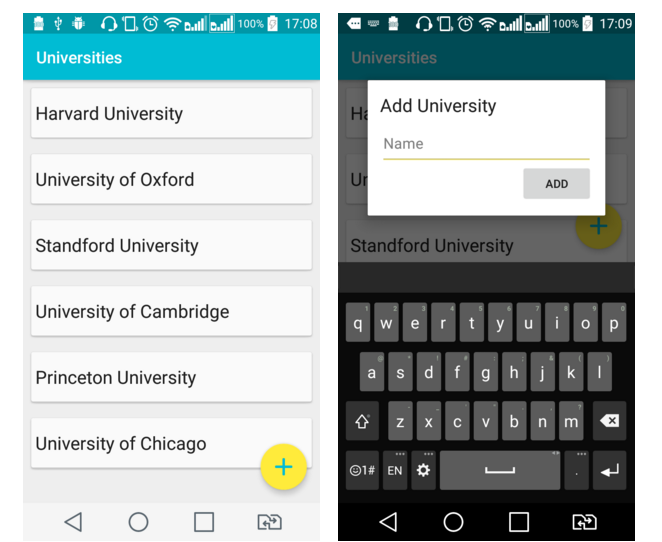
The following screens display what you get from the code:

On the first screen, you can see the list of all universities. On the second screen, you can add a new university.
StudentRepository will be able to add a student to a university, delete a student by id, get a student by id from the database, etc.
public class StudentRepository implements IStudentRepository {

    @Override
    public void addStudent(Student student, OnSaveStudentCallback callback) {
        Realm realm = Realm.getInstance(SimpleRealmApp.getInstance());
        realm.beginTransaction();
        Student realmStudent = realm.createObject(Student.class);
        realmStudent.setId(UUID.randomUUID().toString());
        realmStudent.setName(student.getName());
        realmStudent.setBirthday(student.getBirthday());
        realmStudent.setEmail(student.getEmail());
        realm.commitTransaction();

        if (callback != null)
            callback.onSuccess();
    }

    @Override
    public void addStudentByUniversityId(Student student, String universityId, OnSaveStudentCallback callback) {
        Realm realm = Realm.getInstance(SimpleRealmApp.getInstance());
        realm.beginTransaction();

        Student realmStudent = realm.createObject(Student.class);
        realmStudent.setId(UUID.randomUUID().toString());
        realmStudent.setName(student.getName());
        realmStudent.setEmail(student.getEmail());
        realmStudent.setBirthday(student.getBirthday());

   University university = realm.where(University.class).equalTo(RealmTable.ID, universityId).findFirst();
        university.getStudents().add(realmStudent);

        realm.commitTransaction();

        if (callback != null)
            callback.onSuccess();

    }

    @Override
    public void deleteStudentById(String id, OnDeleteStudentCallback callback) {
        Realm realm = Realm.getInstance(SimpleRealmApp.getInstance());
        realm.beginTransaction();
        Student result = realm.where(Student.class).equalTo(RealmTable.ID, id).findFirst();
        result.removeFromRealm();
        realm.commitTransaction();

        if (callback != null)
            callback.onSuccess();
    }

    @Override
    public void deleteStudentByPosition(int position, OnDeleteStudentCallback callback) {
        Realm realm = Realm.getInstance(SimpleRealmApp.getInstance());
        realm.beginTransaction();
        RealmQuery query = realm.where(Student.class);
        RealmResults results = query.findAll();
        results.remove(position);
        realm.commitTransaction();

        if (callback != null)
            callback.onSuccess();
    }

    @Override
    public void getAllStudents(OnGetAllStudentsCallback callback) {
        Realm realm = Realm.getInstance(SimpleRealmApp.getInstance());
        RealmResults results = realm.where(Student.class).findAll();

        if (callback != null)
            callback.onSuccess(results);
    }

    @Override
    public void getAllStudentsByUniversityId(String id, OnGetStudentsCallback callback) {
        Realm realm = Realm.getInstance(SimpleRealmApp.getInstance());
        University university = realm.where(University.class).equalTo(RealmTable.ID, id).findFirst();
        RealmList students = university.getStudents();

        if (callback != null)
            callback.onSuccess(students);

    }

    @Override
    public void getStudentById(String id, OnGetStudentByIdCallback callback) {
        Realm realm = Realm.getInstance(SimpleRealmApp.getInstance());
        Student student = realm.where(Student.class).equalTo(RealmTable.ID, id).findFirst();

        if (callback != null)
            callback.onSuccess(student);
    }
}
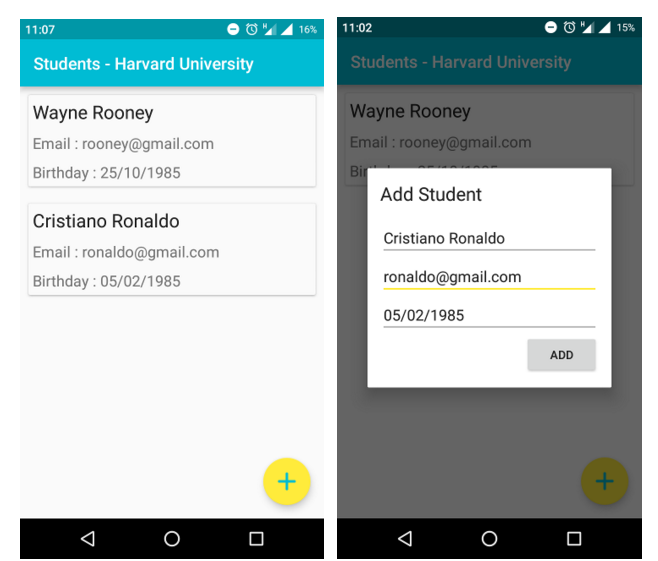
This is what you will see on the screens:

The first screen displays the list of all students of a chosen university. On the second one, you can add a new student.
As you might notice, it is very easy to write queries in Realm. Before each transaction, you should call:
realm.beginTransaction(); And after it, you should call:
realm.commitTransaction();You can also go to the official Realm website to learn more about queries.
Some Bad and Good Impressions of Working With Realm
Bad:
- ID for objects cannot be automatically generated
- You can have only getter and setter methods in a class. This means you cannot override the methods
hashcode();or
equals();Good:
- An easy way to perform queries and transactions asynchronously.
- All fetches (including queries) are lazy in Realm.
- An easy way to build queries (just call existing Realm methods).
- Possibility to run the Realm database in-Memory.
- Possibility to use Realm objects across threads.
- More information is in the official documentation.
Published at DZone with permission of Roman Kukhar, DZone MVB. See the original article here.
Opinions expressed by DZone contributors are their own.

Comments