DZone
Thanks for visiting DZone today,
Edit Profile
  • Manage Email Subscriptions
  • How to Post to DZone
  • Article Submission Guidelines
Sign Out View Profile
  • Post an Article
  • Manage My Drafts
Over 2 million developers have joined DZone.
Log In / Join
Please enter at least three characters to search
Refcards Trend Reports
Events Video Library
Refcards
Trend Reports

Events

View Events Video Library

Zones

Culture and Methodologies Agile Career Development Methodologies Team Management
Data Engineering AI/ML Big Data Data Databases IoT
Software Design and Architecture Cloud Architecture Containers Integration Microservices Performance Security
Coding Frameworks Java JavaScript Languages Tools
Testing, Deployment, and Maintenance Deployment DevOps and CI/CD Maintenance Monitoring and Observability Testing, Tools, and Frameworks
Culture and Methodologies
Agile Career Development Methodologies Team Management
Data Engineering
AI/ML Big Data Data Databases IoT
Software Design and Architecture
Cloud Architecture Containers Integration Microservices Performance Security
Coding
Frameworks Java JavaScript Languages Tools
Testing, Deployment, and Maintenance
Deployment DevOps and CI/CD Maintenance Monitoring and Observability Testing, Tools, and Frameworks

Modernize your data layer. Learn how to design cloud-native database architectures to meet the evolving demands of AI and GenAI workkloads.

Secure your stack and shape the future! Help dev teams across the globe navigate their software supply chain security challenges.

Releasing software shouldn't be stressful or risky. Learn how to leverage progressive delivery techniques to ensure safer deployments.

Avoid machine learning mistakes and boost model performance! Discover key ML patterns, anti-patterns, data strategies, and more.

Related

  • Creating Scrolling Text With HTML, CSS, and JavaScript
  • How to Create a Pokémon Breeding Gaming Calculator Using HTML, CSS, and JavaScript
  • Step-by-Step Guide to Creating a Calculator App With HTML and JS (With Factor Calculator Example)
  • Scrolling With Konva.js and React

Trending

  • AI's Dilemma: When to Retrain and When to Unlearn?
  • Debugging Core Dump Files on Linux - A Detailed Guide
  • Analyzing “java.lang.OutOfMemoryError: Failed to create a thread” Error
  • How to Convert Between PDF and TIFF in Java
  1. DZone
  2. Coding
  3. Languages
  4. Registration Form with HTML and CSS #1

Registration Form with HTML and CSS #1

By 
deji adesoga user avatar
deji adesoga
DZone Core CORE ·
Aug. 25, 20 · Tutorial
Likes (1)
Comment
Save
Tweet
Share
32.4K Views

Join the DZone community and get the full member experience.

Join For Free

What we know matters but who we are matters more.

-  Brené Brown

Introduction

Today we are going to build a simple registration form. The requirements for this tutorial is just a basic knowledge of Html and  CSS as well as a code editor.

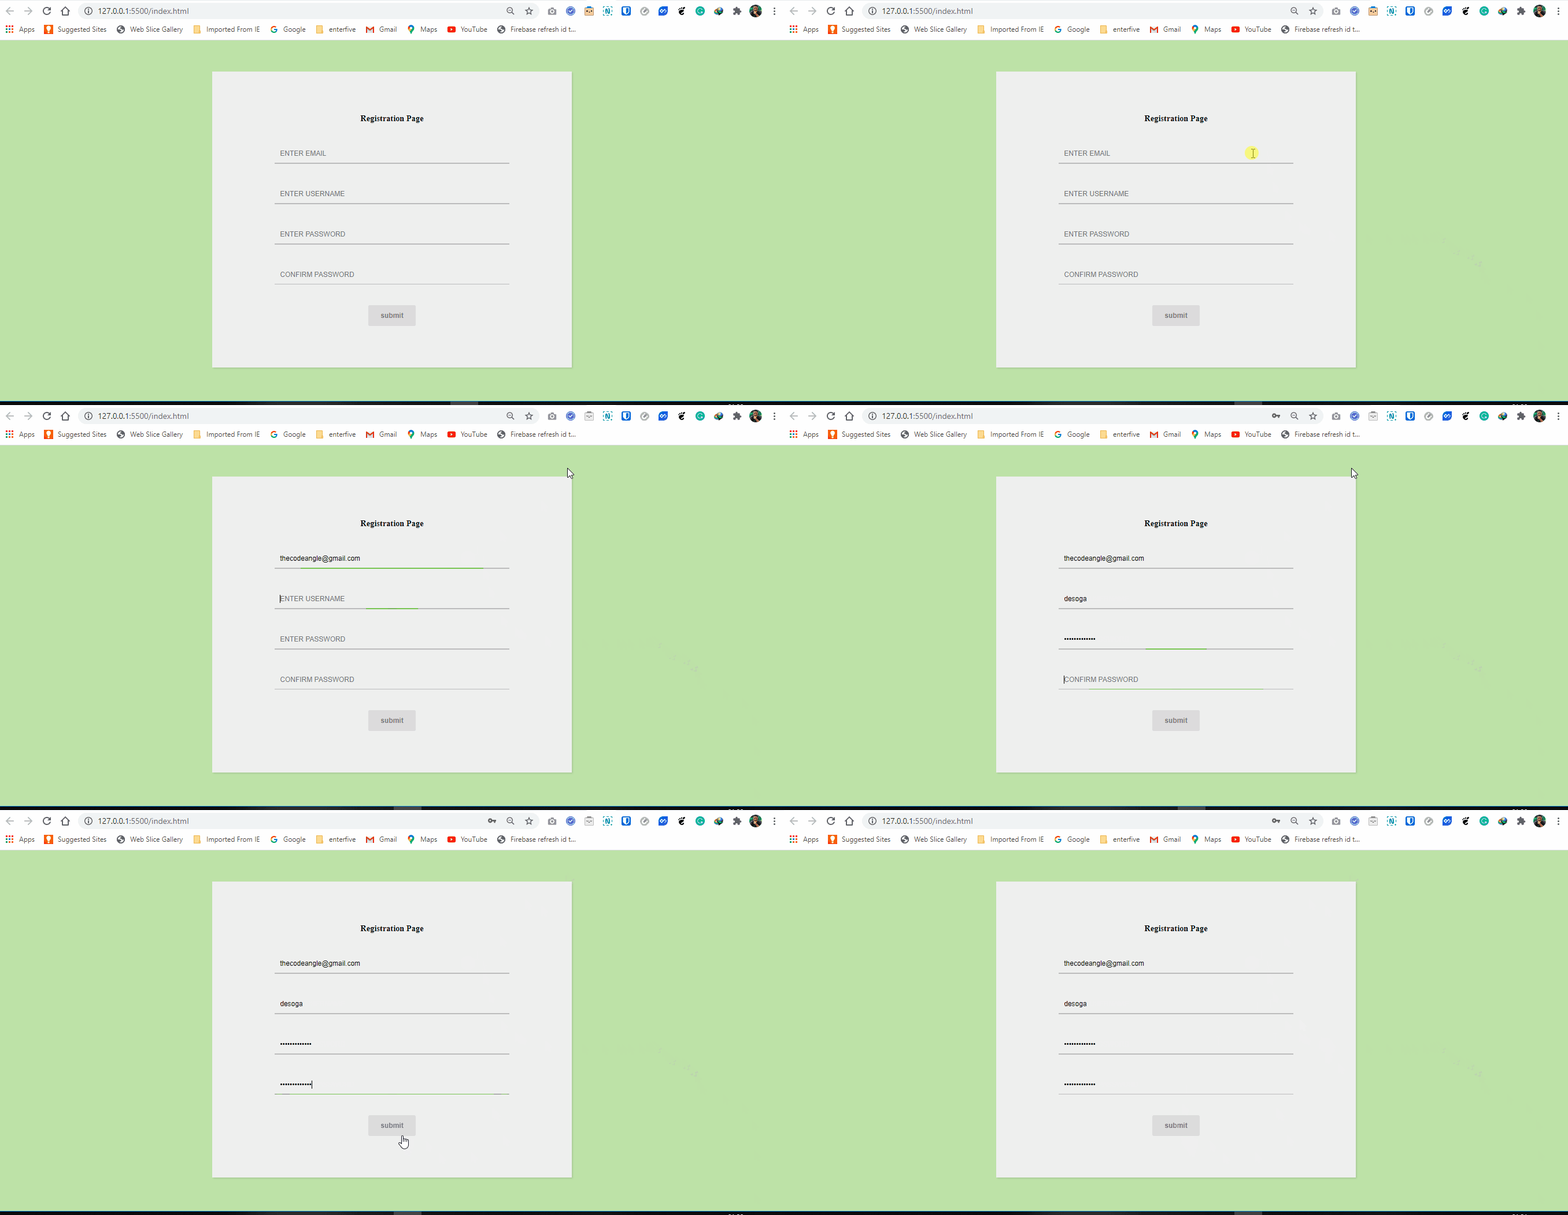
A Preview of What We Are Going To Build
complete form design

Let us get started.

Code Structure

First, in our code editor, we are going to create a new folder. We can call the folder form. Inside that folder, we will create two files. The index.html and the style.css.

HTML

In the index.html file, we should have a bare bone structure similar to what is shown below:

HTML
x
12
 
1
<!DOCTYPE html> 
2
 <html lang="en"> 
3
 <head>  
4
 <meta charset="UTF-8">  
5
 <meta name="viewport" content="width=device-width, initial-scale=1.0">  
6
 <title>Registration Form With Html & Css</title>  
7
 <link rel="stylesheet" href="style.css">  
8
 <meta name="viewport" content="width=device-width, initial-scale=1"> 
9
 </head> 
10
  <body> 
11
  </body> 
12
</html>


Next, I am going to add the tags to the HTML page.

HTML
 
xxxxxxxxxx
1
57
 
1
<!DOCTYPE html> 
2
  <html lang="en"> 
3
    <head>  
4
      <meta charset="UTF-8">  
5
      <meta name="viewport" content="width=device-width, initial-scale=1.0">                <title>Registration Form With Html & Css</title>  
6
      <link rel="stylesheet" href="style.css">  
7
      <meta name="viewport" content="width=device-width, initial-scale=1"> 
8
    </head>
9
    <body> 
10
        <div>   
11
          <form>    
12
            <h4 class="text-warning text-center pt-5">Registration Page</h4>  
13
            
14
            <label>     
15
              <input type="text" class="input" name="email" placeholder="EMAIL"/>                   <div class="line-box">          
16
              <div class="line"></div>        
17
              </div>    
18
            </label>     
19
            
20
            <label>     
21
              <input 
22
                     type="text" 
23
                     class="input" 
24
                     name="username"        
25
                     placeholder="USERNAME"/>        
26
              <div class="line-box">         
27
                <div class="line"></div>        
28
              </div>    
29
            </label>     
30
            
31
            <label>     
32
              <input 
33
                     type="password" 
34
                     class="input" 
35
                     name="password" 
36
                     placeholder="PASSWORD"/>        
37
              <div class="line-box">          
38
                <div class="line"></div>        
39
              </div>    
40
            </label>     
41
            
42
            <label>     
43
              <input 
44
                     type="password" 
45
                     class="input" 
46
                     name="confirm" 
47
                     placeholder="CONFIRM PASSWORD"/>      
48
              <div class="line-box">        
49
                <div class="line"></div>      
50
              </div>    
51
            </label>     
52
            
53
            <button type="submit">submit</button>  
54
          </form> 
55
      </div> 
56
    </body> 
57
</html>


From the code above, we started by adding a form tag. In the form tag, there are four label tags and a button tag. Each input tag is wrapped in a label.

These labels are very important because they tell the user what information to provide in the form element.

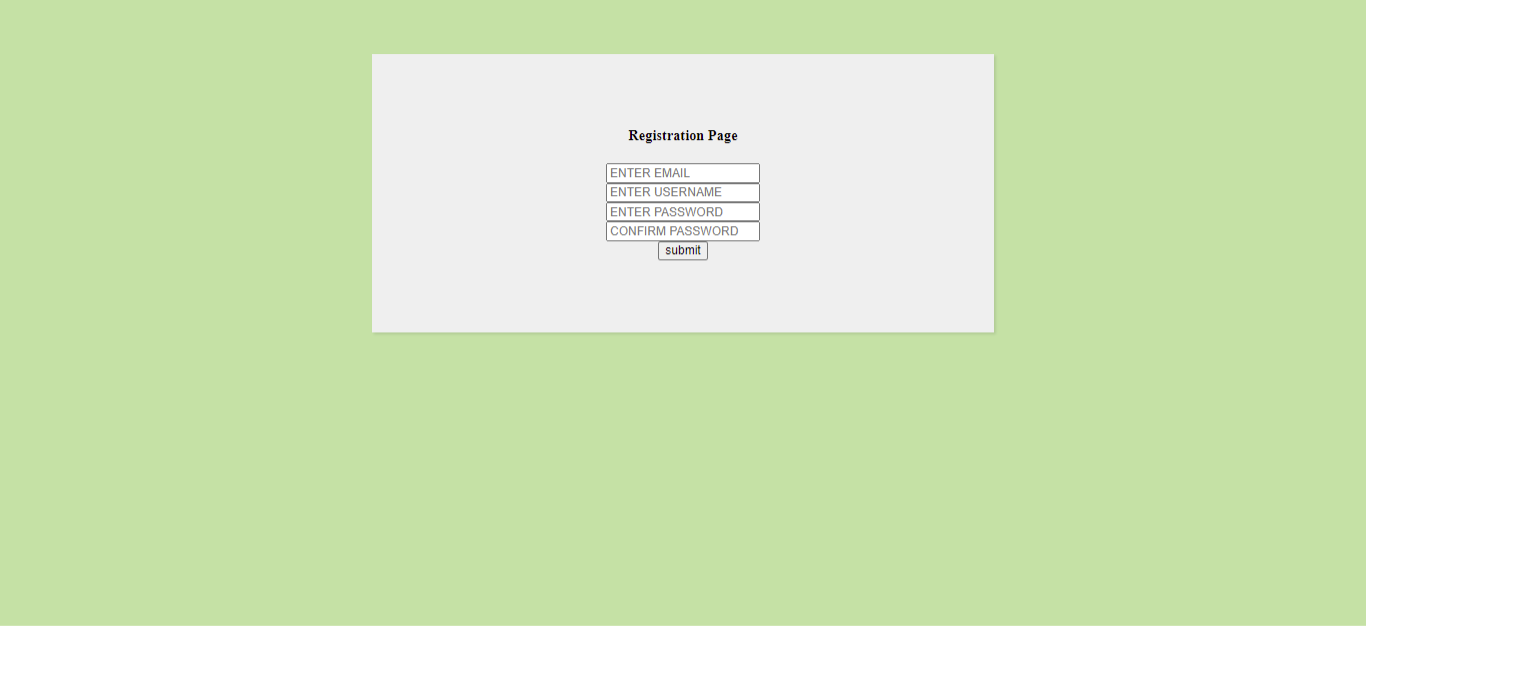
This is all we need for the Html code and our form should look something like this:

HTML preview

HTML preview


Yes, that is ugly. Time for some CSS!

CSS

We start in the style.css file by adding color to the background of the page and also styling the form tag:

CSS


xxxxxxxxxx
1
10


1
body {  
2
  background: #C5E1A5; 
3
}
4

          
5
 form {  
6
   width: 30%;  
7
   margin: 60px auto;  
8
   background: #efefef;  
9
   padding: 60px 120px 80px 120px;  
10
   text-align: center;  
11
   -webkit-box-shadow: 2px 2px 3px rgba(0,0,0,0.1); 
12
   box-shadow: 2px 2px 3px rgba(0,0,0,0.1); 
13
}


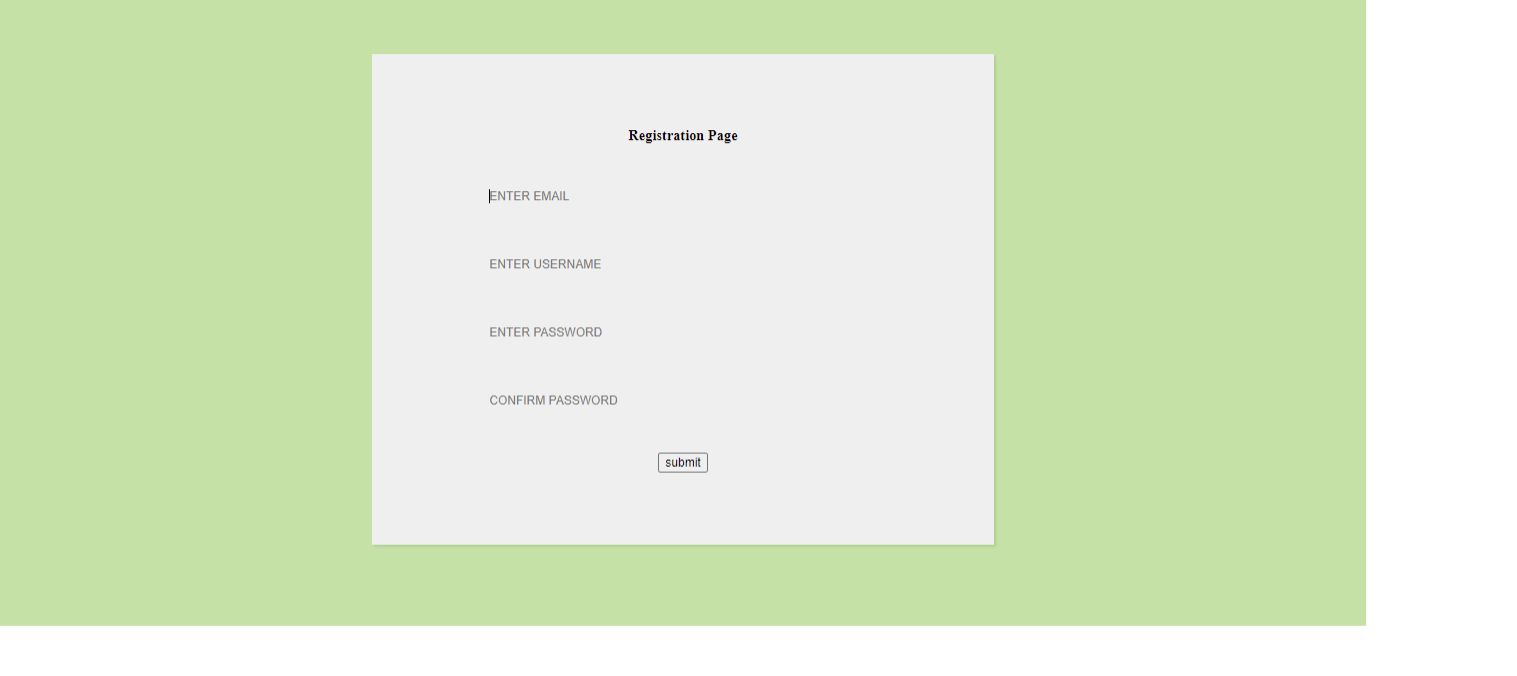
The Outcome:

first CSS preview

Furthermore, we need to style the labels and input. For the label, we will be adding letter-spacing, color, margin, padding and a positional direction for the label and the texts that will be within it.

CSS
 
xxxxxxxxxx
1
23
 
1
label {  
2
  display: block;  
3
  position: relative;  
4
  margin: 40px 0px; 
5
}
6

          
7
 .label-txt {  
8
   position: absolute;  
9
   top: -1.6em;  
10
   padding: 10px;  
11
   font-family: sans-serif;  
12
   font-size: .8em;  
13
   letter-spacing: 1px;  
14
   color: rgb(120,120,120);  
15
   transition: ease .3s; 
16
}
17
 .input {  
18
   width: 100%;  
19
   padding: 10px;  
20
   background: transparent;  
21
   border: none;  
22
   outline: none; 
23
}

The Outcome:

second css preview

Finally, we will be styling the line for the input field and the button.

To get the line effect, we need to set the height in the .line-box class. This will make the line visible. Also, we will be adding some transition effect when the input field is active.

The design for the button class is straight forward, We added a hover color, a background color, padding and border-radius. We also set the display to inline-block, this allows us to set padding to the side of the button.

CSS
 
xxxxxxxxxx
1
42
 
1
.line-box {  
2
  position: relative;  
3
  width: 100%;  
4
  height: 2px;  
5
  background: #BCBCBC; 
6
}
7

          
8
 .line {  
9
   position: absolute;  
10
   width: 0%;  
11
   height: 2px;  
12
   top: 0px;  
13
   left: 50%;  
14
   transform: translateX(-50%);  
15
   background: #8BC34A;  
16
   transition: ease .6s; 
17
}  
18

          
19
 .input:focus + .line-box .line {  
20
   width: 100%; 
21
}
22

          
23
 .label-active {  
24
   top: -3em; 
25
}
26

          
27
 button {  
28
   display: inline-block; 
29
   padding: 12px 24px;  
30
   background: rgb(220,220,220);  
31
   font-weight: bold;  
32
   color: rgb(120,120,120);  
33
   border: none;  outline: none;  
34
   border-radius: 3px;  
35
   cursor: pointer;  
36
   transition: ease .3s; 
37
}  
38

          
39
 button:hover {  
40
   background: #8BC34A;  
41
   color: #ffffff; 
42
}


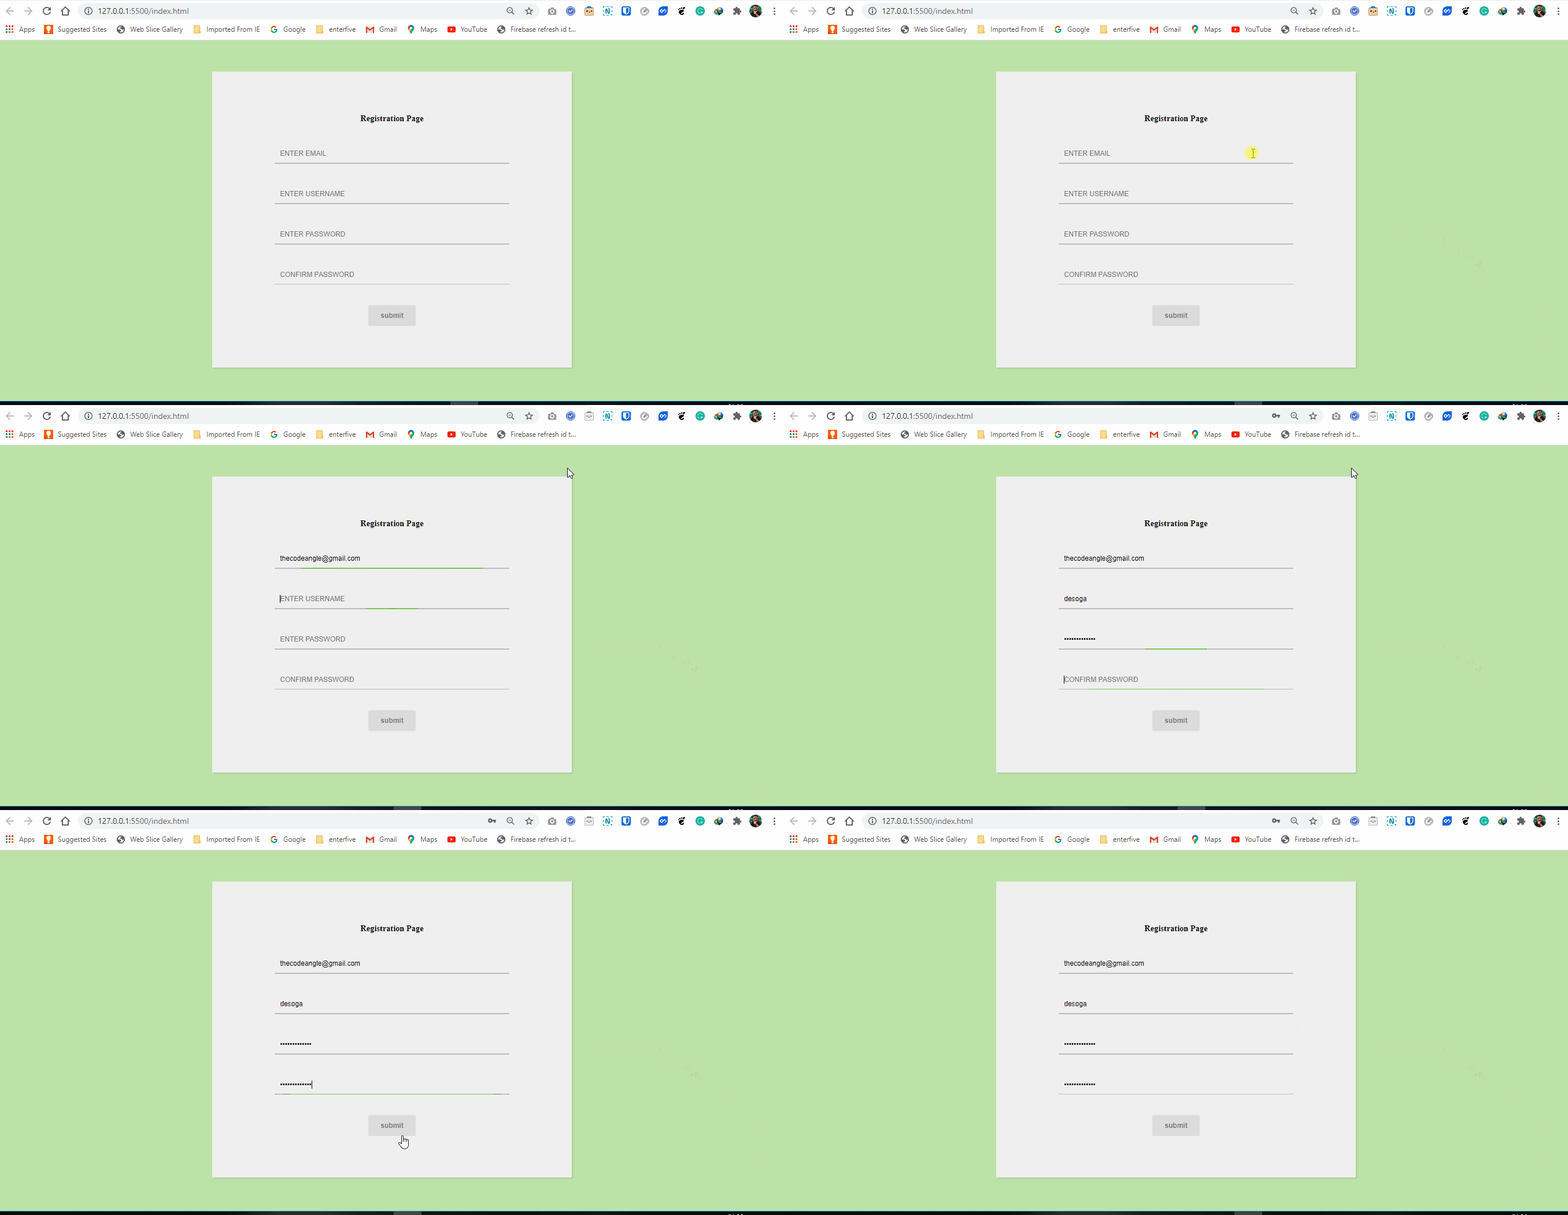
Final Results:

final view

Conclusion

I know this is a very basic tutorial, but I hope you can learn one or two things from it.

Here is the link to the repo on Github.

Support me by subscribing to my newsletter here.

CSS HTML Form (document)

Published at DZone with permission of deji adesoga. See the original article here.

Opinions expressed by DZone contributors are their own.

Related

  • Creating Scrolling Text With HTML, CSS, and JavaScript
  • How to Create a Pokémon Breeding Gaming Calculator Using HTML, CSS, and JavaScript
  • Step-by-Step Guide to Creating a Calculator App With HTML and JS (With Factor Calculator Example)
  • Scrolling With Konva.js and React

Partner Resources

×

Comments
Oops! Something Went Wrong

The likes didn't load as expected. Please refresh the page and try again.

ABOUT US

  • About DZone
  • Support and feedback
  • Community research
  • Sitemap

ADVERTISE

  • Advertise with DZone

CONTRIBUTE ON DZONE

  • Article Submission Guidelines
  • Become a Contributor
  • Core Program
  • Visit the Writers' Zone

LEGAL

  • Terms of Service
  • Privacy Policy

CONTACT US

  • 3343 Perimeter Hill Drive
  • Suite 100
  • Nashville, TN 37211
  • support@dzone.com

Let's be friends:

Likes
There are no likes...yet! 👀
Be the first to like this post!
It looks like you're not logged in.
Sign in to see who liked this post!