Reverse Engineering CryptoPanic REST API
Unleash the full potential of CryptoPanic's REST API with our guide and take your crypto game to the next level!
Join the DZone community and get the full member experience.
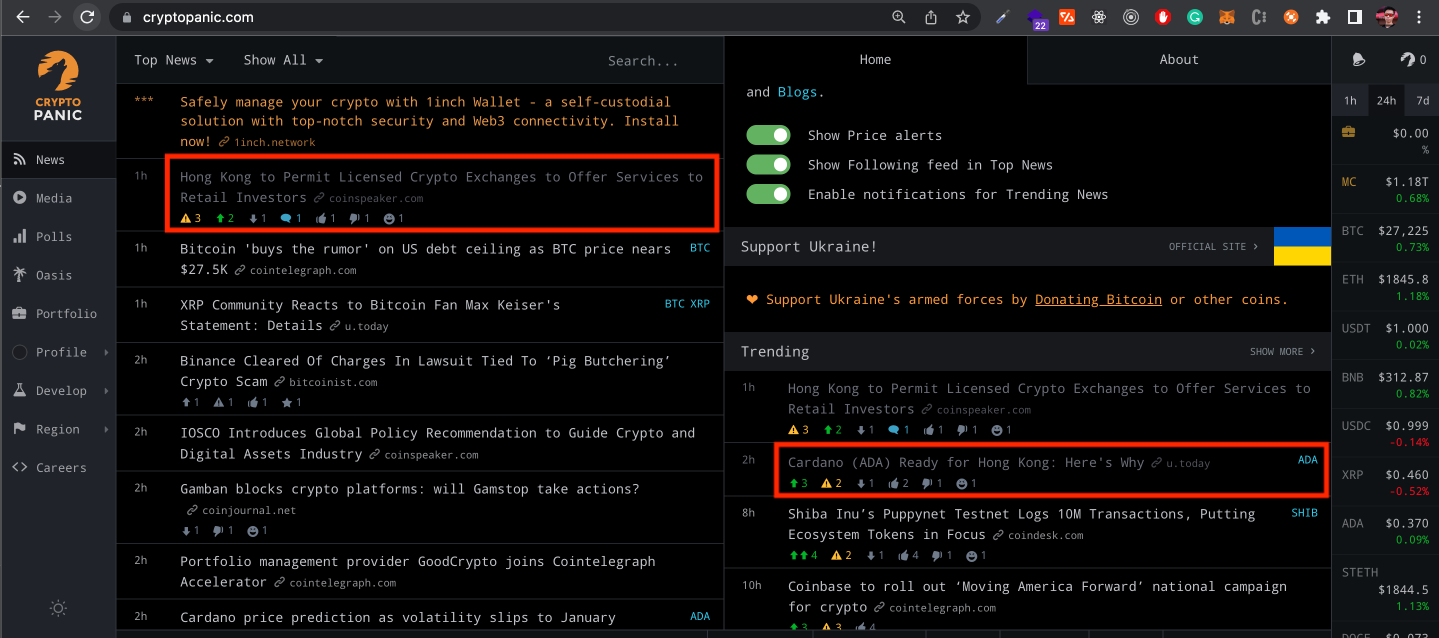
Join For FreeCryptoPanic is a news aggregator website for trending news based on social sentiment. It's a good website for keeping up to date on the latest news, as well as using it as a trading signal.
Its compact layout reminds me of hacker news. I was looking through the network requests and got intrigued after finding out that the main data is not in plaintext:

The server sends some sort of encoded data, and the client decodes it. After digging around the JS bundle, I managed to recover the plaintext data that is displayed on the website.
Note: This post is for educational purposes only.
The Reverse Engineering Process
1. Open the JS Bundle
The first thing is to find out which part of the JavaScript code is responsible for decoding this response. Begin by searching for and opening the JS bundle cryptopanic.min.xxxxx.js.

2. Locate the Part of the Code that Decodes the Data
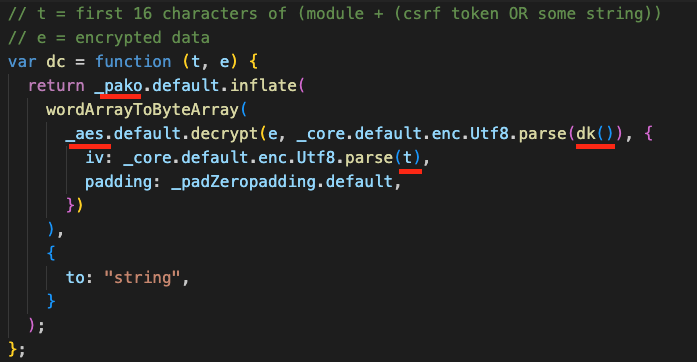
Searching for "decrypt" immediately zooms in on this function called dc that does the core work of decoding the data.
dk() returns the encryption key, together with parameter t which is used as the Initialization Vector(IV), are passed through the AES algorithm with zero padding.
wordArrayToByteArray converts the decrypted response into a byte array and pako.default.inflate decompresses the data and converts them into JavaScript's utf-16.
After this step, the result is a JSON string of the API response. The JSON version looks like this:

3. Transform the Raw Response Into a Usable Array of Objects
The last step is to transform the raw JSON into an array of objects so that it is easy to work with.
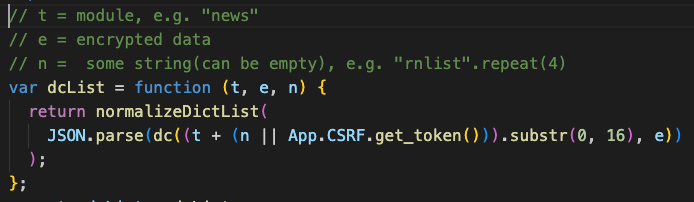
Revisiting the arguments passed to `dc` earlier, the first argument `t`(IV) is the first 16 characters of the module and some string or the CSRF token.
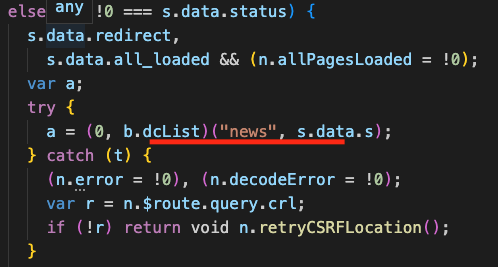
For posts API, t is news, and n is empty.
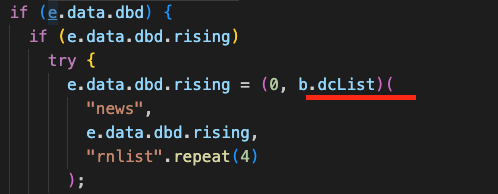
For dashboard API, t is also news while n is rnlistrnlistrnlistrnlist.
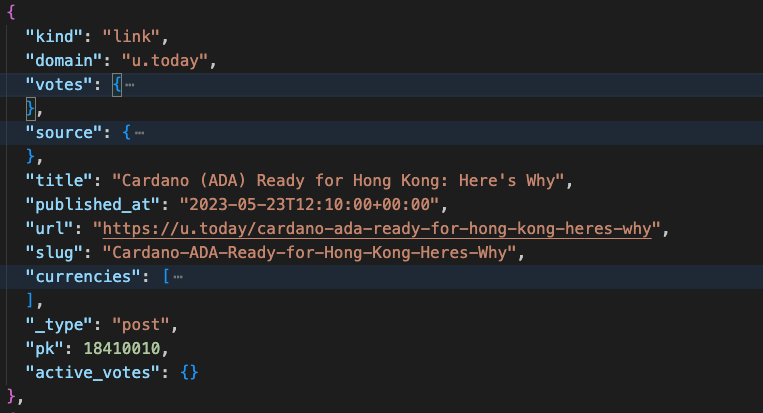
4. Final Output
This is the final output of the posts and dashboard response after decrypting, decompressing, and normalizing.

Try It Out Yourself
Here is a gist that you can use to try decoding the response yourself.
How To Use
- Create an
.envfile withCRYPTOPANIC_ENCRYPTION_KEYandCRYPTOPANIC_CSRF_TOKEN. - Install the dependencies:
npm install dotenv pako crypto-js - Run
node decrypt.js [post|dashboard]
require('dotenv').config();
const CryptoJS = require("crypto-js");
const pako = require('pako');
const fs = require('fs');
const path = require('path');

const ENCRYPTION_KEY = process.env.CRYPTOPANIC_ENCRYPTION_KEY;
const CSRF_TOKEN = process.env.CRYPTOPANIC_CSRF_TOKEN;

function wordToByteArray(t, e) {
    var n = [];
    return (
      e > 0 && n.push(t >>> 24),
      e > 1 && n.push((t >>> 16) & 255),
      e > 2 && n.push((t >>> 8) & 255),
      e > 3 && n.push(255 & t),
      n
    );
  }

function wordArrayToByteArray(t, e) {
    t.hasOwnProperty("sigBytes") &&
      t.hasOwnProperty("words") &&
      ((e = t.sigBytes), (t = t.words));
    for (var n, s = [], i = 0; e > 0; )
      (n = wordToByteArray(t[i], Math.min(4, e))),
        (e -= n.length),
        s.push(n),
        i++;
    return [].concat.apply([], s);
}

function normalizeDictList(t) {
    var e = [];
    return (
      t.l.forEach(function (n) {
        var s = {};
        t.k.forEach(function (t, e) {
          s[t] = n[e];
        }),
          e.push(s);
      }),
      e
    );
  }

// { words, sigBytes }
const key = CryptoJS.enc.Utf8.parse(ENCRYPTION_KEY);

// for posts
const postIvRaw = "news" + CSRF_TOKEN.substring(0, 12);
// for dashboard
const dashboardIvRaw = "newsrnlistrnlist";
const padding = CryptoJS.pad.ZeroPadding;

const postEncrypted = fs.readFileSync(path.join(__dirname, 'input', 'cryptopanic post data'), { encoding: 'utf-8' } );
const dashboardEncrypted = fs.readFileSync(path.join(__dirname, 'input', 'cryptopanic dashboard data'), { encoding: 'utf-8' });

const dataTypeMapping = {
    post: {
        iv: CryptoJS.enc.Utf8.parse(postIvRaw),
        encrypted: postEncrypted
    },
    dashboard: {
        iv: CryptoJS.enc.Utf8.parse(dashboardIvRaw),
        encrypted: dashboardEncrypted
    }
}

function decrypt(encrypted, key, iv, padding, dataType) {
    // { words, sigBytes }
    const decrypted = CryptoJS.AES.decrypt(encrypted, key, {
        iv,
        padding,
    });

    const byteArray = wordArrayToByteArray(decrypted);

    try {
        const inflated = pako.inflate(byteArray, { to: 'string' });
        const inflatedJson = JSON.parse(inflated);

        fs.writeFileSync(path.join(__dirname, 'decrypted', `${dataType}-inflatedRaw.json`), JSON.stringify(inflatedJson, undefined, 2));

        const normalized = normalizeDictList(inflatedJson);

        fs.writeFileSync(path.join(__dirname, 'decrypted', `${dataType}-normalized.json`), JSON.stringify(normalized, undefined, 2));

        return normalized;
    } catch(e) {
        console.log(e);
    }
}

// node decrypt.js
// dataType = 'post', 'dashboard'
if (require.main === module) {
    let [_, __, dataType] = process.argv;
    dataType = dataType ? dataType : 'post';

    const decrypted = decrypt(dataTypeMapping[dataType].encrypted, key, dataTypeMapping[dataType].iv, padding, dataType);
    console.log(decrypted);
}Published at DZone with permission of Han Chiang. See the original article here.
Opinions expressed by DZone contributors are their own.
Comments