Secure a REST API With MicroProfile and JWT Authentication
Don't sleep on REST API security.
Join the DZone community and get the full member experience.
Join For Free
In today’s tutorial, you will learn how to secure a REST API using JSON Web Token (JWT) authentication. We will build it using Eclipse MicroProfile. We will also be using Okta’s free developer account as the OAuth provider for role-based authorization.
To get started, I'll first define some terms.
What’s Eclipse MicroProfile?
It’s an Enterprise Java microservice application platform that can be used across various runtime environments. This tutorial uses Eclipse MicroProfile 2.2 (Eclipse MicroProfile 3.0 was released a couple of months ago with key technologies including Java EE, JAX-RS, CDI, and JSON-P.)
You may also like: Spring Boot Security + JSON Web Token (JWT) ''Hello World'' Example.
- Java EE is the Enterprise Edition of Java, which is built on top of Java SE but expands the included libraries with technologies intended for scaling and security.
- JAX-RS is the Java API specification that adds functionality for building RESTful web services using annotations.
- CDI is Context and Dependency Injection for Java. It adds Spring-like beans and dependency injection.
- JSON-P is the Java API for JSON parsing (not the JSON-P browser javascript pattern).
Take a look at the MicroProfile project if you want to dig deeper.
Authentication and Authorization for MicroProfile with OAuth, OIDC, and JWTs
To authenticate and authorize users to a web app powered by MicroProfile, we’ll need to use two industry-standard protocols, OAuth and OIDC, to call on an existing identity provider, in this case, Okta. OAuth 2.0 provides authorization only, while OIDC adds an identity layer on top of OAuth 2.0. With both of them, you have a complete authentication (Who is the user?) and authorization (What can the user do?) protocol.
However, neither OAuth 2.0 nor OIDC provide an identity implementation. To actually use them, you either need to implement an identity provider yourself or use a 3rd-party identity service. In this tutorial, you’re going to use Okta to create an OAuth 2.0/OIDC-enabled application that will serve as your authentication and authorization provider. This will allow you (and the other users of the client app) to log into the app via Okta. You can let Okta worry about the intricacies of these various standards and protocols and storing credentials, not to mention keeping up to date on all the rapidly evolving security threats. Using a third-party provider you can trust allows you to concentrate on developing the features specific to your app.
Finally, there’s the JWT. The JSON Web Token is a JSON structure that is used to transmit security information from the provider to the app. JWTs are almost always signed, which allows the client app to detect tampering; however, they are generally not encrypted, so sensitive information should not be sent through a JWT. They’re designed to be lightweight, minimal and essentially public.
Install Requirements - Java, Maven and HTTPie
The requirements for this tutorial are pretty minimal. The first requirement is to have at least Java SE 8 installed on your computer. If you don’t have Java installed, go to the AdoptOpenJDK website and install it now. Mac users can also use Homebrew.
You will also need Maven installed. If you don’t have Maven installed already on your computer, go to their website and download it. On a Mac, with Homebrew, you can use brew install maven.
Finally, you will need to install HTTPie, which is a lightweight command line HTTP request utility. You’re going to use it to make simple requests to your REST API. Get it from the HTTPie website.
Generate A REST API with MicroProfile Starter
MicroProfile has a great (beta) website that will generate a fully functioning starter app. You’ll use this to create the starting point for the project.
Open a browser and navigate to https://start.microprofile.io/.
Fill in or select the following values:
- groupId: com.okta.microprofile.
- artifactId: DemoAPI.
- MicroProfile Version: MP 2.2.
- Java SE Version: Java 8.
- MicroProfile Server: Open Liberty.
- Examples for Specifications: uncheck all except JWT Auth.
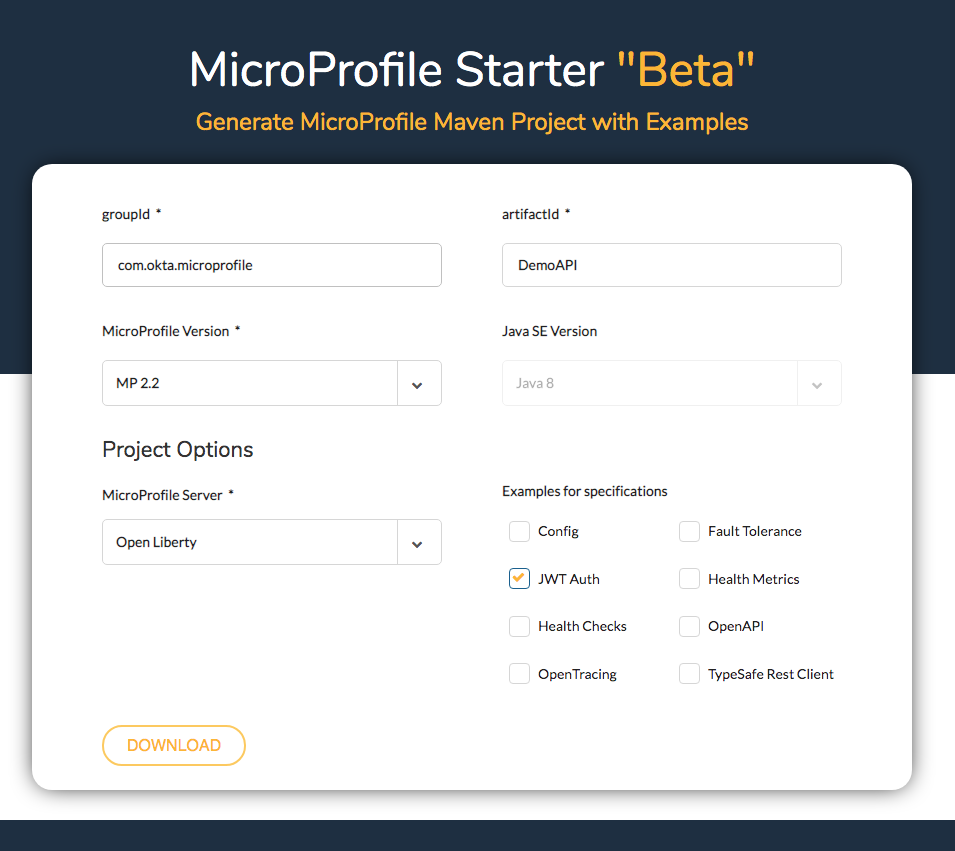
Click Download.
Decompress and copy the generated files to an appropriate place on your computer.
To run the starter app, in a terminal navigate to the root directory of the project. Run the following command:
mvn install liberty:start-serverOnce the app is running within the Open Liberty server instance, navigate to http://localhost:8181/DemoAPI.
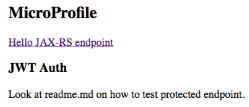
You’ll see the super simple home page. For the curious, this file is located at src/main/webapp/index.html. If you click the link, it takes you to http://localhost:8181/DemoAPI/data/hello, which is the endpoint for the HelloController.
To see how that link is generated, take a look DemoAPIRestApplication.java.
src/main/java/com/okta/microprofile/DemoAPI/DemoAPIRestApplication.java
@ApplicationPath("/data")
@LoginConfig(authMethod = "MP-JWT", realmName = "jwt-jaspi")
@DeclareRoles({"protected"})
public class DemoAPIRestApplication extends Application {
}
The important line is the @ApplicationPath("/data") annotation. This defines the base web context for the REST application. The other two annotations have to do with JWT authentication, which you’ll look at later.
Next, look at the HelloController.java file.
src/main/java/com/okta/microprofile/DemoAPI/HelloController.java
@Path("/hello")
@Singleton
public class HelloController {

    @GET
    public String sayHello() {
        return "Hello World";
    }
}
The @Path("/hello") defines the context path for the controller.
The context root, DemoAPI, is automatically configured from the pom.xml file using the artifactIdelement, which is set to DemoAPI. Thus you end up with the path DemoAPI/data/hello (context root / app path / controller path).
Create A REST API
In this tutorial, our focus is on JWT Auth and MicroProfile, but let’s take the API beyond “Hello World.”
Add a new LetterController.java file in the root package path.
src/main/java/com/okta/microprofile/DemoAPI/LettersController.java
package com.okta.microprofile.DemoAPI;

import javax.inject.Singleton;
import javax.ws.rs.*;
import java.util.ArrayList;
import java.util.Arrays;

@Path("/letters")
@Singleton
public class LettersController {

    private ArrayList<String> letters = new ArrayList<String>(Arrays.asList("A", "B", "C"));

    @GET
    @Produces("text/plain")
    public String letters() {
        return String.join(", ", letters);
    }

    @POST
    @Consumes("text/plain")
    public String addLetter(String newLetter) {
        String trimmed = newLetter.trim();
        this.letters.add(trimmed);
        return "Letter '" + trimmed + "' added!";
    }

}
This class defines two methods: POST and GET. The GET endpoint, marked by the @GET annotation, returns a list of letters, as stored in the letters class property. This is what you’re using as an extremely simple in-memory data store (for brevity and simplicity). The POST endpoint, marked by the @POST annotation, takes a string in the request body, trims it, and adds the string to the list of letters.
Once you’ve added the new file to the project, rebuild and restart the server:
mvn install liberty:start-serverUse HTTPie to send a GET request to the new controller:
http :8181/DemoAPI/data/lettersThe command above is actually shorthand for http GET localhost:8181/DemoAPI/data/letters, but because GET and localhost are defaults, you can omit them.
You’ll see the returned response:
HTTP/1.1 200 OK
Content-Language: en-US
Content-Length: 7
Content-Type: text/plain
Date: Mon, 08 Jul 2019 16:44:44 GMT
X-Powered-By: Servlet/4.0

A, B, C
Great!
Now, add a new letter:
http POST :8181/DemoAPI/data/letters Content-Type:text/plain <<< "D"And the response:
HTTP/1.1 200 OK
Content-Language: en-US
Content-Length: 17
Content-Type: application/json
Date: Mon, 08 Jul 2019 16:45:08 GMT
X-Powered-By: Servlet/4.0

Letter 'D' added!
So, obviously, in a real application, you’d need to implement some things like a database, JSON parsing, POJO mapping, full CRUD methods, etc… But that’s all for another tutorial (see some examples at the end of this post). The next step in this tutorial is to add JWT authentication.
Create An Okta OpenID Connect Application
Okta offers the ability add single sign-on to your application using OAuth 2.0 and OpenID Connect (OIDC). The first step is to sign up for a free developer account.
Once you’ve logged in, you may need to click on the Admin button to get to the developer dashboard.
From the top menu, click on the Applications item, and then click Add Application.
Select Web as the platform and click Next.
Give the app a name. I named mine “MicroProfile”, but you can name yours whatever you like.
Under Login redirect URIs, add a new URI: https://oidcdebugger.com/debug.
Check the box next to Implicit (Hybrid) in the Grant type allowed section. You need to do this to allow the oidcdebugger.com website to get an access token.
The other defaults are fine.

Then, click Done.
That’s it! You’ve now configured Okta as an OAuth 2.0 OIDC provider. Take note of the Client ID value because you’ll need that in a sec.
Add Groups and UPN Claims To Default Authorization Server
You need to add two claims mappings to your default authorization server on Okta, to enable role-based authorization and meet MicroProfile’s claims requirements.
From the top menu of the Okta developer dashboard, go to API and select Authorization Servers.
Click on the default server.
Select the Claims tab.
You’re going to add a groups claim mappings and a upn claim mapping to the access token. The groups claim mapping is what maps Okta’s groups to the role-based authorization in MicroProfile. The upn claim is required by MicroProfile and you’ll get an invalid token error without it. This is the “user principal name” as defined in the documentation.
Click Add Claim.
- Name:
groups - Include in token type:
Access TokenAlways - Value type:
Groups - Filter:
Matches regex.*
Click Create.

Next, add a upn claim.
Click Add Claim.
- Name:
upn - Include in token type:
Access TokenAlways - Value type:
Expression - Filter:
user.email
Click Create.
Generate A JSON Web Token
Because the example app is an API, it expects the request to come with a valid token and will not directly provide a way for the user to log in. There is no login redirect flow. How, then, do you get a token? OpenID Connect Debugger to the rescue!
Open https://oidcdebugger.com/ and fill in the values for your OIDC application.
Your Authorization URI is based on your developer account URI and will look like https://dev-123456.okta.com/oauth2/default. However, you need to replace the dev-123456with your own URI (just look at your dashboard URI).
The Redirect URI stays the same. This is the URI you entered into the Okta OIDC application settings.
Copy and paste the Client ID from the Okta OIDC application into the Client ID field.
The State parameter can be any value, but can’t be empty. I entered 123. Leave the other fields the same.

Scroll down and click Send Request.
If all went well, you’ll see a success page with the JWT. Leave this page open, as you’ll need the token value in a moment.
Add JWT Auth To MicroProfile
Stop your Open Liberty server if it’s running: mvn liberty:stop-server.
Update the server.xml file to match the following.
src/main/liberty/config/server.xml
<?xml version="1.0" encoding="UTF-8"?>
<server description="${project.artifactId}">
    <featureManager>
        <feature>microProfile-2.2</feature>
    </featureManager>
    <httpEndpoint id="defaultHttpEndpoint" httpPort="${httpPort}" httpsPort="${httpsPort}"/>
    <application location="${project.build.finalName}.war"/>
    <logging traceSpecification="${log.name}.*=${log.level}"/>

    <!-- Import default Java trust store for root certs -->
    <ssl id="defaultSSLConfig" keyStoreRef="defaultKeyStore" trustStoreRef="defaultTrustStore" />
    <keyStore id="defaultTrustStore" location="${javaKeystoreLocation}" type="JKS" password="changeit" />

    <!-- Configure MicroProfile JWT Auth -->
    <mpJwt
        id="myMpJwt"
        jwksUri="https://${oktaDomain}/oauth2/default/v1/keys"
        issuer="https://${oktaDomain}/oauth2/default"
        audiences="api://default"
    />
</server>
Two important changes are configured. The first is to import the default Java cacert. The second is to configure the MP-JWT plugin for MicroProfile. Both require a little more explanation.
When the REST app receives a request with a JWT, it is going to connect to Okta via SSL to verify the token. Unfortunately, the default key store that comes configured with MicroProfile via the starter doesn’t have any root certificates imported into it. This means that the app cannot verify the SSL certs on the Okta servers. Because of this, JWT verification will fail (with a pretty non-helpful error). There are two solutions: 1) import Okta’s certificates into the existing app trust store, or 2) configure the app to use the default Java trust store, which includes the root certs already. For this tutorial, I chose the latter.
If anyone wants to dig into this, take a look at the issue on the OpenLiberty GitHub page.
You need to find the location of your Java JDK. From there, your cacerts file should be located under lib/security/cacerts. You can use ${env.JAVA_HOME} in your pom.xml to point to the location of your Java SDK. Add a javaKeystoreLocation property to your pom.xml file in the project root directory (the <properties></properties> element will be near the bottom).
<properties>
    <httpsPort>8543</httpsPort>
    <httpPort>8181</httpPort>
    <javaKeystoreLocation>${env.JAVA_HOME}/lib/security/cacerts</javaKeystoreLocation>
</properties>
The <mpJwt> element configures MP-JWT auth. The id can be whatever you want it to be. The audience is set by the Okta authorization server and is set to the default value. Notice that issuer and jwksUrl reference another property ${oktaDomain}. This needs to be added to the pom.xml file as well (filling in the value for your actual Okta developer domain).
<properties>
  ...
  <javaKeystoreLocation>${env.JAVA_HOME}/lib/security/cacerts</javaKeystoreLocation>
  <oktaDomain>{yourOktaDomain}</oktaDomain>
</properties>
TIP: The processed server.xml will be created at target/classes/config/server.xml. You can look at it to make sure your variables are properly substituted.
Finally, change the ProtectedController to match the following.
src/main/java/com/okta/microprofile/DemoAPI/DemoAPIRestApplication.java
package com.okta.microprofile.DemoAPI.secure;

import org.eclipse.microprofile.jwt.Claim;

import javax.annotation.security.RolesAllowed;
import javax.enterprise.context.RequestScoped;
import javax.inject.Inject;
import javax.ws.rs.GET;
import javax.ws.rs.Path;
import java.util.Set;

@Path("/protected")
@RequestScoped
public class ProtectedController {

    @Inject
    @Claim("groups")
    private Set<String> groups;

    @Inject
    @Claim("sub")
    private String subject;

    @GET
    @RolesAllowed({"Admin", "Everyone"})
    public String getJWTBasedValue() {
        return this.subject + ": " + this.groups.toString();
    }

}
This defines a single protected GET endpoint and uses CDI (Contexts and Dependency Injection) to return the groups claim and the sub claim from the JWT.
Test The Protected Controller
Now you’re going to use HTTPie to make an authenticated request. Copy the token value from the OIDC Debugger. Tokens expire in 3600 seconds, or one hour, so if it’s been longer than an hour since you generated the token, you will need to regenerate it.
In a shell, store the token in a variable.
TOKEN=eyJraWQiOiJxMm5...
Rebuild your app and start the server.
mvn install liberty:start-serverTest the protected endpoint. First, without the JWT.
http :8181/DemoAPI/data/protectedYou’ll get an error.
HTTP/1.1 401 Unauthorized
...
Now test it using the JWT.
http :8181/DemoAPI/data/protected "Authorization: Bearer $TOKEN"You should see something like this:
HTTP/1.1 200 OK
Content-Language: en-US
Content-Length: 55
Content-Type: application/octet-stream
Date: Mon, 08 Jul 2019 20:58:05 GMT
X-Powered-By: Servlet/4.0

[email protected]: [Everyone, Admin]
I was unable to get things to work after making these changes. I contacted a MicroProfile expert I know and they suggested configuring a public key location in src/main/resources/META-INF/microprofile-config.properties:
mp.jwt.verify.publickey.location=https://okta.okta.com/oauth2/default/v1/keysI tied this and had no luck. I did find that adding JJWT to my pom.xml solves the problem.
<dependency>
  <groupId>io.jsonwebtoken</groupId>
  <artifactId>jjwt-jackson</artifactId>
  <version>0.10.5</version>
  <scope>runtime</scope>
</dependency>
Protect The POST Endpoint Of The REST API
The last thing you’re going to do is add JWT auth to the POST endpoint of our simple REST API. Open the LettersController and add @RolesAllowed({"Everyone"}) to the function definition.
OK. Time to be pedantic. Notice that the @RolesAllowed annotation is actually being used to map a groupsclaim. Roles and groups aren’t the same thing, but ultimately these are just string values passed from the OAuth OIDC provider to the REST app via the JWT, so it’s really up to the client app to implement the authorization strategy properly.
public class LettersController {

    ...

    @POST
    @RolesAllowed({"Everyone"}) // <-- ADD ME!!!
    @Consumes("text/plain")
    public String addLetter(String newLetter) {
        String trimmed = newLetter.trim();
        this.letters.add(trimmed);
        return "Letter '" + trimmed + "' added!";
    }

}
Update the server by running: mvn install.
Test the now-protected endpoint without the JWT.
http POST :8181/DemoAPI/data/letters Content-Type:text/plain <<< "D"
...
HTTP/1.1 401 Unauthorized
Content-Language: en-US
Content-Length: 0
...
Do it again with the JWT.
http POST :8181/DemoAPI/data/letters Content-Type:text/plain "Authorization: Bearer $TOKEN" <<< "D"
...
HTTP/1.1 200 OK
Content-Language: en-US
Content-Length: 17
...

Letter 'D' added!
The GET endpoint is still public:
http :8181/DemoAPI/data/letters
...
HTTP/1.1 200 OK
Content-Language: en-US
Content-Length: 10
...

A, B, C, D
Learn More About JWT Auth and MicroProfile
That’s it! In this tutorial, you used MicroProfile to create a very simple REST API. You also secured the API using MP-JWT and role-based authorization and used Okta as an OAuth 2.0 / OIDC provider.
You can find the source code for this example on GitHub at oktadeveloper/okta-microprofile-jwt-auth-example.
There’s a ton more you can dig into moving forward, including learning to use MicroProfile in a microservice cluster. If you want to keep going with MicroProfile, check out their website. The MP-JWT documentation is also pretty helpful.
Also, here are some more links from the Okta blog to keep you going:
- Simple Token Authentication for Java Apps
- Get Started with Spring Boot, OAuth 2.0, and Okta
- 10 Excellent Ways to Secure Your Spring Boot Application
- What Happens If Your JWT Is Stolen?
And here are some tools that you may find useful when working with JWTs:
If you have any questions about this post, please add a comment below.
Published at DZone with permission of Andrew Hughes. See the original article here.
Opinions expressed by DZone contributors are their own.
Comments