How to Set MX Records via API: Automate Email Routing Programmatically
Set MX records automatically with the name.com API instead of by hand. Includes curl examples, Google Workspace routing, and sandbox testing.
Every domain you register for a user without setting MX records just creates broken email configurations. At five domains, it’s a minor annoyance. At five hundred, it’s a support backlog. At five thousand, it’s a full-time job.
If your platform provisions domains for users (whether that’s a website builder, a multi-tenant SaaS, or a developer tool that provides domain-at-checkout), email routing belongs in your provisioning pipeline, executed immediately after domain registration, without any user involvement.
This guide covers the complete implementation of MX records via API: how MX records work, what each field actually means, how to authenticate with the name.com API, and how to write the curl commands that create and verify MX records against the sandbox before you touch production.
Why Manually Managing MX Records Doesn’t Scale
When you don’t automate MX records, the failure mode is predictable: a user registers a domain through your platform, sets up their email with Google Workspace or Microsoft 365, and then waits. Email doesn’t arrive. They open a support ticket. Your team investigates. The problem is more than likely that nobody set the MX records.
It’s an easy fix, but only if you’ve wired it into your pipeline. If the fix requires a human (your team or the user), it might get missed. At scale, “gets missed sometimes” and “breaks at scale” are the same thing.
Fire off a [POST call to /core/v1/domains/{domainName}/records](https://docs.name.com/api/v1/reference/dns/create-record#create-record) immediately after your domain registration call returns successfully. One HTTP request, with a fixed payload containing your standard MX configuration, timed to run before the user ever sees the “domain registered” confirmation. No manual steps, no UI navigation, no user action required.
MX Record Anatomy: What the Fields Actually Mean
An MX record has three required fields that your API call needs to supply. These fields are pretty straightforward. There are also MX-only fields, like priority. Finally, TTL should be set according to how often you think the record might change. If it’s going to change frequently, you’ll want a lower TTL to lower propagation times.
type: Always"MX"for mail exchanger records. Required.host: The hostname relative to the domain zone. For apex routing (mail to[email protected]), use an empty string""or"@". Most platforms route email at the apex. Required.answer: The target for the MX record. Required.priority: An integer. Lower number = higher preference. DNS resolvers try the lowest number first.ttl: Time to live in seconds. Minimum 300 (5 minutes) on name.com’s API. A value of 300 to 3600 is reasonable for most setups.
RFC 5321 (the spec that defines how SMTP works) explicitly states that MX records must point to a fully qualified domain name, not an IP address. If your email provider gives you an IP address rather than a hostname, don’t put it in the answer field. Create an A record pointing to that IP first (e.g., mail.yourdomain.com pointing to 203.0.113.42), then set your MX record’s answer to mail.yourdomain.com.
Priority controls failover order. Set priority: 10 and priority: 20 on two different records, and resolvers will try the 10 server first, falling back to the 20 server only if the first is unreachable. Two records at the same priority value split traffic randomly between them, which suits some setups but isn’t what most people mean by “primary and backup.” Use distinct priority values if you want predictable failover.
Authenticating With the name.com DNS API
name.com uses HTTP Basic Authentication. Your credentials are your API username and a generated API token (your account password won’t work here). Generate a token at https://www.name.com/account/settings/api under API Tokens. You’ll get a username/token pair that every API call requires.
Test in the sandbox first. The sandbox endpoint is https://api.dev.name.com. Your sandbox credentials differ slightly: append -test to your username (so yourname becomes yourname-test) and use the separate sandbox token shown on the same API Tokens page. The production endpoint is https://api.name.com, with your regular credentials. Store these as environment variables in your codebase from day one.
There’s one gotcha with 2FA that’s easy to miss. If your name.com account has two-factor authentication enabled, you must explicitly toggle “name.com API Access” on at Account Settings → Security Settings. Without it, every API call returns an authentication error (HTTP Response 401), but not the exact reason why.
If you prefer iterating on requests interactively before scripting, httpie or Postman both work well for testing individual calls. curl is what we’ll use here because it’s available practically everywhere and makes requests fully reproducible.
Creating an MX Record: The Actual API Call
The endpoint for programmatic MX record creation is POST https://api.dev.name.com/core/v1/domains/{domainName}/records. Replace {domainName} with the domain you’re targeting, for example yourdomain.com.
curl -u "yourusername-test:your-sandbox-token" \
  -X POST \
  -H "Content-Type: application/json" \
  -d '{
    "type": "MX",
    "host": "",
    "answer": "mail.yourmailprovider.com",
    "priority": 10,
    "ttl": 300
  }' \
  "https://api.dev.name.com/core/v1/domains/yourdomain.com/records"
A successful response returns HTTP 200 with the created record object:
{
  "id": 12345678,
  "domainName": "yourdomain.com",
  "host": "",
  "fqdn": "yourdomain.com.",
  "type": "MX",
  "answer": "mail.yourmailprovider.com",
  "ttl": 300,
  "priority": 10
}
A 401 means your credentials are wrong or the 2FA toggle mentioned above is misconfigured. A 404 on the domain means the domain isn’t registered under the account tied to your API credentials.
Routing to Google Workspace looks slightly different because Google supplies specific MX hostnames with pre-defined priority values. The primary MX record call looks like this:
curl -u "yourusername-test:your-sandbox-token" \
  -X POST \
  -H "Content-Type: application/json" \
  -d '{
    "type": "MX",
    "host": "",
    "answer": "aspmx.l.google.com",
    "priority": 1,
    "ttl": 300
  }' \
  "https://api.dev.name.com/core/v1/domains/yourdomain.com/records"
Use Google’s priority values verbatim (1, 5, 10, 20, 30) rather than values you invent. This more than likely applies to any managed provider. Their onboarding docs give you the exact hostnames and priorities, and those values reflect their infrastructure’s routing logic.
You can verify the record was created with a GET request:
curl -u "yourusername-test:your-sandbox-token" \
  "https://api.dev.name.com/core/v1/domains/yourdomain.com/records"
The response includes all DNS records for the domain. Your new MX record should appear in the array:
{
  "records": [
    {
      "id": 12345678,
      "domainName": "yourdomain.com",
      "host": "",
      "fqdn": "yourdomain.com.",
      "type": "MX",
      "answer": "aspmx.l.google.com",
      "ttl": 300,
      "priority": 1
    }
  ]
}
Configuring Failover: Multiple MX Records With Priority
A primary server plus two fallbacks means three API calls, one per record:
# Primary mail server — priority 10
curl -u "yourusername-test:your-sandbox-token" \
  -X POST \
  -H "Content-Type: application/json" \
  -d '{
    "type": "MX",
    "host": "",
    "answer": "mail-primary.yourmailprovider.com",
    "priority": 10,
    "ttl": 300
  }' \
  "https://api.dev.name.com/core/v1/domains/yourdomain.com/records"

# Secondary — priority 20
curl -u "yourusername-test:your-sandbox-token" \
  -X POST \
  -H "Content-Type: application/json" \
  -d '{
    "type": "MX",
    "host": "",
    "answer": "mail-secondary.yourmailprovider.com",
    "priority": 20,
    "ttl": 300
  }' \
  "https://api.dev.name.com/core/v1/domains/yourdomain.com/records"

# Tertiary — priority 30
curl -u "yourusername-test:your-sandbox-token" \
  -X POST \
  -H "Content-Type: application/json" \
  -d '{
    "type": "MX",
    "host": "",
    "answer": "mail-tertiary.yourmailprovider.com",
    "priority": 30,
    "ttl": 300
  }' \
  "https://api.dev.name.com/core/v1/domains/yourdomain.com/records"
DNS resolvers traverse priority in ascending order. A sending mail server looks up your domain’s MX records, sorts them by priority value, and tries the lowest first. If priority: 10 times out or refuses the connection, it falls back to priority: 20, then priority: 30. This is standard SMTP failover behavior defined in RFC 5321.
For Google Workspace, Microsoft 365, and most managed email providers, the full list of MX hostnames and required priority values appears during setup. Copy those values exactly. Consolidating to a single record or reassigning priorities will break their infrastructure’s routing logic.
Wiring MX Record Creation into Your Domain Provisioning Pipeline
After your domain registration API call returns a success response, fire your MX record creation calls immediately before returning control to the user.
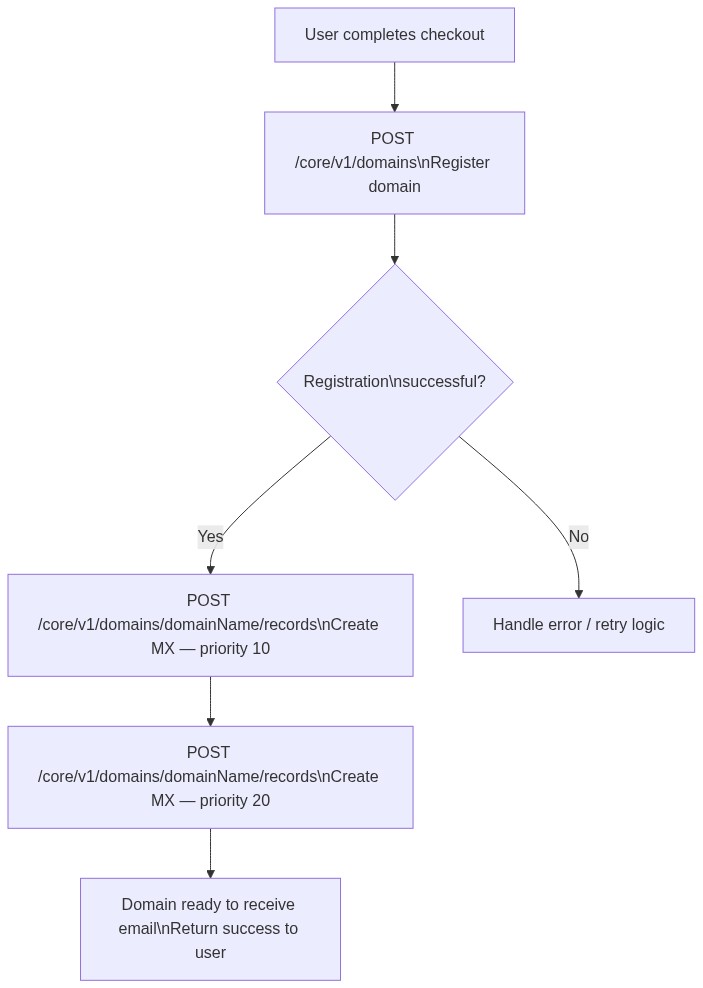
Store your standard MX payload as a configuration constant (provider FQDN, priority, and TTL) rather than hardcoding it inline per request. When you switch email providers, you change the relevant values in one place.
# pseudocode
MX_RECORDS = [
  { type: "MX", host: "", answer: "aspmx.l.google.com", priority: 1, ttl: 300 },
  { type: "MX", host: "", answer: "alt1.aspmx.l.google.com", priority: 5, ttl: 300 },
  { type: "MX", host: "", answer: "alt2.aspmx.l.google.com", priority: 10, ttl: 300 }
]

# On successful domain registration:
for record in MX_RECORDS:
  POST /core/v1/domains/{domainName}/records with record
name.com’s API is built for platforms that need to embed domain registration and DNS management directly into their products, without redirecting users to a registrar dashboard. It follows the OpenAPI specification, which integrates cleanly with AI code generation tools and produces consistent, predictable results.
To go live from here:
- Generate a sandbox token at
https://www.name.com/account/settings/api - Run the
POST /core/v1/domains/{domainName}/recordscurl command from Section 4 against an already-registered sandbox domain - Confirm with the GET call that the record appears correctly
- Switch your base URL from
api.dev.name.comtoapi.name.com, update your credentials to the production token and standard username, and you’re live
You can have all of this working in under an hour.
Final Thoughts
MX records belong in your domain provisioning pipeline. Manual checklists and user documentation will only cause you and your users headaches.
The two mistakes most likely to break things quietly are pointing answer at an IP address instead of an FQDN, and missing the 2FA API access toggle. Both are easy to catch in the sandbox before they reach production.
The full endpoint reference and API token generation are available at docs.name.com/docs/api-overview, with no subscription required to get started.
Comments