Customization and Externalization of Property Files in Spring Boot
Check out this tutorial to learn more about using customization and externalization with property files in Spring Boot using the Eclipse/STS configuration.
Join the DZone community and get the full member experience.
Join For FreeBy now, you must know why we use Spring boot. Yep, that's it — because it's developer friendly! As the features and complexity of the Spring framework are growing, the configuration of your project becomes a more tedious task. To counter the issues developers on the Pivotal team come up with, the Spring Boot project and Spring Jira are improving containerless applications, which triggered the idea of Spring Boot.
Let's have a look at the configuration for the customization and externalization of property files that can be done in a Spring Boot application.
Customization and Externalization of Property Files
Eclipse/STS Configuration
By default, Spring Boot checks for the applications.property file in the class path. Generally, property files get packaged with JAR/WAR, and during execution, the PF application properties are read from the bundled property file.
Now, think of a scenario where you need to change the configuration. Since your property files are not externalized, you need to repackage everything just for changing parts of the configuration. Now, this will be treated as code changes and has to go through all life cycles of software development.
Let's have a look at how we can solve this problem.
Create a new project on https://start.spring.io/:

Next, import the project in Eclipse/STS IDE as a Maven project. Then, you will need to create multiple property files as per the environment in the format below:
format <project_name>-<profile_name>.properties
eq. boot-local.properties, boot-dev.properties

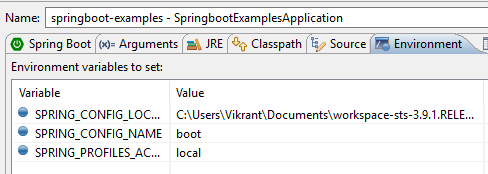
Now, right click on the project Run as->Run Configurations->Environment
Then, add the below variables:
SPRING_CONFIG_LOCATION |
<provide property file path> |
SPRING_CONFIG_NAME |
<property file custom name> |
SPRING_PROFILES_ACTIVE |
<provide profile name> |
Now, you can start the application as a Spring Boot app and observe the console logs and look for "The following profiles are active: local."
  .   ____          _            __ _ _
 /\\ / ___'_ __ _ _(_)_ __  __ _ \ \ \ \
( ( )\___ | '_ | '_| | '_ \/ _` | \ \ \ \
 \\/  ___)| |_)| | | | | || (_| |  ) ) ) )
  '  |____| .__|_| |_|_| |_\__, | / / / /
 =========|_|==============|___/=/_/_/_/
:: Spring Boot :: (v2.0.4.RELEASE)

2018-08-15 13:36:15.391 INFO 16396 --- [ restartedMain] c.s.e.SpringbootExamplesApplication : Starting SpringbootExamplesApplication with PID 16396
2018-08-15 13:36:15.392 INFO 16396 --- [ restartedMain] c.s.e.SpringbootExamplesApplication : The following profiles are active: local
2018-08-15 13:36:15.443  INFO 16396 --- [  restartedMain] ConfigServletWebServerApplicationContext : Refreshing org.springframework.boot.web.servlet.context.AnnotationConfigServletWebServerApplicationContext@1632c14c: startup date [Wed Aug 15 13:36:15 IST 2018]; root of context hierarchy
2018-08-15 13:36:16.636  INFO 16396 --- [  restartedMain] trationDelegate$BeanPostProcessorChecker : Bean 'org.springframework.transaction.annotation.ProxyTransactionManagementConfiguration' of type [org.springframework.transaction.annotation.ProxyTransactionManagementConfiguration$$EnhancerBySpringCGLIB$$1a785b17] is not eligible for getting processed by all BeanPostProcessors (for example: not eligible for auto-proxying)
2018-08-15 13:36:17.094  INFO 16396 --- [  restartedMain] o.s.b.w.embedded.tomcat.TomcatWebServer  : Tomcat initialized with port(s): 8090 (http)
Now, you can easily switch between the different environments just by changing thespring_profile_active value!
Note: If you want to have your property file start with the name application, then simply remove the environment variable spring_config_name and rename the property files as application-local.properties. By default, Spring searches for property file with the name application.
Unix/Linux Configuration
Generally, JAR/ WAR is deployed on the Unix/Linux servers. Let's see how we can use the above configurations to get us started.
First, set up the environment and put property files in a specific location.
In Linux/Unix, they have profile files named as .profile/.bash_profile, which is used for maintaining system-wide environment variables. Set the below variables in the same file:
export SPRING_CONFIG_LOCATION = <provide property file path>
export SPRING_CONFIG_NAME = <property file custom name>
export SPRING_PROFILES_ACTIVE = <provide profile name>
Now, simply run JAR using the command below:
java -jar <jar_name>If you don't want to set the environment variables in .profile/.bash_profile, then simply create a new Shell script and execute it, like so:
#!/bin/sh
export SPRING_CONFIG_LOCATION = <provide property file path>
export SPRING_CONFIG_NAME = <property file custom name>
export SPRING_PROFILES_ACTIVE = <provide profile name>

java -jar ./<jar_name>
There you have it! Let me know what you think in the comments below!
Opinions expressed by DZone contributors are their own.
Comments