Developing Secure REST API Using Spring Boot SSL Bundle Feature
Learn how to secure REST APIs in Spring Boot using SSL and self-signed certificates. Set up HTTPS on the server and configure a client to consume secure endpoints.
Join the DZone community and get the full member experience.
Join For FreeSecure Sockets Layer (SSL) is a key component in securing communication between systems, especially in layered or service-oriented architectures.
In such environments, a typical Spring Boot service might expose a REST endpoint, which is then consumed by another Spring Boot service acting as a client. When a host service exposes a secure endpoint, it must ensure that only authorized services are allowed to connect.
There are several ways to secure REST endpoints, including certificate exchange, JWT tokens, and OAuth. In this article, we’ll focus on certificate-based API protection using a self-signed certificate.
The diagram below illustrates the steps involved in establishing secure communication.
|
|

Hosting a Secure API in Spring Boot
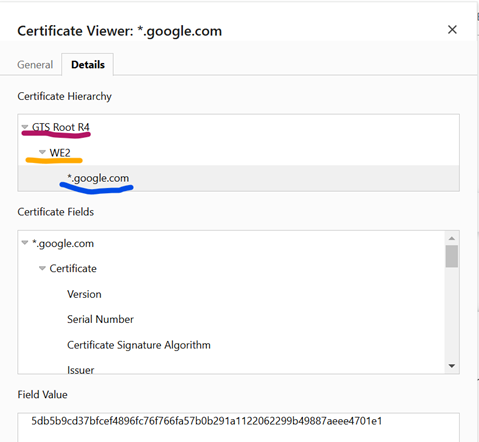
To host a secure REST API using Spring Boot, the service needs to go through a few key steps. First, you must generate a certificate signing request (CSR) and have it signed by a trusted Certificate Authority (CA).
As part of this process, you'll typically receive three certificates:
- The host certificate
- An intermediate certificate
- A root certificate
These three certificates are then combined to form a certificate chain, which ensures the client can verify the entire trust path—from your service all the way to the root authority.
For this article, we won’t be getting a certificate signed by a trusted authority. Instead, we’ll create a self-signed certificate. Self-signed certificates are commonly used to host and test HTTPS APIs in non-production environments. For production, however, it's best practice to use certificates signed by a trusted Certificate Authority (CA).
Steps to Create a Self-Signed Certificate
1. Generating a Keystore File
A keystore file acts like a secure database for storing cryptographic keys and certificates. It can be in either .JKS (Java Keystore) format or .P12/.PFX (PKCS12) format.
To generate a keystore, we’ll use the keytool command, which comes bundled with the JDK installation.
|
keytool -genkeypair -alias mylocalsslapp -keyalg RSA -keysize 2048 -storetype PKCS12 -keystore mysslapp.p12 -validity 365
|
While creating a certificate, the following details need to be provided, which will be validated by certificate authority to sign your certificate request.
keytool -genkeypair -alias mylocalsslapp -keyalg RSA -keysize 2048 -storetype PKCS12 -keystore mysslapp.p12 -validity 365 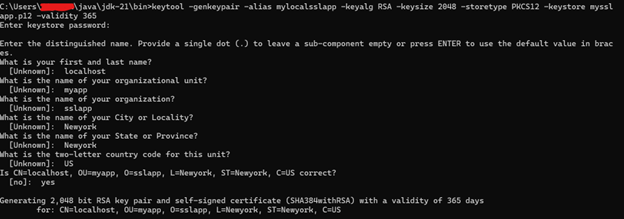
Once this command runs successfully, you’ll see the mysslapp.p12 file created in the current working directory.

You can view the contents of the generated certificate using the following command:

Now your certificate is ready to be used in the Spring Boot server application.
SSL Configuration on the Server
Spring Boot makes it easy to configure and expose HTTPS APIs. With the recent introduction of SSL Bundles, it’s now even simpler to use and manage custom SSL trust material like keystores, certificates, and private keys. An SSL Bundle allows you to apply SSL configurations across one or more connections using standard Spring Boot APIs.
Create a REST Service
Let’s start by creating a simple userService that will return some static user data.
@RestController
 @RequestMapping("/UserService")
 public class UserController {

     @GetMapping("/userDetails")
     public Map<String,String> getUserData(){
         Map<String,String> userMap = new HashMap<>();
         userMap.put("firstName","Bob");
         userMap.put("lastName","Wilson");
         userMap.put("department","security");
         userMap.put("phoneNumber","123-456-7890");

         return userMap;
}

}
Configure SSL Properties With Keystore
Add the following entries to the application.properties file of your Spring Boot server application to enable HTTPS using the keystore:
server.port=8443
server.ssl.bundle=sslbundle
spring.ssl.bundle.jks.sslbundle.key.alias=mylocalsslapp
spring.ssl.bundle.jks.sslbundle.keystore.location=classpath:mysslapp.p12
spring.ssl.bundle.jks.sslbundle.keystore.password=myappsecret
spring.ssl.bundle.jks.sslbundle.keystore.type=PKCS12
Provide the same keystore password you used while creating the keystore in the earlier step. Then, copy the mysslapp.p12 certificate into the resources folder of your Spring Boot project.
Once these steps are done, you’re ready to start your microservice and test the /UserService endpoint from your browser.
When you navigate to the secure endpoint using the URL below, your browser may show a warning. Simply click on “Accept the Risk” (or similar) to proceed. You should then see the response returned by the service, confirming that your API is now accessible over HTTPS.
At this point, you’ve successfully set up a secure REST service using a self-signed certificate.
You can find the corresponding code for this example on GitHub at the following location:

Calling a Secure API from a Spring Boot Client Service
Now that your secure endpoint is up and running, the next step is to configure a Spring Boot client service that can call this HTTPS endpoint. To do this, the client must trust the certificate used by the server.
Export the Certificate from the Server
The server application needs to provide its certificate to the client. This certificate will be used by the client to validate the server when making secure API calls.
Use the following command on the server to export the certificate from the keystore:
|
keytool -exportcert -alias mylocalsslapp -keystore mysslapp.p12 -storetype PKCS12 -storepass ****** -file client.crt -rfc |
This step will create a client.crt file in the location where the command is executed. This certificate file should be shared with the client application.
Configure Certificate in Client Service
Once the client receives the certificate, they should copy the .crt file into the resources folder of the client application.
Next, add the following entry to the application.properties file of the client service:
spring.ssl.bundle.pem.clientbundle.truststore.certificate=classpath:client.crt If you are using RestTemplate to call a secure REST endpoint, you can create the RestTemplate instance using an SSL bundle as shown below:
@Service
public class MyService {
    private final RestTemplate restTemplate;

    public MyService(RestTemplateBuilder restTemplateBuilder, SslBundles sslBundles) {
        this.restTemplate = restTemplateBuilder.sslBundle(sslBundles.getBundle("clientbundle")).build();
    }

    public RestTemplate getRestTemplate() {
        return restTemplate;
    }
}
Now, let’s expose another endpoint in the client service, which will internally call the secure endpoint hosted by the server application.
@RestController
@RequestMapping("/UserService")
public class UserController {

    @Autowired
    private MyService myService;


    @GetMapping("/userDetails")
    public String getUserData(){
        return myService.getRestTemplate().getForObject("https://localhost:8443/UserService/userDetails", String.class);
    }

}
Let’s call the client endpoint, which acts as the consumer of the secured server endpoint.
|
|

With this example, we successfully set up a server application that hosts a secured HTTPS endpoint, and a client application that securely consumes that endpoint.
You can find the complete code for both the server and client applications in the following GitHub repository.
Opinions expressed by DZone contributors are their own.
Comments