Spring Framework: @RestController vs. @Controller
See how you can utilize Spring's annotations to create RESTful web services.
Join the DZone community and get the full member experience.
Join For Freespring mvc framework and rest
spring’s annotation-based mvc framework simplifies the process of creating restful web services. the key difference between a traditional spring mvc controller and the restful web service controller is the way the http response body is created. while the traditional mvc controller relies on the view technology, the restful web service controller simply returns the object and the object data is written directly to the http response as json/xml. for a detailed description of creating restful web services using the spring framework, click here .

figure 1: spring mvc traditional workflow
spring mvc rest workflow
the following steps describe a typical spring mvc rest workflow:
- the client sends a request to a web service in uri form.
-
the request is intercepted by the dispatcherservlet which looks for handler mappings and its type.
- the handler mappings section defined in the application context file tells dispatcherservlet which strategy to use to find controllers based on the incoming request.
- spring mvc supports three different types of mapping request uris to controllers: annotation, name conventions, and explicit mappings.
- requests are processed by the controller and the response is returned to the dispatcherservlet which then dispatches to the view.
in figure 1, notice that in the traditional workflow the modelandview object is forwarded from the controller to the client. spring lets you return data directly from the controller, without looking for a view, using the @responsebody annotation on a method. beginning with version 4.0, this process is simplified even further with the introduction of the @restcontroller annotation. each approach is explained below.
using the @responsebody annotation
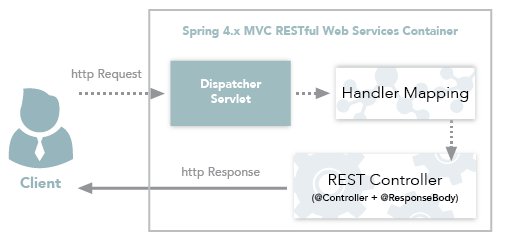
when you use the @responsebody annotation on a method, spring converts the return value and writes it to the http response automatically. each method in the controller class must be annotated with @responsebody.

figure 2: spring 3.x mvc restful web services workflow
behind the scenes
spring has a list of httpmessageconverters registered in the background. the responsibility of the httpmessageconverter is to convert the request body to a specific class and back to the response body again, depending on a predefined mime type. every time an issued request hits @responsebody, spring loops through all registered httpmessageconverters seeking the first that fits the given mime type and class, and then uses it for the actual conversion.
code example
let’s walk through @responsebody with a simple example.
project creation and setup
- create a dynamic web project with maven support in your eclipse or myeclipse ide.
- configure spring support for the project. if you are using eclipse ide, you need to download all spring dependencies and configure your pom.xml to contain those dependencies. in myeclipse, you only need to install the spring facet and the rest of the configuration happens automatically.
-
create the following java class named employee. this class is our pojo.
package com.example.spring.model;

import javax.xml.bind.annotation.xmlrootelement;

@xmlrootelement(name = "employee")
public class employee {

    string name;
    string email;

    public string getname() {
       return name;
    }

    public void setname(string name) {
      this.name = name;
    }

    public string getemail() {
       return email;
    }

    public void setemail(string email) {
      this.email = email;
    }

    public employee() {
    }
}
then, create the following @controller class:
package com.example.spring.rest;

import org.springframework.stereotype.controller;
import org.springframework.web.bind.annotation.pathvariable;
import org.springframework.web.bind.annotation.requestmapping;
import org.springframework.web.bind.annotation.requestmethod;
import org.springframework.web.bind.annotation.responsebody;

import com.example.spring.model.employee;

@controller
@requestmapping("employees")
public class employeecontroller {
    employee employee = new employee();

    @requestmapping(value = "/{name}", method = requestmethod.get, produces = "application/json")
    public @responsebody employee getemployeeinjson(@pathvariable string name) {

       employee.setname(name);
       employee.setemail("[email protected]");

    return employee;
    }

    @requestmapping(value = "/{name}.xml", method = requestmethod.get, produces = "application/xml")
    public @responsebody employee getemployeeinxml(@pathvariable string name) {

       employee.setname(name);
     employee.setemail("[email protected]");

       return employee;
    }
}-
add the
<context:component-scan>and<mvc:annotation-driven />tags to the spring configuration file.-
<context:component-scan>activates the annotations and scans the packages to find and register beans within the application context. -
<mvc:annotation-driven/>adds support for reading and writing json/xml if the jackson/jaxb libraries are on the classpath. - for json format, include the jackson-databind jar and for xml include the jaxb-api-osgi jar to the project classpath.
-
-
deploy and run the application on any server (e.g., tomcat). if you are using
myeclipse
, you can run the project on the
embedded tomcat server
.
json—use the url:http://localhost:8080/springrestcontrollerexample/rest/employees/boband the following output displays:
xml — use the
url:http://localhost:8080/springrestcontrollerexample/rest/employees/bob.xmland the following output displays: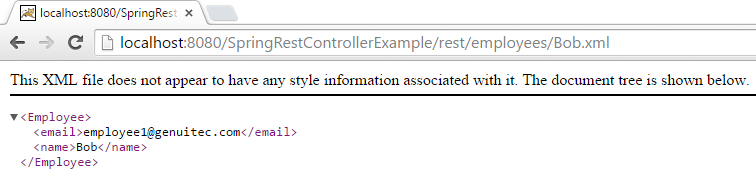
notice the @responsebody added to each of the @requestmapping methods in the return value. after that, it's a two-step process:
using the @restcontroller annotation
spring 4.0 introduced @restcontroller, a specialized version of the controller which is a convenience annotation that does nothing more than add the @controller and @responsebody annotations. by annotating the controller class with @restcontroller annotation, you no longer need to add @responsebody to all the request mapping methods. the @responsebody annotation is active by default. click
here
to learn more.
to use @restcontroller in our example, all we need to do is modify the @controller to @restcontroller and remove the @responsebody from each method. the resultant class should look like the following:
package com.example.spring.rest;

import org.springframework.web.bind.annotation.pathvariable;
import org.springframework.web.bind.annotation.requestmapping;
import org.springframework.web.bind.annotation.requestmethod;
import org.springframework.web.bind.annotation.restcontroller;

import com.example.spring.model.employee;

@restcontroller
@requestmapping("employees")
public class employeecontroller {

    employee employee = new employee();

    @requestmapping(value = "/{name}", method = requestmethod.get, produces = "application/json")
    public employee getemployeeinjson(@pathvariable string name) {

       employee.setname(name);
       employee.setemail("[email protected]");

       return employee;

    }

    @requestmapping(value = "/{name}.xml", method = requestmethod.get, produces = "application/xml")
    public employee getemployeeinxml(@pathvariable string name) {

       employee.setname(name);
       employee.setemail("[email protected]");

    return employee;
    }
}
note that we no longer need to add the @responsebody to the request mapping methods. after making the changes, running the application on the server again results in the same output as before.
conclusion
as you can see, using @restcontroller is quite simple and is the preferred method for creating mvc restful web services starting from spring v4.0. i would like to extend a big thank you to my co-author, swapna sagi, for all of her help in bringing you this information!
Published at DZone with permission of Srivatsan Sundararajan. See the original article here.
Opinions expressed by DZone contributors are their own.
Comments