Stress-Free Deployment Options with Argo Rollouts
Despite the propagation of DevOps culture for several years, many development teams still don't have a healthy implementation strategy.
Join the DZone community and get the full member experience.
Join For FreeWorking as a software consultant allowed me to get to know different realities of different companies. These realities were not always the best, and they still aren't. Despite the propagation of DevOps culture for several years, even with the emergence of many tools that facilitate the delivery of software (and many of these tools being freely distributed), many development teams still suffer when they have to deploy software in a production environment. Stress, tension, fear, guilt, and frustration are some of the feelings involved when you don't have a healthy implementation strategy.
What Is Progressive Delivery?
Users expect their applications to be available at all times. IT professionals expect to deploy their software as quickly and smoothly as possible.
Progressive delivery is a term for software delivery strategies that aim to release new features gradually.
We are talking about productive environments that are containerized and managed by Kubernetes. No matter what strategy you use to deploy your application, you will always deal with these two elements:
1) Cluster
A cluster is a set of computers linked together in a network. Each computer is a node. The purpose of the cluster is to solve difficult problems using computational speed and improve data integrity. A Kubernetes cluster is a set of nodes that run containerized applications. A container packages an application and its dependencies.
2) Load Balancer
This component is responsible for efficiently distributing incoming network traffic to a group of servers.
Big Bang
This is one of the cheapest and most primitive ways of deploying a new version of software. It's not exactly a strategy, but may seem like the natural way. During deployment, the previous version is destroyed and a new one is installed in its place.
One of the obvious problems with this model is the downtime between shutting down the stable version and starting the new one. Always thinking about the best-case scenario, it can be said that this downtime is negligible, maybe a few seconds. However, in the worst-case scenario, it can last for a few days. Of course, no one would like to take the risk of having their productive environment stopped for a long period, in addition to the stress that all this generates.
This basic form of deployment can be a valid alternative if the application is not critical, is not part of a business, or simply does not need high availability.
Blue/Green
In the blue/green strategy, two identical environments are used, one called blue and the other green, representing staging and production respectively. One of the environments stores the stable version and the other the newly deployed version. If the acceptance tests are successful, then Load Balancer traffic will be directed to the environment running the latest version.
During this deployment, there is no downtime. The process is simple and fast.
While the previous version is running, we can do the rollback just by pointing the load balancer at it again.
Some obvious issues with blue/green are the need for a dual backend and the possibility of slowdowns while current and previous backends are running concurrently. Another factor to consider is finance.
Rolling Updates
In the rolling updates strategy, the update is incremental: one pod is terminated while another is started with the new software version. During the deployment process, the maximum number of Pods that can be unavailable is only one and the maximum number of Pods that can be created is also one.
Rolling updates is the default Kubernetes strategy and is used in most cloud services.
Canary
In the canary model, deployment is incremental, as in rolling updates.
The idea of the canary model is to deploy the change to a small group of servers first, test it, and then deploy it to the remaining servers. This deployment mode serves as an early warning indicator with less impact on downtime, that is, if the first deployment fails, the remaining servers will not be impacted. This upgrade is done in phases, for example, first upgrade 10%, then 25%, until you reach 100% upgrade.
Argo CD
To paraphrase the documentation of the tool itself: “Argo CD is a declarative, GitOps continuous delivery tool for Kubernetes.”
But what is GitOps? In a nutshell, GitOps is a set of practices that empower developers to perform tasks that normally fall under the purview of IT operations teams.
Argo CD is a tool that greatly facilitates the deployment process, is easy to install, is intuitive, has many features, and is open-source.
To enrich this experience, let's do a quick demo starting with installing the Argo CD. Let's assume you already have Kubectl and Minikube installed on your desktop.
An important requirement is that you have the Ingress Controller enabled. To enable this feature in Minikube use the following command:
$ minikube addons enable ingressEverything will be simpler if you also download the following project from Github: https://github.com/marceloweb/exp-cd.git.
$ git clone https://github.com/marceloweb/exp-cd.git
$ cd exp-cd/
Within this project, I have some configurations for Istio, which is a service mesh that provides us with some interesting tools, especially in the strategy using canary.
$ kubectl apply -f istio/The next step is to install Argo CD.
$ kubectl create namespace argocd
$ kubectl apply -n argocd -f https://raw.githubusercontent.com/argoproj/argo-cd/stable/manifests/install.yaml
$ kubectl patch svc argocd-server -n argocd -p '{"spec": {"type": "LoadBalancer"}}'
And to access Argo CD in the browser, make sure you have initialized all pods. Then, with the following commands, get the admin password and port forwarding from Argo CD.
$ kubectl port-forward svc/argocd-server -n argocd 8080:443
$ kubectl -n argocd get secret argocd-initial-admin-secret -o jsonpath="{.data.password}" | base64 -d; echo
Port forwarding is recommended to do in another terminal window.
After these steps, you can access https://localhost:8080 in the browser and enter the user "admin" and the newly generated password.

After logging in, you must click "New App" to register your first software to be deployed using Argo CD.

For this example, I filled in the fields with the following values:
Application Name: realtimeapp
Project Name: default
Sync Policy: Manual
Repository URL: https://github.com/marceloweb/exp-cd.git
Revision: HEAD
Path: argo
Cluster URL: https://kubernetes.default.svc
Namespace: default
The other fields I kept unchanged. After filling in the fields, I clicked on the Create button.
If all goes well, the newly registered app will appear on the Argo CD home screen, as shown in the image below:

Argo Rollouts
With the Argo CD installed, we already have a tool that makes the deployment process much easier. Now adding Argo Rollouts allows us to use the strategies we covered a few lines ago.
Argo Rollouts is yet another tool from the excellent open-source Argo project. Argo Rollouts is a Kubernetes controller that facilitates the implementation of a progressive delivery strategy. It can also be integrated with ingress controllers and with service meshes.
Let's start by installing the tool with the following commands:
$ kubectl create namespace argo-rollouts
$ kubectl apply -n argo-rollouts -f https://github.com/argoproj/argo-rollouts/releases/latest/download/install.yaml
After the installation is complete, we can test it on Argo CD. For this, we will click on the application that we have just registered, then on the "Sync" button, and then on "Synchronize."

The first deployment will take place.

Next, we will change the canary.yml file in the project, inside the argo directory, in the line corresponding to the version of the image to be applied. In this case, I changed from v1.0-1 to v1.0-2.
spec selector matchLabels apprealtime replicas5 template metadata labels apprealtime spec containersnamerealtimeapp imagemarceloweb/app-demo-htmlv1.0-2Now I will make a commit with the new version. After that, I'll sync it again on Argo CD.
After clicking the "Synchronize" and "Synchronize" buttons again, Argo CD starts executing all the steps configured in the canary.yml file according to the rules that have been defined. At no time do we have downtime for our application.

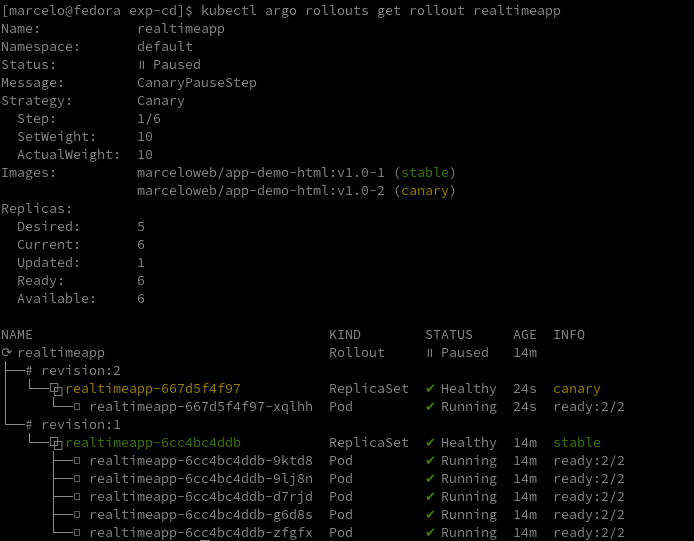
We can track the deployment both through the Dashboard, noting that whenever there is a pause defined in the canary.yml file, in the Dashboard the value "Suspended" is displayed under the App Health label. We can also follow the deployment through the terminal using the following command:
$ kubectl argo rollouts get rollout realtimeapp
It will be shown in the image below:

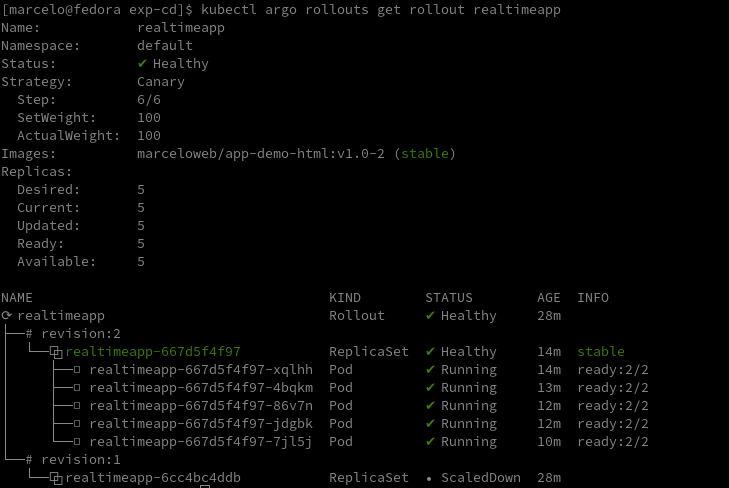
Upon successful completion, the App Health label shows the Healthy value, as exemplified in the image below:

It is also possible to verify that the deployment was successful by querying via the terminal:

Conclusion
If you are starting a project, there is no reason to opt for the old software delivery model. There is also no longer any reason to arbitrarily use any software that is not intended for software delivery. In this article, we analyzed some tools from the Argo project. There are no other significant tools on the market that are also open-source.
All codes presented in the examples in this article are available in the following repository: https://github.com/marceloweb/exp-cd.git. You can download, change, and migrate to your own repo.
Opinions expressed by DZone contributors are their own.

Comments