Trigger Salesforce Assignment Rules and Send Notifications From MuleSoft
This blog describes the process of triggering Salesforce lead or case assignment rules and sending email notifications to owners when creating records from MuleSoft.
Join the DZone community and get the full member experience.
Join For FreeIn many MuleSoft integration projects, there is a requirement to create lead or case records in Salesforce. Organizations typically use the lead assignment rule and case assignment rule to automatically assign new leads or cases to the users or queue.
When we create leads or cases from MuleSoft using the Salesforce connector, by default it does not trigger the assignment rules and does not send email notifications to owners.
This blog describes the process of triggering Salesforce lead or case assignment rules and sending email notifications to owners when creating records from MuleSoft. We will assume that the salesforce assignment rules are already set up and which get triggered when creating leads or cases from the salesforce UI. We will be focusing on triggering assignment rules in Salesforce when creating a new lead or case from Mulesoft. This blog will not cover how to create assignment rules in Salesforce.
Background
Salesforce Assignment Rules
Assignment rules in Salesforce are used to automatically assign a lead or case to the owner (user or queue).
Salesforce provides two types of assignment rules:
- Lead assignment rule: This is used to specify how leads are assigned to users or queues.
- Case assignment rule: This is used to determine how cases are assigned to users or put into queues.
When a new lead or case is created it triggers the assignment rule as well as sends the notification email to the assignee if the send email checkbox is enabled. For example: In the below screenshot, you can see two lead assignment rules. One is default and the other is a custom rule (Mule Assignment Rule) created for this blog. Please note that at a time only one assignment rule can be active.
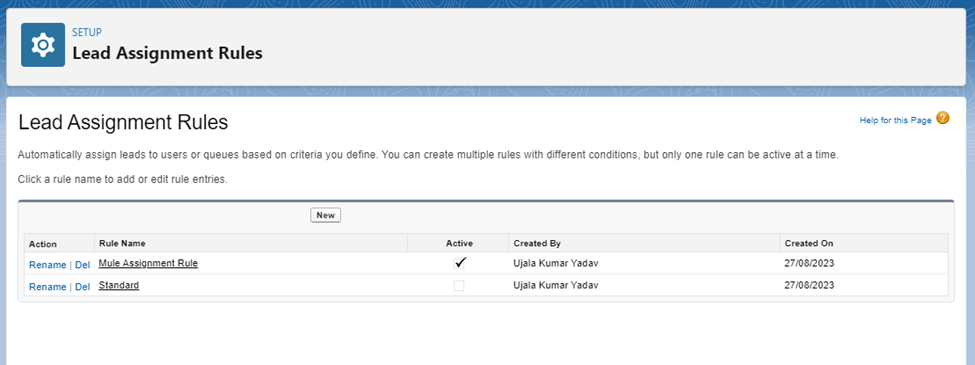
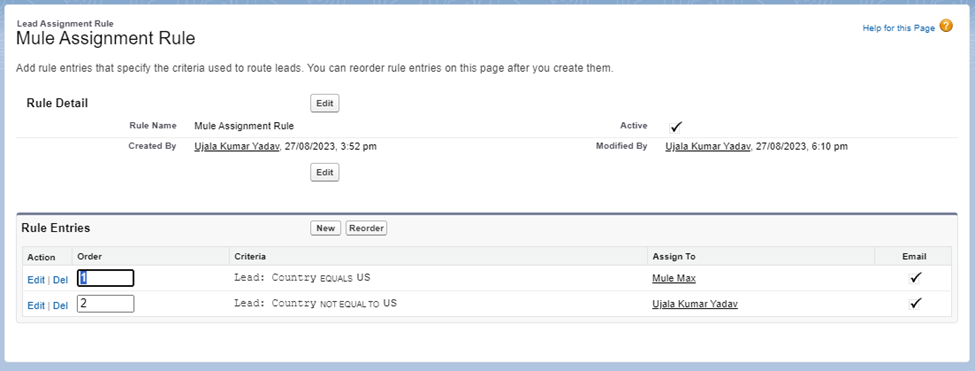
Mule Assignment Rule
In this rule, leads are assigned to the owners based on the condition for lead: country, and after that email notifications are sent to those owners as the send email checkbox is true.
To know more about the salesforce assignment rules you can refer here.
Solution
AssignmentRuleHeader
To trigger the assignment rule from MuleSoft, AssignmentRuleHeader must be specified in the salesforce connector for the specified assignment rule to be triggered. We can specify two types of AssignmentRuleHeader.
useDefaultRule: This is a boolean type and it should be set to true. This triggers the default (active) assignment rule. If this is specified, do not specify anassignmentRuleId.assignmentRuleId: In this type, we can pass the ID of a specific assignment rule to run for the case or lead. The lead or case assignment rule can be active or inactive. The Assignment rule ID can be fetched by querying theAssignmentRuleobject. If this is specified, do not specifyuseDefaultRule.
EmailHeader: To send an email notification to the lead or case owner as a part of the assignment rule, EmailHeader with "triggerUserEmail'' type set to 'true' should be passed in the Salesforce connector.
Walkthrough
For the demo, we will be considering a use case where leads are created in Salesforce using MuleSoft. We will be using the previously mentioned ‘Mule Assignment Rule’ which assigns leads to owners based on the lead country value and sends email notifications.

Step 1
Add a mule flow with the below connectors to create leads in Salesforce.

Step 2
In the salesforceHeaders variable set the AssignmentRuleHeader and EmailHeader with the below syntax:
%dw 2.0
output application/java
---
{
    "AssignmentRuleHeader": {
        "useDefaultRule": true
    },
    "EmailHeader": {
        "triggerUserEmail": true
    }
}
Here, we are using the useDefaultRule option which will trigger the default active lead assignment rule.
If your requirement is to trigger a specific assignment rule, we can specify the assignmentRuleId:
%dw 2.0
output application/java
---
{
    "AssignmentRuleHeader": {
        "assignmentRuleId": "01Q5j000000p4xaEAA"
    },
    "EmailHeader": {
        "triggerUserEmail": true
    }
}
You can get the assignmentRuleId by running SOQL: SELECT id FROM AssignmentRule WHERE Name = 'Mule Assignment Rule'
Please note that we need to pass both the headers to trigger the assignment rule and send notifications. If the requirement is to only trigger the assignment and not send an email, you can skip the EmailHeader. But if email notification is needed you need to mandatorily add the EmailHeader else it will not send an email even if the send email checkbox is true in the assignment rule.
Step 3
Add the Salesforce transformation in the Transform Message.
%dw 2.0
output application/java
---
[
    {
        "FirstName": "John",
        "LastName": "Doe",
        "Company": "XYZ Company",
        "Phone": "0123456789",
        "Email": "[email protected]",
        "Status": "Open - Not Contacted",
        "Street": "1, Main Street",
        "City": "New York City",
        "State": "NY",
        "Country": "US",
        "PostalCode": "10001"
    }
]
Please note that we are creating this lead with country = ‘US’ which will satisfy the first assignment rule condition and should assign this lead to ‘Mule Max’.
Step 4
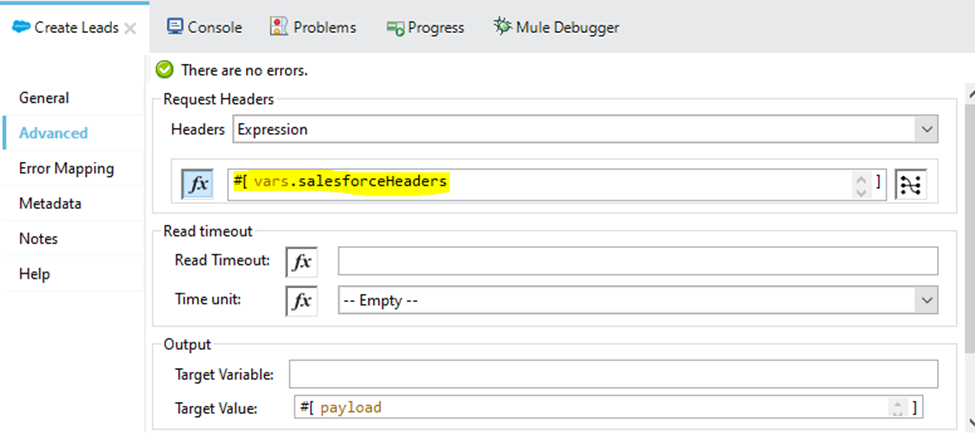
Pass the salesforceHeaders variable in the headers section of the Salesforce connector.
Step 5
Run the application and trigger the request.
Validation
- Lead Assigned: A lead is created in Salesforce and it is assigned to
‘Mule Max’as per the lead assignment rule.
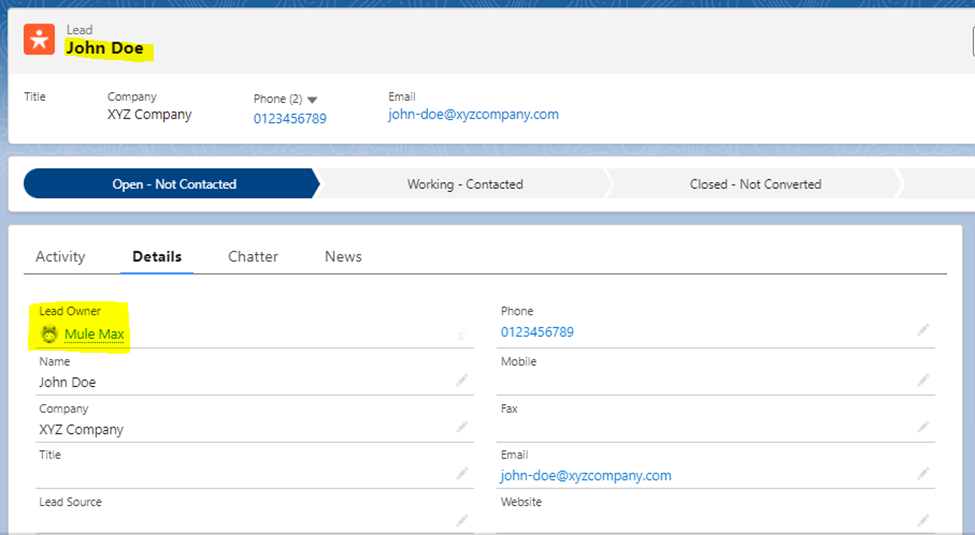
- Email Sent: Email is triggered to the lead owner as per the lead assignment rule.

Email format can be different based on the email template used in the salesforce assignment rule.
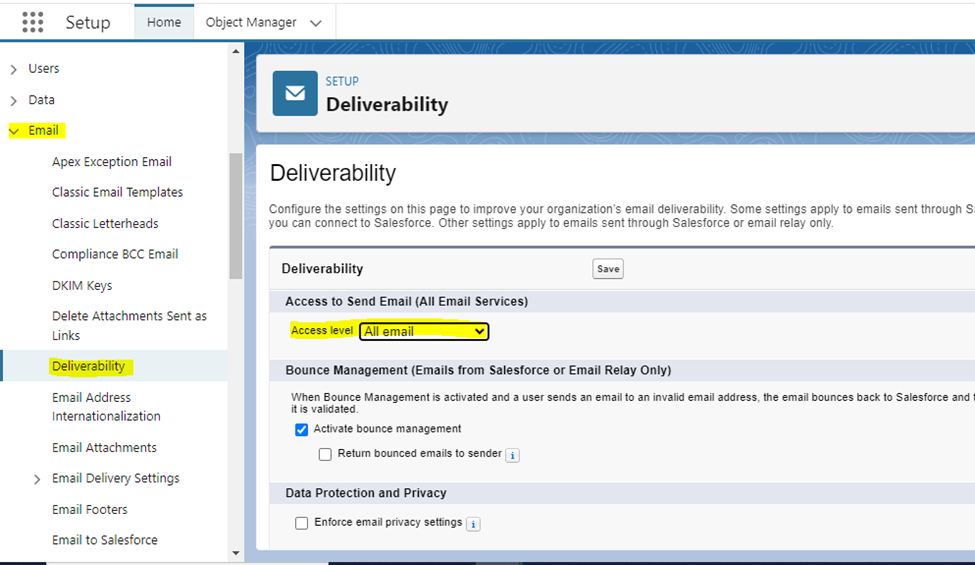
Note: If you are using the Salesforce Sandbox environment, it may not trigger the email notification because by default the send email access is disabled in Sandbox. To enable the send email access go to the email deliverability setting in the Salesforce setup and change the access level to All Email.
Summary
We have covered how to trigger the salesforce lead assignment rule and send email notifications to the lead owners when creating new leads from MuleSoft. The same process can be used for the case assignment rules.
Opinions expressed by DZone contributors are their own.
Comments