WebSockets Tutorial: Creating a Real-Time WebSocket Server
In this tutorial, let's take a look at how to create a websocket server, which will allow real-time interaction with your users.
Join the DZone community and get the full member experience.
Join For FreeA lot of the work we do with Javascript involves us sending information back and forth from servers. You are probably familiar with the concept of APIs, which send data to servers or websites in a particular format, to get a specific response back.
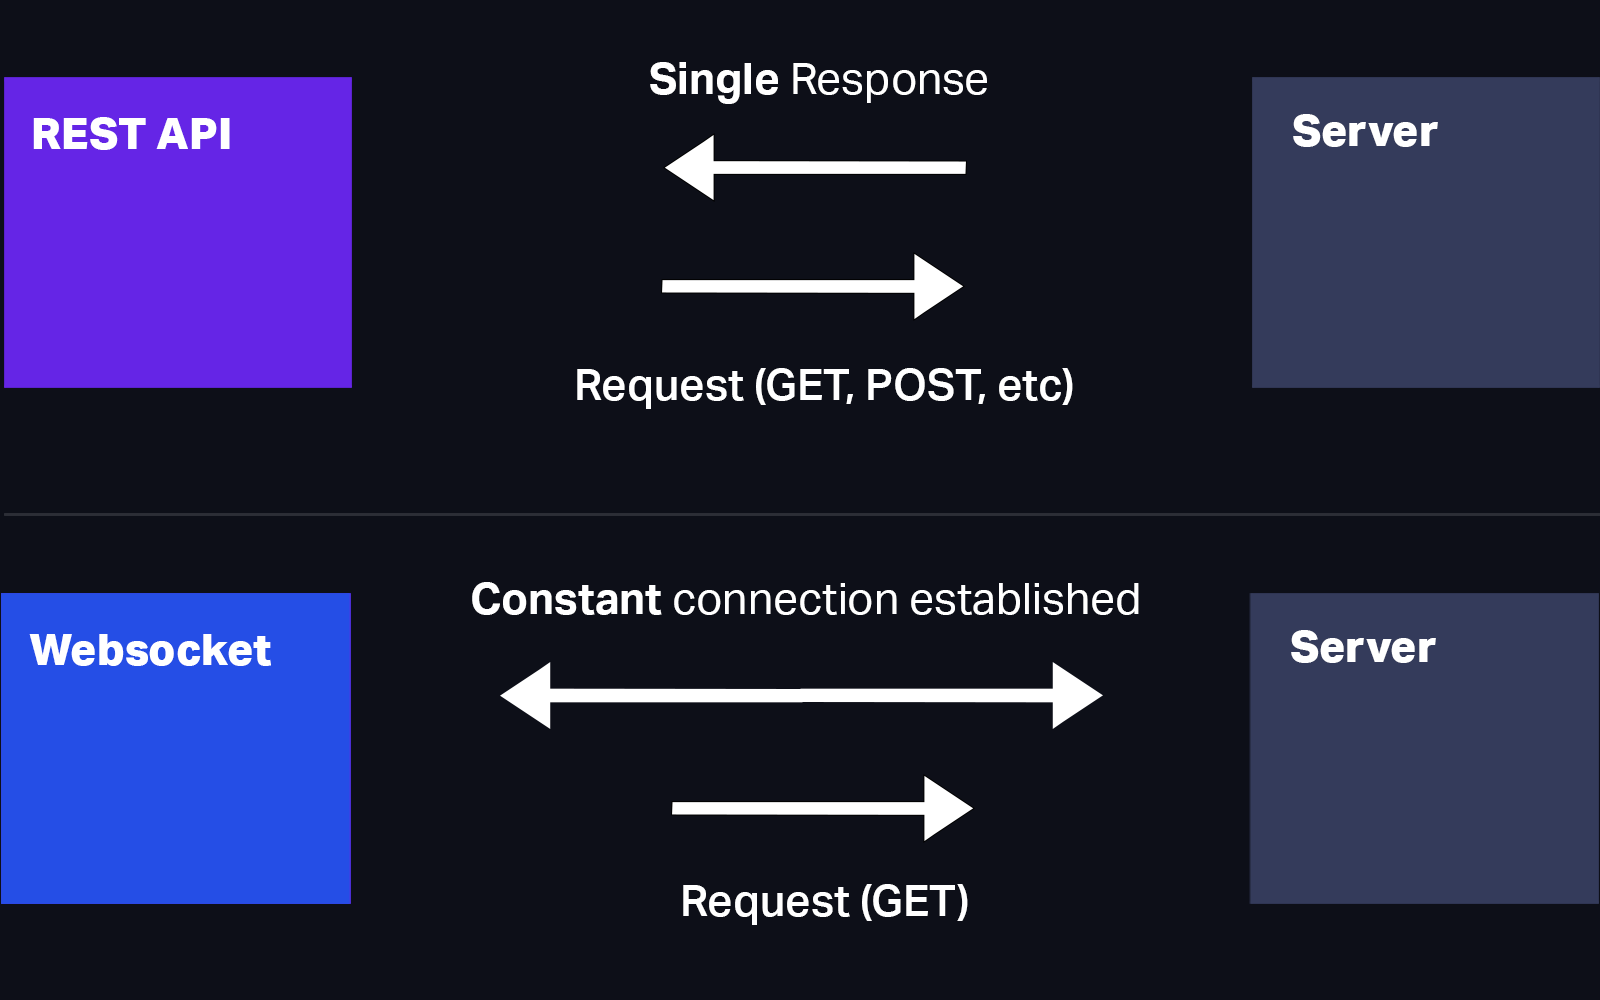
These are known as REST APIs. Although useful, they are not very good at constant streams of data. If you try to do something real-time with REST APIs, you're going to have a bad time. Fortunately, if we want a real-time connection with a user, we have an alternative, known as Websockets.
How WebSockets Work
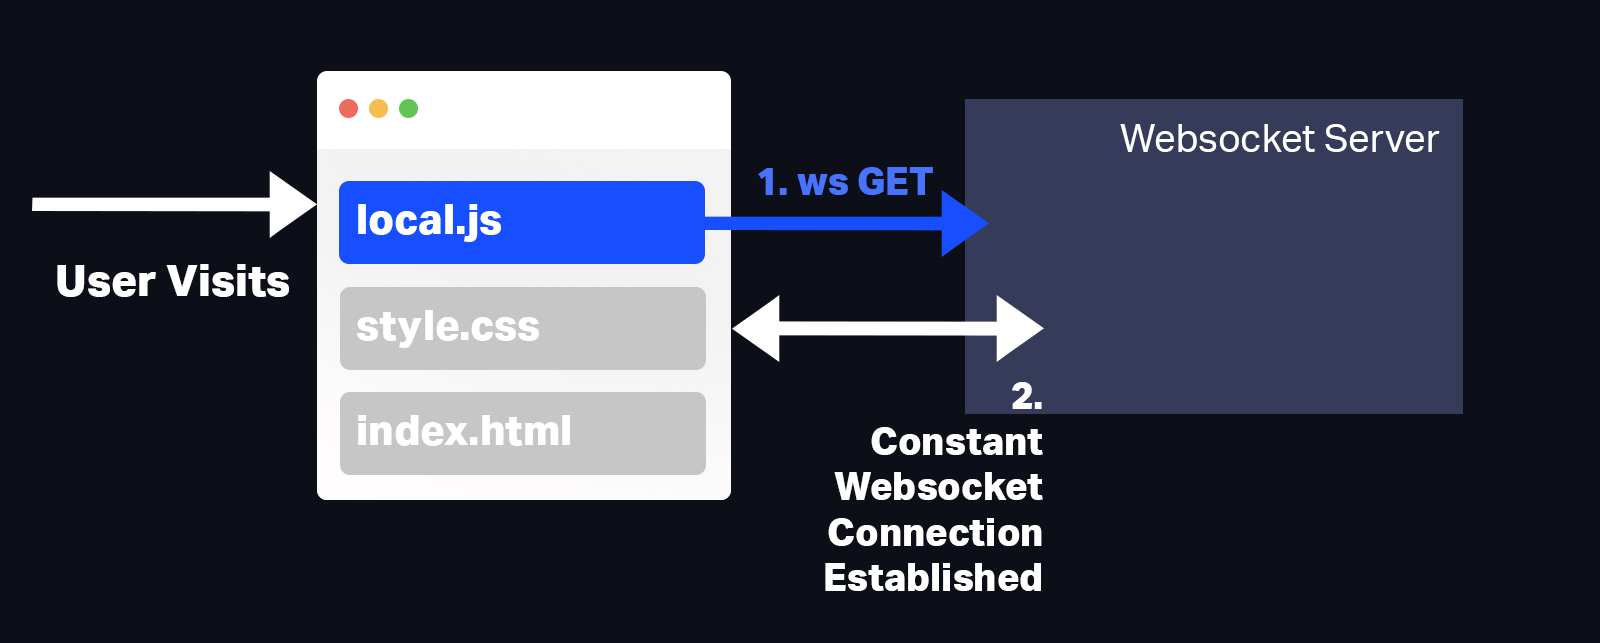
Websockets are essentially constant connections made between the server and your computer. When you access a website, it can send a GET request to the server, to initiate a WebSocket connection between the user and the server.
Websockets vs REST API

If the user leaves the website, the connection is cut, so the user only has access to the websocket as long as they continue to use the website.
How Long Can a Websocket Stay Open?
Once a WebSocket is created, it can theoretically stay open forever. There are a few exceptions to this:
- The server goes down: This will break the websocket, but we can attempt to reconnect to it.
- A power outage or internet connection problem: The connection will break if the user's internet stops.
- Inactivity: If the user doesn't interact or send data through the websocket, the connection inevitably times out.
As such, when we design our websockets, we need to consider how we reconnect to them if the user's connection stops for some reason, as to not interrupt the user's experience.
Making a WebSocket
A websocket, therefore, consists of two parts; the server and the local machine that the user is using. For what we are doing, we'll be using Node.JS as our server, but other languages also support websockets.
When the user accesses our website, we load a file with some Javascript which contains a connection string to our websocket. Meanwhile, in our backend, we will have websocket set up that the user will connect to. This is shown in the below diagram:

Step 1: Creating our Server
Let's start by making our Node.JS web server for the websocket connection. For this, we're going to be using an express server with an additional package called express-ws. This additional package will allow us to use ws in the same way we might use get.
import path from 'path'
import { fileURLToPath } from 'url'

const __filename = fileURLToPath(import.meta.url);
const __dirname = path.dirname(__filename);

import express from 'express'
import expressWs from 'express-ws'
import http from 'http'

// Our port
let port = 3000;

// App and server
let app = express();
let server = http.createServer(app).listen(port);

// Apply expressWs
expressWs(app, server);

app.use(express.static(__dirname + '/views'));

// Get the route /
app.get('/', (req, res) => {
    res.status(200).send("Welcome to our app");
});

// Get the /ws websocket route
app.ws('/ws', async function(ws, req) {
    ws.on('message', async function(msg) {
        console.log(msg);
        // Start listening for messages
    });
});
The last clause, app.ws, refers to the websocket, and that's what we'll try to connect to on the frontend. For the time being, the websocket only consoles log a message whenever it receives one from the frontend. Let's change it so that it sends something back:
// Get the /ws websocket route
app.ws('/ws', async function(ws, req) {
    ws.on('message', async function(msg) {
        // What was the message?
        console.log(msg);
        // Send back some data
        ws.send(JSON.stringify({
            "append" : true,
            "returnText" : "I am using websockets!"
        }));
    });
});
Now whenever this websocket connection receives data, it will send back an object, which we've defined above. We can then manipulate this object in our frontend, to display or change views for the user.
Step 2: Connect on Frontend
As we mentioned before, when our user visits our website, we provide them with some local javascript in our HTML document. I've added a few other elements for our demo in the index.html file:
<script src="local.js"></script>
<p>Welcome to websockets. Click here to start receiving messages.</p>
<button id="websocket-button">Click me</button>
<div id="websocket-returns"></div>
Next, we need to put some connection details in our local.js file. I have created a single connection file which we run after the document has loaded. It looks like this:
// @connect
// Connect to the websocket
let socket;
const connect = function() {
    return new Promise((resolve, reject) => {
        const socketProtocol = (window.location.protocol === 'https:' ? 'wss:' : 'ws:')
        const port = 3000;
        const socketUrl = `${socketProtocol}//${window.location.hostname}:${port}/ws/`

        // Define socket
        socket = new WebSocket(socketUrl);

        socket.onopen = (e) => {
            // Send a little test data, which we can use on the server if we want
            socket.send(JSON.stringify({ "loaded" : true }));
            // Resolve the promise - we are connected
            resolve();
        }

        socket.onmessage = (data) => {
            console.log(data);
            // Any data from the server can be manipulated here.
            let parsedData = JSON.parse(data.data);
            if(parsedData.append === true) {
                const newEl = document.createElement('p');
                newEl.textContent = parsedData.returnText;
                document.getElementById('websocket-returns').appendChild(newEl);
            }
        }

        socket.onerror = (e) => {
            // Return an error if any occurs
            console.log(e);
            resolve();
            // Try to connect again
            connect();
        }
    });
}

// @isOpen
// check if a websocket is open
const isOpen = function(ws) {
    return ws.readyState === ws.OPEN
}
To connect to a websocket, we have to use ws://, instead of HTTP, and wss://, instead of HTTPS. We put that into our new WebSocket() function to generate our connection. Inside our connection function, we then have three event listeners:
socket.onopen: If the connection is successful and open, this fires.socket.onmessage: Any time the server sends a message to us, this fires. In our example, we will append a new element to our user's HTML if they receive data that hasappendset totrue.socket.onerror: If the connection fails, or an error occurs, this will fire.
Let's tie it all together; since we are storing our socket variable in the global scope, we can send data after the connection is successful. The below event listener connects to the websocket, and then sends data to the server when the user clicks our HTML button.
When the server receives this data, it then sends back its own data, as the server's message' event fires. This comes back to the user, which then adds a new element to their document.
javascript Copy
// When the document has loaded
document.addEventListener('DOMContentLoaded', function() {
    // Connect to the websocket
    connect();
    // And add our event listeners
    document.getElementById('websocket-button').addEventListener('click', function(e) {
        if(isOpen(socket)) {
            socket.send(JSON.stringify({
                "data" : "this is our data to send",
                "other" : "this can be in any format"
            }))
        }
    });
});
Conclusion
And that's it! Now, we have a functioning Websocket, which allows you to send data to the server and back to the user. If you want to learn more or download the source code, here are some useful links:
Published at DZone with permission of Johnny Simpson, DZone MVB. See the original article here.
Opinions expressed by DZone contributors are their own.

Comments