Working With Oracle JET UI Web Components
Learn the basics for working with Oracle JET UI web components with help from the JET Cookbook.
Join the DZone community and get the full member experience.
Join For FreeFollowing on in my article series sharing what I've learned about Oracle JET (look to the bottom of this article for the complete article series), in this article given we've now explored RequireJS and Knockout, I feel comfortable enough to investigate Oracle JET's UI components for web development.
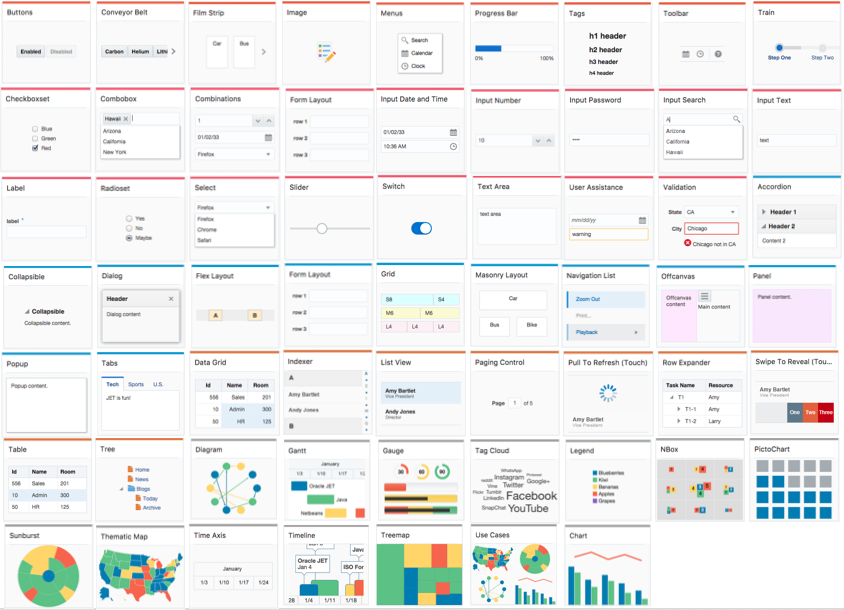
Oracle JET focuses on delivering rich client-side web components written in HTML5, CSS3, and JavaScript, that are designed predominately for web and mobile applications working with and visualizing data. At the time this article was published, JET had just on 61 different component types with more coming each release:
The JET components based on JQuery UI Widgets take on a number of responsibilities required for enterprise websites including support for WCAG2.0 accessibility compliance and internationalization. The components out of the box also support keyboard navigation, mobile-friendly touch support, animations, drag and drop, and data validation and conversion where appropriate.
Oracle JET Cookbook
As a developer working with Oracle JET UI Components, a valuable tool if not most valuable is the Oracle JET Cookbook.
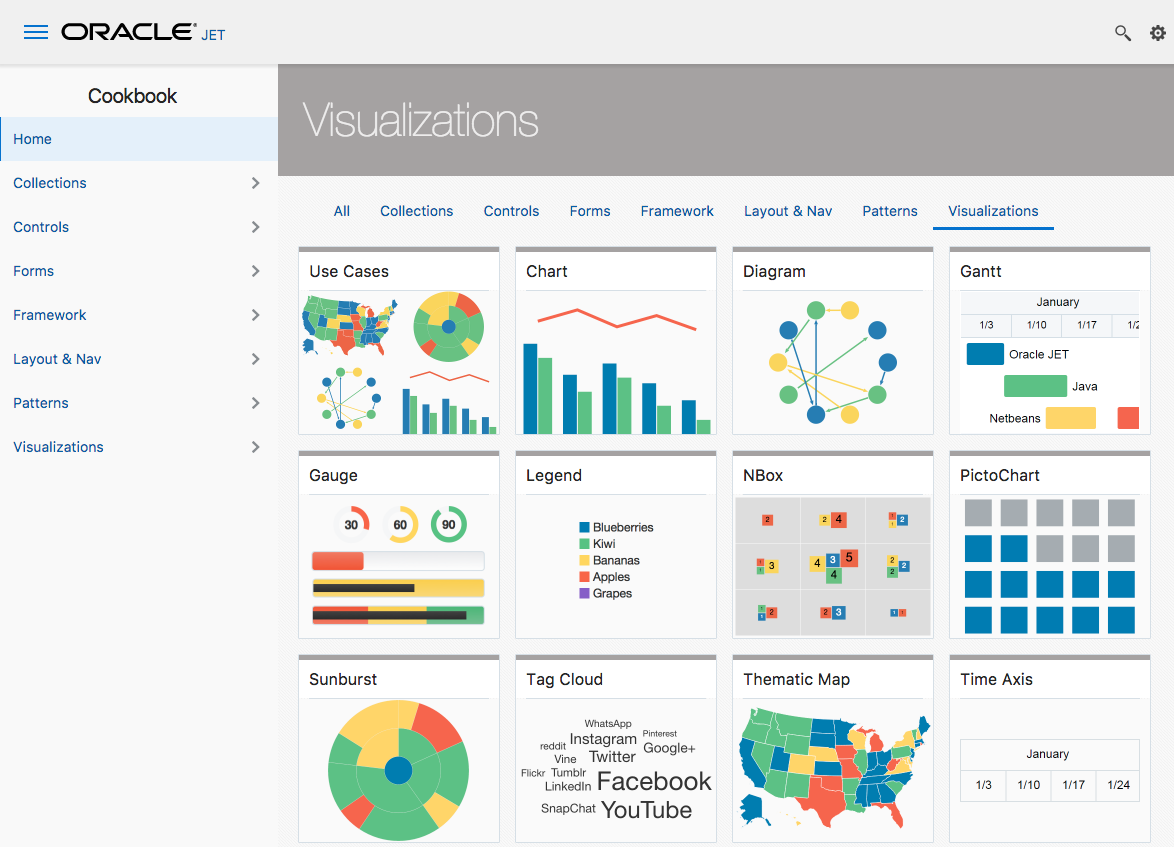
The cookbook is a live JET website demonstrating all the JET UI components in action, with numerous examples for each component including the HTML & JavaScript used. Potentially the best feature of the Cookbook is the code can be edited and tested live so we can see what our changes do, without having to build 1001 small test applications.
Overall the components are broken into 5 to 6 categories:
Controls and editable form components
Collections
Navigation
Layout
Data visualization
Individual components may look and behave differently, but within the same category have similar programmatic structures. As such it's not necessary to learn about all the components to start with, rather, we can learn the basics from a small set of UI components in each category and then expand our knowledge to cover the other components on demand.
Adding a JET UI Component to our Page
In order to add JET UI components to our own application we are best to start with generating a JET application via a Yeoman template:
yo oraclejet MyWebProject --template=navbar...and then modifying one of the separate modules such as src/js/views/dashboard.html:
<div class="oj-hybrid-padding">
  <h3>Dashboard Content Area</h3>
  <div>
     Blah blah etc
  </div>
</div>
....and src/js/viewModels/dashboard.js.
define(['ojs/ojcore', 'knockout', 'jquery'],
  function(oj, ko, $) {
    function DashboardViewModel() {
      var self = this;
      // Add our custom code here
    }
    return new DashboardViewModel();
  }
);
These act as a blank canvas for us to add code and try out our own work, but have all the plumbing set up so we don't need to configure the JET application itself.
In order to add a component to our JET application, we identify the specific component in the Cookbook we want to use and:
Read and follow the associated recipe which is typically the following steps
Copy the component's HTML markup to our page & customize properties where needed
Add the component's library to the page's JavaScript module's require() or define() RequireJS
Setup Knocking bindings
And add our own logic where needed
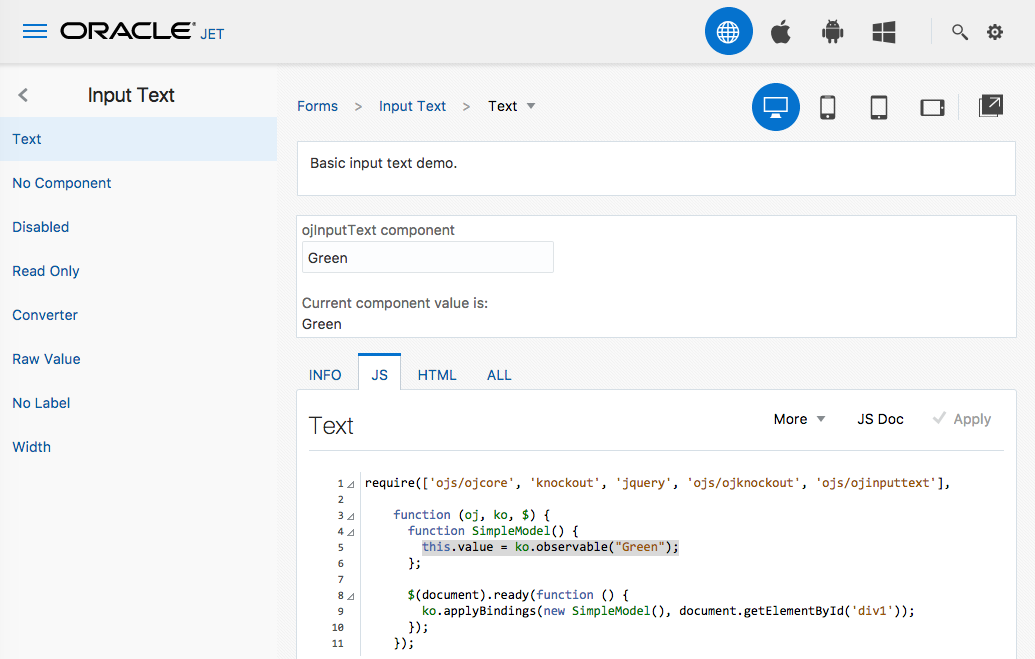
For example imagine we wanted to add a simple input text component from the Cookbook to our dashboard page:
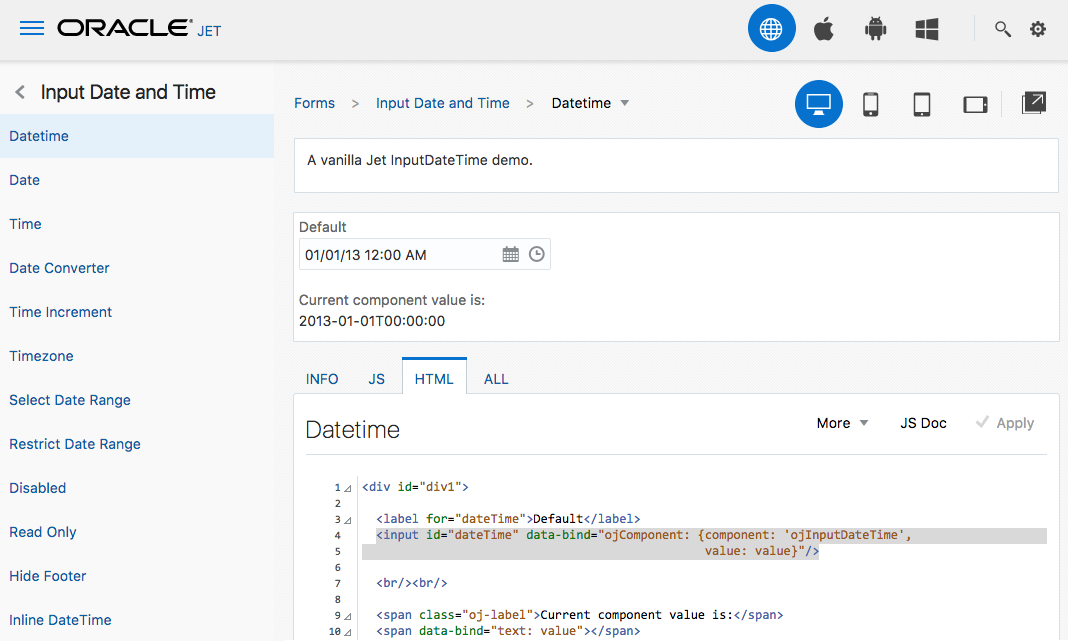
Following the recipe we identify the component's markup and copy it into our page.
I do think the choice of "value: value" is poor for teaching purposes, rather it should be "value: myValue" to be clearer what is the property name, and what is holding the value to show. So I've made that change here:
<div class="oj-hybrid-padding">
  <h3>Dashboard Content Area</h3>
  <div>
    <!-- New content -->
    <input id="text-input"  type="text"
        data-bind="ojComponent: {component: 'ojInputText', value: myValue}"/>
  </div>
</div>
Then in the Cookbook's JavaScript section we identify the associated library dependency for the component: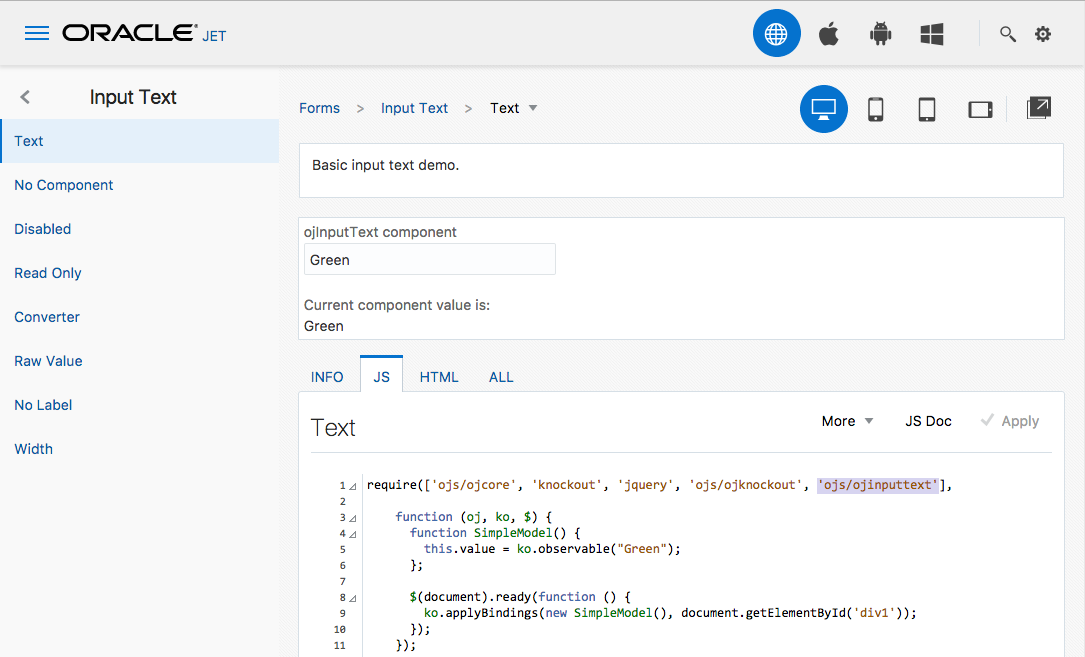
...and copy that into our JavaScript:
define(['ojs/ojcore', 'knockout', 'jquery','ojs/ojinputtext'],
 function(oj, ko, $) {
    function DashboardViewModel() {
      var self = this;
      // Add custom code here
    }
    return new DashboardViewModel();
  }
);
...and finally construct our own Knockout observable to help populate the component.
In this case, we copy across line 5, but we need to modify it slightly to assign to self.value over this.value, and also change the name to myValue as I suggested earlier.
define(['ojs/ojcore', 'knockout', 'jquery','ojs/ojinputtext'],
 function(oj, ko, $) {
    function DashboardViewModel() {
      var self = this;
      // New content
      self.myValue = ko.observable("Green");
    }
    return new DashboardViewModel();
  }
);
Voila!
I've also recently had some teaching experience with JET and seen where students go wrong with this step. The most common mistake is to copy the JavaScript code across & insert it, forgetting what we learned from Knockout in the previous article. So often when we've created an app on for example the "navbar" JET template where the DashboardViewModel() already exists, I would see people copy the code across with this outcome:
define(['ojs/ojcore', 'knockout', 'jquery','ojs/ojinputtext'],
 function(oj, ko, $) {
    function DashboardViewModel() {
      var self = this;
      // New content
      function SimpleModel() {
        this.value = ko.observable("Green");
      };

      $(document).ready(function () {
        ko.applyBindings(new SimpleModel(), document.getElementById('div1'));
      });
    }
    return new DashboardViewModel();
  }
);
As in this case our dashboard already has a DashboardViewModel(), it's not necessary to create another model object - SimpleModel() in this case incorrectly copied from the Cookbook. In addition, we want the observable to be written to self.value, not this.value (or more correctly for my small change earlier self.myValue) And finally the ready-function at end where we apply ko.applyBindings is not needed, as the Oracle JET "navbar" template has already applied the Knockout bindings in the main.js file.
UI Component Examples
With the mechanics of using the Cookbook aside, let's work our way through some examples to see what we can learn.
As a summary to teach myself the basics, I created this picture of using the basic inputText component which may assist you:
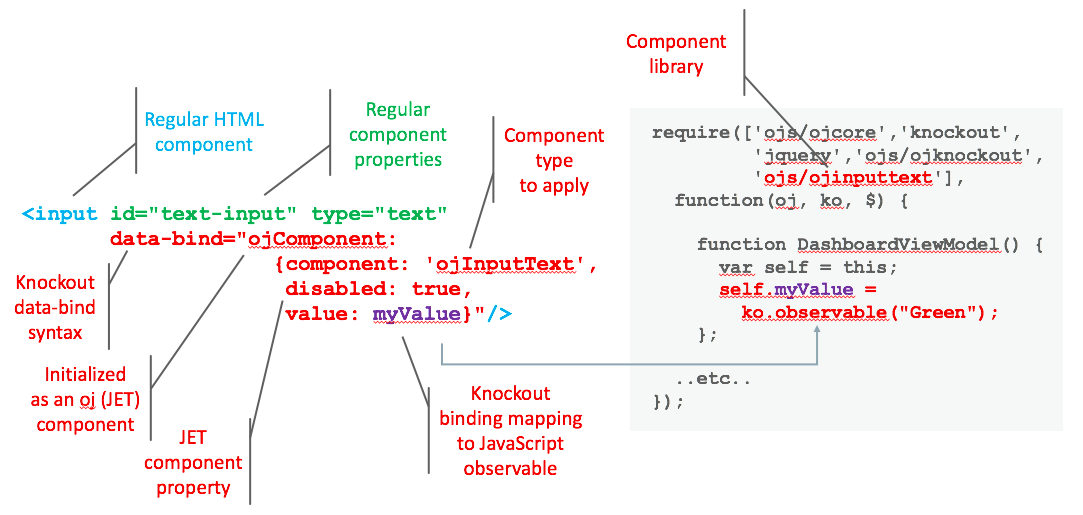
In remembering what we learned from the previous Knockout article, Knockout gives us the ability to define our own components and use them via the data-bind property. Oracle JET uses this to define its own component set for you to use, exposing them through the data-bind="ojComponent: { component: '<jetComponentName>' }" syntax. It's worth again stating in using this component in our page, we must also add it to my JavaScript's require() or define() call as a library dependency. So for ojInputText this is ojs/ojinputtext.
As you can also see in this example I've introduced another property for the inputText component "disabled". A reasonable question at this point is how do we know what properties and methods are available for the components?
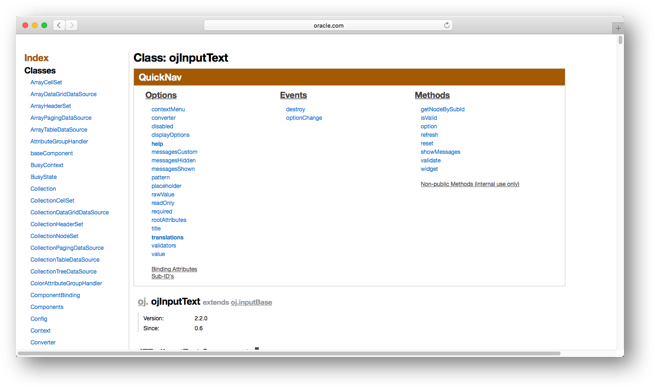
Via the Cookbook for each component we can see a link to JS Docs. This will take us to a page similar to the following, listing all the details we need to know:
Another interesting question to be raised is, doesn't the standard HTML text component already has a disabled property, why would we duplicate disabled properties in both the HTML component and Knockout bindings?
<input id="text-input" type="text" disabled
       data-bind="ojComponent: {component: 'ojInputText',
                                disabled: mydisabledflag,
                                value: myvalue}"/>
Given we're using Knockout the main advantage is, the Knockout data-bind syntax allows properties to map to a Knockout observable value, allowing easy updates from a JavaScript value, rather than using JQuery to walk the DOM and manipulate the object.
The following picture shows a simple button example:
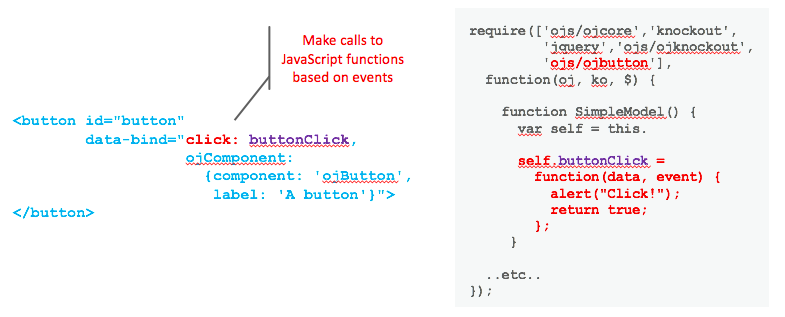 In adding the "click: buttonClick" functionality, we're not really relying on any specific JET functionality here, rather just Knockout click event handler to call our buttonClick function defined in our model.
Adding a modal dialog component to our page nicely shows several features at play for our learning purposes. So imagine we want something similar to following in our page:

...here's the relevant code:
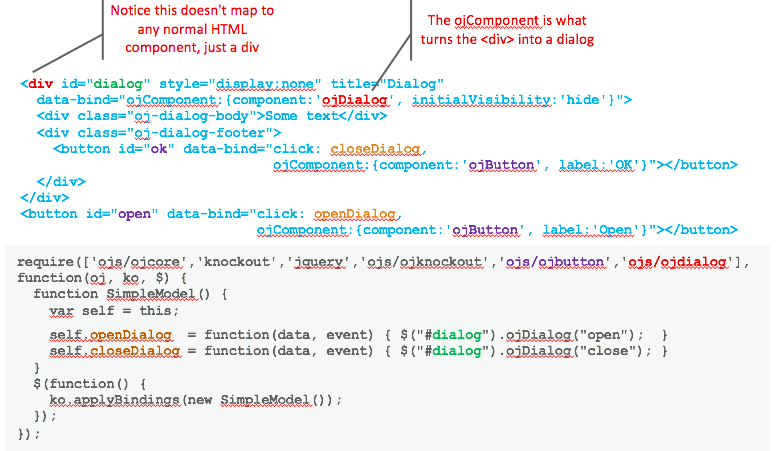
As noted in the picture we can see the <div> tag turned into an ojDialog via the Knockout component data bind.
Within the dialog we have various content included some text and the closeDialog button. Outside the dialog in our main page we have the openDialog button. Ultimately overall this is just some <div> tags and buttons.
On the JavaScript side in turn we've bound two functions openDialog and closedialog, which call ojDialog to open and close the dialog, which is initially hidden by the initialVisibility:hide property in the <div>.
As you can see, the dialog component from a learning perspective is just an incremental step up from learning the basics. This goes back to my earlier comment we don't need to learn everything at start, rather we start with the basics then work our way into more complicated examples reducing the overall learning curve.
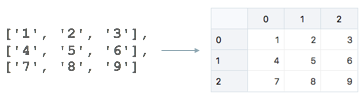
The next level of complexity in terms of components is those dealing with collections such as list views, grids and tables. For these types of components, they can't be mapped to simple variables. Instead they often need tables of data, or more correctly arrays. Let's explore this.
Working with Collections
To start with to keep it simple we'll look at a data grid. Imagine we wanted to present the following array of elements in a grid on the screen:
 The following picture demonstrates the code:
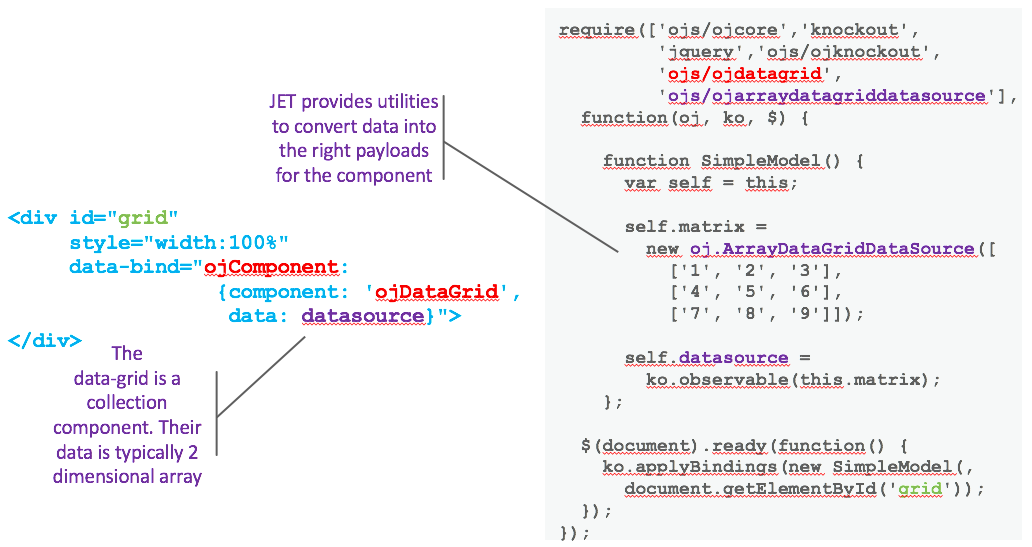
To create a JET grid in HTML, like we've seen in the other examples, you simply apply the ojDataGrid component in this case to a <div>.
Of importance, however, is the data binding, in the example mapped to an observable datasource. The ojDataGrid data property requires that it be passed a JET object of type/subtype of DataGridDataSource. Having worked with other web UI component frameworks, this is a little novel to me in that I'm used to having to assemble a multidimensional array to the requirements of the component at hand. In JET, rather, each component has a number of classes to support loading in different data structures such as arrays, cubes and more.
As such if we look at the JS Doc page for the ojDataGrid component we discover the set of available classes for us to map the data to the component:

Returning to the above sample code, duplicated here to save you scrolling the page:
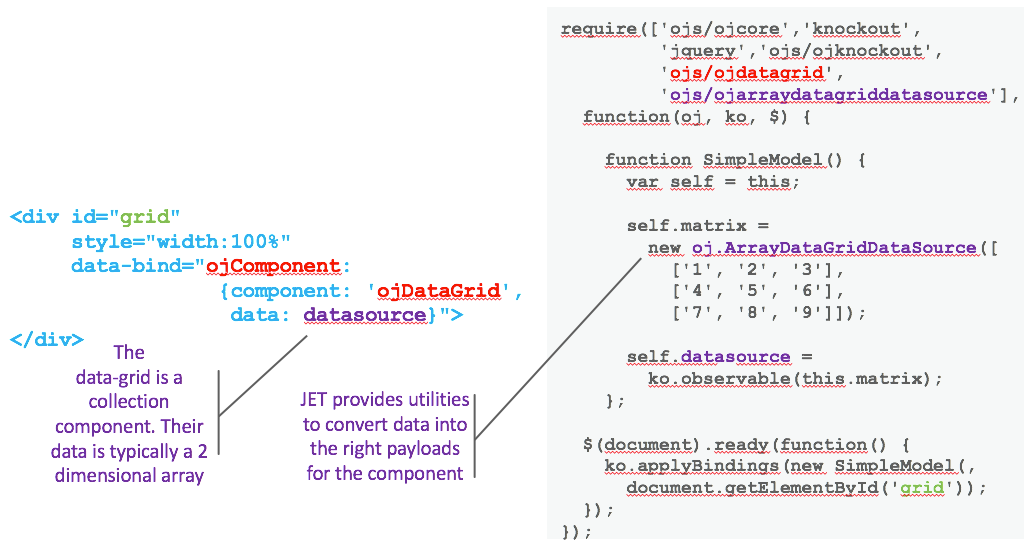
....we can see the components "data: datasource" is mapped to an instance of oj.ArrayDataGridDataSource via a Knockout observable, which in turn is passed our original static array containing our data. Definitely slightly more complex, but only in the fact we just can't map an array observable straight to our component, we are using subtype of DataGridDataSource to transform the data into what the ojDataGrid component requires first.
To take one last example, let's look at adding a list-view component. List-views are common in mobile applications where you swipe up and down a list of items. In the following example say we want to display various products:
For a list view, as we now know what we need to build for collection components from the JavaScript side, let's first look at the JavaScript code needed:
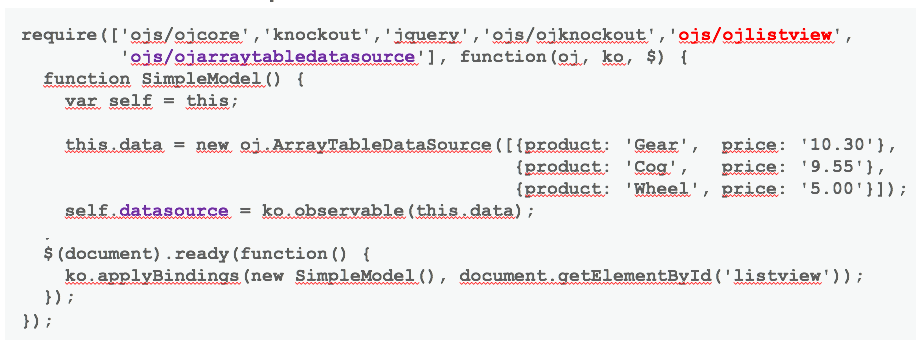 ....similar to the previous oj.ArrayDataGridDataSource, for our list view we're using an instance of oj.ArrayTableDataSource, so very similar indeed. Note how it is Array "Table" DataSource though, not Array "ListView" DataSource. As I mentioned earlier components in categories often share implementation details, which makes sense here as the ojListView is a glorified ojTable from my point of view.
Okay, so nothing tricky there. Let's instead look at the HTML code:
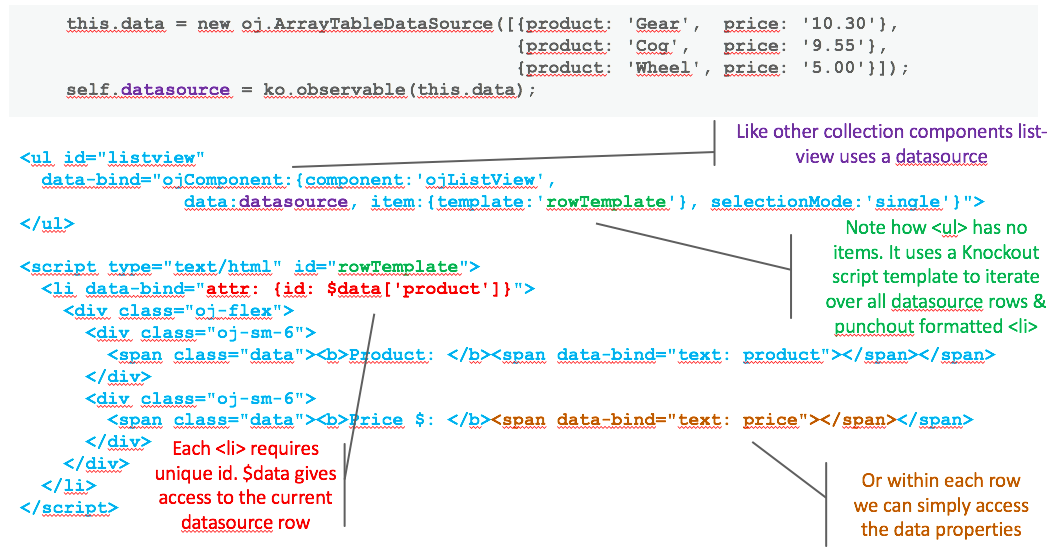
This appears to be more tricky, but let's break it down.
First note the <ul> ojListView component near top. As you can see just like the table it has a data property mapped to the previous datasource oj.ArrayTableDataSource instance we created.
Of difference is the "item: {template:'rowTemplate'}" properties. Note how the 'rowTemplate' refers to the <script> of the same id below.
This is an example of a Knockout Named Template that we explained in the previous Knockout article. In this case how it works is as the ojListView extracts the datasource containing our product array, for every element in the array, it will call the script for each element. So for our 3 products Gear, Cog and Wheel, rowTemplate will be called 3 times. For each time rowTemplate is called, the content within the rowTemplate HTML script will be inserted into the ojListView. Or in other words, this is just a for-each loop iterating over our data.
In calling the rowTemplate script, you will notice it is comprised of HTML tags which among other things have <span> tags pumping out both the product and price values. The rowTemplate has direct access to the array properties for the current row, so no need to call datasource.product or datasource.price, just product or price is fine in the bindings.
So yes, this is more tricky as there are more moving pieces in the solution, but everything you apply here you already learned to date.
Conclusion
By taking time to first learn RequireJS and Knockout, we seem to have set ourselves up nicely in this article for understanding the basics of the JET UI Components. In turn, the JET Cookbook provides an excellent resource to research how to build components once we know the basics.
Opinions expressed by DZone contributors are their own.
Comments