The world doesn't need Yet Another Todo List, but let's build one. Unlike most Rails tutorials, we will assume you are using Windows. (Rails has "crossed the chasm", so this is now becoming the correct assumption.)
Open a command prompt or Terminal window and run the following commands:
This installs the SQLite3 gem and then creates a new Rails application which by default uses the SQLite database. (The default in Rails 2.0.1 and below was MySQL.)
Next, create a couple of directories:
Next, switch to Flex Builder 3 and create the new Flex project:
- Do File > New > Flex Project...
- Choose to create a new project named Todo in c:\todo
- Leave its type set to "Web application" and its "Application server type" set to None and click Next
- Set the Output folder of the Flex project to public\bin and click Next
- Set the "Main source folder" to app\flex, leave the "Main application file" as Todo.mxml and set the output folder to http://localhost:3000/bin and click Finish. Your new Flex project will be created. (Note that public isn't part of the path since it's the root; 3000 is the default port for the server).

We are using app\flex as the root of all our Flex code,in larger team environments it's advisable to create a Flex project as a sibling of the Rails app (say, c:\todoclient) and set its output folder to go inside c:\todo\public\bin. This way, different team members can use different IDEs for the client and server projects: for example, Aptana and Flex Builder are both Eclipse-based, and interesting things can happen when you nest projects.
Next, let's create a new Task resource using the now-RESTful scaffold command.
Here we are creating a Task that has a name attribute, which is a string. Running this command generates the various Rails files, including the model, helper, controller, view templates, tests and database migration. We're going to make the simplest Todo list in history: Tasks have names, and nothing else. Furthermore, there are no users even, just a global list of tasks.
The Task model looks like this:
Because the Task model extends (with <) ActiveRecord::Base, it can be mapped to the equivalent database tables. Because we also created the controllers and views with the script\generate scaffold command and ensured that we specified all the fields, we can use a prebuilt web interface to Create, Read, Update, and Delete (CRUD) them.
The CreateTasks migration that was created (in db\migrate\001_create_tasks.rb) looks like this:
| CreateTasks Class |
Extends ActiveRecord::Migration |
| Up method |
Creates a new tasks table with the create_table method call, which takes a block that does the work |
| Down method |
Deletes it with the drop_table call |
In the up method, we specify the data types of each new column, such as string in our case, or boolean, integer or text. These are then mapped to the equivalent database data types: for example, boolean becomes a tinyint(1) in MySQL. The timestamps call adds two columns: created_at and updated_at, which Rails treats specially, ensuring that they're automatically set. This is often a good thing to have, so we'll leave them there even though they won't be needed in this build.
The TasksController (in app\controllers\tasks_controller.rb) looks like this:
This new controller which was generated for us contains the seven RESTful controller methods, which are explained in the following table (inspired by David Heinemeier Hansson's Discovering a World of Resources on Rails presentation - media.rubyonrails.org/presentations/worldofresources.pdf, slide 7,as well as the table on p. 410 of Agile Web Development with Rails, 2nd ed. (The Pragmatic Programmers), and the tables in Geoffrey Grosenbach's REST cheat sheet http://topfunky.com/clients/peepcode/REST-cheatsheet.pdf):
| # |
Method |
Sample URL paths |
Pretend HTTP Method |
Actual HTTP Method |
Corres- ponding CRUD Method |
Corres- ponding SQL Method |
| 1 |
index |
/tasks
/tasks.xml |
GET |
GET |
READ |
SELECT |
| 2 |
show |
/tasks/1
/tasks/1.xml |
GET |
GET |
READ |
SELECT |
| 3 |
new |
/tasks/new
/tasks/new.xml |
GET |
GET |
- |
- |
| 4 |
edit |
/tasks/1/edit |
GET |
GET |
READ |
SELECT |
| 5 |
create |
/tasks
/tasks.xml |
POST |
POST |
CREATE |
INSERT |
| 6 |
update |
/tasks/1
/tasks/1.xml |
PUT |
POST |
UPDATE |
UPDATE |
| 7 |
destroy |
/tasks/1
/tasks/1.xml |
DELETE |
POST |
DELETE |
DELETE |
Table 1: The seven standard RESTful controller methods

What's REST?
REST (Representational State Transfer) is a way of building web services that focuses on simplicity and an architecture style that is of the web. This can be described as a Resource Oriented Architecture (ROA); see RESTful Web Services published by O'Reilly Media for details. Briefly, the reason to use a RESTful design in Rails is that it helps us organize our controllers better, forces us to think harder about our domain, and gives us a nice API for free.
Next, we run the new migration that was created (CreateTasks) when we ran the scaffold command:
At this point we run the server:
and play with creating, editing and deleting tasks.
- Go to http://localhost:3000/tasks/new to see an empty task list.
- Click the New link to go to http://localhost:3000/tasks/new.
- Create a new Task with a name of "drink coffee" and click Create.
- Go back to http://localhost:3000/tasks/new to see the task list with the new "drink coffee" task present.
Now, let's do something interesting and hook this up to Flex. Currently, the Todo.mxml file looks like this:
<?xml version="1.0" encoding="utf-8"?> <mx:Application xmlns:mx="http://www.adobe.com/ 2006/mxml" layout="absolute"> </mx:Application>
The top-level tag is mx:Application; the root of a Flex application is always an Application. The mx: part identifies the XML namespace that the Application component is from. By default, an Application uses an absolute layout, where you specify the x,y of each top level container and component.
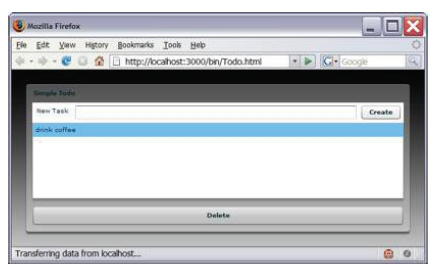
What we want to build is the following application:

Figure 3: The Simple Todo Flex Application
We want the ability to create new tasks, delete tasks and rename them inline in the list. Furthermore, we want to do this in the least amount of code possible. Normally, I'd build this iteratively; but we'll build it all at once. Modify the Todo.mxml file to look like this:
This is a complete Flex application in 67 lines of code! Compile and run the application by clicking the green "play" button: you will see the screen shown in Figure 3.
A Quick Highlight Tour of this Code:

We use a vertical layout to make the components flow vertically. Other choices are horizontal (for horizontal flow) and absolute (which we saw before). The backgroundGradientColors specify the start and end of the gradient fill for the background.

We define a HTTPService svcTasksList, which does a GET to /tasks.xml (thus triggering the index action of the TasksController) and specifies a resultFormat of e4x so the result of the service can be handled with the new E4X XML API. We then take the lastResult of this service, which is an XML document, get its children (which is an XMLList of the tasks), and make this be the source of an XMLListCollection called tasksXLC. We do this with a binding to the source attribute. Similarly, we define svcTasksCreate, svcTasksUpdate and svcTasksDestroy to be used for the other CRUD operations.

We can pass data to Rails via data bindings using curly braces {} inside XML (as shown in svcTaskCreate) or by sending form parameters that Rails would be expecting (as shown in the updateSelectedTask method).

For svcTasksUpdate and svcTasksDestroy we are not setting the url property statically, but instead dynamically setting it to include the id of the task we are updating or destroying.

A hack: you can't send HTTP PUT or DELETE from the Flash player in a web browser, so we need to fake it. Luckily, since you can't send PUT or DELETE from HTML in a web browser either, Rails already has a hack in place we just need to know how to use it. Rails will look for a _method parameter in its params hash and, if there is one, use it instead of the actual HTTP method. So, if we do a form POST with a _method of PUT, Rails will pretend we sent an HTTP PUT. (If you're thinking that it's ironic that at the core of a "cleaner" architecture is a giant hack, well, you're not alone.) This _method can be added to a params Object (params['_method'] = "PUT";) or to an anonymous object (svcTasksDestroy.send({_method: "DELETE"});) If you're new to Flex, {} can be used for both anonymous object creation and for data binding. Think of an anonymous object like a hash in Ruby.


