DZone
Thanks for visiting DZone today,
Edit Profile
  • Manage Email Subscriptions
  • How to Post to DZone
  • Article Submission Guidelines
Sign Out View Profile
  • Post an Article
  • Manage My Drafts
Over 2 million developers have joined DZone.
Log In / Join
Please enter at least three characters to search
Refcards Trend Reports
Events Video Library
Refcards
Trend Reports

Events

View Events Video Library

Zones

Culture and Methodologies Agile Career Development Methodologies Team Management
Data Engineering AI/ML Big Data Data Databases IoT
Software Design and Architecture Cloud Architecture Containers Integration Microservices Performance Security
Coding Frameworks Java JavaScript Languages Tools
Testing, Deployment, and Maintenance Deployment DevOps and CI/CD Maintenance Monitoring and Observability Testing, Tools, and Frameworks
Culture and Methodologies
Agile Career Development Methodologies Team Management
Data Engineering
AI/ML Big Data Data Databases IoT
Software Design and Architecture
Cloud Architecture Containers Integration Microservices Performance Security
Coding
Frameworks Java JavaScript Languages Tools
Testing, Deployment, and Maintenance
Deployment DevOps and CI/CD Maintenance Monitoring and Observability Testing, Tools, and Frameworks

Last call! Secure your stack and shape the future! Help dev teams across the globe navigate their software supply chain security challenges.

Modernize your data layer. Learn how to design cloud-native database architectures to meet the evolving demands of AI and GenAI workloads.

Releasing software shouldn't be stressful or risky. Learn how to leverage progressive delivery techniques to ensure safer deployments.

Avoid machine learning mistakes and boost model performance! Discover key ML patterns, anti-patterns, data strategies, and more.

  1. DZone
  2. Refcards
  3. Getting Started with Silverlight and Expression Blend
refcard cover
Refcard #092

Getting Started with Silverlight and Expression Blend

A Cross-Browser, Cross-Platform Plug-In For Your Browser

Learn to use Silverlight 4 and Expression Blend with a step by step guide through the development of your first application.

Download Refcard
Free PDF for Easy Reference
refcard cover

Written By

author avatar Victor Gaudioso
developer, CND
Table of Contents
► Introduction ► What is Silverlight? ► New Features of Silverlight 4 ► What is Blend? ► What Can Be Done in Blend? ► Summary
Section 1

Introduction

By Victor Gaudioso

Today there is a lot of buzz around a relatively new platform in the world of Rich Internet Application (RIA) development called Silverlight. Even with all of the buzz going around there are many who do not really know or understand what Silverlight is or what it can do. This DZone Refcard will put that mystery to rest along with providing an introduction to Blend, an application that is used to develop Silverlight applications. Also included is an introduction to some of the cool new features offered by the newest version of Silverlight 4, and a step by step guide through the development of your first Silverlight application.

Section 2

What is Silverlight?

Silverlight is a cross browser, cross platform plug-in for your browser that installs in seconds. It also allows for developers to designers to develop Rich Internet Applications (RIA) and deliver them through the web and now even Out of Browser (OOB) experiences.

The Silverlight plug-in installs in seconds and is free to users.

Silverlight applications leverage the .NET Framework which allow for rapid development and provide backend support. Silverlight offers support for delivery of high quality audio and video. Since the release of Silverlight 3 Silverlight offers rich, stutter-free, fullscreen experiences. Below is a list of video features offered with Silverlight:

  • True HD playback in fullscreen.
  • Support for a number of 3rd party video codecs. Further video can be decoded outside of the runtime and rendered in Silverlight thus extending format support beyond native codecs.
  • Smooth Streaming - Smooth streaming automatically detects CPU and bandwidth conditions and can seamlessly switch to lower or higher quality versions of the same video thus allowing for delivery of non-stuttering video even if the CPU or bandwidth conditions change during a live streaming session.
  • Built in Digital Rights Management (DRM) - Silverlight DRM provided by PlayReady Content Protection allows you to protect your video using AES encryption or Windows Media DRM.
  • Format Choice - Silverlight supports VC-1/MMA and since the release of Silverlight 3 support for MPEG-4.

Silverlight allows for rapid RIA development by making use of the improved designer/developer workflow. Because Silverlight UserControls make use of a front-end XML based language called XAML (pronounced ZAMEL) and a codebehind C# (Visual Basic can also be used) the developers can now work on the back end code-behind files while the designers can, at the same time work on the front-end XAML pages. This allows for the designer and developers to work on the same set of files at the same time thus making for more rapid application development.

Silverlight offers Out Of Browser (OOB) experiences. OOB support is offered since Silverlight 3 without any further downloads of the Silverlight runtime or the need to write applications any differently. There are new features in Silverlight 4 that make OOB development even more exciting. We will talk more about that in the new features of Silverlight 4 section.

Silverlight has improved performance by doing this such as application library caching. Now parts of the .NET Framework are cached on the client machine thus reducing the size of your applications. Further applications now communicate with the server via Binary XML thus increasing the speed by which data is exchanged.

Silverlight now has enhanced data support. This allows for features such as Element to Element DataBinding. In the past Silverlight only allowed Binding between UI elements and data objects. Now UI elements can bind directly to properties on other UI elements. For instance a Slider can now bind to properties of other UI elements such as the Volume property of a MediaElement, this allows for more interactive, user-friendly interactions.

Section 3

New Features of Silverlight 4

At the Professional Developers Conference (PDC) 2009 in Los Angeles, CA Microsoft released Silverlight 4 Beta. Currently Silverlight 4 is still in the Beta phase with the release date expected to be in late March of 2010 and possibly to coincide with the Microsoft MIX conference in Las Vegas March 15-17. The Silverlight 4 Beta version can be download and installed from the Silverlight.net website located here:

http://silverlight.net/getstarted/silverlight-4-beta/

There are still some features that have not been released but below you will find a list of the new features that have been released in the Beta version:

  • Printing - Silverlight 4 now offers support for printing documents that are on the screen as well as virtual print which allows for printing that is independent of what is showing on the users screen.
  • Tooling support for Visual Studio 2010 (the other tool for development of Silverlight applications)- now Visual Studio will now have features that were formerly exclusive to Blend. This includes but is not limited to: Drag and Drop data binding, integration with Blend styling resources, and an editable design surface.
  • New Controls - Silverlight 4 now offers new controls such as the RichTexBox that allows for images, other controls and hyperlinks.
  • Managed Extensibility Framework (MEF) - a framework that allows for large scale composite Silverlight applications.
  • Right-to-left support - this allows for controls to align their content from right-to-left instead of the default leftto-right.
  • Improved RIA Services and WCF support - this allows for more powerful n-tier data driven applications.
  • Enhanced data binding support
  • Intellisence with support for XAML, C# and VB.
  • Webcam and microphone API (Application Programming Interface) - this allows the developer to incorporate video and audio from the client machine without the inclusion of any third party dlls or plug-ins.
  • Fully Trusted Applications - now it is easy to set properties on your Silverlight applications so that they can be ran as fully trusted applications on client machines.
  • Support for the Google Chrome browser. Mouse Wheel support - now developers have access to the Mouse Wheel to allow for effortless scrolling though long documents or content controls.
  • Right-click support - now developers have access to the right-click mouse event. This allows developers to develop applications that easily respond to right-clicks from their users. This will allow for such features as Context Menus in your Silverlight applications.
  • Performance optimizations means that Silverlight 4 applications can run up to 200% faster than applications developed in Silverlight 3.
  • Multi-touch support - Silverlight 4 applications have the ability to respond to gestures and touch interactions such as pinch to shrink.
  • Multicast networking allows for cheap smooth streaming.
  • Content protection for H.264 media through Silverlight DRM.

Below is a list of Silverlight 4 features that apply to Out Of Browser (OOB) applications:

  • The ability to place HTML into your Silverlight applications.
  • This allows you to add content from the web such as charts, email, and social serves such as Facebook, Linked-In, twitter, and MySpace.
  • Support for Windows settings - this allows you to set the Startup Position of you Silverlight applications, set the size and choose a Windows Chrome.
  • Offline DRM - This allows you to play protected content such as video. Content can be downloaded from the web and imediately enjoyed on your OOB Silverlight applications.
  • “Toast” support - Toast Windows are popup windows that appear on the Taskbar and allow you to provide messages from your OOB Silverlight application. A common Toast window would be the Online Status of your application.

Below is a list of Silverlight 4 features that apply to Out Of Browser (OOB) Trusted applications:

  • Networking Improvements - Silverlight 4 Trusted OOB applications now have cross-domain access without a security policy file.
  • The COM API - This API allows you to Run and control other programs right from your trusted Silverlight applications such as Word, Excel, as well as other Microsoft Office applications. Further, you can request and send email using Outlook from you Silverlight applications.
  • Read and write capability - you can now read and write files to the User's file library. This includes the MyDocuments, MyPictures, and MyVideos folders.
  • A new user interface for requesting additional privileges outside of the Silverlight sandbox.

Now that you know what Silverlight is let's move ahead and examine the main tool by which you develop Silverlight applications.

Section 4

What is Blend?

There are two programs developed by Microsoft for developing Silverlight applications. They are Blend and Visual Studio. Visual Studio has been around for many years now and is the main tool for writing Silverlight code-behind. Because it is not new and not specific to Silverlight we will only mention it here. Blend, on the other hand is a tool that was developed by Microsoft specifically for developing Silverlight (and Silverlight's big brother WPF) applications. While Visual Studio is most often used to write Silverlight code-behind Blend can handle to task as well. So, that means an entire application can be developed with Blend alone.

Blend 3, released in July 2009 is an application developed by Microsoft (using WPF) specifically for developing Silverlight applications in a visual manner. Objects can be dragged from the toolbar on the artboard (analogous to a State in Flash). Properties for objects on the artboard can be set in the properties panel.

Further you can create Storyboard animations in Blend using Blend's Timeline in Blend's animation mode (as opposed to Blend's Design mode). Once you have created a Storyboard animation you can then preview that animation right inside of Blend. This allows you to perfect your animations before you even build and deploy your Silverlight applications. When you create a Storyboard you move a playhead out to a specific time on your Timeline, say for example 5 seconds. You then manipulate objects on your artboard. When you run the animations the manipulations you created on the artboard will occur over the timespan you set with your played, 5 seconds in our example. These Storyboards that you create are written in XAML by Blend. They then become resources that you can fire in code-behind or by Storyboard Behaviors (pre-defined Storyboard actions written in Code and dragged onto objects in Blend).

You can also use the Visual State Manager (VSM) to create Visual States in Blend using the States panel. These Visual States make use of Storyboards to control the Visual States. You then hook up these States to user actions by dragging Behaviors (pre-defined actions written in code-behind)onto objects on the Artboard or Blend's Objects and Timeline panel (a panel that provides a textual representation of objects in your Visual Tree). You can also fire these Visual States from code-behind in both Blend and Visual Studio.

When you develop visually in Blend code is written for you in the XAML file of the UserControl. This XAML can be written by hand in both Blend and Visual Studio but this can be both time consuming and laborious. Further, it would be nearly impossible to create some objects by hand such as a very complex Path object. For this type of development Blend is essential.

Most often the designer works in Blend doing things visually while the developer works in Visual Studio doing things in code-behind. This workflow is fuzzy and can overlap with some designers jumping into Visual Studio at times and some developers using Blend at times.

The tools in Blend are much like those that designers are used to from working with popular design programs such as Adobe's Photoshop, Illustrator and Fireworks. A designer can create vector graphics right inside of Blend or use tools like Expression Design to create the graphics and move them into Blend. Further, Photoshop and Illustrator files can be directly imported into Blend via the importer interface.

Blend now includes a Data panel where data can be imported from Silverlight data objects created in Visual Studio, from XML or from Sample Data that is shipped with Blend. Blend also includes an interface for doing complex DataBinding.

While coding is usually done in Visual Studio Blend does have an editor for code. The editor now even includes Intellisense which attempts to figure out what you are trying to do in code and then tries to auto-complete the code for you. Intellisense is also available for coding XAML in Blend as well.

Blend also has panels for: all of the files in the application, called the Projects panel; all of the Resources available to the application, called the Projects panel; We will go over all of the panels in Blend in the Blend IDE Refcard.

Section 5

What Can Be Done in Blend?

Now that you know what Silverlight is and what Blend is I think it is time that we create your first Silverlight application and I show you what we can do. In this example I am going to go over only what to do, not why or how we are doing it. We will go over the why's and how's in later Refcardz; this example is merely meant to show you that you can easily and quickly do some very cool things with Blend in Silverlight. With that, open Blend and let's get started.

  • 1) In Blend's menu click File>New Project
  • 2) In the New Project dialog box select Silverlight as the Project Type, Silverlight 3 Application for the Template, name the project MyFirstSLApp, select Visual C# for the language and click OK like I am doing in Figure 1-1.

New Project dialog

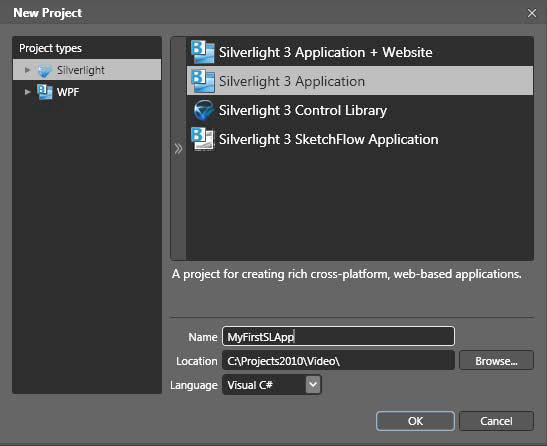
Figure 1-1: Create a new Silverlight project named MyFristSLApp.

Textblock tool

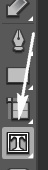
Figure 1-2: The TextBlock tool.

  • 3) Next double-click the TextBlock tool in the toolbar(shown in Figure 1-2).
  • 4) This will put a TextBlock in the upper left corner of your artboard with the text selected (see Figure 1-3).

Default textblock

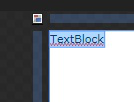
Figure 1-3: A default TextBlock.

  • 5) Next start typing “Hello World”. Because your TextBlock is already highlighted this will now become the Text of your TextBlock.
  • 6) Next go to the Properties panel and find the Text bucket and change the font to 20pt like I am doing in Figure 1-4.

Font dialog

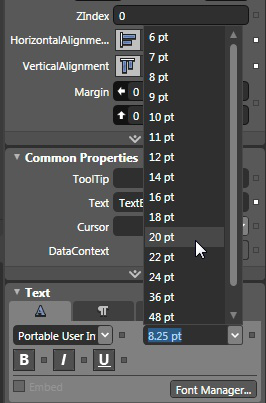
Figure 1-4: Change the front to 20.

  • 7) Now click the V key to get your Selection tool (the first tool on the top of the toolbar). Click and drag your TextBlock to the center of the artboard like I have done in Figure 1-5.

The art board

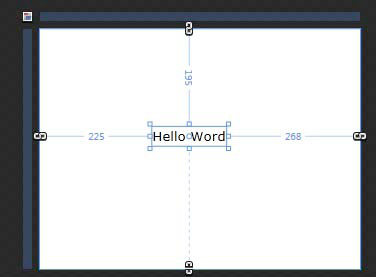
Figure 1-5: Drag your TextBlock to the center of the artboard.

  • 8) Now right-click the TextBlock and left-click Path>Convert to Path like I am doing in Figure 1-6.

Text to path

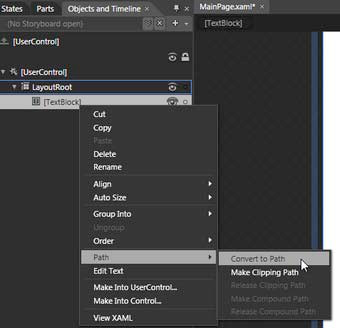
Figure 1-6: Convert the TextBlock to a Path.

  • 9) Now right-click the TextBlock in the Objects and Timeline panel and right-click Path>Release Compound Path like I am doing in Figure 1-7

Release the Compound Path

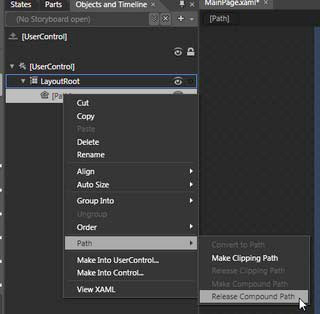
Figure 1-7: Release the Compound Path.

Now you will notice that each of your letters is now its very own Path. Now we can manipulate each individual letter of “Hello World”. Let's do that now.

  • 1) Click V to select the Selection tool and click a draw a line around all of the letters to select them all like I am doing in Figure 1-8.

Select all letters

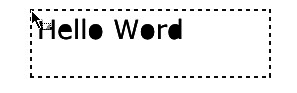
Figure 1-8: Select all letters.

  • 2) Now with all of the letters selected click and drag them off the right of the artboard like I have done in Figure 1-9.

Move letters

Figure 1-9: Move the letters off to the right of the artboard.

Now we can make a Storyboard that will make the letters fly into the screen.

  • 3) First click F6 to go into Blend's Animation mode.
  • 4) Click the New Storyboard button like I am doing in Figure 1-10.

Click the New Storyboard button

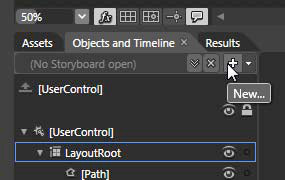
Figure 1-10: Click the New Storyboard button.

  • 5) When the Create Storyboard Resource dialog box appears name the Storyboard SlideInLetters and click OK like I am doing in Figure 1-11.

Name the new Storyboard

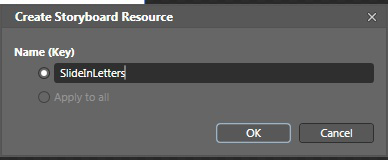
Figure 1-11: Name the new Storyboard SlideInLetters.

  • 6) Notice how the artboard has a red line around it and a Timeline appears next to the Objects and Timeline panel to indicate you are recording.
  • 7) Move your playhead out to one second like I have done in Figure 1-12.

Move your playhead

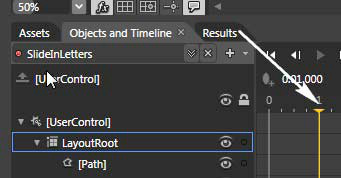
Figure 1-12: Move your playhead out to one second.

  • 8) Now select the last letter and move it out to the artboard like I am doing in Figure 1-13.

Move last letter

Figure 1-13: Move the last letter “d” to the artboard.

  • 9) Now move your playhead out to 2 seconds and move the next letter, “r” onto the artboard next to the last letter, “d” like I am doing in Figure 1-14.

Move second last letter

Figure 1-14: With the playhead at 2 seconds move in your second to last letter.

  • 10) Keep repeating this for every letter, that is move the playhead out one more second and move the next letter onto the artboard.

When you have completed your Timeline should look like what I have in Figure 1-15.

Storyboard Timeline

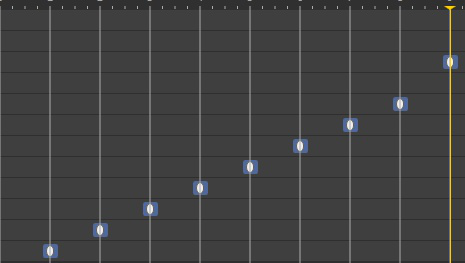
Figure 1-15: Your Storyboard Timeline should look like this.

Now that we have created the Storyboard you can close it by clicking the Close Storyboard button like I am doing in Figure 1-16. Then Click F6 to exit the animation mode.

Close the Storyboard

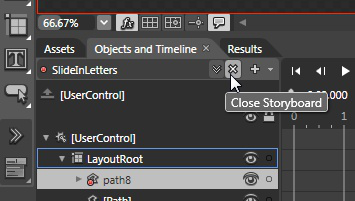
Figure 1-16: Close the Storyboard.

Now all we need to do it to trigger the Storyboards to start when the application loads. To do this we are going to use a Behavior.

  • 1) Click the Asset Library, then click the Behaviors tab, and find the ControlStoryboardAction Behavior like I am doing in Figure 1-17.

Close the Storyboard

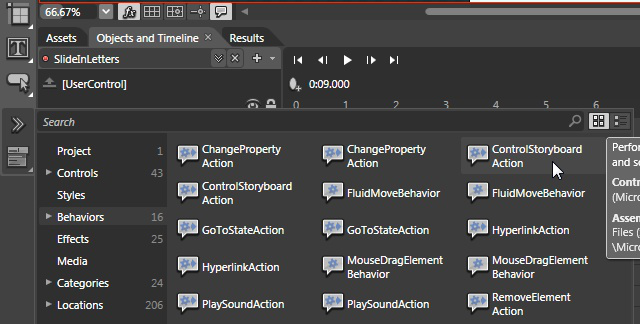
Figure 1-17: Find the ControlStoryboardAction Behavior.

  • 2) Click and drag that behavior and drop it onto the [UserControl] in the Objects and Timeline panel like I am doing in Figure 1-18.

Objects and Timeline panel

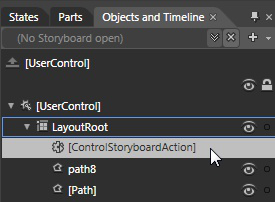
Figure 1-18: Drag the Behavior onto the [UserControl] in the Objects and Timeline panel.

  • 3) In the Properties panel find the Tigger bucket and change the EventName property to Loaded like I am doing in Figure 1-19.

Properties panel

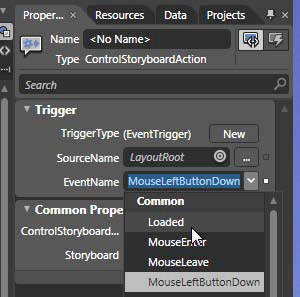
Figure 1-19: Change the EventName to Loaded.

  • 4) Next located the Common Properties bucket and change the Storyboard property dropdown to the name of our Storyboard, “SlideInLetters” like I am doing in Figure 1-20.

Change Properties

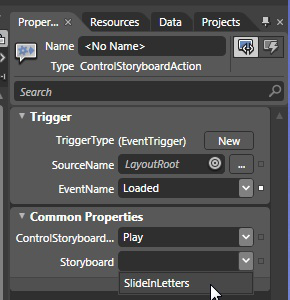
Figure 1-20: Change the Storyboard property to the Storyboard we created earlier.

Now hit F4 to run the application and you will see a browser open and run our SlideInLetters Storyboard. See Figure 1-21.

Silverlight application running in browser

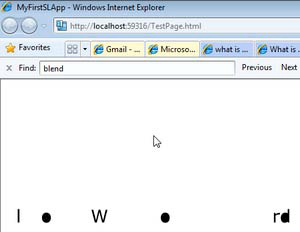
Figure 1-21: Our Silverlight application running in a browser.

You can see my application here:
http://windowspresentationfoundation.com/RefCardSamples/RefCard1/

Section 6

Summary

This DZone Refcard provided a brief introduction to SIlverlight 4 and how Blend is used to develop Silverlight applications. You should now have the building blocks you need to grow as a Silverlight developer. For further information on Microsoft Silverlight and Expression Blend please visit the following sites: Silverlight.net, Learn Expression Blend, Download Silverlight and Download Expression Blend.

Like This Refcard? Read More From DZone

related article thumbnail

DZone Article

Using Python Libraries in Java
related article thumbnail

DZone Article

Infrastructure as Code (IaC) Beyond the Basics
related article thumbnail

DZone Article

Endpoint Security Controls: Designing a Secure Endpoint Architecture, Part 2
related article thumbnail

DZone Article

Unit Testing Large Codebases: Principles, Practices, and C++ Examples
related refcard thumbnail

Free DZone Refcard

Getting Started With Low-Code Development
related refcard thumbnail

Free DZone Refcard

JavaScript Test Automation Frameworks
related refcard thumbnail

Free DZone Refcard

Salesforce Application Design
related refcard thumbnail

Free DZone Refcard

E-Commerce Development Essentials

ABOUT US

  • About DZone
  • Support and feedback
  • Community research
  • Sitemap

ADVERTISE

  • Advertise with DZone

CONTRIBUTE ON DZONE

  • Article Submission Guidelines
  • Become a Contributor
  • Core Program
  • Visit the Writers' Zone

LEGAL

  • Terms of Service
  • Privacy Policy

CONTACT US

  • 3343 Perimeter Hill Drive
  • Suite 100
  • Nashville, TN 37211
  • support@dzone.com

Let's be friends: