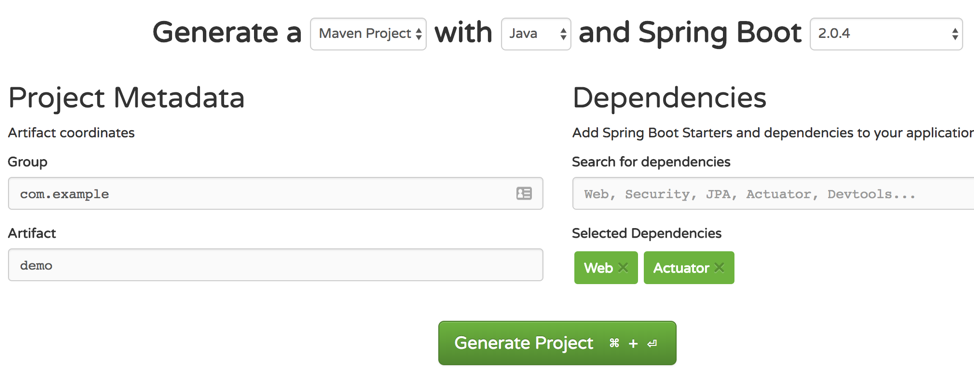
Go to https://start.spring.io/ and create a Maven application. Select Web and Actuator as dependencies. Click Generate Project, download the file demo.zip, and extract it.
For test purposes, let’s add a simple REST endpoint that returns a message with the hostname and the number of invocations.
Add the following class to your application. You can type the code or copy from here.
package com.example.demo;
import org.springframework.web.bind.annotation.GetMapping;
import org.springframework.web.bind.annotation.RequestMapping;
import org.springframework.web.bind.annotation.ResponseBody;
import org.springframework.web.bind.annotation.RestController;
@RestController
@RequestMapping("/api/hello")
public class HelloController {
    private static final String RESPONSE_STRING_FORMAT = "Hello from '%s': %d\n";
    /**
     * Counter to help us see the lifecycle
     */
    private int count = 0;
    @GetMapping
    public String helloworld(){
        count++;
        return String.format(
                RESPONSE_STRING_FORMAT,
                System.getenv().getOrDefault("HOSTNAME", "unknown"),
                count);
    }
}
Now, go to your application folder and execute the following Maven command to start your Spring Boot application. This will allow you to test the application before placing it inside a container.
$ mvn spring-boot:run
[INFO] Scanning for projects...
. . .
INFO 2172 --- [           main] com.example.demo.DemoApplication: Started DemoApplication in 2.614 seconds (JVM running for 5.447)
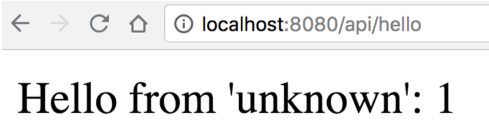
Open the browser in the following URL: http://localhost:8080/api/hello.
Note that every access (or refresh) will increase the counter variable.
Before moving to the next section, make sure to stop the application running locally through CTRL + C.
Creating a Container Image for the Spring Boot Application
The easiest way to create a Docker image is to write a Dockerfile. It contains a series of commands that customize an image based on a previous one. For our application, we will start from the existing OpenJDK 10 image, add our JAR file, and define the default command that will execute when the container starts.
The Dockerfile below is also available to be copied here. This file should be in the same folder of the project.
# Our base image that contains OpenJDK
FROM openjdk

# Add the fatjar in the image
COPY target/demo-0.0.1-SNAPSHOT.jar /

# Default command
CMD java -jar /demo-0.0.1-SNAPSHOT.jar
Before adding the JAR file to the image, we needed to create it using the command mvn package. Now that we have a Dockerfile, we can execute the build of the JAR and the Docker image using the following commands:
$ mvn package
. . .

$ sudo docker build -t demo .
Sending build context to Docker daemon  17.87MB
Step 1/3 : FROM openjdk
Step 2/3 : COPY target/demo-0.0.1-SNAPSHOT.jar /
Step 3/3 : CMD java -jar /demo-0.0.1-SNAPSHOT.jar
. . .
Successfully built 4df92f5aa7f6
Successfully tagged demo:latest
The flag -t on the docker build command specifies the name/tag of the image. Using a tag called demo allows you to refer to this image by its name when you need to create a container instance. The last parameter for docker build is the path of Dockerfile. Since the Dockerfile is in the same folder of your project, the . will instruct the Docker daemon to use the file in the same folder that you execute the command.
Running the Application Inside the Container
The previously created image called demo is available locally. You can check the existing images available locally through the command docker images.
The demo image can now be used to create a new container instance with the following command:
$ sudo docker run -d --name demo-app -p 8080:8080 demo
582b891f7ffa307ad08f6669cfb473ac822dc49d29b80dc18477d4a120d2a023
The flag -d instructs the Docker daemon to detach from the container after the execution of the command. The flag --name gives the name demo-app to this container. If you don’t specify a name, Docker will create a random name for you.
By default, you can’t access any ports in the container unless you specify the mapping between the Docker daemon port and the container port. This feature is useful to allow the same application that is running on port 8080 to bind to different ports if you decide to run multiple containers. In our case, we are mapping port 8080 from the Docker daemon to port 8080 of the container through the flag -p 8080:8080.
Finally, we specify the name of the image that we want to use to create the container. In this case, we used the demo image created previously. After the execution of the command, it will show a hash number that identifies your container. You can verify the containers that are running with the following command:
$ sudo docker ps
CONTAINER ID        IMAGE               COMMAND                  CREATED             .         STATUS              PORTS                    NAMES
ebc74b33f1e5        demo                "/bin/sh -c 'java -j…"   5 minutes ago       Up 5 minutes        0.0.0.0:8080->8080/tcp   demo-app
Now that your container is being executed, you can open your browser again in the URL http://localhost:8080/api/hello. You will see the same result that you had previously, but this time, your application is running inside the container.
Extra Operations on the Container
Although your container is running detached, you can perform some operations on it like checking the logs of your application with the command docker logs plus the name of the container.
$ sudo docker logs demo-app

  .   ____          _            __ _ _
 /\\ / ___'_ __ _ _(_)_ __  __ _ \ \ \ \
( ( )\___ | '_ | '_| | '_ \/ _` | \ \ \ \
 \\/  ___)| |_)| | | | | || (_| |  ) ) ) )
  '  |____| .__|_| |_|_| |_\__, | / / / /
 =========|_|==============|___/=/_/_/_/
 :: Spring Boot ::        (v2.0.4.RELEASE)
...
If you want to open a terminal session inside the container, you can use the command docker exec followed by the name of the container and the name of a process that you want to execute. In this case, we want to execute bash in an interactive terminal. Use the following command:
$ sudo docker exec -it demo-app bash
root@ebc74b33f1e5:/# ls
bin          dev           home   lib64   mnt   root  srv  usr
boot             docker-java-home  lib    libx32  opt   run   sys  var
demo-0.0.1-SNAPSHOT.jar  etc           lib32  media   proc  sbin  tmp
Once you are inside the container, you can run any Linux command like ls or ps. Note that if you run ls, you should see the file demo-0.0.1-SNAPSHOT.jar that was added during the creation of the image. You can exit from the container terminal and return to your local terminal by typing exit.