With Vaadin, the user interface is built from user interface components. They are server-side Java classes that implement a single UI control such as a button, select, or layout. With layout components, you can compose larger components that hierarchically build up the application UI.
Vaadin Application
A Vaadin application is defined in a class that extends com.vaadin.ui.UI. This is the class that you should define as the UI initialization parameter in portlet.xml as described in earlier sections.
A new instance of this class is created when a new user comes to portal view where the port let resides.
Example minimal working Vaadin application using the “Valo” theme:
Vaadin UI Components
Vaadin Framework includes nearly 100 stock components, and you can find hundreds of open-source add-on components in the Vaadin Add-on Directory.
You can also extend Vaadin by creating new UI components with the Google Web Toolkit (GWT) or JavaScript. GWT is an open-source Java-to-JavaScript compiler that allows you to build client-side features without JavaScript.
You can find all the core components in the com.vaadin.ui.* Java package. Add-ons may use their own package naming, but it is typical that they start with org.vaadin.*.

You can test and try different Vaadin components online at http://vaadin.com/sampler. All the demos include source code and documentation.
User Interface Layout
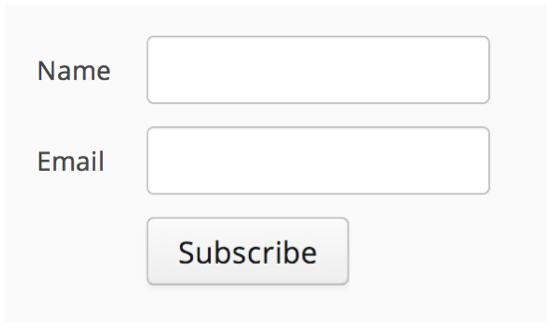
Start by creating a main Window for your application and putting the initial content in there. The user interface structure is a hierarchy of nested layouts and components. Here is an example of a simple user interface hierarchy:
VerticalLayout (form)
- TextField (name)
- TextField (email)
- Button (subscribeBtn)
The above UI could be created in Java as follows:
The result will look like.


You should avoid creating deeply nested layout structures. In particular, older browsers can become slow. Instead, use the CustomLayout, GridLayout, or some lightweight layouts like the CSSLayout.
User Interface Events
Vaadin is an event-based framework. You can receive user-triggered events in your application by registering a listener for it. Here is an example for Button.ClickEvent:
Event listeners are executed in the server side synchronously. You can fetch data and update the user interface by adding and removing components.

A good practice for event listeners is to only call your Java control code and let them do the UI updates. This is better object-oriented design, and it enhances readability of your Java code.
Theming Vaadin Applications
Vaadin is designed to support the parallel work of application developers and graphic designers by strongly separating the graphical elements from the functionality.
All Vaadin applications have an associated theme. Themes are essentially a collection of SCSS files, images, fonts, and other assets that define the look and feel of Vaadin’s user interface components. The following Vaadin themes are included in Liferay by default:
| Theme Name |
Description |
| valo |
A comprehensive and highly customizable Sass-theme. This is the recommended starting point for building your own themes. |
| base |
The base theme for creating your own customized theme. Handles most of the cross-browser issues. |
| life ray |
A Liferay 6.0 look-a-like theme. Use this to create applications that match the Liferay 6 default styles. |
| reindeer |
The default look and feel of Vaadin. It provides a minimalistic look for business applications. |
| runo |
A more colorful and rounded theme for web applications. |
Structure of a Vaadin Theme
Vaadin themes are located in the themes folder of the portal. They are a collection of CSS and images that give the Vaadin components their look and feel. The theme folder must contain a styles.css stylesheet, and custom layouts must be placed in the layouts/ sub-folder. Other contents may be named freely.
An example Vaadin theme structure extending “Valo”:
| File |
Purpose |
| mytheme.scss |
Sass/CSS rules for your own theme. |
| addons.scss |
SCSS/CSS for Vaadin add-ons. This file is automatically generated by the Vaadin widget set compiler. |
| styles.css |
Generated CSS file. This file is the result of Sass compilation of styles.scss, and you should not edit this file manually. |
| styles.scss |
Main level theme file importing mytheme.scss, addon.scss, and other inherited themes. |
| layouts/ |
Directory for CustomLayout definition files. |
To inherit a Vaadin Valo-theme, insert it in the main level styles.scss file:
You should put your SCSS customization rules into the separate mytheme.scss file and import those rules into styles.scss. To activate the theme in your port let, add the following to the init() method of your application:
SCSS Class Names in Vaadin
To maximize the use of theme inheritance and to help customize components, the CSS class selectors in Vaadin are defined using the scheme .v-<component|item>. All style names are lowercase.
As an example, the following SCSS rules extend the Valo theme and change the color of all captions and add borders to all TextFields in the mytheme.scss file:
The relevant CSS class names are:
| CSS Class Name |
Description |
| v-app |
The top-level DIV container for the whole application UI. |
| v-<component> |
A container for a specific component type. |
| v-<component>-<element> |
A CSS class for elements inside components. |

Always scope your selectors appropriately. This helps to avoid side effects and style leakage outside the Vaadin application. For example, to change only text field captions
Extending Valo-theme
The Valo theme was introduced in Vaadin 7.3. Unlike other themes, Valo is meant to be configured using variables instead of using CSS rules. Variables define a feature of a theme, and they can affect many CSS rules at the same time. For example, changing background color luminance also configures the highlight color. Variable names start with v- and can be used like this:
Full reference documentation is available at https://vaadin.com/api/valo.
Accessing Liferay APIs from Vaadin: Best Practices
Vaadin applications typically begin by constructing the UI using Vaadin APIs, and then allowing the application to respond to user events such as button clicks. In many cases, UI construction or event handling requires some data from the Liferay environment. Here are two example methods demonstrating how to access Liferay services from Vaadin UI code:
The above examples use several APIs explained below:
| VaadinRequest |
This object is passed to the application’s init() method, and contains several methods to get information about the incoming request and the portal context. |
| VaadinRequest.getWrappedSession() |
This returns a generic wrapper around a more specific session object. When Vaadin applications are deployed to Liferay, this wraps the JSR Standard javax.portlet.PortletSession object and can be used to get information about Liferay, including the user making the request, and any shared session data (e.g. for IPC). |
| WrappedPortletSession.getPortletSession() |
This unwraps the underlying JSR Standard javax.portlet.PortletSession object, giving access to session data using standard Portlet interfaces. |
| PortletSession.getPortletContext() |
This object provides a handle to the portlet, as deployed to the server (see the JSR Portlet Specification for more information). |
| PortletContext.getPortletContextName() |
The name of the context in which the portlet has been deployed on the application server (see the JSR Portlet specification for more detail). |
These can be used throughout a Vaadin application, including init(), and within listeners and other Vaadin-specific code.
Accessing Liferay Services
In the above code, there is a method call to UserLocalServiceUtil.getUsersCount() - this is a Liferay service that returns the number of users registered in Liferay. The Liferay Developer Guide contains descriptions of many other Liferay services, but here are a few to get you started (and which can be used throughout Vaadin applications).
| Service Name |
Description |
| User |
User account information, e.g. UserLocalService.getUsersCount() |
| Team, Role, Permission, Company, Group, UserGroup |
Multi-tenant companies, sites and organization data, e.g. GroupLocalServiceUtil.getGroupByName(companyId, “my-site”); |
| BlogsEntry, Bookmarks, JournalArticle, MBMessage, WikiPage, DL* |
Web content and user-generated content like blogs and wikis, e.g. BlogsEntryLocalServiceUtil.getBlogEntries(0, max); |
| Portal, Portlet, PortletPreferences |
Portal-wide and per-portlet configuration and preferences, e.g. PortalUtil.getUser(request); |
| SocialActivity |
Social Activities Framework, e.g. SocialActivityLocalServiceUtil.getUserActivities(userId, 0, max); |

There are two ways to call a service. For example, UserLocalServiceUtil.getUsersCount() vs. UserServiceUtil.getUsersCount(). The local service skips permission checking, and assumes the caller has the required permissions. You can either do the permission checking yourself, or call the non-local variation, and let Liferay check permissions for you.
Inter-portlet Communication (IPC)
Liferay offers different IPC mechanisms to allow portlets to communicate with each other. The following table summarizes the different IPC methods in Liferay:
| Type |
Description |
| JSR-286 Portlet Events |
Standard port let communication mechanism. Requires page reload. |
| JavaScript/AJAX |
Traditional client/server communication, using client-side JavaScript, calling other port lets running in the same page using Liferay’s client-side JavaScript API. |
| Vaadin Add-on for Liferay IPC |
Mechanism for sending and receiving events between Vaadin and non-Vaadin port lets. |
| Ajax Push (Reverse Ajax) or WebSockets |
Typically used for server > client notifications (for example, in-browser chat). |
IPC in Vaadin Portlets
Vaadin applications deployed to Liferay can easily communicate with each other through the above IPC mechanisms. The easiest approach is to use the Vaadin IPC Add-on for Liferay. To use this add-on in your project, simply declare the dependency within your pom.xml:
Or, if you are using Ivy:
Once declared, your Vaadin applications can communicate using the LiferayIPC APIs, as shown here:
Sending a Message to Another Vaadin Application
Receiving the event in another Vaadin application:
Receiving an Eevent from a Vaadin Application/Portlet Using JavaScript
Sending an Event from Another Portlet Using JavaScript
This method is not suitable for sending a lot of data, but rather notifying the portlet that something has updated. The actual data should be shared using the portal session, the database, files, or some external storage. For example, to use the portal session to store and retrieve large objects:
SomeType data = (SomeType)portletSession.getAttribute(“data-key”, PortletSession.APPLICATION_SCOPE);


