DZone
Thanks for visiting DZone today,
Edit Profile
  • Manage Email Subscriptions
  • How to Post to DZone
  • Article Submission Guidelines
Sign Out View Profile
  • Post an Article
  • Manage My Drafts
Over 2 million developers have joined DZone.
Log In / Join
Refcards Trend Reports Events Over 2 million developers have joined DZone. Join Today! Thanks for visiting DZone today,
Edit Profile Manage Email Subscriptions Moderation Admin Console How to Post to DZone Article Submission Guidelines
View Profile
Sign Out
Refcards
Trend Reports
Events
Zones
Culture and Methodologies Agile Career Development Methodologies Team Management
Data Engineering AI/ML Big Data Data Databases IoT
Software Design and Architecture Cloud Architecture Containers Integration Microservices Performance Security
Coding Frameworks Java JavaScript Languages Tools
Testing, Deployment, and Maintenance Deployment DevOps and CI/CD Maintenance Monitoring and Observability Testing, Tools, and Frameworks
Partner Zones AWS Cloud
by AWS Developer Relations
Culture and Methodologies
Agile Career Development Methodologies Team Management
Data Engineering
AI/ML Big Data Data Databases IoT
Software Design and Architecture
Cloud Architecture Containers Integration Microservices Performance Security
Coding
Frameworks Java JavaScript Languages Tools
Testing, Deployment, and Maintenance
Deployment DevOps and CI/CD Maintenance Monitoring and Observability Testing, Tools, and Frameworks
Partner Zones
AWS Cloud
by AWS Developer Relations
11 Monitoring and Observability Tools for 2023
Learn more
  1. DZone
  2. Refcards
  3. Flex Mobile Development
refcard cover
Refcard #146

Flex Mobile Development

Build Apps for Android, iOS, and BlackBerry Tablet OS

The Flex Mobile Development Refcard will walk you through the easiest process yet for developing and deploying cross-platform applications on multiple devices and platforms with the richness that you expect out of an Adobe creative tool.

Free PDF for Easy Reference
refcard cover

Written By

author avatar Mihai Corlan
,
Table of Contents
► Introduction ► Creating a Flex Mobile Project ► Testing and Debugging Mobile Projects ► Packaging a Mobile Project as a Mobile App ► Conclusions
Section 1

Introduction

Adobe® Flash® Builder™ is an integrated development environment (IDE) based on the Eclipse platform. Available for Windows and Mac, it is used for creating Flex and Flash applications accessible via a web browser with Flash Player or as standalone apps.

Because it is based on the Eclipse platform (version 3.6.1), it can be installed as a standalone IDE or as a plug-in within another Eclipse installation.

You can run this version along with previous versions (Flash Builder 4 or Flash Builder 3) without any problems.

This version comes in two flavors: standard or premium. Each flavor is also available as Flash Builder 4.5 for PHP, which has all the features of Flash Builder plus Zend Studio 8.1 and a number of plug-ins that integrate these two IDEs.

Flash Builder Premium provides the following features in addition to those included with the standard version:

  • Network Monitor
  • Memory Profiler
  • HP QuickTest Professional and FlexUnit integration
  • Command-line support for automated build processes
  • ColdFusion Builder (an Eclipse-based IDE for ColdFusion application developers)

You can download Flash Builder 4.5 from here and Flash Builder 4.5 for PHP from here. Select the installer for the version you are interested in and for your operating system. The same installer can be used for installing the standalone version or the plug-in version.

Each version offers a 60-day trial period. Every time you start the product during the trial period you will see a reminder that enables you to buy the product or enter the serial number if you’ve already bought it.

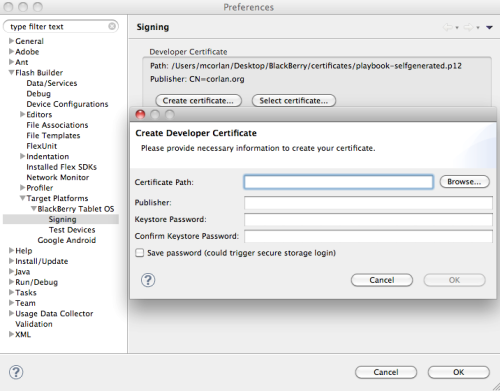
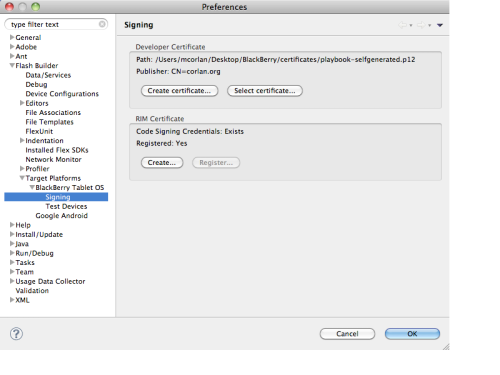
To enable support for BlackBerry Tablet OS development you’ll have to download an Eclipse plug-in from RIM. Once installed in Flash Builder 4.5, this plug-in will enable a new platform target.

What’s New in Flash Builder 4.5

Here is a high level view of what is new in this release:

Support for mobile development. Flex 4.5 version marks the extension of the Flex framework to mobile development. Flash Builder 4.5 includes several mobile-specific features, including new project types, desktop simulation and design view, and support for packaging projects as native installers for Android, iOS, and BlackBerry Tablet OS.

Improved productivity. Code templates, quick assist, code hinting for metadata, and an improved profiler.

Expanded PHP support. Flash Builder for PHP integrates Zend Studio with Flash Builder:

  • New wizards for creating Flex and PHP projects for desktop or mobile.
  • Integrated debugging for PHP and Flex.

Flash Builder 4.5, Flex 4.5, and the Screen Metaphor

While it is possible to create mobile applications using pure ActionScript and Flash Builder 4.5, developing mobile apps using the Flex 4.5 framework, with its support for the screen metaphor, provides a substantial productivity boost.

There is almost always enough resolution and area on a desktop computer to fit all the information you want on the screen. By using hierarchical menus and pop-up windows you can fit even more content. Compared to this, a smartphone screen feels (almost) like a postage stamp. Besides screen size, pixel density plays an important role. The Nexus One, for example, has a resolution of 480 x 800 pixels and 254 pixels per inch. This means that you have to enlarge the text roughly two to four times to make it appear similar to the app running on a desktop or laptop screen. Thus you end up with less space to display information.

Window 1

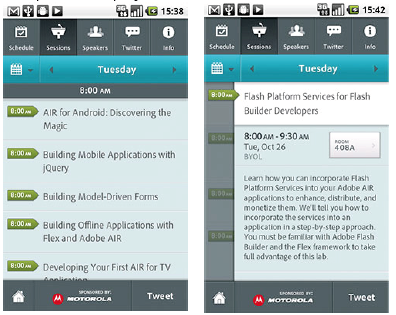
Using the screen metaphor you can split the information and the UI of your application among multiple screens. For example, consider the MAX Companion 2010 app, which shows conference session information. When you want to see details for a particular session (see the images above) another screen is presented. When you return to the previous screen, the session list is shown again.

Elegant as it might be, writing an app using the screen metaphor is not rocket science. However, there are some issues to be considered, such as:

  • Memory management – pushing dozens of screens can consume all the memory available on the device
  • Transitions from one screen to another – nice effects will help you create an application like a professional UX Designer
  • Passing data from one screen to another – you need some way of exchanging data between screens
  • Preserving application state – when the OS closes your app, you’ll want to save its state to restore when it reopens
  • Integration with hardware buttons – you press the Back button of the device, for example, to navigate to the previous screen

The Flex framework has built-in support for the screen metaphor so you don’t have to reinvent the wheel as you address these issues

Supported Mobile Platforms

The June 2011 release of Flash Builder 4.5 and the Flex 4.5 SDK support Android, iOS, and BlackBerry Tablet OS. The initial launch (in May 2011) supported Flex development for Android only, although you could still develop pure ActionScript apps for all three platforms (Android, iOS, and BlackBerry Tablet OS).Applications created in Flash Builder run differently depending on the target platform:

  • On Android and BlackBerry Tablet OS the APK or BAR files are run using the Adobe AIR runtime installed on the devices. PlayBook devices (running BlackBerry Tablet OS) come with Adobe AIR pre-installed. Some Android devices have Adobe AIR pre-installed, while others don’t. If AIR is not installed already, you will be prompted to install it from the Android Market the first time an AIR application is opened.
  • On iOS, the application is cross-compiled to a native IPA file together with the Adobe AIR runtime.

Flash Builder 4.5 Mobile Project Types

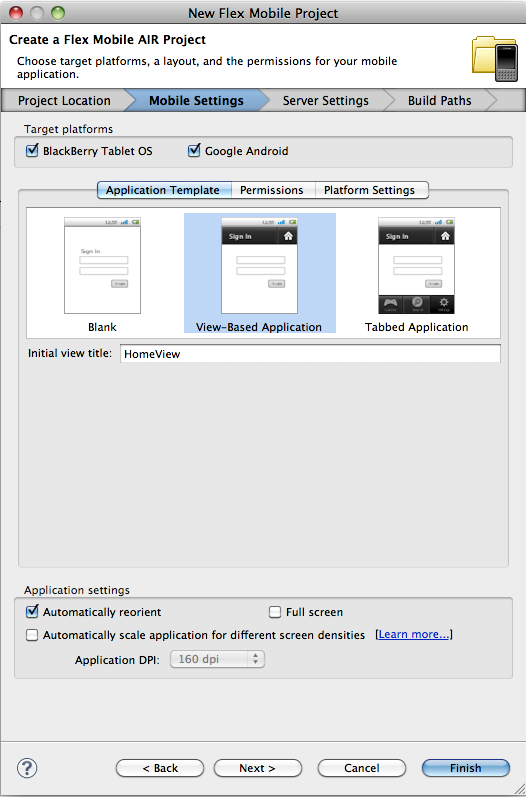
When you choose File > New in Flash Builder 4.5, you will see two new mobile applications project types to choose from: ActionScript Mobile Project and Flex Mobile Project.

In Flash Builder for PHP you’ll see those two types plus one more for creating a Flex Mobile and PHP project.

Section 2

Creating a Flex Mobile Project

To use the Flex framework to create a mobile app:

  1. 1choose File > New > Flex Mobile Project. In the first page of the wizard, specify the project name. Window 2
  2. In the second page of the wizard, choose the target platforms. In the following image, BlackBerry Tablet OS and Google Android are selected; in the June 2011 release you can also select iOS. You can also use the Permissions tab on this page to set additional mobile application permissions for Android and BlackBerry Tablet OS. In the Application Template tab you’ll see three options: Blank, View-Based Application, and Tabbed Application. If you want Flex support for the screen metaphor, choose either View-Based Application or Tabbed Application. The Tabbed Application option is preferable if your application has lots of screens and you want to use a tab group at the bottom of the page to group these screens. if you choose Blank, you can use Flex components but you will have to handle events such as device orientation changes or pressing the Back button on an Android device yourself. When creating a Flex mobile and PHP project with Flash Builder 4.5 for PHP (File > New > Flex Mobile and PHP Project), the process is quite similar except you also set up a PHP project at the same time:

Window3

  • The second screen is for setting up the Flex project
  • The third screen is for setting up mobile specific settings

You can watch my video tutorial on this topic. Creating an ActionScript mobile project is similar to the Flex one.

Understanding Flex Mobile View and ViewNavigator Class

If you choose to use View-Based Application or Tabbed Application, it is important to understand the following classes: View, ViewNavigator, ViewNavigatorApplication, and TabbedViewNavigatorApplication.

The top application class will be ViewNavigatorApplication or TabbedViewNavigatorApplication depending on the Application Template you used when creating the project. You create your application user interface by extending the View class. Basically each screen of your application will be represented by a component that extends the View class. To create a new screen, choose File > New > MXML Component and then set the spark.components.View class as the class to base the component on.

The View class has two important properties: data and navigator. You use the navigator property (which refers to an instance of the ViewNavigator class) to control the screens. When you want to push a new view to the screen, you call navigator.pushView(new-viewclass- name). When you want to return to the previous view, you call navigator.popView(). When you want to jump to the first view you call navigator.popToFirstView().If you don’t want to have the View destroyed, you can set the destructionPolicy attribute of the View tag to “never”.

To pass data from the current View to the next one, simply set the second argument of the pushView() method to the data you want to pass; for example, navigator.pushView(view-class-name, dataToBeUsed); There are some applications that need to preserve their entire state when they are closed by the OS. To do this, just set the persistNavigatorState attribute in your main application file to true. This is a neat feature that allows you to support (with almost no effort) scenarios in which the user has navigated several screens into the application when the application gets closed (for example if the user switched to a new application or decided to close the app); when the application opens again, the user will see the same screen as in the previous session.

There are also events you can listen for in each View:

  • viewActivate (FlexEvent.VIEW_ACTIVATE) – Dispatched when the current view has been activated.
  • viewDeactivate (FlexEvent.VIEW_DEACTIVATE) – Dispatched when the current view has been deactivated.
  • removing (FlexEvent.REMOVING) – Dispatched when the screen is about to be removed in response to a screen change. If you call preventDefault() you can cancel the screen change. This event is triggered before the FlexEvent.VIEW_DEACTIVATE event.
Section 3

Testing and Debugging Mobile Projects

One of the most powerful features of Flash Builder 4.5 is its ability to run mobile projects right from the IDE. If you have a physical device you can deploy the app and debug on the device from Flash Builder

If you don’t have a device you can use the Flash Builder simulator to test the app. In either case, you start by choosing Run > Running Configuration or Run > Debug Configurations.

To add a new configuration, select the Mobile Application entry (or Mobile (PHP) Application if the project type is Flex Mobile and PHP) and then click the top-left icon to add a new configuration. Select the project that you want to create the configuration for and then select the Target Platform (Android, iOS, or BlackBerry Tablet OS).

Window4

For the Launch Method, select On Desktop if you want to run the app on the desktop simulator or select On Device if you want to deploy the app to the device. The simulator is quick and easy to use. Using the second option—On Device—is less straightforward; depending on the target platform you will need certificates, provisioning files, debug tokens, and so on. For both options you can run the application with or without debugging support.

Section 4

Packaging a Mobile Project as a Mobile App

Flash Builder 4.5 supports packaging your mobile projects (ActionScript or Flex) as native applications that is, as an APK for Android, an IPA for iOS, or a BAR for BlackBerry Tablet OS.

To access this feature, select the project for which you want to create the native app, choose File > Export, and select Flash Builder > Release Build.

Window5

Follow the directions on screen for the rest of the process, which is different for each supported target (Android, BlackBerry Tablet OS, or iOS).

Packaging Mobile Apps for Android

To package a mobile app for Android, right-click the project name in the Package Explorer view and select Export > Flash Builder > Release Build. On the first page of the wizard make sure you select the Google Android platform and select Signed Package For Each Target Platform.

Window6

On the second page of the wizard in the Digital Signature section, click Create to begin creating a self-signed certificate. Type the publisher name, organizational unit, organizational name, and country. Select 2040-RSA for the type, set the password, and specify the location and the file name for the certificate. When you click OK, Flash Builder will create the certificate. When you complete the wizard by clicking Finish, Flash Builder will create the APK file. By default, the APK file is created inside the root of your project. You can upload this file to the Android Market.

Window7

Every time you want to release an update for your application, first increase the versionNumber in your application descriptor file and then use the same workflow to create the APK. This time, however, instead of creating a new certificate, just select the one you created earlier.

Packaging Mobile Apps for BlackBerry Tablet OS

There are two main steps you have to complete to package AIR projects for BlackBerry Tablet OS:

  • Request permission from RIM to sign BlackBerry Tablet OS apps and get the CSJ registration files.
  • Configure Flash Builder for signing PlayBook apps and sign your application.

The credit card is required only for verification purpose. Once you finish this registration you will receive a confirmation email. Then, you should receive by email a number of CSI and CSJ files within 24 hours. Save all these files in the same folder. (Note that the number part of the filename is different for each registration). If you forget the PIN or if you want to sign from another computer, you can submit another request.

Package the Project for PlayBook

Once you have the files from RIM, you are ready to use Flash Builder 4.5 to sign mobile ActionScript and Flex projects. Begin by opening the Preferences dialog box (choose Window > Preferences). Then expand the Flash Builder entry on the left side and choose Target Platforms > BlackBerry Tablet OS > Signing.

The top section is for providing a developer certificate for signing the code. To create one, click Create Certificate. Pay attention to what password you set and what value you set for the Publisher–this value must be the same as the one you provided when requesting permission to sign PlayBook apps. When you click OK in the Create Developer Certificate dialog box, a new certificate will be generated. Now, add this certificate by clicking the Select Certificate button.

Window8

Next you need to register and configure the RIM certificate. First click Create in the RIM Certificate section and set a password (it must be at least 6 characters long). Then click the Register button, select the last of the five CSJ files you received via email, and provide the same PIN you set when you completed the online form. Flash Builder will communicate with RIM servers (this step requires you to have your computer connected to the Internet) to register your RIM certificate.

Next you need to register and configure the RIM certificate. First click Create in the RIM Certificate section and set a password (it must be at least 6 characters long). Then click the Register button, select the last of the five CSJ files you received via email, and provide the same PIN you set when you completed the online form. Flash Builder will communicate with RIM servers (this step requires you to have your computer connected to the Internet) to register your RIM certificate. To save the configuration, click OK.

Window9

After you’ve registered your certificates with the BlackBerry Signing Authority you should receive an email confirmation. The next step is to open the application descriptor file for your project in Flash Builder and make sure you set a version number for <versionNumber>. Each time you export a release build you’ll have to increase this number. Next, open the blackberry-tablet. xml file and make sure that the value for the <publisher> node is the same as the one you set for the company value when you registered for signing PlayBook apps and when you generated the developer certificate. Then right-click the project name in the Package Explorer view and select Export.

In the wizard that opens, select Flash Builder > Release Build and click Next. In the second page of the wizard make sure you select BlackBerry Tablet OS in the Target Platforms section. By default the BAR file will be created in the root folder of the project you are exporting. If you want to use a different path, type a new Export To Folder value. You also need to select Export And Sign A Platform-specific Application Package. Click Next.

Window10

In the third page of the wizard select Enable Digital Signing on the Digital Signature tab. This option will use the certificates (Developer and RIM) you set earlier. Finally, click Finish.

Window11

After a few seconds you should have a new BAR file. If you encounter any errors, see BlackBerry’s page on application signing errors for additional information.

You can submit the BAR file to the BlackBerry App World portal (if you have registered as a vendor) via https://appworld.blackberry. com/isvportal/.

Packaging Mobile Apps for iOS

To package applications for testing and debugging on iOS devices or for deployment to the Apple App Store you will need to enroll in the Apple Developer Program (fees apply). For more information on the Apple Developer Program and to create an account, visit Apple’s Developer Program Enrollment page.

Once registered, you will need to login to the iOS Provisioning Portal and complete the following tasks:

  • Generate a development certificate
  • Register any devices to which you wish to deploy applications during development
  • Define an App ID for the application you are developing
  • Create a development provisioning profile

You will also use the iOS Provisioning Portal to distribute your application via the App Store. That part of the process is not covered in this article; instead refer to Apple’s documentation. The development certificate (in P12 format) and the provisioning profile are required before you can package your application for iOS in Flash Builder.

Generate a Development Certificate

Follow the guide on the iOS Provisioning Portal to generate your development certificate. This guide assumes you are using a Mac OS based computer, but it is possible to generate the certificate using Windows; details are available in the Adobe AIR documentation.

Convert the Developer Certificate into a P12 Format

To use the certificate with Flash Builder, you must convert into P12 format. Instructions on how to do this are provided in the Adobe AIR documentation on signing AIR applications.

Store the P12 (.p12) file on your computer; you will need to use it with Flash Builder later.

Register Devices to Which You Wish to Deploy Applications During Development

You must specify any devices on which you intend to run or debug the application in the provisioning profile used to package the application; as such, you must register the devices on the iOS Provisioning Portal.

To register a device you need its Unique Device Identifier (UDID). To get this, connect your device to your computer and launch iTunes. In iTunes, select your device in the Devices section and navigate to the Summary tab. Click the Serial Number label to reveal the Identifier field and the 40 character UDID. Press Command/CTRL+C to copy the UDID to your clipboard.

Define an App ID for the Application You are Developing

Each application that you wish to deploy must have an App ID, which comprises a Bundle Seed ID (also called the App ID Prefix) and a Bundle Identifier (also called the App ID Suffix). Follow the guide on the iOS Provisioning Portal to create your

App ID. Note that the Bundle Identifier must be the same as the value of the <id> attribute in your application’s app.xml descriptor file. For example, if you create a Bundle Identifier as “com.adobe. myApp”, then your app.xml file must contain the following:

<!-- A universally unique application identifier. Must be unique across all AIR applications. Using a reverse DNSstyle name as the id is recommended. Required. --> <id>com.adobe.myApp</id> You can use a wildcard in the Bundle Identifier to create a provisioning profile that is valid for a number of applications; for example a provisioning profile with a Bundle Identifier specified as “com.adobe.*” can be used with applications with an id of “com.adobe.myApp” and “com.adobe.myOtherApp”. Also note that once created, you cannot remove an App ID from the iOS Provisioning Portal.

Create a Development Provisioning Profile

The final step you need to complete using the iOS Provisioning Portal is to create an iOS Development Provisioning Profile. You will define a profile name, specify the certificate you created, select an App ID, and choose the device or devices the application can be deployed to. More information on creating a Provisioning Profile can be found in the guide on Apple’s site. Download the provisioning file to your computer; you will need to use it with Flash Builder later.

Specify Build Packaging Information for the Project in Flash Builder

Before you are ready to deploy an application to an Apple iOS device you need to specify the information required to package the application as an IPA file.

In the Package Explorer view in Flash Builder, right-click your project and select Properties. In the Properties dialog box, select ActionScript Build Packaging > Apple iOS (for an ActionScript project) or Flex Build Packaging > Apple iOS (for a Flex project). In the Digital Signature tab, specify the previously saved P12 certificate file and the provisioning file for your project. Click Apply and then click OK.

When you want to create an IPA file simply right-click the project name in the Package Explorer view and select Export > Flash Builder > Release build. Follow the steps in the wizard to create your IPA file.

Section 5

Conclusions

If you want to learn more about mobile development for Android, iOS, and PlayBook using Adobe AIR, Flash Builder, and Flex I encourage you to check these resources:

  • Adobe Mobile and Devices Development Center
  • Creating Flex Mobile Apps with Flash Builder for PHP tutorial
  • Great list of resources for designing and skinning mobile applications

Like This Refcard? Read More From DZone

related article thumbnail

DZone Article

related refcard thumbnail

Free DZone Refcard

ABOUT US

  • About DZone
  • Send feedback
  • Careers
  • Sitemap

ADVERTISE

  • Advertise with DZone

CONTRIBUTE ON DZONE

  • Article Submission Guidelines
  • Become a Contributor
  • Visit the Writers' Zone

LEGAL

  • Terms of Service
  • Privacy Policy

CONTACT US

  • 600 Park Offices Drive
  • Suite 300
  • Durham, NC 27709
  • support@dzone.com
  • +1 (919) 678-0300

Let's be friends:

{{ parent.title || parent.header.title}}

{{ parent.tldr }}

{{ parent.linkDescription }}

{{ parent.urlSource.name }}
by
CORE
· {{ parent.articleDate | date:'MMM. dd, yyyy' }} {{ parent.linkDate | date:'MMM. dd, yyyy' }}
Tweet
{{ parent.views }} ViewsClicks
  • Edit
  • Delete
  • {{ parent.isLocked ? 'Enable' : 'Disable' }} comments
  • {{ parent.isLimited ? 'Remove comment limits' : 'Enable moderated comments' }}